With data binding, you can declare data objects within your layout file:
<layout xmlns:android="http://schemas.android.com/apk/res/android"
        xmlns:tools="http://schemas.android.com/tools">
    <data>
        <variable
            name="crime"
            type="com.bignerdranch.android.criminalintent.Crime"/>
    </data>
    ...
</layout>
And then use values from those objects directly in your layout file by using the binding mustache operator – @{}:
<CheckBox
    android:id="@+id/list_item_crime_solved_check_box"
    android:layout_width="wrap_content"
    android:layout_height="wrap_content"
    android:layout_alignParentRight="true"
    android:checked="@{crime.isSolved()}"
    android:padding="4dp"/>
In an object diagram, that would look like Figure 20.7:

Your goal right now is to put the sound names on their buttons. The most direct way to do that using data binding is to bind directly to a Sound object in list_item_sound.xml, like Figure 20.8:

However, this causes some architectural issues. To see why, look at it from an MVC perspective (Figure 20.9).

The guiding principle behind any architecture is the Single Responsibility Principle. It says that each class you make should have exactly one responsibility. MVC gave you an idea of what those responsibilities should be: The model represents how your app works, the controller decides how to display your app, and the view displays it on the screen the way you want it to look.
Using data binding as shown in Figure 20.8 would break this division of responsibilities, because the Sound model object would likely end up deciding how things are displayed. This would quickly make your app a mess, as Sound.java would become littered with both kinds of code: code that represents how your app works and code that decides how things are displayed.
Instead of muddying up the responsibility of Sound, you will introduce a new object called a view model to use with data binding. This view model will take on the responsibility of deciding how things are displayed (Figure 20.10).

This architecture is called MVVM. Most of the work your controller classes once did at runtime to format data for display will go in the view model. Wiring widgets up with that data will be handled directly in the layout file using data binding to that view model. The controller (your activity or fragment) will be in charge of things like initializing the binding and the view model and creating the link between the two.
Let’s create your view model. Create a new class called SoundViewModel and give it two properties: a Sound for it to use and a BeatBox to (eventually) play that sound with.
Listing 20.20 Creating SoundViewModel (SoundViewModel.java)
public class SoundViewModel {
    private Sound mSound;
    private BeatBox mBeatBox;

    public SoundViewModel(BeatBox beatBox) {
        mBeatBox = beatBox;
    }

    public Sound getSound() {
        return mSound;
    }

    public void setSound(Sound sound) {
        mSound = sound;
    }
}
These properties are the interface your adapter will use. For the layout file, you will want an additional method to get the title that the button should display. Add it now to SoundViewModel.
Now to integrate the view model into your layout file. The first step is to declare a property on your layout file, like so:
Listing 20.22 Declaring the view model property (list_item_sound.xml)
<layout xmlns:android="http://schemas.android.com/apk/res/android"
        xmlns:tools="http://schemas.android.com/tools">
    <data>
        <variable
            name="viewModel"
            type="com.bignerdranch.android.beatbox.SoundViewModel"/>
    </data>
    <Button
This defines a property named viewModel on your binding class, including a getter and setter.
Within your binding class, you can use viewModel in binding expressions.
Listing 20.23 Binding your button title (list_item_sound.xml)
<layout xmlns:android="http://schemas.android.com/apk/res/android"
        xmlns:tools="http://schemas.android.com/tools">
    <data>
        <variable
            name="viewModel"
            type="com.bignerdranch.android.beatbox.SoundViewModel"/>
    </data>
    <Button
        android:layout_width="match_parent"
        android:layout_height="120dp"
        android:text="@{viewModel.title}"
        tools:text="Sound name"/>
</layout>
Within the binding mustache, you can write simple Java expressions, including chained method calls, math, and anything else you want to include.
You also get some “syntactic sugar” – conveniences to save you typing.
For example, viewModel.title above is shorthand for viewModel.getTitle().
Data binding knows how to translate your property reference into the appropriate method call.
The last step is to hook up your view model. Create a SoundViewModel and attach it to your binding class. Then add a binding method to your SoundHolder.
Listing 20.24 Hooking up the view model (BeatBoxFragment.java)
private class SoundHolder extends RecyclerView.ViewHolder {
    private ListItemSoundBinding mBinding;

    private SoundHolder(ListItemSoundBinding binding) {
        super(binding.getRoot());
        mBinding = binding;
        mBinding.setViewModel(new SoundViewModel(mBeatBox));
    }

    public void bind(Sound sound) {
        mBinding.getViewModel().setSound(sound);
        mBinding.executePendingBindings();
    }
}
Inside your constructor, you construct and attach your view model. Then, in your bind method, you update the data that view model is working with.
Calling executePendingBindings() is not normally necessary. Here, though, you are updating binding data inside a RecyclerView, which updates views at a very high speed. By calling this method, you force the layout to immediately update itself, rather than waiting a millisecond or two. This keeps your RecyclerView looking spiffy.
Finally, finish hooking up your view model by implementing onBindViewHolder(…).
Listing 20.25 Calling bind(Sound) method (BeatBoxFragment.java)
    return new SoundHolder(binding);
}

@Override
public void onBindViewHolder(SoundHolder holder, int position) {
    Sound sound = mSounds.get(position);
    holder.bind(sound);
}

@Override
public int getItemCount() {
    return mSounds.size();
}
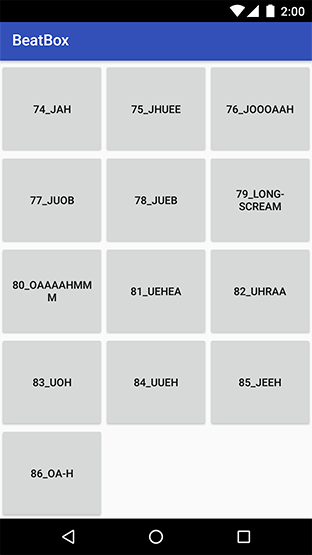
Run your app and you will see titles on all the buttons on your screen (Figure 20.11).

All may appear to be well, but darkness lies hidden in your code. You can see it if you scroll down (Figure 20.12).
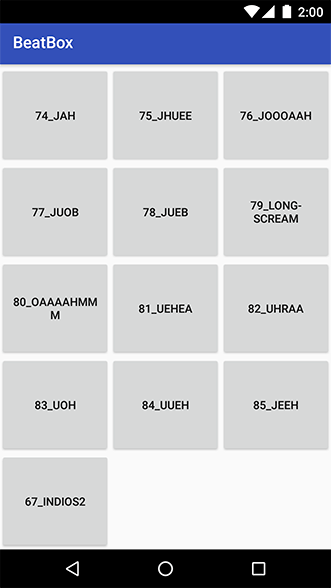
See the item “67_INDIOS2” at the bottom? It was at the top, too. Scroll up and down repeatedly, and you will see other file titles repeatedly appearing in unexpected, seemingly random places.
This is happening because your layout has no way of knowing that you updated SoundViewModel’s Sound inside SoundHolder.bind(Sound). Your view model does not talk back to the layout file, as depicted in Figure 20.10.
Your next job will be to add this connection. To do this, your view model needs to implement data binding’s Observable interface. This interface lets your binding class set listeners on your view model so that it can automatically receive callbacks when its fields are modified.
Implementing the whole interface is possible, but it is also a lot of work. We do not shy away from hard work here at Big Nerd Ranch, but we prefer to avoid it when we can. So we will instead show you how to do it the smart way, with data binding’s BaseObservable class.
Three steps are required with this method:
-
Subclass BaseObservable in your view model.
-
Annotate your view model’s bindable properties with
@Bindable. -
Call notifyChange() or notifyPropertyChanged(int) each time a bindable property’s value changes.
In SoundViewModel, this is only a few lines of code. Update SoundViewModel to be observable.
Listing 20.26 Making view model observable (SoundViewModel.java)
public class SoundViewModel extends BaseObservable {
    private Sound mSound;
    private BeatBox mBeatBox;

    public SoundViewModel(BeatBox beatBox) {
        mBeatBox = beatBox;
    }

    @Bindable
    public String getTitle() {
        return mSound.getName();
    }

    public Sound getSound() {
        return mSound;
    }

    public void setSound(Sound sound) {
        mSound = sound;
        notifyChange();
    }
}
When you call notifyChange() here, it notifies your binding class that all of the Bindable fields on your objects have been updated. The binding class then runs the code inside the binding mustaches again to repopulate the view. So now, when setSound(Sound) is called, ListItemSoundBinding will be notified and call Button.setText(String) as you specified in list_item_sound.xml.
Above, we mentioned another method: notifyPropertyChanged(int). The notifyPropertyChanged(int) method does the same thing as notifyChange(), except it is more particular. By writing notifyChange(), you say, “All of my bindable properties have changed; please update everything.” By writing notifyPropertyChanged(BR.title), you can instead say, “Only getTitle()’s value has changed.”
Run BeatBox one more time. This time, you should see the right thing when you scroll around (Figure 20.13).