Now that you know how to work with implicit intents, you can document your crimes in even more detail. With a picture of the crime, you can share the gory details with everyone.
Taking a picture will involve a couple of new tools, used in combination with a tool you recently got to know: the implicit intent. An implicit intent can be used to start up the user’s favorite camera application and receive a new picture from it.
An implicit intent can get you a picture, but where do you put it? And once the picture comes in, how do you display it? In this chapter, you will answer both of those questions.
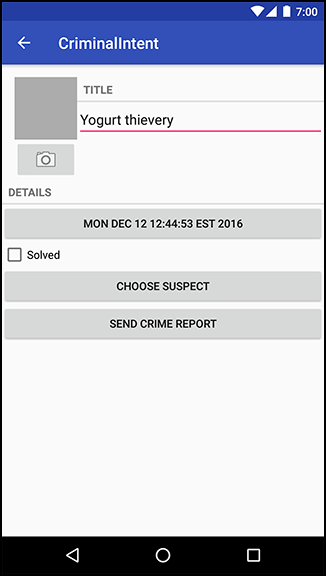
The first step is to build out a place for your photo to live. You will need two new View objects: an ImageView to display the photo and a Button to press to take a new photo (Figure 16.1).
Dedicating an entire row to a thumbnail and a button would make your app look clunky and unprofessional. You do not want that, so you will arrange things nicely.
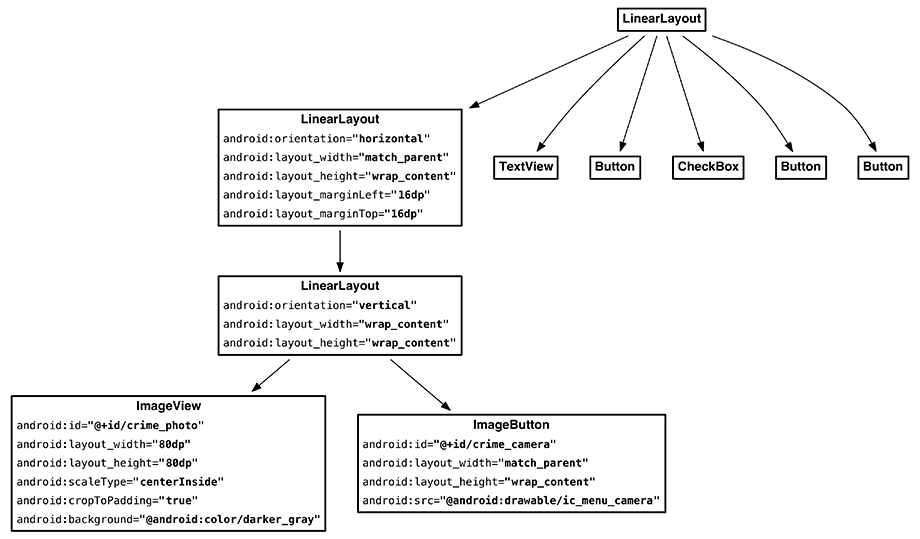
Add new views to fragment_crime.xml to build out this new area. Start with the lefthand side, adding an ImageView for the picture and an ImageButton to take a picture (Figure 16.2).
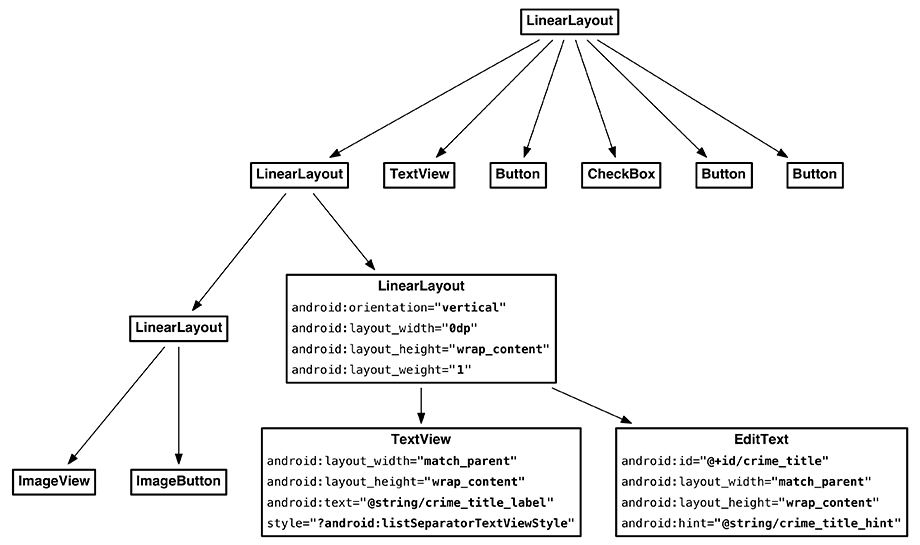
Then continue with the righthand side, moving your title TextView and EditText into a new LinearLayout child to the LinearLayout you built in Figure 16.2 (Figure 16.3).
Run CriminalIntent, and you should see your new UI looking just like Figure 16.1.
Looks great. Now, to respond to presses on your ImageButton and to control the content of your ImageView, you need instance variables referring to each of them. Call findViewById(int) as usual on your inflated fragment_crime.xml to find your new views and wire them up.
Listing 16.1 Adding instance variables (CrimeFragment.java)
private Button mSuspectButton;
private Button mReportButton;
private ImageButton mPhotoButton;
private ImageView mPhotoView;
...
@Override
public View onCreateView(LayoutInflater inflater, ViewGroup container,
        Bundle savedInstanceState) {
    ...
    PackageManager packageManager = getActivity().getPackageManager();
    if (packageManager.resolveActivity(pickContact,
            PackageManager.MATCH_DEFAULT_ONLY) == null) {
        mSuspectButton.setEnabled(false);
    }

    mPhotoButton = (ImageButton) v.findViewById(R.id.crime_camera);
    mPhotoView = (ImageView) v.findViewById(R.id.crime_photo);

    return v;
}
And with that, you are done with the UI for the time being. (You will wire those buttons up in a minute or two.)


