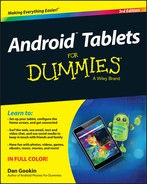
Chapter 5
All Your Friends
In This Chapter
![]() Exploring the tablet’s address book
Exploring the tablet’s address book
![]() Searching and sorting your contacts
Searching and sorting your contacts
![]() Creating a new contact
Creating a new contact
![]() Importing contacts
Importing contacts
![]() Editing contacts
Editing contacts
![]() Putting a picture on a contact
Putting a picture on a contact
![]() Deleting contacts
Deleting contacts
To best use your tablet as a communications tool, you need to keep track of people. That means having their email information, website addresses, social networking info, and phone numbers because — and this isn’t really a secret — it’s possible to make phone calls with your tablet. That communication all starts with keeping all your friends’ information in a single app.
The Tablet’s Address Book
You most likely already have contacts in your Android tablet’s address book because your Google account was synchronized with the tablet when you first set things up. All your Gmail contacts, as well as other types of contacts on the Internet, were duplicated on the tablet, so you already have a host of friends available. The place where you can access these folks is the tablet’s address book.
- The tablet’s address book app is named either Contacts or People. The stock Android name is Contacts, although the app has been called People in the past. For the sake of consistency, this chapter refers to the app as Contacts.
- Many apps use contact information from the Contacts app, including Gmail, Hangouts, as well as any app that lets you share information such as photographs or videos.
- Information from your social networking apps is also coordinated with the Contacts app. See Chapter 9 for more information on using the tablet as your social networking hub.
Using the address book
To peruse your Android tablet’s address book, open the Contacts app. You may be blessed to find that app's icon on the Home screen. If not, tap the Apps icon to locate the Contacts app in the Apps drawer.
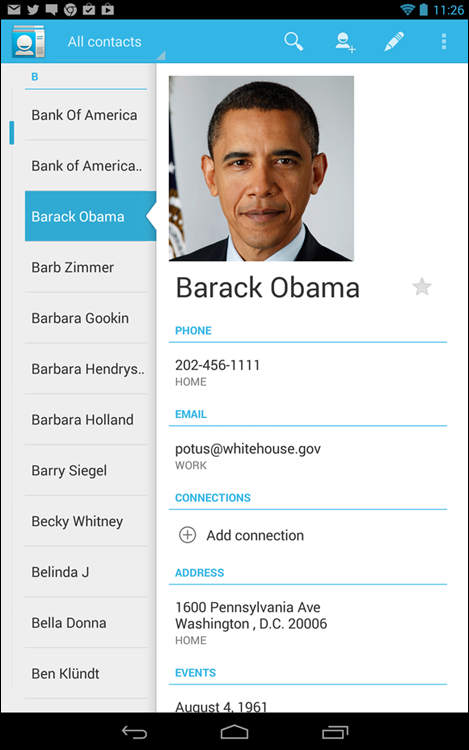
The address book app shows a list of all contacts in your Android tablet, organized alphabetically by first name. Figure 5-1 illustrates one way the Contacts app might look.
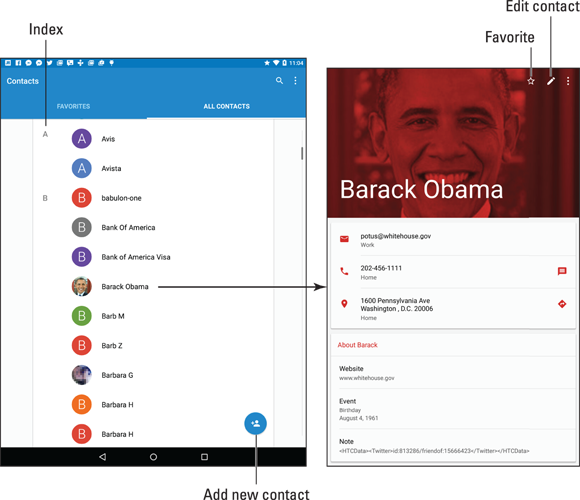
Figure 5-1: The Contacts app.
Scroll the list by swiping your finger on the touchscreen. Some versions of the app feature an index off to one side of the screen; use the index to help you quickly view an entry.
The list of activities you can do with a contact depends on the information shown and the apps installed on your tablet. Here are some common activities:
- Place a phone call. No, an Android tablet isn’t a phone, but when you install a phone-dialer app such as the Hangouts Dialer or Skype, tapping a contact’s phone number activates that app and you can use the tablet to make a call. See Chapter 8 for details.
- Send email. Tap the contact’s email address to compose an email message. When the contact has more than one email address, you can choose to which one you want to send the message. Chapter 6 covers email.
- View a social networking status. Some address book apps display social networking information on the contact’s screen, such as a tweet or Facebook status update. See Chapter 9 for more information on social networking.
- View an address on a map. When the contact has a home or business address, you can choose that item to view the address using the Maps app. When you choose the Maps app, you can then get directions, look at the place using the Street View tool, or do any of a number of interesting things, as covered in Chapter 10.
Some tidbits of information that show up for a contact don’t have an associated action. For example, the tablet doesn’t sing Happy Birthday whenever you tap a contact’s birthday information.
 Some address book apps display contact information side-by-side with the contact index. In Figure 5-1, the contact’s information appears on a card. Dismiss the card by tapping the Back navigation icon.
- Not every contact has a picture, and the picture can come from a number of sources (Gmail or Facebook, for example). See the later section “Adding a contact picture” for more information.
- Also see the section “Joining identical contacts” for information on how to deal with duplicate entries for the same person.
Sorting the address book
The tablet’s address book displays contacts in a certain order. Most often, that order is alphabetically by first name. You can change this order if the existing arrangement drives you nuts. Here’s how: Tap the Action Overflow icon on the Contacts app main screen.
- Choose Settings.
- Choose Sort By.
Choose First Name or Last Name, depending on how you want the contacts sorted.
The Contacts app normally sorts entries by first name.
Choose Name Format.
This command might be titled Display Contacts By or View Contacts Names By.
Choose First Name First or Last Name First.
This command specifies how the contacts appear in the list: first name first or last name first. The Contacts app normally lists entries first name first.
There’s no right or wrong way to display your contacts — only the method you prefer.
Searching contacts
You might have a massive number of contacts. Although the address book app doesn’t provide a running total, I’m certain that I have more than 250,000 contacts on my tablet. That’s either because I know a lot of people or they just owe me money.
Rather than endlessly scroll the Contacts list and run the risk of rubbing your fingers down to nubs, you can employ the tablet’s powerful Search command to quickly find a contact:
 Tap the Search icon.
Some versions of the Contacts app show a Search or Find Contacts text box. If so, tap that box.
Type the name you want to locate.
The list of contacts narrows the more you type.
- Once you see the matching person, tap that entry.
To clear a search, tap the X at the right side of the Search text box. To exit the search screen, tap the Back navigation icon.
 No, there’s no correlation between the number of contacts you have and how popular you are in real life.
Even More Friends
Having friends is great. Having more friends is better. Keeping all those friends as entries in the tablet’s address book is best.
Building a contact from scratch
Sometimes it’s necessary to create a contact when you actually meet another human being in the real world. Or maybe you finally got around to transferring information to the tablet from your old datebook. In either instance, you have information to input, and it starts like this:
Tap the Add Contact icon in the Contacts app.
Refer to Figure 5-1 for what the icon may look like, although different address book apps use subtly different icons.
Choose an account with which to associate the contact.
Tap the action bar or account item (it may say Google Account) to choose an account.
 I recommend choosing your Google account. That way, the contact is synchronized with the Internet and any other Android gizmos you may own. Or if you use Yahoo! or any another account as your primary account, choose it instead.
 Do not choose the Device category. When you do, the contact information is saved only on your Android tablet. It won't be synchronized with the Internet or any other Android devices.
Fill in the contact’s information as best you can.
Type text in the various boxes with the information you know. The more information you provide, the better.
Tap the action bar to the right of a field to set more details, such as whether a phone number is Mobile, Home, Work, or so on.
 To add a second phone number, email, or location, tap the Add New button, which may look like a large Plus icon.
At the bottom of the Add New Contact screen, you’ll find the button Add Another Field. Use that button when you can add more details for the contact, such as a birthday or website address.
- Tap the Done or Save button to complete editing and add the new contact.
If you followed my advice in Step 2, the new contact is automatically synched with your Google account. That's one beauty of the Android operating system: You have no need to duplicate your efforts; contacts you create on the tablet are instantly updated with your Google account on the Internet.
Creating a contact from an email message
Perhaps one of the easiest ways to build up the tablet’s address book is to create a contact from an email message. Follow these general steps when you receive a message from someone not already in your Android tablet’s address book:
View the email message.
You can’t add a contact from the inbox; tap the message to view its contents.
Tap the icon by the contact's name.
The Gmail app uses a letter icon for unknown contacts, such as the H shown in Figure 5-2. The Email app uses a generic human icon, also shown in the figure.
Tap the OK button to create the new contact, if prompted.
If you don’t see the prompt, you may see a card, such as the one shown on the right in Figure 5-2. If so, tap the Create Contact button and fill in the blanks. Tap the Save button to save the contact.
Figure 5-2: Adding a new email contact.
 These steps may vary, depending the tablet’s incarnation of the Contacts app. You also may have to tap the Add New Contact icon, similar to the one shown in the margin. However you get there, complete creating the contact information as described in the preceding section. As a bonus, the contact’s email address is already provided.
Sometimes you receive email from someone already in the address book, but who is using a new email address. If so, tap the Update Existing button, shown in Figure 5-2. Scroll through the address book to select the person, or the tablet may find the matching contact automatically. The new email address is added to that person's entry in the address book.
Importing contacts from a computer
Your computer’s email program is doubtless a useful repository of contacts you’ve built up over the years. You can export these contacts from your computer’s email program and then import them into your tablet. It’s not simple, but it’s possible.
The key is to save or export your computer email program’s records in the vCard (vcf) file format. These records can then be imported by the Android tablet into the address book app. The method for exporting contacts varies, depending on the email program:
- In the Windows Live Mail program, choose Go⇒Contacts and then choose File⇒Export⇒Business Card (.VCF) to export the contacts.
- In Windows Mail, choose File⇒Export⇒Windows Contacts and then choose vCards (Folder of .VCF Files) from the Export Windows Contacts dialog box. Click the Export button.
- On the Mac, open the Address Book program and choose All Contacts. Then choose File⇒Export⇒Export vCard to save the vCards as a single file.
After the vCard files are created on your computer, connect the Android tablet to the computer and transfer them. Transferring files from your computer to the Android tablet is covered in Chapter 17.
With the vCard files stored on your tablet, follow these steps in the Address Book app to complete the process:
- Tap the Action Overflow icon.
Choose the Import/Export action.
If you can’t find this action, look for a Settings command, and then choose Import/Export.
Choose Import from Storage.
The action might instead read Import from USB Storage or Import from SD Card.
- Choose your Google account to save and synchronize the contacts.
- Choose the Import All vCard Files option.
Tap the OK button.
The contacts are saved on your tablet and also synchronized to your Gmail account, which instantly creates a backup copy.
The importing process may create some duplicates. That’s okay: You can join two entries for the same person in your tablet’s address book. See the section “Joining identical contacts,” later in this chapter.
Manage Your Friends
Don’t let your friends just sit there, occupying valuable storage space inside your tablet! Put them to work. Actually, the tablet does the work; you just give the orders. This section lists some routine and common address book chores and activities.
Editing contact information
 To make minor touch-ups on any contact, start by locating and displaying the contact’s information. Tap the Edit icon, similar to the Pencil icon shown in the margin. When the Edit icon isn’t visible, tap the Action Overflow icon and choose Edit.
Change or add information by tapping a field and then editing or adding new text.
Some contact information cannot be edited. For example, fields pulled in from social networking sites can be edited only by that account holder on the social networking site.
When you’re finished editing, tap the Save button or Done button.
Adding a contact picture
Nothing can be more delicious than snapping an inappropriate picture of someone you know and using the picture as his contact picture on your tablet. Then, every time he contacts you, that embarrassing, potentially career-ending photo comes up.
I suppose you could use nice pictures as well, but what's the fun in that?
To use the tablet's camera to snap a contact picture, heed these directions:
- Locate and display the contact’s information.
Tap the contact’s picture.
If nothing happens after tapping the picture, tap the Edit icon, and then tap the picture.
- Choose the action Take New Photo, which might be titled Take Picture or something similar.
Use the tablet's camera to snap a picture.
Chapter 11 covers using the Camera app. Both the front and rear cameras can be used (but not both at the same time). Tap the Shutter icon to take the picture.
Review the picture.
Nothing is set yet. If you want to try again, tap the Retry icon. Refer to Table 5-1 for definitions of the picture confirmation icons.
Table 5-1 Picture Confirmation Icons
Icon
Name
Function

Retry
Take another photo

Done
Accept the photo and crop

Cancel
- Tap the Done icon to confirm the new image and prepare for cropping.
- If you see a Complete Action Using card, tap Crop Picture and then tap the Always button. Tap OK to confirm.
Crop the image, as shown in Figure 5-3.
Adjust the cropping box so that it surrounds only the portion of the image you want to keep.
- Tap the Done button to crop and save the image.

Figure 5-3: Cropping a contact’s image.
The image you took (refer to Step 4) now appears whenever the contact is referenced on your tablet.
To remove an image from a contact, you need to edit the contact as described in the preceding section. Tap the contact's picture while you're editing, and then choose the Remove Photo or similar command.
You can also use any image stored on the tablet as a contact's picture. In Step 3, choose the Select New Photo command to view pictures stored or available on your tablet. Browse for and select an image, and then crop.
- For more information on the Complete Action Using prompt, see Chapter 18.
- See Chapter 12 for more information on photo management.
Making a favorite
A favorite contact is someone you stay in touch with most often. The person doesn’t have to be someone you like — just someone you (perhaps unfortunately) contact often, such as your bookie.
 To make a contact a favorite, display the contact’s information and tap the Favorite (star) icon by the contact’s image, as shown in Figure 5-1. When the star is filled, the contact is one of your favorites and is stored in the Favorites group.
To remove a favorite, tap the contact’s star again, and it loses its highlight.
The favorite contacts are all found by accessing the Favorites group. To view that group, tap the Favorites tab (refer to Figure 5-1). On some tablets, you may have to choose Favorites from an action bar on the Contacts app screen.
- Removing a favorite doesn’t delete the contact, but instead removes it from the Favorites group.
- The Favorites group may be named the Starred group on some tablets.
- By the way, contacts have no idea whether they're among your favorites, so don’t believe that you’re hurting their feelings by not making them favorites.
Joining identical contacts
Your tablet pulls contacts from multiple sources, such as Gmail, Facebook, Yahoo!, and Skype. Because of that, you may discover duplicate contact entries in the tablet’s address book. Rather than fuss over which entry to use, you can join the contacts. Here’s how:
- Wildly scroll the address book until you locate a duplicate. Well, maybe not wildly scroll, but locate a duplicated entry. Because the address book is sorted, the duplicates usually appear close together.
Edit one of the duplicate contacts.
Tap the Edit icon to edit the contact.Editing may not be required for some versions of the Contacts app. So just go ahead and:
Tap the Action Overflow icon and choose the Join action, which may be titled Link Contact on some tablets.
After choosing the action, you see a list of contacts that the tablet guesses might be identical. You also see the entire list of contacts, in case the guess is incorrect. Your job is to find the duplicate contact.
Select a matching contact in the list to join the two contacts.
The contacts are merged, appearing as a single entry in the address book.
Joined contacts aren’t flagged as such in the address book, but you can easily identify them: When looking at the contact’s information, a joined contact appears as a single, long entry, often showing two sources or accounts from which the contact’s information is pulled.
Separating contacts
The topic of separating contacts has little to do with parenting, although separating bickering children is the first step in avoiding a fight. Contacts in the address book might not be bickering, but occasionally the tablet may automatically join two contacts that aren’t really the same person. When that happens, you can split them by following these steps:
Display the improperly joined contact.
As an example, I’m a Facebook friend with other humans named Dan Gookin. My tablet accidentally joined my address book entry with another Dan Gookin.
Tap the Action Overflow icon and choose the Separate action, which might also be called Separate Contacts.
The command might not be available, in which case you must first edit the contact, as described earlier in this chapter. At that point, tap the Action Overflow icon to choose Separate.
- Tap the OK button to confirm that you’re splitting the contacts.
You don’t need to actively look for improperly joined contacts as much as you’ll just stumble across them. When you do, feel free to separate them, especially if you detect any bickering.
Removing a contact
Every so often, consider reviewing your tablet’s address book. Purge the folks whom you no longer recognize or you’ve forgotten. It’s simple:
Edit the forlorn contact.
Directions are offered earlier in this chapter.
Tap the Action Overflow icon and choose Delete.
If you don’t see the Delete item, the contact is brought in from another source, such as Facebook. You need to use that app to disassociate the contact.
- Tap the OK button to confirm.
Poof! They’re gone.
![]() On some tablets, you may find a Delete icon (shown in the margin) directly on the contact’s screen or on the Edit Contact screen. Tap that icon to remove it, and then tap the OK button to remove the contact.
On some tablets, you may find a Delete icon (shown in the margin) directly on the contact’s screen or on the Edit Contact screen. Tap that icon to remove it, and then tap the OK button to remove the contact.
- Because the Contacts list is synchronized with your Google account, the contact is also removed there — and on other Android devices.
- Removing a contact doesn’t kill the person in real life.