Chapter 6
You’ve Got Email
In This Chapter
![]() Configuring email on your tablet
Configuring email on your tablet
![]() Receiving email
Receiving email
![]() Reading, replying to, and forwarding email
Reading, replying to, and forwarding email
![]() Composing a new message
Composing a new message
![]() Dealing with email attachments
Dealing with email attachments
![]() Changing your email signature
Changing your email signature
The first email message was sent back in the early 1970s. Programmer Ray Tomlinson doesn’t remember the exact text but guesses that it was probably something like “QWERTYUIOP.” Although that’s not as memorable as the first telegraph that was sent (“What hath God wrought?”) or the first telephone message (“Mr. Watson, come here. I want you.”), it’s one for the history books.
Today, email has become far more functional and necessary, well beyond Mr. Tomlinson’s early tests. Although you could impress your email buddies by sending them “QWERTYUIOP,” you’re likely to send and reply to more meaningful communications. Your Android tablet is happily up to the task.
Android Tablet Email
Historically, Android tablets handled electronic mail by using two apps: Gmail and Email. Gmail handled only the Google email. The Email app handled everything else, from traditional ISP email to web-based email, such as Yahoo! Mail or Windows Live Mail, and even corporate email.
With the introduction of Android Lollipop, the Gmail app now handles all email. Even so, your tablet may come with the Email app as well. I cover both apps in this chapter and — as a bonus — both apps do tend to work the same.
- Both the Gmail and Email apps are located in the Apps drawer. You may also find launchers on the Home screen.
The Gmail app is updated frequently. To review any changes since this book went to press, visit my website at
 Although you can use your tablet’s web browser to visit the Gmail website, you should use the Gmail app to pick up your Gmail. Likewise, you can use a web page to read most other email, but using the Email (or newer Gmail) app is preferred.
If you forget your Gmail password, visit this web address:
Setting up the first Email account
If your tablet uses the Email app, getting that first account set up works differently than when adding a second or third account. These steps apply only to the Email app. If you’re using the Gmail app to add more email accounts, refer to the next section.
Adding your email account to your tablet’s inventory of accounts is simple. Providing you know your email address and password, follow these steps:
Start the Email app.
Look for it in the Apps drawer. If it’s not there, use the Gmail app instead. See the next section.
The first screen you see is Set Up Email. If you've already run the Email app, you're taken to the Email inbox and you can skip these steps. See the next section for information on adding additional accounts.
Type the email address you use for the account.
For example, if you have a Comcast email account, use the onscreen keyboard to type your
[email protected]email address in the Email Address box. You'll find a .com key on the onscreen keyboard, which you can use to more efficiently type your email address. Look for it in the lower-right corner of the screen.- Type the account’s password.
Tap the Next button on the screen or the Done button on the onscreen keyboard.
If you’re lucky, everything is connected and you can move on to Step 5. Otherwise, you have to specify the details as provided by your ISP. See the later section “Adding an account manually.”
Review the items on the aptly named Account Options screen.
You might want to reset the Inbox Checking Frequency option to something other than 15 minutes.
If the account will be your main email account, place a check mark next to the Send Email from This Account By Default option. Also see the later section “Setting the primary email account.”
- Tap the Next button.
Give the account a name and confirm your own name.
The account is given the name of the mail server or your email address. That choice may not ring a bell when you receive your email. I name my ISP’s email account Main because it’s my main account.
The Your Name field shows your name as it’s applied to outgoing messages. So if your name is really, say, Cornelius the Magnificent and not wally78, you can make that change now.
Tap the Done button.
You’re done.
After configuring the account, messages are immediately synchronized with the tablet. You find those message in the inbox. See the later section “Message for You!” for what to do next.
If you use Yahoo! Mail, get the Yahoo! Mail app, which handles your Yahoo! mail far better than the Email app (or the Gmail app). The Yahoo! Mail app gives you access to other Yahoo! features you may use and enjoy. Obtain the Yahoo! Mail app from the Google Play Store. See Chapter 15.
Adding more email accounts
The Email app, as well as the newest version of Gmail, can be configured to pick up email from multiple sources. If you have a Windows Live account or maybe an evil corporate account in addition to your ISP’s account, you can add them.
Both the Email and Gmail apps offer different ways to add a new email account. A more generic approach is to use the Settings app. Obey these directions:
Open the Settings app.
It’s found in the Apps drawer; tap the Apps icon on the Home screen to view the Apps drawer.
Choose Accounts.
On Samsung tablets, tap the General tab to locate the Accounts item.
Tap Add Account.
The three options for adding email accounts are:
Exchange or Microsoft Exchange ActiveSync. For a corporate email account hosted by an Exchange Server (Outlook mail)
Personal (IMAP). For web-based email accounts, such as Microsoft Live
Personal (POP3). For traditional, ISP-email accounts, such as Comcast
See the later section “Adding a corporate email account” for information on the Exchange option. The other two options work pretty much the same. In fact, on some tablets a single option, Email, may replace both.
- Choose the proper Personal email account type.
- Type your email address and tap the Next button
- Type the email account password and tap the Next button.
Continue working through the email setup as described in the preceding section.
Start with Step 5, where you review the account settings.
The only change between creating the first email account and adding more is that you will be asked whether the new account is the primary or default account. See the later section “Setting the primary email account” for details.
The new email account is synchronized immediately after it’s added, and you see the inbox. See the later section “Checking the inbox.”
Adding an account manually
 If your email account isn’t recognized, or some other booboo happens, you have to manually add the account. The steps in the preceding sections remain the same, but you need to provide more specific and technical details. This information includes tidbits such as the server name, port address, domain name, and other bothersome details.
My advice is to contact your ISP or email provider: Look on their website for specific directions on connecting an Android tablet to their email account. Contact them directly if you cannot locate specific information.
The good news is that manual setup is very rare these days. Most ISPs and webmail accounts are added painlessly, as described earlier in this chapter.
Adding a corporate email account
The easiest way to set up your evil corporation’s email on your tablet is to have the IT people do it for you. Or you may be fortunate and on the organization’s intranet you’ll find directions. I present this tip because configuring corporate email, also known as Exchange Service email, can be a difficult and terrifying ordeal.
It’s possible to add the account on your own, but you still need detailed information. Specifically, you need to know the domain name, which may not be the same as the outfit’s website domain. Other details may be required as well.
Above all, you need to apply a secure screen lock to your tablet to access Outlook email. This means you need to add a PIN or password to the device, which is covered in Chapter 20. You cannot access the Exchange Server without that added level of security.
And there’s more!
You also need to grant Remote Security Administration privileges. This means your organization’s IT gurus will have the power to remotely wipe all information your Android tablet. You must activate that feature, which is part of the setup process.
The bonus is that when you’re done, you’ll have full access to the Exchange Server info. That includes your email messages, as well as the corporate address book and calendar. Refer to Chapter 5 for information on the tablet’s address book app; the Calendar app is covered in Chapter 14.
Message for You!
New email arrives into your tablet automatically, picked up according to the Gmail and Email apps’ synchronization schedules. On newer tablets, use the Gmail app to read all your email. Otherwise, use the Email app to read non-Gmail email.
Getting a new message
The arrival of a new email epistle is heralded by a notification icon. Each email app generates its own version.
 For a new Gmail message, the New Gmail notification, similar to the one shown in the margin, appears at the top of the touchscreen.
![]() For a new email message, you see the New Email notification.
For a new email message, you see the New Email notification.
Conjure the notifications drawer to review the email notifications. Tap a notification to be whisked to an inbox for instant reading, as described in the next section.
Checking the inbox
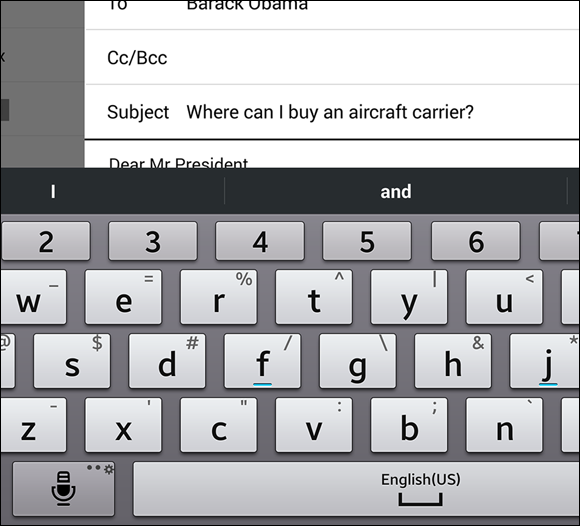
To peruse your Gmail, start the Gmail app. The Gmail inbox is shown in Figure 6-1.
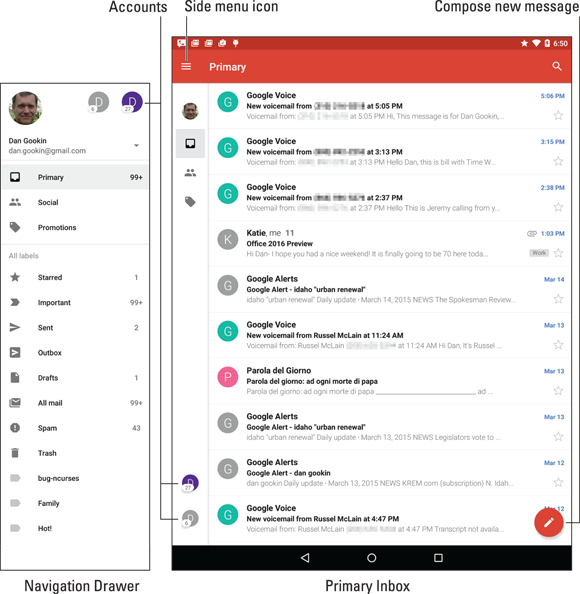
Figure 6-1: The Gmail inbox.
Choose non-Gmail accounts by tapping the account icon from the navigation drawer (refer to Figure 6-1). You can view only one account’s inbox at a time.
If your tablet still uses the Email app, open it to view its inbox. You see a single account’s inbox, or you can choose to view the universal inbox, shown as Combined view in Figure 6-2.
Figure 6-2: Messages in the Email app.
 Gmail doesn’t show up in the Email app. Use the Gmail app to read your Google mail.
- The Gmail app lacks a combined inbox. To view specific inboxes, tap an account bubble on the navigation drawer, as illustrated in Figure 6-1.
- Multiple email accounts that are gathered in the Email app are color-coded. When you view the combined inbox, you see the color codes to the left of each message — as long as messages from multiple accounts are available.
- To view an individual account’s inbox in the Email app, choose the account from the navigation drawer.
Reading email
To view a specific email message, tap its entry in the Inbox, as shown earlier in Figures 6-1 and 6-2. Or you can choose a new email notification. Reading and working with the message operate much the same whether you’re using the Gmail or Email app:
- Swipe the message up or down by using your finger to read it.
- Browse between messages by swiping the screen left or right.
- Tap the left-pointing arrow or chevron at the top left corner of the screen to return to the inbox.
To work with the message, use the icons that appear above or below the message. These icons, which may not look exactly like those shown in the margin, cover common email actions:
 Reply: Tap this icon to reply to a message. A new message window appears with the To and Subject fields reflecting the original sender(s) and subject.
![]() Reply All: Tap this icon to respond to everyone who received the original message, including folks on the Cc line. Use this option only when everyone else must get a copy of your reply.
Reply All: Tap this icon to respond to everyone who received the original message, including folks on the Cc line. Use this option only when everyone else must get a copy of your reply.
![]() Forward: Tap this icon to send a copy of the message to someone else.
Forward: Tap this icon to send a copy of the message to someone else.
![]() Delete: Tap this icon to delete a message.
Delete: Tap this icon to delete a message.
You may not see the Reply All and Forward icons when the tablet is in its vertical orientation. Turn the tablet horizontally to see all three icons, along with the Favorite icon.
![]() Additional email commands can be found by tapping the Action Overflow icon, as shown in the margin. The commands available depend on what you’re doing in the Gmail or Email app at the time you touch the icon.
Additional email commands can be found by tapping the Action Overflow icon, as shown in the margin. The commands available depend on what you’re doing in the Gmail or Email app at the time you touch the icon.
If you’ve properly configured the Email program, you don’t need to delete messages you’ve read. See the section “Configuring the Delete Email from Server option,” later in this chapter.
Write a New Email Message
The Gmail and Email apps not only receive electronic mail but can also be used to spawn new mail. This section describes the various ways to create a message using your tablet.
Starting a message from scratch
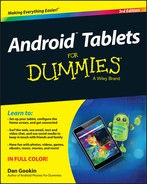
Creating a new email epistle works similarly in both the Gmail and Email apps. The key is to find the Compose icon. Tap that icon and then fill in the blanks, adding a recipient, subject, and message text. Figure 6-3 shows how the email composition screen might look. Its features should be familiar to you if you’ve ever written email on a computer.
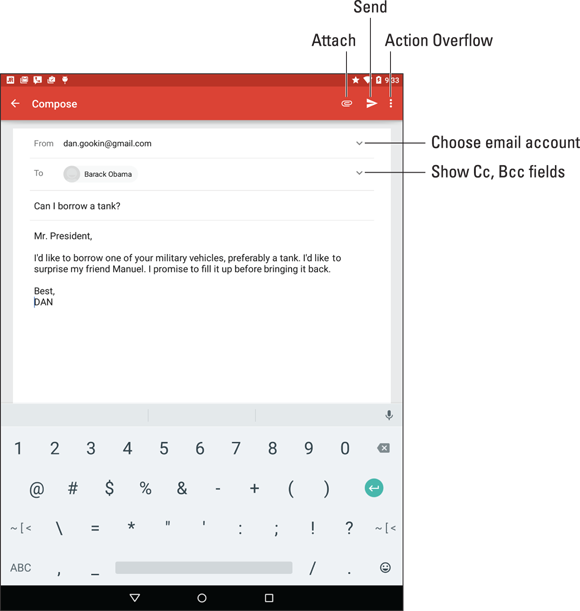
Figure 6-3: Writing a new email message.
 To send the message, touch the Send icon, illustrated in Figure 6-3 and shown in the margin.
- To choose an email account for sending, tap the chevron next to your name atop the Compose screen, shown in Figure 6-3. Otherwise, the primary or default email account is used. See the later section “Setting the primary email account.”
- You need only type a few letters of the recipient’s name. Matching contacts from the tablet’s address book appear in a list. Tap a contact to automatically fill in the To field.
- If you can’t see the CC and BCC fields, tap the chevron, shown in Figure 6-3, to display those fields. Or you can tap the Action Overflow icon and choose the Add Cc/Bcc command.
- To cancel a message, tap the Action Overflow icon and choose Discard. This action might also be found on the Compose screen. Tap the OK button or Discard button to confirm.
- Save a message by choosing the Save Draft action from the Action Overflow menu. Drafts are saved in the Drafts folder. You can open them there for further editing or sending.
- Some tablets feature a formatting toolbar in the Email app. Use the toolbar to change the way the text looks in your message.
Sending email to a contact
A quick and easy way to compose a new message is to find a contact and then create a message using that contact’s information. Heed these steps:
Open the tablet’s address book app.
The stock Android app is named People, although the name Contacts is also popular.
- Locate the contact to whom you want to send an electronic message.
- Touch the contact’s email address.
Choose Gmail or Email to compose the message.
Other options may be available for composing the message. For example, a custom email app you’ve downloaded may show up there as well.
At this point, creating the message works as described in the preceding section.
At Step 4, you may be prompted to use the selected app always or just once. I recommend choosing Just Once until you become more familiar with the email apps. Refer to Chapter 18 for more information on the Always/Just Once choice.
Message Attachments
 The key to understanding email attachments on your Android tablet is to look for the paperclip icon. When you find that icon, you can either deal with an attachment for incoming email or add an attachment to outgoing email.
Receiving an attachment
Attachments are presented differently between the Gmail and Email apps, yet your goal is the same: to view the attachment or save it. Sometimes you can do both!
Figure 6-4 shows both the Gmail app and Email app methods of presenting an email attachment. To deal with the attachment, tap it. In most cases, the attachment opens an appropriate app on your tablet. For example, a PDF attachment might be opened by the QuickOffice app.
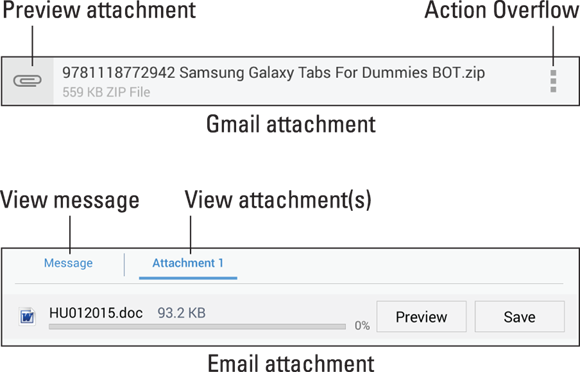
Figure 6-4: Attachment methods and madness.
The Gmail attachment features the Action Overflow icon (refer to Figure 6-4). Tap that icon to control specifically what to do with the app. Actions you might see include
- Preview: Open the attachment for viewing.
- Save to Drive: Send a copy of the attachment to your Google Drive (cloud) storage.
- Save: Save the attachment to the tablet’s storage.
- Download Again: Fetch the attachment from the mail server.
As with email attachments received on a computer, the only problem you may have is that the tablet lacks the app required to deal with the attachment. When an app can’t be found, you have to either suffer through not viewing the attachment or simply reply to the message and direct the person to resend the attachment in a common file format.
- Sometimes, pictures included in an email message aren’t displayed. Tap the message’s Show Pictures button to see the images.
- Common image file formats include PNG and JPEG. Documents are shared by using the HTML (web page), DOCX (Microsoft Word), and PDF (Adobe Acrobat) file formats.
- You may see a prompt displayed when several apps can deal with the attachment. Choose one and tap the Just This Once button to view the attachment. Also see Chapter 18 for information on the default app prompt.
- Attachments are saved in the Downloads or Download folder on either the tablet’s internal storage or its removable storage (the MicroSD card). See Chapter 17 for details on Android tablet storage, including how to view downloaded files.
Sharing an attachment
When sending an email attachment on an Android tablet, don’t think about the method. Instead, think about the attachment: Which app on the tablet created that attachment? When you know that, you’re ready to follow these steps:
Open the app that created the item you want to attach.
Popular apps for sharing include Photos, Gallery, the web browser app, Maps, Play Store, Drive or any other cloud storage app, and so on.
View the item you want to share.
For example, an image, a document, an app in the Play Store, a web page, or a location on a map.
Tap the Share icon.
 The icon is shown in the margin.
- Choose the Gmail or Email app.
Complete the message as described earlier in this chapter.
The item you’re sharing is automatically attached to the message or included as a link.
Sharing an item is the Android tablet method of attaching something to an email message. You’re probably more familiar with the computer method, which is to compose the message first and then attach. You can still do that: Tap the Attachment (paperclip) icon, similar to what’s shown in the margin, when creating a new message. Choose an app or category, and then select the item to share.
You’ve got to admit, however, that finding the item first, and then sharing it, works better on a mobile device.
- The variety of items you can attach depends on which apps are installed on the tablet.
- The Gmail and Email apps sometimes accept different types of attachments. So if you cannot attach something by using the Gmail app, try using the Email app instead.
Email Configuration
You can have oodles of fun and waste oceans of time confirming and customizing the email experience on your Android tablet. The most interesting things you can do are to modify or create an email signature, specify how mail you retrieve on the tablet is deleted from the server, and assign a default email account.
Creating a signature
Don’t be one of the uninformed tablet users whose email signature is the same as everyone else’s. Be unique! Set your own signature, just as I did:
DAN

This was sent from my Android tablet.
Typos, no matter how hilarious, are unintentional.
To create a custom signature for your email accounts, obey these directions:
- Open the Settings app.
Choose the Accounts item.
For Samsung tablets, look for the Accounts item on the General tab.
Choose an email account from the list.
For example, choose the Personal (IMAP) or Personal (POP3) items, or tap the Email item if you see only it.
Choose Account Settings.
This item might be titled Settings.
- Choose a specific email account from the left side of the screen.
Choose Signature.
Any existing signature appears on the card, ready for you to edit or replace it.
- Type or dictate your signature.
If you want to use this signature on other accounts, select and copy the text. See Chapter 4 for details on text editing.
- Repeat Steps 5–7 for any additional email accounts.
The signature you set is appended automatically to all outgoing email you send.
Configuring the Delete Email from Server option
POP3 email, the kind you get from traditional ISPs like Comcast or CenturyLink, is handled differently between an Android tablet and a computer. Unlike reading your email on a computer, messages you fetch on your tablet aren’t deleted from the email server. The advantage is that you can retrieve the same messages later by using a computer. The disadvantage is that you end up retrieving mail you've already read and possibly replied to.
You can control whether messages are removed after they’re picked up. This setting applies only to POP3 email, not Gmail or IMAP (webmail) accounts. Follow these steps:
Open the Settings app and choose Accounts.
Samsung tablets hide the Accounts item on the General tab.
Tap the Personal (POP3) item.
This item might simply be titled Email.
- Choose the Account Settings item, which might be titled Settings.
- Choose an email account.
Choose Incoming Settings.
Look for the More Settings button if you don’t directly see the Incoming Settings item.
- Touch the Delete Email from Server item.
- Choose the When I Delete from Inbox option.
- Tap the Done button.
After you make or confirm this setting, messages you delete in the Email app are also deleted from the mail server. That means the message won’t be picked up again, not by the tablet, another mobile device, or any computer that fetches email from that same account.
Setting the primary email account
When you have more than one email account, the main account — the default — is the one used by the Email app to send messages. To change that primary mail account, follow these steps:
- Start the Email app.
- From the action bar, choose Combined View.
- Tap the Action Overflow icon and choose Settings.
- On the left side of the screen, select the email account you want to mark as your favorite.
- On the right side of the screen, select the Default Account item.
The messages you compose and send using the Email app are sent from the account you specified in Step 4.
In the Gmail app, choose the sending account by tapping the chevron next to the From field, as illustrated in Figure 6-3.