Chapter 13
Music, Music, Music
In This Chapter
![]() Finding music on an Android tablet
Finding music on an Android tablet
![]() Enjoying a tune
Enjoying a tune
![]() Turning the tablet into a deejay
Turning the tablet into a deejay
![]() Buying music online
Buying music online
![]() Organizing your tunes into a playlist
Organizing your tunes into a playlist
![]() Listening to Internet radio
Listening to Internet radio
Your Android tablet’s amazing arsenal of features includes its capability to play music. So it effectively replaces any gramophone that you’ve been lugging around, which is the whole idea behind such an all-in-one gizmo like an Android tablet. And beyond all your Eddie Cantor and Bing Crosby recordings, you can add new tunes to the tablet’s music library. It’s all covered here.

Listen Here
Your Android tablet is ready to entertain you with music whenever you want to hear it. Simply plug in the headphones, summon the music-playing app, and choose tunes to match your mood.
Browsing your music library
Though your tablet may have come with a Music or My Music app, the great Googly way to audibly entertain yourself on an Android tablet is to use the Play Music app. It accesses music stored on the tablet as well as music stored on the Google cloud.
To view your music library, heed these directions:
- Start the Play Music app.
Tap the Side Menu icon to display the navigation drawer.
 The Side Menu icon is found in the upper left corner of the screen. It’s shown in the margin. If you see a left-pointing arrow instead, tap that arrow until the Side Menu icon appears.
- Choose My Library.
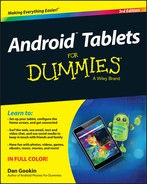
The Play Music app is shown in Figure 13-1 with the My Library screen selected. Your music is organized by category, which appears as tabs atop the screen. Switch categories by tapping a tab, or swipe the screen left or right to browse your music library.
Figure 13-1: The Play Music app; Album category.
The categories make your music easier to find, as you don’t always remember song, artist, or album names. The Genres category is for those times when you're in the mood for a certain type of music but don't know, or don't mind, who recorded it.
 Choose the Listen Now category from the navigation drawer to browse songs you frequently listen to or to discover tunes that the tablet guesses you’ll like. The more you use the Play Music app, the more you’ll appreciate the results shown in the Listen Now category.
 Songs and albums feature the Action Overflow icon, similar to the one shown in the margin. Use that icon to view a list of commands associated with the album or artist.
- Two types of album artwork are used by the Play Music app. For purchased music, or music recognized by the app, original album artwork appears. Otherwise, the app shows a generic album cover.
- When the tablet can't recognize an artist, it uses the title Unknown Artist. This usually happens with music you copy manually to your tablet, but it can also apply to audio recordings you make.
Playing a tune
 When you’ve found the proper tune to enhance your mood, play it! Tap on a song to play that song. Tap on an album to view songs in the album, or tap the album’s large Play button, shown in the margin, to listen to the entire album.
While a song plays, controls appear at the bottom of the screen, as shown on the bottom right in Figure 13-1. Tap that strip to view the song full-screen, as shown in Figure 13-2.

Figure 13-2: A song is playing.
 While the song plays, you’re free to do anything else on the tablet. In fact, the song continues to play even when the tablet is locked. Choose the Play Music notification, shown in the margin, to return to the Play Music app, or you can use the controls on the notification drawer even on the Lock screen to pause the song or skip to the next or previous tune.
After the song is over, the next song in the list plays. The order depends on how you start the song. For example, if you start a song from Album view, all songs in that album play in the order listed.
The next song doesn’t play if you have the Shuffle button activated (refer to Figure 13-2). In that case, the Play Music app randomly chooses another song from the same list. Who knows which one is next?
The next song also might not play when you have the Repeat option on: The three repeat settings, along with the Shuffle settings, are illustrated in Table 13-1. To change settings, tap the Shuffle icon or Repeat icon.
Table 13-1 Shuffle and Repeat Icons
Icon |
Setting |
What Happens When You Touch the Icon |
|
Shuffle Is Off |
Songs play one after the other. |
|
Shuffle Is On |
Songs are played in random order. |
|
Repeat Is Off |
Songs don’t repeat. |
|
Repeat Current Song |
The same song plays over and over. |
|
Repeat All Songs |
All songs in the list play over and over. |


To stop the song from playing, tap the Pause icon, labeled in Figure 13-2.
 Use the volume key on the side of the tablet to set the volume.
- Music on your Android tablet is played by streaming it from the cloud. That means music may not play when an Internet connection is unavailable.
- You can store music on your tablet by downloading it. Directions are offered in Chapter 15.
To change the song order, tap the Song Queue icon, shown in Figure 13-2. Use the tab to the left of each song in the list to change the order; drag the song up or down. Also see the section “Organize Your Music,” later in this chapter.
 You can use the Android tablet’s search capabilities to help locate tunes in your music library. You can search by artist name, song title, or album. The key is to touch the Search icon when you’re using the Play Music app. Type all or part of the text you’re searching for, and then touch the Search icon on the onscreen keyboard. Choose the song you want to hear from the list that’s displayed.
- When a song is playing or paused, its album artwork might appear as the Lock screen wallpaper. Don’t let the change alarm you.
Being the life of the party
You need to do four things to make your Android tablet the soul of your next shindig or soirée:
- Connect it to external speakers.
- Use the Shuffle command.
- Set the Repeat command.
- Provide plenty of drinks and snacks.
The external speakers can be provided by anything from a custom media dock or a stereo to the sound system on the Times Square Jumbotron. You need audio cable with a mini-headphone connector for the tablet’s headphone jack and an audio jack that matches the output device. Look for such a cable at any fine retailer where the employees wear name tags.
After you connect your tablet, start the Play Music app and choose the party playlist you've created. See the later section “Organize Your Music” for information on creating playlists
Enjoy your party, and please drink responsibly.
Add Some Music to Your Life
Consider yourself fortunate if your Android tablet came with music preinstalled. Otherwise, your music library may be a little light. To pack it full of those songs you adore, you have two options:
- Buy lots of music from the Google Play Store, which is what Google wants you to do.
- Borrow music from your computer, which Google also wants you to do, just not as enthusiastically as the first option.
For information on buying music at the Play Store, see Chapter 15. The next section covers borrowing music from your computer.
Getting music into the Google cloud
Realizing that you probably don’t want to buy yet another copy of the Beatles’ White Album, you can take songs from your computer and transfer them to your Google Play Music library on the Internet. Here’s how that procedure works:
Locate the music you want to upload to your Play Music library.
You can open a music jukebox program, like Windows Media Player, or just have a folder window open that lists the songs you want to copy.
Open the computer’s web browser.
This would be the computer on which you have lots of music stored.
Visit
https://music.google.com.That address represents your music library on the Google cloud. You see a copy of your Play Music library on the screen, including your playlists and any recent songs. You can even listen to your music right there on the computer, but no: You have music to upload.
- Click the Upload Music button.
If you haven’t yet done so, download the Music Manager.
Click the Download Music Manager button. Complete the installation process. You need to perform this task only once.
Drag music into the web browser window, or click the Select from Your Computer button to add tunes.
It takes a while for Google to digest the songs, so be patient.
You can repeat these steps to upload tens of thousands of songs. The limit was once 25,000, but I believe Google increased that number recently.
The songs you upload are available to your Android tablet just like any other songs in the music library.
Synchronizing music directly
Some tablets may let you copy music from the computer directly to the tablet by using the USB cable connection. In that setup, you can use a music jukebox program, such as Windows Media Player, to synchronize music with your Android tablet just as you would any portable music player. Follow these steps:
Connect the Android tablet to your PC.
See Chapter 17 if you have difficulty making the connection.
On the PC, choose Windows Media Player from the AutoPlay dialog box.
If the AutoPlay dialog box doesn’t appear, start the Windows Media Player program.
On the PC, ensure that the Sync list appears, as shown in Figure 13-3.
The Android tablet appears in the Sync list on the right side of the Windows Media Player, as shown in Figure 13-3. If it doesn’t, click the Next Device link or button until it shows up.
Drag to the Sync area the music you want to transfer to your tablet.
In Figure 13-3, you see a list of songs that appear in the Sync list. To add more, drag an album or individual song into the Sync list. Dragging an album sets up all its songs for transfer.
Click the Start Sync button to transfer the music from the PC to your tablet.
The Start Sync button may be located atop the list, as shown in Figure 13-3, or it might be found on the bottom.
- Close Windows Media Player and disconnect the tablet.

Figure 13-3: Windows Media Player meets Android tablet.
As I wrote at the start of this section, some tablets let you copy music this way. Even if the transfer appears to be complete, the music may not show up in the Play Music app. If so, great. If not, oh well. You can always try the upload technique described in the preceding section.
- You cannot use iTunes to synchronize music with Android devices.
 The Android tablet can store only so much music! Don’t be overzealous when copying your tunes. In Windows Media Player (refer to Figure 13-3), a capacity-thermometer thing shows you how much storage space is used and how much is available on your tablet. Pay heed to the indicator!
Organize Your Music
The Play Music app categorizes your music by album, artist, song, and so forth, but unless you have only one album and enjoy all the songs on it, that configuration probably won’t do. To better organize your music, you can create playlists. That way, you can hear the music you want to hear, in the order you want, for whatever mood hits you.
Reviewing your playlists
To view any playlists that you’ve already created, or that have been preset on the tablet, choose Playlists from the Play Music app’s navigation drawer (refer to Figure 13-1). Playlists you’ve created are displayed on the screen, similar to what’s shown in Figure 13-4.

Figure 13-4: Playlists in the Play Music app.
To see which songs are in a playlist, touch the playlist's Album icon. To play the songs in the playlist, touch the first song in the list.
A playlist is a helpful way to organize music when a song’s information may not have been completely imported into your Android tablet. For example, if you’re like me, you probably have a lot of songs labeled Unknown. A quick way to remedy this situation is to name a playlist after the artist and then add those unknown songs to the playlist. The next section describes how it’s done.
Creating your own playlists
The Play Music app features “auto” playlists, three of which are shown in Figure 13-4. Beyond those few, the playlists you see are those you create. Here’s how it works:
- Locate some music you want to add to a playlist.
Touch the Action Overflow icon by the album or song.
- Choose Add to Playlist.
Ensure that you’re viewing a song or an album; otherwise, the Add to Playlist action doesn’t show up.
Choose an existing playlist or, to create a new playlist, tap New Playlist.
If you choose to create a new playlist, type a name for the playlist and tap the OK button.
The song or album is added to the playlist you selected, or it’s placed into a new playlist you created. You can continue to add songs to the playlist by repeating these steps.
- You can have as many playlists as you like on the tablet and stick as many songs as you like in them. Adding songs to a playlist doesn’t noticeably affect the tablet’s storage capacity.
- To remove a song from a playlist, open the playlist and tap the Action Overflow by the song and choose Remove from Playlist.
- Removing a song from a playlist doesn’t delete the song from the music library; see the next section.
- Songs in a playlist can be rearranged: While viewing the playlist, use the tab on the far left end of a song title to drag that song up or down in the list.
- To delete a playlist, tap the Action Overflow icon in the Playlist icon’s lower right corner (refer to Figure 13-4). Choose Delete and tap OK to confirm.
Removing unwanted music
To remove a song or an album, tap its Action Overflow icon. Choose the Delete action. Tap the OK button to remove the song. Bye-bye, music.
I don’t recommend removing music. Most music on your Android tablet is actually stored on the cloud, Google’s Play Music service. Therefore, removing the music doesn’t affect the tablet’s storage, so unless you totally despise the song or artist, removing the music has no effect.
Some music can be stored locally by downloading it to the tablet. That way, the music is always available. See Chapter 15 for details.
Music from the Stream
Although they're not broadcast radio stations, some sources on the Internet — Internet radio sites — play music. These Internet radio apps are available from the Google Play Store. Some free services that I can recommend are
- Pandora Radio
- Spotify
- TuneIn Radio
Pandora Radio and Spotify let you select music based on your mood and preferences. The more feedback you give the apps, the better the music selections.
The TuneIn Radio app gives you access to hundreds of Internet radio stations broadcasting around the world. They're organized by category, so you can find just about whatever you want. Many of the radio stations are also broadcast radio stations, so odds are good that you can find a local station or two, which you can listen to on your Android tablet.
These apps, as well as other, similar apps, are available for free. Paid versions might also be found at the Google Play Store. The paid versions generally provide unlimited music with no advertising.
- Google offers an unlimited music listening service. You can sign up by tapping the Get Unlimited Music button, found at the bottom of the Play Music app’s navigation drawer. The service is free for 30 days, and then a nominal fee, currently $9.99, is charged monthly.
- It’s best to listen to Internet radio when your tablet is connected to the Internet via a Wi-Fi connection. Streaming music can use a lot of your cellular data plan’s data allotment.
- Be wary of music subscription services offered through your tablet’s manufacturer or cellular provider. I’ve subscribed to such services only to find them terminated for various reasons. To avoid that disappointment, stick with the services described in this section until you feel comfortable enough to buy into another service.
- See Chapter 15 for more information about the Google Play Store.
 Internet music of the type delivered by the apps mentioned in this section is referred to by the nerds as streaming music. That’s because the music arrives on your Android tablet as a continuous download from the source. Unlike music you download and save, streaming music is played as it comes in and isn’t stored long-term.