
Until now, we have seen how the datasource is configured on different databases. Let's quickly compare and find out what are the different syntaxes for each database:
- Oracle: The following mentioned code describes the datasource parameter for the Oracle database:
- MySQL: The following mentioned code describes the datasource parameter for the MySQL database:
<Resource name="jdbc/tomcat7" auth="Container" type="javax.sql.DataSource" driverClassName="org.postgresql.Driver" url="jdbc:postgresql://127.0.0.1:5432/tomcat7" username="tomcat7" password="tomcat" maxActive="20" maxIdle="10" maxWait="-1"/>
- PostgreSQL: The following mentioned code describes the datasource parameter for the PostgreSQL database:
<Resource name="jdbc/tomcat7" auth="Container" type="javax.sql.DataSource" driverClassName="org.postgresql.Driver" url="jdbc:postgresql://127.0.0.1:5432/tomcat7" username="tomcat7" password="tomcat" maxActive="20" maxIdle="10" maxWait="-1"/>

In the previous figure, we have defined each driverClassName, port, and JDBC driver for each database and tabulated to conclude that if you know the details for connectivity with the database, you can configure any new database very easily.
Note
Every vendor has a predefined set of libraries through which you can connect to its database. If you need to connect to any other database, which is not mentioned here, then you can visit the vendor websites for support information.
The Tomcat Manager is a very powerful tool for Tomcat administration. In production server issues, it's not possible to be in the data center at all times. Sometimes, we have to connect to Tomcat remotely to resolve the issues and that is when the Tomcat Manager is very useful for handing a critical issue. It comes with the following features:
- Deployment of a new application remotely
- Idle session clearing
- Undeployment of an application without restarting the container
- Analysis of memory leaks
- JVM status
- Server status
By default, the Tomcat Manager is disabled in Tomcat 7. To enable the Tomcat Manager, you have to do the configuration in the default file, that is, tomcat-users.xml in the conf folder of Tomcat 7.
In this file, user roles and their authentication are configured. Let's quickly discuss the configuration parameters for enabling the Tomcat Manager.
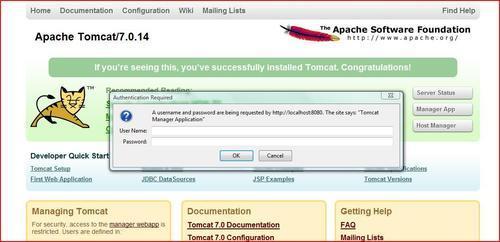
Before enabling the Tomcat Manager, an authentication window will pop-up while browsing the Tomcat page, as shown in the following screenshot:
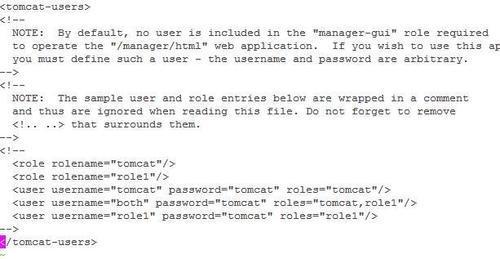
The following screenshot shows the tomcat-users.xml section before enabling the user properties:
After enabling the Tomcat Manager, the user will get a message in the command prompt, as shown in the following screenshot:

By default, Tomcat 7 comes with two users, tomcat and role1. If you want to add more users based on your system requirement, you can add here and define the role. Once you enable the Tomcat user configurations, this configuration will be in effect after the Tomcat recycle.
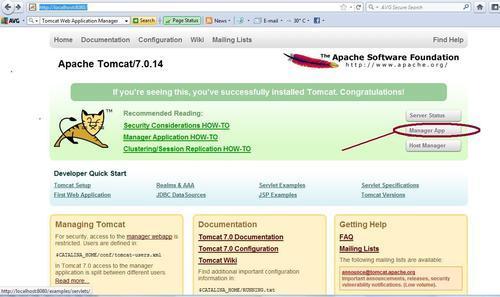
You can browse the Tomcat Manager using the URL http://localhost:8080/ and click on Manager App, as shown in the the following screenshot:

Once the authentication page is displayed, provide the user ID/password (user = admin, password = admin) as it's already defined in tomcat-users.xml. Click on OK. The pop-up will redirect it to the Tomcat Manager console, as shown in the following screenshot:

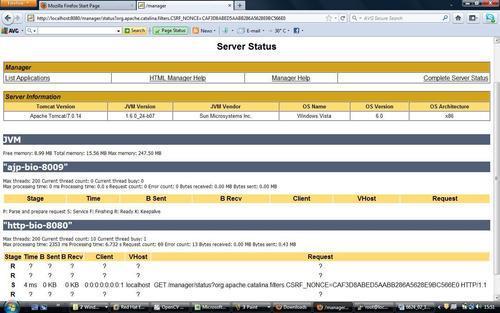
Through this console, we can deploy the new application or modify the current application's state to stop, undeploy, start, reload, clear sessions, and so on. Also, we can check the current status of the server by clicking on the Server Status, as shown in the following screenshot:

The following screenshot shows the Server Status:
The context path is a key element of a web application. It's also used for a virtual host. Virtual hosting can be defined as a method through which you can host multiple domain names on the same web server or a single IP.
The context path is also used to define the URL mapping for the .war files.
Many people ask why we need the context path. Instead, can we deploy the application on one root directory? The answer is, by defining the context path, we minimize the load on the server. When the server gets the request with the URL, it will check the server.xml or context path for the defined URL. If it's found, then the URL will be served from here, otherwise the server has to search all the deployed WAR files. Hence, the context path reduces the CPU cycle.
The second important advantage is, it gives us freedom to customize the application based on our requirement, such as logging, appBase, DB connection, and so on.
Let's consider a scenario for a large enterprise where a single application needs to be deployed on 100 Tomcat servers. Now it's impossible to deploy the application on every server, and so, in that case Common NAS share is used for the application deployment.
The context path in Tomcat can be enabled in two ways:
- GUI using the Tomcat Web Application Manager
- Command-line configuration in
server.xml
For enabling the context path in the Tomcat Manager, you have to first log in to the Tomcat Manager app using the URL http://localhost:8080. Then click on Manager App, as shown in the following screenshot:
It then displays the Tomcat Web Application Manager console and its features, as shown in the following screenshot:

You can create the context path using the Deploy tab. Click on Browse and select the required WAR file. Then click on Deploy. It will take 10 to 15 seconds to deploy the application and you will see a page similar to the following screenshot:
Tip
Downloading the example code
You can download the example code files for all Packt books you have purchased from your account at http://www.packtpub.com. If you purchased this book elsewhere, you can visit http://www.packtpub.com/support and register to have the files e-mailed directly to you

The following screenshot shows the application deployment status and administrative controls such as Stop, Reload, and Undeploy:
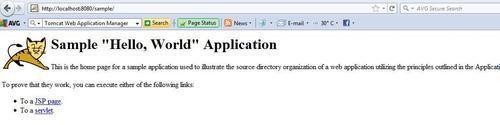
Once the application is deployed successfully, you can browse the application using the URL http://localhost:8080/sample, as shown in the following screenshot:
Another way of adding the context path in Tomcat 7 is by editing server.xml. But, you need to have a good understanding of XML. Let's quickly discuss the changes that need to be done on the Tomcat server.
<Context path="/sample" docBase="/opt/" reloadable="true" swallowOutput="true">
<WatchedResource>WEB-INF/web.xml</WatchedResource>
<Logger className="org.apache.catalina.logger.FileLogger" prefix="www-sample-com-log." suffix=".txt" timestamp="true"/>
</Context>

Now, it's time to discuss the parameters defined in the context path. The previous screenshot shows the details for the context path.
path="/sample":It defines the path URL for the server request, for example,http://localhost:8080/sample.docBase="/opt/":It defines the document root for the context path. In simple language, this parameter defines the place from where the deployment.warfile gets picked up.reloadable="true":If this parameter istrue, then every change done on the WAR file will be in effect automatically without a Tomcat recycle.swallowOutput="true":If this parameter is set to true, then the output forSystem.outandSystem.errwill be redirected to the application log.