
This protocol was mainly developed to transfer data over the network in binary format instead of plain text. It uses TCP and a packet-based protocol, hence, increasing the performance of the web servers. Another informational point is that decryption of requests is done on the web server end so that the application server doesn't have a high load.
Note
If you are using AJP, the network traffic is reduced, as the tariff passes over the TCP protocol.
mod_jk and mod_proxy are based on the AJP protocol. They are also helpful in transmitting a high content response over the browser.
Note
If we use the latest version of mod_jk for integration of Apache and Tomcat, then we can store the response header of 64k in the web browsers. This process is very useful in the case of SSO enabled applications or storing Java session values in the browser.
mod_jk is an AJP connector which is used to integrate web servers such as Apache or IIS to Tomcat 7. In case we don't install mod_jk, then we cannot use frontend web servers for Tomcat. This module is very helpful in order to hide Tomcat behind the frontend web server and also eliminates the port number while browsing the URL. It involves multiple steps starting from installation and configuration. Let's first discuss the installation of mod_jk.
The mod_jk source can be downloaded from its official site, http://tomcat.apache.org/download-connectors.cgi. It is always recommended to download the latest stable version from the site for the implementation.
- Once the source is downloaded we have to extract it in the server directory using the following command:
[root@localhost opt]# tar -zxvf tomcat-connectors-1.2.x-src.tar- where x is the minor version number.
- Once the code is extracted, a directory is created in the current path named as
tomcat-connectors-1.2.32. It's the home directory of themod_jksource. The following screenshot shows the extracted code in thetomcat-connectors-1.2.32directory, which is created after the execution of the previous command: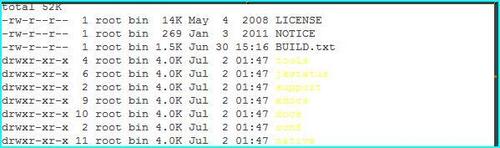
- Go to the native directory of the
mod_jksource using the following command and then run theconfigurecommand:[root@localhost opt]# cd /opt/tomcat-connectors-1.2.32-src/native ./configure --with-apxs=/opt/apache-2.2.19/bin/apxsTip
Tip for configuration
mod_jkis specific to the Apache version and the Apache Extension Tool (APXS) should be used for the current version of Apache, which we will use in the environment.Once
mod_jkis compiled on one server, there is no need to generate for another Apache instance. It can be directly copied to the other instance.This trick is tested on Linux only.
- The following screenshot shows the installation process using the APXS module. Installation of
mod_jkbegins by running theconfigurecommand:
- Once the configuration is done, you need to run the
makecommand, which compiles the source code, as shown in the following screenshot:[root@localhost apache-2.0]# make
- After the code is compiled using the make command then installation of the code is done using the command
make install:root@localhost apache-2.0]# make install
- Once the execution is complete, it will create the module in the
apache-2.0directory of the source, as shown in the following screenshot: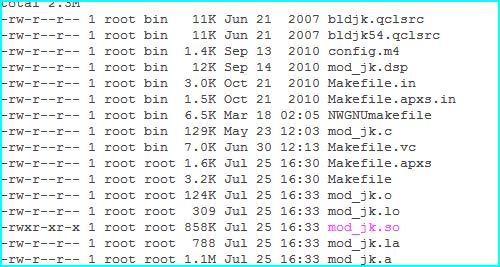
Configuration of mod_jk is a little complicated in Apache. There are various ways of performing the configuration, but the most commonly used option is the concept of creation of workers.properties and mod_jk.conf. The steps to be performed are mentioned below:
- Copy the
mod_jk.sofrom theapache 2.0directory of the connector source to the modules directory of the Apache httpd server by using the following command:[root@localhost apache-2.0]# cp mod_jk.so /opt/apache-2.2.19/modules/ chmod 755 mod_jk.so- The previous command sets the execution permission.
chown root:root mod_jk.so - The previous command sets the the ownership to root.
- The previous command sets the execution permission.
- To edit the configuration of the httpd server, you have to create the new file called as
mod_jk.confin theconfdirectory of$APACHE_HOME/confas follows:[root@localhost apache-2.0]# cd /opt/apache-2.2.19/conf vi mod-jk.conf LoadModule jk_module modules/mod_jk.so JkWorkersFile conf/workers.properties JkLogFile logs/mod_jk.log JkLogLevel info JkMount /sample/* node1The
mod_jk.conffile contains the following details:- Module path: It defines the location of the module from where Apache loads the module during the startup process, for example,
LoadModule jk_module modules/mod_jk.so. - Worker file path: It defines the location of the worker file, this file contains the information of the Tomcat instance details such as the IP, port and load balancing methods such as
JkWorkersFile conf/workers.properties. - Log file: It records the activity for Apache Tomcat integration, it also records the connectivity health check run between Apache/Tomcat (
JkLogFile logs/mod_jk.log). - URL mapping: It defines the context path for Apache and also sets the rules such as redirecting the request if you get any request with the defined URL, for example,
JkMount /sample/* node1. This means whenever the user hit the URLhttp://localhost/sample, the request will redirect to the Tomcat node1. - Log level: This parameter captures the different events performed by
mod_jkin the logs (JkLogLevel info).

- Module path: It defines the location of the module from where Apache loads the module during the startup process, for example,
- Create a new file named as
workers. propertiesin theconfusing the following command:[root@localhost conf]# vi workers.properties worker.list=node1 worker.node1.port=8009 worker.node1.host=10.130.240.51 worker.node1.type=ajp13 worker.node1.lbfactor=1workers.propertiescontain the following details:- Node name (common name for the host)
- AJP port details for Tomcat (the port on which Tomcat accepts the request for AJP)
- Host IP for Tomcat (the IP address where the Tomcat instance is running)
- Protocol used (the protocol used for communication by default is AJP)
- Load balancing method (Round robin, persistence, and so on)

- The last step is to include the
mod_jk.confin the main configuration file of the httpd, that is,httpd.conf.[root@localhost conf]# vi httpd.conf
Now we are done with configuration of mod_jk in the Apache HTTP configuration file (httpd.conf). But mod_jk will not work until we recycle the Apache httpd services. So why wait? Let's recycle by running the following command:
[root@localhost bin]# ./apachectl stop
[root@root@localhost bin]# ./apachectl start
Note
In case the Apache services are not displayed after the configuration, then we will run the configtest.sh placed in the bin directory that shows the issues with configuration.
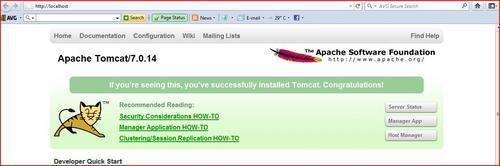
Once we are done with the Apache web server configurations, followed by the web server service restart, it's now time to test the application. In Chapter 1, Installation of Tomcat 7, we had tested the application by using the host and port number on which Tomcat services were running http://localhost:8080/applicationname, as shown in the following screenshot:

After enabling the mod_jk configuration, you can check the URL without using the port number (http://localhost/applicationname). The following screenshot shows the application with the application's URL:
mod_proxy configuration is very simple as compared to mod_jk configuration. Here, we need to add the module and redirect the URL to a virtual host.
Open the httpd.conf and place the following entry:
- Place the following lines of code after the other
LoadModuledirectives:LoadModule proxy_module modules/mod_proxy.so LoadModule proxy_http_module modules/mod_proxy_http.so
- Place the following lines of code with your other
VirtualHost, or at the bottom of the file:NameVirtualHost * <VirtualHost *> ServerName abc.com ProxyRequests Off <Proxy *> Order deny,allow Allow from all </Proxy> ProxyPass / http://localhost:8080/ ProxyPassReverse / http://localhost:8080/ <Location /> Order allow,deny Allow from all </Location> </VirtualHost>
Save the configuration file. Based on the Rule of Thumb, every configuration change is reflected only after a recycle.
[root@localhost bin]# ./apachectl stop
[root@root@localhost bin]# ./apachectl start
We have discussed mod_jk and mod_proxy but we still don't know when to use which module to increase the speed of the web server. Let's compare both modules and find out which can be used in a real-time environment:
|
Feature |
|
|
|---|---|---|
|
Load balancing |
High level |
Basic |
|
Management interface |
Yes |
No |
|
Compilation |
Separate process |
Not required. By default comes with Apache |
|
Configuration |
Huge |
Basic |
|
Protocol |
AJP |
HTTP/HTTPS/AJP |
|
Node failure |
Advance |
NA |
The previous table shows the comparison of mod_jk and mod_proxy. Based on the features, the web administrator can decide which module should be used.