C H A P T E R 4
Using Tomcat’s Manager Web Application
In previous chapters, we have learned, among other things, how to deploy Java web applications to Apache Tomcat server. In our examples, we copied the directory or WAR file of the web application to Tomcat’s /webapps directory, and started (or restarted) the server. However, in a production environment, it may be inconvenient to stop the running server with existing applications – that’s where Tomcat’s Manager web applications come in handy. Using Manager web application bundled with the Apache Tomcat distribution, you can deploy new applications, undeploy existing ones, and perform various other server management tasks from your browser.
In this chapter, we will:
- Define the Tomcat Manager web application, and discuss its usage
- Describe how to access the Tomcat Manager web application using its HTML web interface
- Explain the steps involved in accessing Manager’s text-based interface using Ant scripts
What Is the Manager Web Application?
The Tomcat Manager web application is packaged with the Tomcat server. It is installed in the context path of /manager and provides the basic functionality to manage Web applications running in the Tomcat server. Some of the provided functionality includes the ability to install, start, stop, remove, and report web applications. Using Manager web application, you can easily deploy web applications on the local or remote server, without the need for FTP access to the server itself – all commands are invoked over HTTP protocol – using your favorite browser or the command line.
Tomcat Manager web application shipped with Apache Tomcat 7 and has a web-based interface, so it can be accessed via any browser and commands issues by simply clicking on the links in the web page.
Although a web-based browser is convenient and easy for human access, sometimes we need to manage web applications using external scripting tools. For that reason, commands to the Manager web application can be issued using the text-based interface.
For advanced access when security is critical, Manager web application can be accessed via Java Management Extension (JMX) proxy. JMX is a standard Java technology created for the management of applications, devices, or networks using standardized Java API. Because JMX is beyond the scope of this book, we won’t be getting into the details of JMX access to Tomcat Manager web application. For more information about JMX, see the JMX home page at www.oracle.com/technetwork/java/javase/tech/javamanagement-140525.html. You can find details about JMX access to the Tomcat Manger application on Tomcat project’s web site at http://tomcat.apache.org/tomcat-7.0-doc/manager-howto.html#Using_the_JMX_Proxy_Servlet.
Finally, accessing status information of the Tomcat instance is also part of the Manager web application. You can see basic server stats from Tomcat’s status page, including the Tomcat version, Java version, OS version, and basic JVM memory and thread information.
For convenience and easier access and security management, these four ways of accessing Tomcat’s Manager web application are accessible on separate contexts (all sub-contexts of the main /manager context). Table 4-1 shows the contexts for accessing different parts of Manager web application.
Table 4-1. Manager Web Application Components and Their Context Paths
| Component | Context Path |
| HTML-based web application | /manager/html |
| Text-based script access | /manager/text |
| JMX proxy access | /manager/jmxproxy |
| Status request | /manager/status |
In the following sections we will demonstrate issuing commands to the Manager web application using its HTML web-based interface, as well as using Ant script to access Manager web application from the command line.
Gaining Access to the Manager Web Application
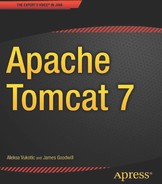
Before you can use the Manager, you must set up a new user with the appropriate privileges to access the Manager web application. If you try to access any part of the Manager web application without setting up security privileges, you will be presented with a Tomcat error page, with standard HTML status code 403 - forbidden, as Figure 4-1 illustrates.
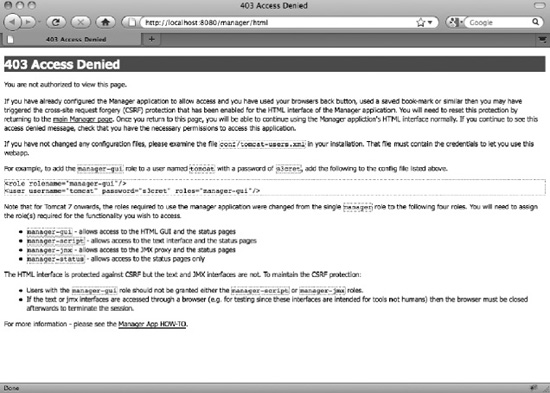
Figure 4-1. Error page displayed if user tries to access Manager web application without required privileges
Prior to Tomcat version 7, there was one user role required to access it, which was simply called “manager.” From version 7, Tomcat introduced four different roles for accessing Manager web application – one for each component described in the previous section. Table 4-2 shows the roles required to access each of the components:
Table 4-2. User Roles Required to Access Manager Web Application Components
| Component | Required User Role | Description |
| HTML -based web application | manager-gui | Allows access to HTML interface and status pages only. |
| Text-based script access | manager-script | Allows access to the text-based scripting engine and status pages only. |
| JMX proxy access | manager-jmx | Allows access via JMX proxy and status pages only. |
| Status request | manager-status | Allows access to status pages only. |
![]() Note For security reasons, a user shouldn’t be given more than one of the following roles:
Note For security reasons, a user shouldn’t be given more than one of the following roles: manager-gui, manager-script, or manager-jmx.
![]() Note Users with the role of
Note Users with the role of manager-gui, manager-script, or manager-jmx will have access to status pages, even if they don’t have the manager-status role set explicitly.
Now we need to create a couple of users with required roles, so we can demonstrate what can be done using Tomcat’s Manager web application. Although we will cover Tomcat’s security in more depth in Chapter 6, we will cover a few details now so we can proceed with Manager web application. Tomcat’s users’ usernames, passwords, and roles are stored in file CATALINA_HOME/conf/tomcat-users.xml. If you open this file in your favorite text editor, you will see that it’s empty. It would be quite dangerous if Tomcat shipped with pre-configured users and roles – someone might, by mistake, use the default configuration in production, allowing management of any web application deployed to anyone who knows Tomcat’s default user configuration.
So, we will have to add a couple of lines to tomcat-users.xml, so we can create users that can access Manager web application. Listing 4-1 shows the configuration that we will use in the examples that follow.
Listing 4-1. Tomcat Users Configuration, Allowing Access to the Manager Web Application
<?xml version='1.0' encoding='utf-8'?>

   <user username="managerGui" password="abc123" roles="manager-gui"/>          #1

   <user username="managerScript" password="abc123" roles="manager-script"/>    #2

</tomcat-users>
In the line marked #1, we have defined a user with the username managerGui and the role of manager-gui. In the next line (#2), we created the user managerScript with the role of manager-script. User managerGui therefore can only access Manager web application’s HTML interface, and user managerScript can only issue commands using a text-based script engine.
As we explained before, both users can access status pages.
Accessing the Manager Web Application Using Web Interface
The most common way to access Manager web application is using its rich web interface. Once you have a privileged user, you can go to the home page of the Manager web application by entering the following URL in your browser’s address bar: http://localhost:8080/manager/html. Because Manager web application is a protected web page, you will be presented with the BASIC authentication login dialog box, similar to Figure 4-2.
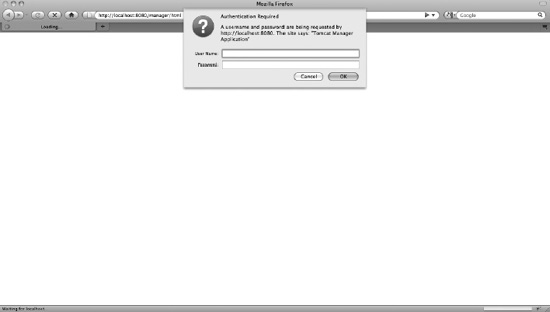
Figure 4-2. Login page after requesting Apache Tomcat Status component
![]() Note Tomcat uses the BASIC authentication mechanism for login, so the look and feel of the login box will depend of the OS and browser you are using. You will learn more about BASIC authentication in Chapter 6.
Note Tomcat uses the BASIC authentication mechanism for login, so the look and feel of the login box will depend of the OS and browser you are using. You will learn more about BASIC authentication in Chapter 6.
Now let’s enter the username and password for the user we configured with the role of manager-gui. We will enter the username as managerGui, and the password as abc123, as per Listing 4-1.
After entering the correct credentials, you will see the Manager web application’s home page. Figure 4-3 shows how this page looks in the browser. Note that, due to the screen size, part of the page is not visible in the figure.

Figure 4-3. Tomcat’s Manager web application – web interface home page
Just below the famous Tomcat logo and the page title in Figure 4-3, you can see the box titled “Message” and the text “OK.” In this message box, you will see the response from Tomcat after every action. Each action or command performed by Tomcat’s Manager web application will provide a response. If everything worked as expected, response message will be short – OK. In case of an error, the response message will be conveniently displayed in the message box for easy and quick troubleshooting of the problem. When using Tomcat’ Manager web application, make sure to check the message box often, so you can see the relevant information about any operation you perform.
Below the message box, you will see the table with four links: the List Applications link, two Help page links, and the Server Status link.
The Help pages give useful information about Manager web application, and specifically its web interface. The Server Status link shows the Tomcat status page, as you’ll see later in this chapter. Let’s now explore the List Applications link in the Manager section.
Listing Deployed Web Applications
The List Application link performs the list command on the Tomcat instance. The command results in a list of all web applications currently deployed on the server. The list command is the invoked by default when using the web interface of the Tomcat Manager. So, when we loaded the Tomcat Manager’s home page, we actually invoked list command. If you click the List Applications link, you will actually be invoking list command, resulting in the same page being reloaded in the browser. The message box will contain message the message “OK” to notify you that the list command has been invoked successfully.
You can see the result of the list command in the section Applications, which is just below the four links in the Manager section. All web applications shipped with Tomcat are in the list by default, including the Examples web application, which we used before, and the Manager web application – the one we are using to see this information. For each web application deployed to Tomcat, you can see its context path in the first column. The next two columns show the version and the display name of the web application. The Running column indicates whether it is running. The Sessions column shows the number of active sessions for the web application, so you can see how many users are currently accessing the application. Clicking the number in the Sessions column gives you more information about the specific application’s sessions, which we will see in more detail later in this chapter. Finally, the Commands column shows all the commands you can perform on each single web application – all of which will be covered in more detail later in this chapter.
Below the Applications list, you’ll see deploy box, with the HTML form for invoking the deploy command.
Now that we have access to the home page of the Manager web application, you can begin looking at the functionality that’s associated with the Manager web application, which currently has the following available commands:
- List web application currently deploy on the server with the
listcommand, as we’ve seen in this section - Check server status, using the
statuscommand - Deploy new web application to the Tomcat, using the
deploycommand - Reload selected web application, using the
reloadcommand - Check server sessions for each web application with the
sessionscommand - Start web application, using the
startcommand - Stop running web application, using the
stopcommand - Remove the web application from the server, using the
removecommand
We will discuss each of these commands in relation to our sample web application packaged in the apress.war file, which was created in Chapter 2. All commands will be performed from your browser with just a few mouse clicks, using the web interface of the Manager web application.
![]() Note Before you begin using these commands, make sure you have backed up and removed the /apress web application from your current Tomcat installation.
Note Before you begin using these commands, make sure you have backed up and removed the /apress web application from your current Tomcat installation.
Checking Server Status
The first component of the Manager web application we’re going to use is the server status. To access the Apache Tomcat status, click on the Server Status link in the top right area of the Manager web application’s home page. Or, you can enter the following URL to your browser: http://localhost:8080/manager/status. You will see the Apache Tomcat Status page. Figure 4-4 shows how the status page looks in the browser.

Figure 4-4. The Apache Tomcat Server Status page
On the Server Status page, you can see details about your operating system (the name, architecture, and version), your Java virtual machine (vendor and version), and the version of Apache Tomcat you are running.
In addition, at the bottom of the screen, you can see the JVM memory status and the status of AJP and HTTP Tomcat connectors – thread status, and status of active requests.
Deploying a New Web Application
The first command we are going to use is deploy, which is used to deploy new web applications. To deploy a new web application using the web interface, you will use the HTML form of the Manager’s home page. There are two HTML forms available: one to deploy a web application for a file or directory already available on the server where the Tomcat instance is running, and one that allows you to deploy a web application from the WAR file located on your local machine.
Figure 4-5 shows the Deploy section of the home page, with the deployment HTML forms.

Figure 4-5. Using the HTML form to invoke the deploy command in the Manager web application
The most common usage of the Manager web application for deployment to Tomcat is the remote deployment – where you have the web application packaged in the WAR file on your local machine, and you want to deploy it to a remote Tomcat server. To achieve that, we will use second form in the Deploy section of the Manager web application home page, titled “WAR file to deploy” and shown in Figure 4-5. All you have to do is to select the file located on your disk’s file system (by clicking on the “Browse…” button), and click the Deploy button below the file selection field. The web application will be deployed under a context path matching the name of the WAR file, excluding the .war extension – in our case, the context path will be /apress, as we will be uploading apress.war file.
![]() Note The
Note The deploy command takes the referenced WAR file and extracts it into the /webapps directory during this process.
When the command completes, the Manager web application web page will be reloaded in the browser, and you will see a success message (simply saying “OK”) in the message box. In addition, you will see newly a deployed application listed along with the other applications deployed on the Tomcat server. Figure 4-6 shows the web page after the successful deployment of the new application.

Figure 4-6. After the successful remote deployment, the page shows a success message and lists the new web application.
![]() Note The web application is automatically started after deployment, as you can see in the Running column, which displays
Note The web application is automatically started after deployment, as you can see in the Running column, which displays true for the /apress application.
You can also use the Manager web application to deploy a web application located on the server’s file system. This is done using the top form in the Deploy section shown in the Figure 4-5. The form has three input fields: Context Path, “XML configuration file URL,” and “WAR or directory URL.” The first parameter, Context Path, is, as its name suggests, a context path that the web application will be deployed to. We are going to deploy our web application under the /apress context path, so we enter that in the Context Path text input field in the HTML form. The Context Path field is mandatory when deploying a web application from the local path. You should populate one of the other two parameters, depending of the location of the web application you’re deploying. If you know the location of the WAR file, or the directory of the web application on the local file system, you should specify it in the “WAR or directory URL” field – and leave the “XML configuration URL” field empty. On the other hand, if you have a deployment descriptor XML file, enter its file location in the “XML Configuration file URL” field, and leave the field for the WAR file location empty. When you have entered all the details, you can submit the form by clicking the Deploy button.
![]() Note You’ll have to upload the web application files (either the
Note You’ll have to upload the web application files (either the WAR file or the exploded directory) to the machine where the Tomcat is running – for example via FTP – before you can deploy it using this approach.
If the deployment was successful, you will see the screen shown in Figure 4-6, and the new application will be listed along with the other deployed applications.
If, for some reason, an error occurs during the deployment, the error message explaining the problem will be displayed in the message box as a response. Table 4-3 shows the common error messages received during deployment, and their causes.
Table 4-3. Common Error Messages That Can Occur During Deployment
| Response Message | Cause |
| Application already exists at path /apress. | Context path specified is already used on the server. |
| Document base does not exist or is not a readable directory. | The value passed as a value of war parameter is incorrect – it must be either unpacked web application directory, or an absolute path to the WAR file. |
| Invalid application URL was specified. | The value passed as a value of war parameter is incorrect – it must start with file: and end with .war in case of absolute war path. |
| Invalid context path was specified. | The value of path parameter is wrong – context path must start with slash /. |
| Encountered exception. | An exception was thrown while deploying application. Check the Tomcat logs for details. |
Reloading an Existing Web Application
The reload command is used to reload all of the web components, including servlet, JSPs, and dependent classes, associated with the named web application. You can invoke reload command by clicking the Reload button for the selected web application, which is located in the Commands column in the Applications list (see Figure 4-3). If any of the files of the selected web application have changed on the server, the changes will be reloaded after you invoke this command.
Once all of the components have been reloaded, the Manager web application responds with a page similar to that shown in Figure 4-7.

Figure 4-7. After invoking the reload command, the Manager web application’s home page is reloaded in the browser.
As you can see, the response message is displayed in the message box. The response has the usual success message (“OK”), but also contains information about the reloaded web application – more specifically, its context path.
Sessions
The HTTP protocol that we use to communicate with server web applications is stateless. This means that the protocol treats each request independently, with no information about previous requests from the same user for example, or from the same Internet address. All that is important is the current request, and the server’s response to it. A servlet container, such as Tomcat, uses user sessions to maintain the state between the requests. Tomcat associates each client with the session id, and then maintains the stateful information in the session. Every request contains the session id and, when it reaches the server, the session with that id is loaded and attached to request. Usually, session information contains information such as whether user has already logged in, so we don’t need to ask for username and password on every request. The shopping cart is usually stored in the session as well, so we can browse the online shop without losing the data we added to the cart previously. We will cover sessions in more depth in Chapter 5.
You can see the number of associated user sessions for each web application on the Manager’s home page. This information is presented as the number in the Sessions column of the list of deployed applications. You should see value 1 in the Sessions column of the Manager web application (context path /manager) – this is actually your session, as you’re accessing the Manager web application at the moment. If haven’t accessed other applications recently, the value of the Sessions column for other listed applications will be zero.
If you do the same from another computer (or from a different browser on the same computer – say from Firefox and Internet Explorer) and then reload the Manager’s home page again, the number of sessions displayed for the Manager web application will now be 2.
Sessions are stored for a limited amount of time, configurable in your web application’s web.xml file. The default value is 30 minutes. This means that if a user does not access web application for 30 minutes, the session information associated with that visit will be cleared (for example, the user will need to log in to the web site again). You can invalidate all sessions for a particular web application by clicking the “Expire sessions” button in the Commands column. You can also filter the session to invalidate, and invalidate only sessions that are inactive for the selected number of minutes, by entering the desired value to the text box next to the “Expire sessions” button.
Finally, you can get detailed information about each session for a selected web application by clicking on the number of sessions in the Sessions column. The number is actually a link, and by clicking on it, you will be presented with the detailed session information page. Figure 4-8 shows detailed information about the Manager web application sessions.
Figure 4-8. Detailed session information page for Manager web application displayed in the browser
The page shows a list of all active sessions, with basic information about each session. Table 4-4 explains the columns displayed on this page.
Table 4-4. The Session Information Page Columns on the Details Session Page
| Column | Description |
| Session Id | The identifier for the session – a string that is unique for the Tomcat instance. |
| Type | Used in a clustered environment where the same session is available on multiple Tomcat instances. In the instance where the session is created, it is considered as primary. In single instance environments, like our examples, all sessions will be primary. |
| Guessed Locale | User locale, if it can be determined from the request attributes. |
| Guessed Username | Username of the logged-in user (if any), if it can be determined from the request. |
| Creation Time | The date and time when the session is created. |
| Last Accessed Time | The date and time the session was accessed last. |
| Used Time | The amount of time between the session’s creation and its last use. |
| Inactive | The time passed since the session has been last accessed. |
| TTL | Time To Live – the time left until the session is invalidated (if it stays inactive). |
You can invalidate a single session by clicking on its Session Id link. If you want to invalidate multiple sessions, you can check the checkboxes for the sessions you want to invalidate and click the “Invalidate selected sessions” button.
Stop
The stop command does just what you think it does: it stops the named web application. When the web application is stopped, it cannot be accessed anymore. You can stop a web application by clicking the Stop button in the Commands column for the selected web application. Once you click the button, the Manager’s home page will be reloaded and, if the command was executed successfully, you should see a page similar that shown in Figure 4-9. We stopped our /apress web application in this example.

Figure 4-9. The Manager web application after the selected web application is stopped
You can see the response message displayed in the usual message box. In addition, the status of the /apress application now shows that it has stopped – you can see the value false in the Running column. If you try to access our sample application by entering http://localhost:8080/apress/index.jsp URL, you will see Tomcat’s error page with HTML status 404 – Not Found in the browser. Figure 4-10 shows the error page.
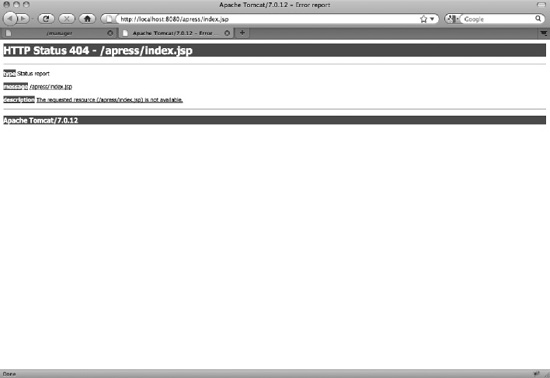
Figure 4-10. 404 – Not Found error page when trying to access stopped web application
In order to have our application up and running, we have to start it again.
Start
The start command also does just what you’d expect: it starts a named web application that has been previously stopped. All you have to do is to click the Start button (in the Commands column) for the previously stopped web application.
![]() Note The buttons for the commands that cannot be performed for each application will be disabled by the Manager web application. So, you won’t be able to try to start the application that is already started, or stop the application that is not running.
Note The buttons for the commands that cannot be performed for each application will be disabled by the Manager web application. So, you won’t be able to try to start the application that is already started, or stop the application that is not running.
Once all of the components have been reloaded, the Manager web application’s home page reloads with the following response text in the message box: OK - Started application at context path /apress. The status of the web applications will be changed again: the Running column will display value true.
If you try to access our sample application again, you will see the welcome page, meaning that our web application is running and accepting requests again.
Undeploy
The last command that you will use, appropriately enough, is the undeploy command. It is used to stop and remove the named web application from the Tomcat server. It does not remove the directories and files associated with the web application, however; it simply removes the application from the internally maintained list of deployed applications.
You can undeploy application by clicking on the Undeploy button for the selected web application. Once all of the components have been removed, the Manager web application responds with a page similar to that shown in Figure 4-11, with expected text message: OK - Undeployed application at context path /apress.
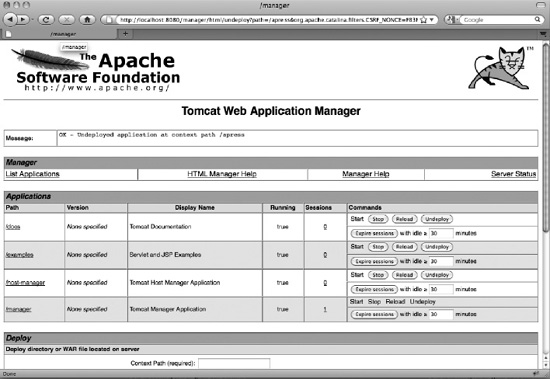
Figure 4-11. After you undeployed a web application, the Manager’s home page is reloaded with an updated list of deployed applications.
You will notice that the list of applications of the Manager’s home page does not show the undeployed web application anymore.
Using the web interface of the Manager web application is an easy and convenient way to perform basic administration tasks for web applications deployed to Tomcat server. However, the administration tasks often need to be performed by other computers and not humans, using executable scripts. For that reason, Tomcat Manager web application is accessible using the text-based interface, in addition to the HTML web interface described in this section. In the next section, we are going to show you how you can use Ant scripts to invoke the Tomcat Manager commands, using this text-based interface.
Using a Text-Based Interface to Access Manager Web Application
Manager’s text interface can be used directly from the browser by typing the commands in the form of URLs and getting the text response directly back to the browser. However, in practice, text-based access to the Tomcat’s Manager web application is usually done using Ant scripts.
Ant is a popular building tool for Java, and ships with a number of Tasks you can use to control different stages of Java project builds. These tasks include compiling Java classes, running unit tests, packaging, copying artifacts to target directories, and many more.
In addition to being a useful build tool with its out-of-the-box Tasks, Ant is extremely flexible and extensible. You can easily implement your own Tasks (in Java) to satisfy specific requirements of your build process. A lot of other popular libraries and frameworks supply their own Ant Tasks libraries, to help building projects using that particular product. Apache Tomcat supplies its own Ant Tasks that you can use to access Manager web application from your Ant command line scripts.
![]() Note Ant is an open source project, and it’s part of Apache’s open source community. You can find out more about Apache Ant on its project’s home page at
Note Ant is an open source project, and it’s part of Apache’s open source community. You can find out more about Apache Ant on its project’s home page at http://ant.apache.org.
Installing Ant
We’ll start with quick instructions for how to install Apache Ant to your computer. The first step is to download the Ant binary distribution from the project’s web site (http://ant.apache.org/bindownload.cgi). Ant is distributed as a platform-independent archive (ZIP or TGZ file), so you will download same version of the file regardless of your operating system. The latest version of Apache Ant at the time of writing is 1.8.X. After downloading the ZIP file, unpack it to the location of your choice; this will be the ANT_HOME directory of your ANT installation. For the purposes of this example, we will unpack the archive to the /opt/ant directory.
To complete the installation, you’ll need to set environment variables for the ANT_HOME directory, and add ANT_HOME/bin to the global PATH environment variable so you can invoke Ant commands regardless of the working directory you’re in. You can do this in the same way we set Tomcat’s environment variables in the Tomcat installation section of Chapter 1.
And that’s it! To test the installation open your command prompt window (on Windows) or terminal window (on Linux), type ant and press enter. If everything is working correctly, you should see following message:
ant

Buildfile: build.xml does not exist!

Build failed
This message means that the ant command has been executed, and tried to build the project in the current directory. We haven’t configured any project, so we see the error message from Ant.
If Ant wasn’t installed correctly, you would see a “Command not found” error when trying to execute the ant command.
Now that we have Ant installed and ready to use, we need to configure Tomcat’s Ant tasks for accessing Manager web application.
Configuring Tomcat’s Ant Tasks
Tomcat’s Ant tasks are shipped with Tomcat 7, in a single library catalina-ant.jar. You can find this library in the CATALINA_HOME/lib directory of your Tomcat 7 installation. In order to use Ant tasks from the catalina-ant.jar library, you have to copy it to the Ant’s libraries directory, located in the ANT_HOME/lib directory.
![]() Note The Tomcat’s Ant tasks classes need to be available on the Ant’s classpath during execution, so without copying the
Note The Tomcat’s Ant tasks classes need to be available on the Ant’s classpath during execution, so without copying the catalina-ant.jar file to ANT_HOME/lib directory (which is on Ant’s classpath), you won’t be able to execute Tomcat’s Ant tasks to invoke Manager web application’s commands.
To build any Java project using Ant, you have to write build.xml file. This file contains all the instructions for Ant about the structure of your project, and about the tasks it needs to perform on it. You should place the build.xml file in your projects directory and invoke Ant commands from the same directory, so Ant can locate the build.xml file.
Our project contains of one single WAR file, and for the purposes of this example, we are going to assume our project path is /apresstomcat7/project/chapter4 – the code accompanying this book has the example on this path.
The first step is to create build.xml in this directory, and configure Tomcat’s tasks in that file. You can use any text editor you like, or an IDE, like Eclipse, to create this file. Listing 4-2 shows how the build.xml file should look.
Listing 4-2. Ant’s Build File with Tomcat’s Ant Tasks Definitions
<project name="Apress Tomcat 7 Sample Web Application" basedir=".">                  #1

  <property name="managerUrl"

            value="http://localhost:8080/manager/text"/>                             #2

  <property name="username" value="managerScript"/>                                  #3

  <property name="password" value="abc123"/>                                         #4


  <property name="contextPath"     value="/apress"/>                                 #5

  <property name="warFileName"     value="apress.war"/>                              #6


  <!-- Configure the custom Ant tasks for the Manager application -->                #7

  <taskdef name="deploy"    classname="org.apache.catalina.ant.DeployTask"/>
  <taskdef name="list"      classname="org.apache.catalina.ant.ListTask"/>

  <taskdef name="reload"    classname="org.apache.catalina.ant.ReloadTask"/>

  <taskdef name="start"     classname="org.apache.catalina.ant.StartTask"/>

  <taskdef name="stop"      classname="org.apache.catalina.ant.StopTask"/>

  <taskdef name="undeploy"  classname="org.apache.catalina.ant.UndeployTask"/>


  <target name="list" description="List deployed web applications">                  #8

    <list url="${managerUrl}"

          username="${username}" password="${password}"/>                            #9

  </target>


  <target name="deploy" description="Install web application">                      #10

    <deploy url="${managerUrl}" username="${username}" password="${password}"

            path="${contextPath}" war="file:${basedir}/${warFileName } "/>          #11

  </target>


  <target name="reload" description="Reload web application">

    <reload  url="${managerUrl}" username="${username}" password="${password}"

            path="${contextPath}"/>

  </target>


  <target name="undeploy" description="Remove web application">

    <undeploy url="${managerUrl}"

              username="${username}" password="${password}"

            path="${contextPath}"/>

  </target>

<!— The rest of the targets is omitted for clarity


</project>
The build.xml file’s root element is <project>, where we specify the project’s name and the base directory (#1). Next, we configure a few properties relating to the Tomcat’s instance and the Manager web application we are going to access. The first property we set is the managerUrl, where the Manager web application is running (#2). We’re running the Tomcat instance locally for this example, so the URL points to the localhost. Note that the managerUrl points to the text-based interface of the Manager web application: http://localhost:8080/manager/text. Next, we configure the username and password of the user we’re going to use to access Manager web application. We configured user managerGui, with password abc123, to have access to text-based interface (see Table 4-2), so we configure username and password to these values (#3 and #4 in Listing 4-2).
Finally, we configure the properties for the web application we’re going to deploy using this Ant script – the context path we’re going to deploy it to (#5), and the name of the packaged web application’s WAR file (#6).
The properties we defined can now be used instead of their values for the rest of the build.xml file, making the build script easier to write, and also easier to read and maintain later.
Next step is to configure the Tomcat tasks for accessing Manager web application (#7). For each task we are going to use, we need to add <taskdef> element, specifying the task name, and the class where the task is implemented. You can choose your own names for each task, but for this example our tasks’ names match the commands that they invoke. The task classes specified are located in the catalina-ant.jar library. Although catalina-ant.jar library contains implementations for every command available, you will only be able to use those commands that you defined in the <taskdef> elements in the build.xml file.
The Ant command, ant, when executed from the command line, actually invokes targets defined in the build.xml file. Each target performs specific task, and we are going to create Ant target for each of the tasks we defined previously.
Target is defined using <target> XML element, and needs only the name attribute, and optionally the description. The first target we’re going to configure is the list target (#8). Target by itself doesn’t do anything; it is the elements that are enclosed within the <target> element that do the actual work. For this target, we’re going to invoke the list command using the list task defined previously (#9). As you can see, the task we defined using <taskdef> can now be used as an XML element directly. We specify three attributes: the URL of the Manager web application, and the username and password we use to access it. All three attributes are specified using the properties we defined at the top of the build.xml file.
The next target we’re going to configure is the deploy target (#10). It encloses the deploy task, which in turn deploys a new application to the Tomcat server (#11). The <deploy> element requires more attributes than we used for listing web applications. In addition to the Manager web application’s URL, username, and password, it requires the context path under which we want to deploy our web application, and the path to the WAR file to deploy. We specify these two attributes using the properties we defined earlier in the build.xml file (#5 and #6).
You can configure the rest of the tasks on your own for practice; they are all configured in exactly the same way. The code that accompanies this book contains the configuration for all the tasks as well.
Now we have all the tasks configured, and we can run them from the command line.
Running Ant Scripts
All Ant tasks are executed by running the ant command from the projects base directory, and specifying one or more targets you want executed.
So, to list all the applications deployed on the configured Tomcat instance, go to the project’s directory and type ant list. This is the text response you will see in your terminal window:
apress-apache-tomcat7/project/chapter4$ ant list

Buildfile: /Users/aleksav/Sandbox/apress-apache-tomcat7/project/chapter4/build.xml


list:

     [list] OK - Listed applications for virtual host localhost       #1

     [list] /manager:running:0:manager                                #2

     [list] /docs:running:0:docs

     [list] /examples:running:0:examples

     [list] /host-manager:running:0:host-manager


BUILD SUCCESSFUL

Total time: 0 seconds
The information returned is the same as we saw when using HTML web interface, only in text format. The “OK” success message is displayed (#1), followed by all applications deployed on the Tomcat instance. Instead of a table and columns, the text response contains the usual information delimited with the colon (#2). The part until the first colon is the context path of the web application (/manager), followed by the status (running), followed by the number of active sessions, and finally followed by the application name. The same format is used for all listed application.
Let’s now deploy our apress.war application using Ant. All you have to do is execute the deploy target from our build script, by running following command: ant deploy. The result of this invocation is the same status message that was displayed when using web interface earlier in this chapter. This is the success message you should see in your terminal window:
Buildfile: /Users/aleksav/Sandbox/apress-apache-tomcat7/project/chapter4/build.xml

Trying to override old definition of datatype resources


deploy:

   [deploy] OK - Deployed application at context path /apress


BUILD SUCCESSFUL

Total time: 2 seconds
In case of any errors during deployment, you will see one of the messages from Table 4-3 instead of the success message.
The same approach applies for executing any other command – you can play with those yourself. In addition, you can execute multiple ant targets at the same time. For example, by running the ant undeploy list, the application will be undeployed first using undeploy task, then the list command will be executed – so you can quickly confirm that the application is not listed anymore. The usual scenario in automated scripts that are part of continuous integration is to undeploy the old version of the web application, build the WAR file, deploy it to Tomcat (using deploy task), and finally run automated test scripts against the deployed web application. By specifying all tasks to be executed, the entire process executed as a single ant command, making it repeatable and easy to automate.
As you can see, using Ant scripts to access the text-based interface of the Manager web application is not as pretty as the HTML web interface, but it’s more convenient to execute as part of the project build, and to automate as part of the bigger build and test scripts.
Summary
In this chapter, we covered using the Tomcat Manager web application to install and manage our own web application. We explained the role of the Manager web application and configured security privileges so we are able to access it. We discussed how to execute each of the available commands using Manager web application’s HTML interface. Finally, we used Tomcat’s Ant tasks to perform all available commands from the command line. In the next chapter, we cover HTTP sessions and their persistence in Tomcat.