C H A P T E R 9
Embedding Tomcat
Previously, we learned how to install and use standalone Apache Tomcat server, and discussed some of Tomcat’s advanced features. In this chapter, we’ll see how we can use all of the Apache Tomcat features in another, independent Java application, by embedding Tomcat.
Testing Tomcat web applications automatically in-container has always been difficult, because the server where the web application is to be deployed must be installed and configured on the machine where the tests are running. When you needed to run a server from your unit and integration tests, usually the Jetty server was the only option – although your application runs in Tomcat in the production environment. With version 7, Tomcat now supports embedding, so you can instantiate Tomcat from your code, deploy the web application, run the tests, and, finally, shut down Tomcat gracefully. Tomcat does not have to be previously installed on the computer where the tests are running – it will be started using the libraries that are supplied with the code.
In another scenario, you may need a servlet container to run within a standalone, desktop GUI Java application – so you can run a web application that should only be available on a user’s local machine, and not publicly on the Internet. You don’t need to install the servlet container separately from your standalone application – you can embed Tomcat within the Java application instead, and ship it as one integral piece of software.
These are common scenarios for using embedded Apache Tomcat. In this chapter, we will
- discuss the steps to build an embedded Tomcat application;
- create a sample application that contains an embedded version of Tomcat; and
- demonstrate how to use embedded Tomcat in a JUnit test.
Requirements for Embedding Tomcat
To create a Java application that contains an embedded version of the Tomcat server, we will first leverage Tomcat classes that have been developed to ease this type of integration.
Apache Tomcat 7 has a special version for embedding purposes. This can be downloaded from the main Apache Tomcat project downloads page at (http://tomcat.apache.org/download-70.cgi), in the Embedded section. When you download and unpack the file, you will find it contains a number of JAR files that are used as library files for Java projects with embedded Tomcat. Table 9-1 describes the contents these JAR files.

The main classes required for embedding Apache Tomcat 7 within your Java application are found in tomcat-embed-core.jar. This is the main library you will need to include in order to use it. It contains implementation of all the architectural concepts of Apache Tomcat that we discussed in Chapter 1, such as Server, Engine, Service, Connector, and Host. The main class we want to use is org.apache.catalina.startup.Tomcat, which provides an embedded server wrapper and can be found in the tomcat-embed-core.jar.
In addition, you will need to include at least one logging integration library, to enable logging of your embedded Tomcat’s instance. As with Tomcat’s standalone distribution, two options are available: Tomcat’s own JULI logging mechanism, or integration with the popular log4j open-source logging project. We will use log4j integration in our example, so log4j library will have to be included in our classpath as well.
Finally, we will want our embedded Tomcat to serve JSP classes, just like standalone Tomcat. For that, we will need to include the Jasper engine in our project. The Jasper engine can be found in the tomcat-embed-jasper.jar library. This jar file contains JSP API interfaces and classes as well, so there is no need to include jsp-api.jar library separately. In addition to JSP API, Tomcat’s Jasper engine requires a separate JSP compiler – a library that can compile JSP files (*.jsp) to standard Java binary compiled files (*.class) that can be executed by JVM. Jasper supports two JSP compiler implementations, both of them open source: Eclipse implementation and Apache Ant implementation. The Eclipse implementation is shipped with the Apache Tomcat 7 Embedded distribution (ecj-3.6.2.jar), and we will use that in our example.
We won’t be demonstrating JDBC integration with embedded Tomcat, so tomcat-dbcp.jar will not be required for the sample in this chapter. If you are using JDBC code with embedded Tomcat, make sure to include this library to your project’s classpath. JDBC integration with Tomcat will be covered in more detail in Chapter 11, where we will go through a full-fledged web application deployed on Tomcat, and in Chapter 13, where we will discuss JDBC in the context of JNDI integration.
![]() Note Table 9-1 lists all the Jar dependencies you may need for any scenario for embedding Tomcat. Make sure the libraries from Table 9-1 are present in your project’s classpath.
Note Table 9-1 lists all the Jar dependencies you may need for any scenario for embedding Tomcat. Make sure the libraries from Table 9-1 are present in your project’s classpath.
Embedded Tomcat Java Components
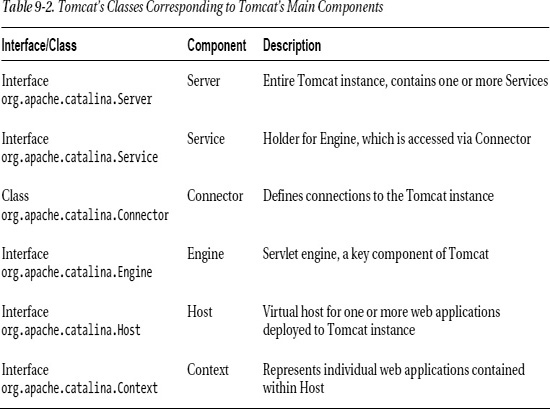
Recall from Chapter 1 that Tomcat can be subdivided into a set of containers, each having their own purpose. These containers are by default configured using the server.xml file. When embedding a version of Tomcat, you won’t have this file available, and so you need to assemble instances of these containers programmatically. The Tomcat embedded distribution ships with core interfaces that enable you to build whatever combination of these components you require. Table 9-2 lists the main classes that correspond to Tomcat’s architectural components. All these classes can be found in the tomcat-embed-core.jar library of the embedded Tomcat distribution.
For all interfaces defined in the Tomcat API in Table 9-2, Tomcat provides one or more implementations that you can use directly to create your own Embedded Tomcat stack. So you have at your disposal classes like org.apache.catalina.core.StandardServer (standard implementation of the Server interface) and org.apache.catalina.core.StandardEngine (standard implementation of Tomcat’s servlet engine). These standard classes are used by the standalone version of Apache Tomcat discussed in the previous chapter. By using them, you can be sure that your embedded Tomcat will behave in the same way as the standalone version. However, you are free to customize any of these implementations, or even create your own completely new implementations of the core Tomcat interfaces.
Nevertheless, this is seldom required. Most often you need to embed a single Tomcat instance, with a single Server, single Service, and single Engine to your Java application, and run one or more web applications in it. For that purpose, Tomcat’s embedded distribution comes with the convenient class org.apache.catalina.startup.Tomcat, which contains this minimal set up out of the box. All you have to do is instantiate this class, and start using embedded Tomcat server in your Java application.
If we take a look at the source code of this class, you will see that it contains all of Tomcat’s main components as properties – exactly one of each component. Listing 9-1 shows a snippet of the org.apache.catalina.startup.Tomcat class.
Listing 9-1. Source Code of the Minimal Embeddable Tomcat Instance
public class Tomcat {

    // Single engine, service, server, connector - few cases need more,

    // they can use server.xml

    protected Server server;

    protected Service service;

    protected Engine engine;

    protected Connector connector;

    protected Host host;

    protected int port = 8080;

    protected String hostname = "localhost";

    protected String basedir;
As you can see, there is exactly one server component, one service component, one engine component, one connector, and one host. In addition, the hostname and host are set to the default values "localhost" and 8080.
Implementing a Sample Application with Embedded Tomcat
Let’s now implement a sample Java application that will embed Tomcat server. We are going to start Tomcat on port 8080, and deploy an “examples” web application that comes with the standalone Tomcat distribution, but we will deploy it to embedded Tomcat instance without starting the standalone server. The “examples” web application contains both a servlet and JSP sample, so we will be able to test that both features of Tomcat work normally in the embedded instance. Listing 9-2 shows the EmbeddedTomcat class, used to demonstrate embedded Tomcat functionality.
Listing 9-2. Embedding Tomcat in a Sample Java Application
package com.apress.apachetomcat7.chapter9;


import org.apache.catalina.startup.Tomcat;

import org.apache.catalina.core.StandardServer;

import org.apache.catalina.core.AprLifecycleListener;

import org.apache.catalina.LifecycleException;

import javax.servlet.ServletException;


public class EmbeddedTomcat {


    private Tomcat tomcat;


    private void startTomcat() throws ServletException, LifecycleException {


        this.tomcat = new Tomcat();                                     #1
        this.tomcat.setPort(8080);                                      #2

        this.tomcat.setBaseDir(".");                                    #3


        // Add AprLifecycleListener

        StandardServer server = (StandardServer) this.tomcat.getServer();

        AprLifecycleListener listener = new AprLifecycleListener();

        server.addLifecycleListener(listener);                          #4


        String contextPath = "/myapp";

        String appBase = "/opt/tomcat7/webapps/examples";

        this.tomcat.addWebapp(contextPath, appBase);                    #5


        this.tomcat.start();                                            #6


}


    private void stopTomcat() throws LifecycleException {

        this.tomcat.stop();                                             #7

    }


    public static void main(String args[]) {

        try {

            EmbeddedTomcat tomcat = new EmbeddedTomcat();               #8

            tomcat.startTomcat();

            Thread.sleep(100000);

            tomcat.stopTomcat();

          } catch (Exception e) {

                e.printStackTrace();

        }

    }

}
We implemented two main server lifecycle operations as two main methods: startTomcat() and stopTomcat().
First, we instantiated the org.apache.catalina.startup.Tomcat class. That will take care of the component structure of embedded Tomcat server (#1). Next, we set port property (#2) and base directory of the embedded Tomcat (#3). Because embedded Tomcat is instantiated in memory, there is no real need for a base directory, as there is with the standalone version (called CATALINA_HOME). However, if you’re using JSPs, a temporary directory for storing compiled JSP classes is required, and it’s set relative to the base directory configured. We set it to the project’s working directory (".").
Next step is to add any required listeners to the Tomcat instance (#4). Any listeners required for any of the Tomcat’s components are configured this way programmatically. Tomcat ships with a few implementations of the LifecycleListener interface, such as ServerLifecycleListener (for initialization of MBean for JMX management), GlobalResourcesLifecycleListener (for initialization of global JNDI resources), JasperLifecycleListener (loads the Jasper JPS engine before any web application that requires it), and so forth. A full list of supported listeners and their uses can be found on Apache Tomcat’s Listeners web page (http://tomcat.apache.org/tomcat-7.0-doc/config/listeners.html).
In our example, we are adding AprLifecycleListener. Although this listener is not required for the example, we have included it here as an example of a listener configuration with embedded Tomcat. AprLifecycleListener listener checks for the presence of the Apache Portable Library (APR) on the classpath and loads it if present. APR native library is high performance library used by Apache HTTP server and adds better scalability and integration on performance capabilities to the Apache Tomcat server. This library is heavily used in Apache’s HTTP server project, and it improves Apache Tomcat’s robustness and performance, especially with connection handling and content delivery, so it can be used not only as a servlet container, but also as a capable web server.
Now that we have a configured an embedded Tomcat instance, let’s deploy a web application to it (#5). To deploy a web application to embedded Tomcat, we need two pieces of the application: the full path to the expanded web application directory (or the path to the WAR file if we use an unpacked WAR for deployment), and the context path under which our web application will live. As we mentioned before, we are going to deploy the “examples” web application that comes with the standard Tomcat distribution, so we set the application base directory to "/opt/tomcat7/webapps/examples". When we showed the JSP examples in Chapter 1, which we deployed to standalone Tomcat, we accessed the JSP Examples page with the following URL: http://localhost:8080/examples. Therefore, the context for the application was "examples". To make things more interesting, we’re going to set a custom context this time, to value "myapp". This means that, once up and running, the application will be available at a new URL: http://localhost:8080/myapp. This will allow you to programmatically change the Context under which the web application can be accessed, regardless of the name of the WAR archive or the application’s directory.
Next, we start the Tomcat instance, using Tomcat.start() method (#6).
Now we have embedded Tomcat up and running, and listening for a shutdown command. But it won’t shut down itself – that’s why we implemented stop() method (#7), which simply invokes Tomcat.stop(), which in turn issues the shutdown command that our server expects (because of previous await()).
The last thing we need to do is to wrap everything into a public static void main(…) method, which we can then run (#8). We simply instantiate our EmbeddedTomcat and start it. Then we wait for 100 seconds so we can test it, and finally we stop the server gracefully. We are using a simple main() method for demonstration only; in reality, you will probably have your main method in the desktop Java application, or even unit test, that starts and stops embedded Tomcat.
Note that you can start Tomcat server and keep it running without pausing the Thread we’re running in, like we did in our example. As a last step, after starting the server (#6), we can call the Server.await() method on the Server instance configured for the embedded Tomcat we’re using. Calling await() on the server tells Tomcat to keep running, but listen to any shutdown command issued. That way, when the shutdown command is issued (by the same or another process or thread), the server will shut down gracefully. Here is the line of code that can be added after (#6) to achieve this:
this.tomcat.getServer().await();
After running the main class, you will see familiar output, similar to the output of the started standalone Tomcat server:
Apr 10, 2011 10:07:30 PM org.apache.catalina.core.AprLifecycleListener init

INFO: The APR based Apache Tomcat Native library which allows optimal performance in production environments was not found on the java.library.path: /Applications/IntelliJ IDEA 8.1.3.app/Contents/Resources/Java:/System/Library/PrivateFrameworks/JavaApplicationLauncher.framework/Resources:.:/Library/Java/Extensions:/System/Library/Java/Extensions:/usr/lib/java

Apr 10, 2011 10:07:30 PM org.apache.coyote.AbstractProtocolHandler init

INFO: Initializing ProtocolHandler ["http-bio-8080"]

Apr 10, 2011 10:07:30 PM org.apache.catalina.core.StandardService startInternal

INFO: Starting service Tomcat

Apr 10, 2011 10:07:30 PM org.apache.catalina.core.StandardEngine startInternal

INFO: Starting Servlet Engine: Apache Tomcat/7.0.11

Apr 10, 2011 10:07:30 PM org.apache.catalina.startup.ContextConfig webConfig

INFO: No global web.xml found

Apr 10, 2011 10:07:31 PM org.apache.catalina.core.ApplicationContext log

INFO: ContextListener: contextInitialized()

Apr 10, 2011 10:07:31 PM org.apache.catalina.core.ApplicationContext log
INFO: SessionListener: contextInitialized()

Apr 10, 2011 10:07:31 PM org.apache.coyote.AbstractProtocolHandler start

INFO: Starting ProtocolHandler ["http-bio-8080"]
Now we open the browser and navigate to the “examples” web application, using the configured context “myapp”. The application loads in the browser, and you can use all servlet and JSP examples in exactly the same way as we did with standalone server in Chapter 1. Figure 9-1 shows the JSP Examples web application running in the browser, under configured context, using this URL:
http://localhost:8080/myapp.
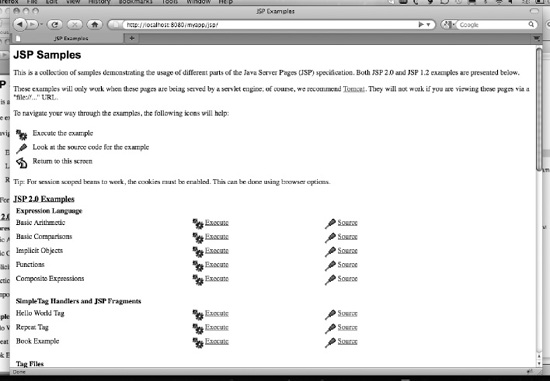
Figure 9-1. JSP Examples web application running in embedded Tomcat server
Once the configure time of 100 seconds expires, the server will shut down. This shows the console output for the embedded Tomcat shutdown process:
Apr 11, 2011 11:28:28 AM org.apache.coyote.AbstractProtocolHandler pause

INFO: Pausing ProtocolHandler ["http-bio-8080"]

Apr 11, 2011 11:28:29 AM org.apache.catalina.core.StandardService stopInternal

INFO: Stopping service Tomcat

Apr 11, 2011 11:28:29 AM org.apache.catalina.core.ApplicationContext log

INFO: SessionListener: contextDestroyed()

Apr 11, 2011 11:28:29 AM org.apache.catalina.core.ApplicationContext log
INFO: ContextListener: contextDestroyed()

Apr 11, 2011 11:28:29 AM org.apache.catalina.loader.WebappClassLoader clearReferencesThreads

Apr 11, 2011 11:28:29 AM org.apache.coyote.AbstractProtocolHandler stop

INFO: Stopping ProtocolHandler ["http-bio-8080"]
Testing Servlets with Embedded Tomcat
Testing web applications automatically has always been a challenge in web development. Traditionally, any testing of a web application would involve installing the servlet container, deploying the web application to it, and then manually clicking your way through the web application in order to test a specific scenario. These tests are usually error prone, and involve a lot of manual work – with means that are not easily repeatable and cannot be automated.
However, if you use embedded Tomcat in your tests, you can deploy your applications to Tomcat programmatically, without installing the Tomcat first. The tests implemented this way are repeatable and can be easily scripted to run automatically. In this section we will illustrate how you can use embedded Tomcat to test your servlets.
For this example, we will implement a simple servlet that calculates the square root of the number passed as request parameter, and then write the JUnit test for it, which will run the servlet inside embedded Tomcat server and check the resulting output.
Listing 9-3 shows the implementation of the SimpleServlet.
Listing 9-3. SimpleServlet Implementation That Calculates the Square Root of the Given Number
public class SimpleServlet extends HttpServlet{                         #1

    @Override

    protected void doGet(

                HttpServletRequest request,

                HttpServletResponse response

                throws ServletException, IOException {                  #2

        Double input =

            Double.parseDouble(request.getParameter("number"));         #3


        double result = Math.sqrt(input);                               #4

        String message = "The result is " + result;                     #5

        response.getOutputStream().write(message.getBytes());           #6

    }

}
The SimpleServlet extends the convenient servlet superclass javax.servlet.http.HttpServlet, available as part of the servlet API (#1). To keep things simple, we override only the doGet(…) method (#2), which means that our servlet will only respond to the GET HTTP method. First, we take the required request parameter “number,” and parse it to the double value (#3). Because all request parameters are passed as Strings from the browser, we need to create a number from it first, and then calculate the square root of the given number using java.lang.math function (#4). Next, we create the message that will be displayed in the browser, containing the result (#5). And finally, we send the message back to the browser, by writing the message to the HttpServletResponse’s output stream (#6). If the user enters the URL in the browser, with the required parameter – for example, www.myhost.com/?number=25 – the result will be displayed on the web page as text: "The result is 5.0."
Traditionally, if we wanted to check that our servlet actually worked as expected, we would need to install a servlet container (such as Tomcat server), configure and deploy the servlet, run the browser, and type the URL with the value we want to test. There are quite a few manual steps involved in that, and it would be very difficult to repeat the steps automatically in order to continually test the servlet.
That’s where the embedded Tomcat comes into play. We can write the test that will start embedded Tomcat, deploy our servlet, and then simulate a browser to test the servlet result. All that will be done programmatically, without any manual steps. It will also be possible to run a test manually and automatically, from your favorite IDE or from the command line – you can even automate it as part of the nightly build, for example.
Listing 9-4 shows the JUnit test of the SimpleServlet, using embedded Tomcat.
Listing 9-4. SimpleServletTest – JUnit Test of the Servlet Using Embedded Tomcat
public class SimpleServletTest {

    private Tomcat tomcat;


    @Before

    public void startTomcat()                                                               #1

             throws ServletException, LifecycleException {


        this.tomcat = new Tomcat();

        this.tomcat.setPort(8080);

        String tmpDirPath = System.getProperty("java.io.tmpdir");

        Context ctxt = this.tomcat.addContext("/sqrt", tmpDirPath);                         #2

        this.tomcat.addServlet(ctxt, "simpleServlet",

                               new SimpleServlet());                                        #3

        ctxt.addServletMapping("/", "simpleServlet");

        this.tomcat.start();

    }


    @Test

    public void testSuccess()                                                               #4

            throws IOException, SAXException {

        final WebClient webClient = new WebClient();

        final TextPage page = webClient.getPage("http://localhost:8080/sqrt/?number=49");   #5

        String responseText = page.getContent();                                            #6

        Assert.assertEquals("Incorrect result", "The result is 7.0", responseText);         #7

    }


    @After

    public void stopTomcat()                                                                #8

            throws LifecycleException {

        this.tomcat.stop();

    }

}
The first step is to start embedded Tomcat before the test, which is done in the startTomcat() method (#1). Note that this method is annotated with @Before annotation – this is JUnit annotation, and it marks the method that should be invoked before the test. Similar to the standalone embedded Tomcat example from the previous section, we create the Tomcat instance and set based properties, such as port number. This time, we are creating Context node manually (#2). Our servlet will be in the context path /sqrt. Next we add our servlet to the created context, with name simpleServlet (#4). And that’s it. Note that we didn’t have to write any web.xml file or any configuration whatsoever – everything is done programmatically. Of course, if you want to use ready web.xml configuration, you can, using the same syntax as the standalone example from the previous section.
Now that the embedded Tomcat is up and running and our servlet is deployed, we can write the actual test (#4). The test is annotated with standard JUnit @Test annotation.
We are using HtmlUnit library to access our servlet. HtmlUnit is a lightweight library for accessing web applications programmatically, without the browser. It emulates the browser and its common features, including GET requests using URLs, POST form submissions, JavaScript engine, and even AJAX functionality. It is often used as an extension to the JUnit testing framework for testing web applications. You can learn more about this helpful library and download it here: http://sourceforge.net/projects/htmlunit/.
![]() Note In order to use
Note In order to use HtmlUnit with these samples, make sure you have the htmlunit.jar file on your classpath.
Using HtmlUnit is very simple. Just call the getPage(…) method passing the URL you want to access (#5). Because our SimpleServlet writes the output as text, we are loading the response as text (#6), and checking if the text is coming as expected using simple assertion (#7).
Finally, we have to stop the Tomcat instance after the test is finished (#8). We are simply using the Tomcat.stop() command, as we did in the earlier example. The method that stops the Tomcat instance is annotated with the @After JUnit annotation, marking the method to be executed after the test and shutting down the Tomcat server gracefully when it is no longer needed.
Now you can run the test from your IDE, like Eclipse (right-click on the class and select Run as JUnit test). You will see Tomcat starting in the logs, and the test executing. If everything goes as expected, the test will pass – which means that the servlet worked as expected. If the test fails, you can find out why and fix the code. Then you can run it again, until it passes – in the true test-drive development fashion.
If this test is a part of the bigger build script, it can be run automatically as part of test suite – just like any other test. And you don’t need to install Tomcat or anything else before the test can be run – all you need is the actual test code, and it will work.
Summary
In this chapter, we discussed the required steps of embedding Tomcat into a Java application and the dependencies required to do that. Next, we created our own example application, embedded Tomcat in it, and ran a Java web application from the embedded Tomcat instance. Finally, we illustrated how you can use embedded Tomcat for testing servlets using JUnit.
In the next chapter, we will discuss how to store state with Tomcat using HttpSession.