C H A P T E R 11
Integrating Spring MVC Framework
Java Servlet API provides a rich and customizable framework for the development of web applications. However, in the professional Java development world, that is often not enough. While Java Servlet API provides low-level interfaces and classes for interaction with web requests, efficient programming often requires an abstraction layer on top of the core servlet components. We are going to take a look at one such framework in this chapter: Spring MVC. In this chapter we are going to
- Describe the Model-View-Controller pattern, which is the core part of Spring MVC
- Discuss the Front Controller pattern that Spring MVC also implements
- Introduce the Spring framework, of which Spring MVC is part
- Implement and configure a sample Spring MVC application, by adding model, view, and controller components
Introducing Spring MVC
Spring MVC is a Java framework for the development of Java web applications using servlets. It uses the MVC design pattern to organize the structure of web applications. It also implements the Front Controller design pattern to create configurable and easy-to-implement web components. Spring MVC is a part of the Spring framework—a popular, multi-purpose, open source Java framework.
In this section, we will discuss each of the design patterns implemented by the Spring MVC framework, and introduce the core principles of Spring framework, to which Spring MVC belongs.
Spring Framework Overview
Spring framework is a lightweight, open source Java application framework designed to enable application developers to concentrate on the functional problems at hand by providing the infrastructure, or glue-code, for Java enterprise applications. Spring is the brainchild of Rod Johnson, who first introduced in it his book Expert One-on-One J2EE Design and Development (Wrox, 2002) In the book, Johnson takes a critical look at what was, at the time, standard Java enterprise application design and development, and gives his views about how it can be improved. The framework he implements for the book was then released as the open source Spring framework, and with scores of Java professionals sharing his views, it quickly grew in popularity. Today, Spring is the Java framework of choice for enterprise application development, has had proven success in complex production environments, and is more popular and more frequently used than official Java EE components.
The core part of the Spring framework is the dependency injection container, which is the implementation of the Inversion of Control design pattern. It is designed to help developers and architects compose the complex applications from its contributing parts, or components. Using Spring, you can split your application into loosely coupled components and wire them together using Spring’s dependency-injection container, which manages all your components’ lifecycles. The application components in Spring are called beans, and they are configured using XML or Java annotations. All configured beans are instantiated and managed in the Spring container, typically called the Spring application context. When creating beans from the configuration, Spring can pass (or inject) each bean to other beans, providing dependency injection functionality.
In addition to this core functionality, Spring ships with many other components, built with the purpose of helping developers follow best-practices in architecture and implementation of Java applications; for example, database access and integration with popular Java data access frameworks, aspect-oriented programming support, Java Messaging Service (JMS) integration, the development and design of web applications using servlets and portlets, scheduling, and the like.
Spring is non-invasive, so application components managed by Spring don’t have any dependency on the Spring framework itself. Non-invasiveness is an important characteristic of the Spring framework; your Java classes do not depend on Spring-specific classes and interfaces at all. That is, if you don’t want them to—Spring has a lot of very useful and convenient components that you will actually want to use in your code, so the choice is all yours.
Spring MVC represents the part of the Spring framework that is designed to make the development of Java web applications easier. In the next section, we’re going to explore the Spring MVC framework for the development of a web application deployed on Tomcat.
MVC Pattern
At the beginning of user-oriented architecture and development, the major challenge was how to model the user-interface part of the system architecturally. The requirements were to decouple the presentation part of the application’s user-interface and the data it displays to the user. For example, different user interface components sometimes display different views of the same data (for example, HTML web pages and PDF files). In addition, the user interface is typically platform dependent, whether you consider desktop applications that are often completely different on Windows and Linux, for example, or web applications with different visual representations in a desktop browser and on a mobile device. Finally, the development of the look-and-feel aspects of the user interface is usually related to completely different skill sets from the back-end, data-centric functionalities.
MVC came to life in 1979 by Trygve Reenskaug, a computer scientist at the Oslo University in Norway. It defines three collaborating aspects of the application from the user interface perspective: model, view, and controller.
- Model represents the data and the behavior of the application’s domain model. It contains the information presented to the user. It also serves as the container for data additions or updates performed via the user interface (for example, data submitted using HTML forms in web applications).
- View component is responsible for visual display of the data. It transforms the information contained in the model to the chosen visual representation, and usually does not contain any logic. Examples of view technologies in web application development are HTML, CSS, and JavaScript. Java Server Pages can be considered view technology if they are used with MVC principles, so that they don’t have any business logic, and are used only for data display and retrieval.
- Controller is the component responsible for responding to user actions and, based on the input, manipulates and queries the model, and renders the view with data from the model. In a Java web application sense, servlets can be considered as controller components: when a user clicks on a link or presses the submit button, the action invokes the servlet, which performs the operation on the model (loads or updates data in the database, for example), and renders the HTML view in the user’s browser.
![]() Note It is important to follow good practices when implementing the MVC pattern in your web applications. The business logic should be encapsulated within the controller (or, to be more precise, delegated to the transactional service layer from the controller), the model should only contain data, and the view should only have visual markup, without any logic. In Java web application development, this means that JSP pages should only be used for data rendering and collection, without any embedded Java code. All logic, such as database queries and updates, should be invoked from the servlet (Controller) code or its delegating components.
Note It is important to follow good practices when implementing the MVC pattern in your web applications. The business logic should be encapsulated within the controller (or, to be more precise, delegated to the transactional service layer from the controller), the model should only contain data, and the view should only have visual markup, without any logic. In Java web application development, this means that JSP pages should only be used for data rendering and collection, without any embedded Java code. All logic, such as database queries and updates, should be invoked from the servlet (Controller) code or its delegating components.
Figure 11-1 illustrates the architecture of the MVC pattern.

Figure 11-1. Model-View-Controller pattern
There are two main benefits of using the MVC pattern in user-interface development:
- With the view decoupled from the model, it becomes easy to maintain multiple views while keeping the model unchanged. In web application design, for example, using the MVC pattern, you are able to develop web applications that can be accessed on standard desktop browsers as well as multiple mobile devices.
- Adapting to change in application design is easy with MVC. You can change the presentation of the data to the user without changing the way your application responds to user actions or the data itself (for example, you can change the complete look and feel of the web page by changing HTML and CSS code, without making any changes to servlets or to the database schema). In addition, you can make the changes to the model and controller components without affecting the application visibility to the user.
In the Spring MVC framework, the controller component is represented with the Controller interface, the model is represented as a Java Map containing the collection of key-value pairs, where values are objects that are stored in the model, which are then accessed in the view using keys. Finally, views can be configured to be any web technology you like—HTML, JSP, Freemarker, and so on.
In addition to the MVC pattern, Spring MVC employs another important architectural software pattern: the Front Controller pattern.
Front Controller Pattern
The Front Controller pattern is a popular pattern in web applications architecture. In addition to Spring MVC, many other web frameworks implement this pattern, including Ruby on Rails and PHP frameworks such as Cake PHP and Drupal. Servlet filters are implementations of the Front Controller pattern as well.
The main principle of the Front Controller pattern is that all web requests to web applications are handled by a single entry point. This central entry point is called the front controller, and its role is to route requests to the specific web application component that should handle it. After a specific handler has completed processing the request, the control is returned to the front controller, which is responsible for sending the web response back to the calling client. In addition to routing requests to specialized handlers, front controller is responsible for all common web application functionalities: session handling, caching, and filtering the requests for example.
Figure 11-2 illustrates the Front Controller pattern architecture.
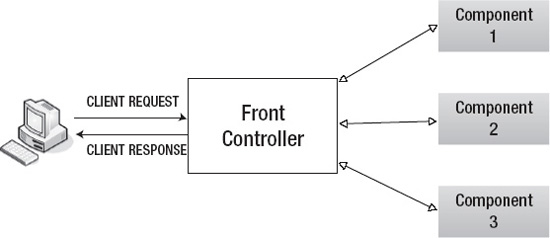
Figure 11-2. Architecture of the Front Controller pattern
In the case of Spring MVC framework, this central entry point is the Java servlet implemented in class org.springframework.web.servlet.DispatcherServlet.
In the next section, we are going to use the Spring MVC framework to develop and configure a sample web application.
Spring MVC Web Applications
Spring MVC framework uses proven MVC and Front Controller patterns to guide developers to use best practices in web application development. Spring MVC contains many components that are configured to work together in order to create a working web applications. Figure 11-3 illustrates the inner workings of the Spring MVC application.
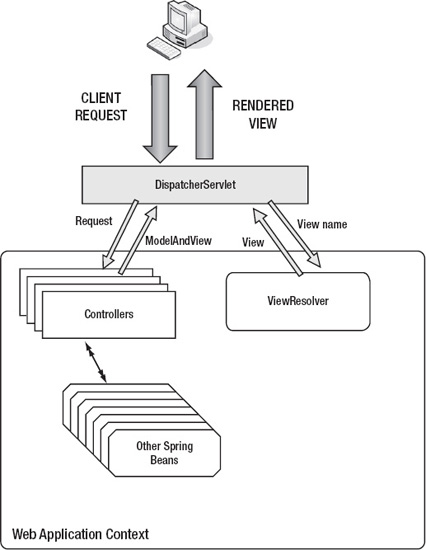
Figure 11-3. Spring MVC application architecture
DispatcherServlet (the front controller in Spring MVC implementation) processes all incoming client requests. It then delegates each request for handling by the Spring’s Controller component (or handler, as it’s sometimes called), based on the handler mapping. During request processing, a controller can collaborate with any of the configured Spring beans. After finishing with request processing, a controller returns an instance of ModelAndView to the DispatcherServlet. ModelAndView is the spring abstraction of the model and view components in the MVC pattern, which contains the data (model) and the view template. DispatcherServlet then uses ViewResolver Spring component to load the view template and render it using the model data—the rendered view is finally sent to the client (as an HTML page in the browser, for example). In this section, we are going to learn how to use each of these Spring components.
Most of the components are readily available in Spring MVC, and all we need to do in order to use them is to add configuration to our web application. The key parts that need to be implemented by developers are views and controllers. Spring MVC supports almost all view technologies available in Java: JSP, Freemarker, Velocity, and Flex. In this section, we are going to use JSPs as our view technology. The controllers in Spring MVC are implemented as Plain Old Java Objects (POJOs), with Spring-specific annotations.
In the following sections, we are going to guide you through configuration and basic implementation of a Spring MVC web application. Let’s start by configuring the DispatcherServlet.
Configuring DispatcherServlet
The DispatcherServlet is the only servlet we are going to configure for the Spring MVC web application. It’s configured like any other servlet, in web.xml file. Listing 11-1 shows the example configuration of DispatcherServlet.
Listing 11-1. Spring MVC’s DispatcherServlet Is Configured as Front Controller in web.xml
<?xml version="1.0" encoding="ISO-8859-1"?>

<web-app xmlns="http://java.sun.com/xml/ns/javaee"

         xmlns:xsi="http://www.w3.org/2001/XMLSchema-instance"

         xsi:schemaLocation="http://java.sun.com/xml/ns/javaee

                      http://java.sun.com/xml/ns/javaee/web-app_3_0.xsd" version="3.0">


    <display-name>Chapter 11</display-name>

    <description>Spring MVC Demo</description>


    <servlet>

        <servlet-name>chapter11</servlet-name>

        <servlet-class

           org.springframework.web.servlet.DispatcherServlet                     #1

        </servlet-class>

        <load-on-startup>1</load-on-startup>

    </servlet>


    <servlet-mapping>

        <servlet-name>chapter11</servlet-name>

        <url-pattern>*.html</url-pattern>                                        #2

    </servlet-mapping>


</web-app>
There is nothing new in this configuration: we configured the servlet with the name chapter11 using the <servlet> element, specifying the org.springframework.web.servlet.DispatcherServlet as servlet class (#1). We then mapped this servlet to all URLs with .html extensions (#2).
Let’s now implement and configure all the components used in the MVC pattern: model, view, and controller. We’re going to start with the view and its model representation.
Adding Views
Let’s start by adding a view component to our Spring MVC example. We will use a standard JSP file as a view in our application, which will display the message to the user. The message itself will be our model from the Model-View-Controller pattern. The message is the information that is displayed in the view—it’s not hard-coded in the view itself, but rather passed to the view from the controller component. Listing 11-2 shows the JSP file implementation.
Listing 11-2. View Implementation Using JSP
<html>

  <head>

   <title>Spring MVC Demo</title>

   <meta http-equiv="Content-Type" content="text/html; charset=UTF-8">

  </head>

  <body>

    <div class="content">

      <b>

          ${message}                                  #1

       </b>

    </div>

  </body>

</html>
We are displaying the message in a JSP file using JSP Expression Language (EL), which we introduced in Chapter 3. We used the key message to reference the message object from the model (#1); this object will need to be added to the model by the controller.
We are going to save this JSP file as index.jsp in the /WEB-INF/views/ directory.
Now that we have the view to display the data from the model, we need to implement the controller component.
Implementing Controllers
The controller component from the MVC pattern is called just like that in the Spring MVC: controller. It’s a POJO implementation, which does not extend any other class or implement any interface from the framework. To mark the Java class as controller, all we have to do is annotate it with Spring’s @Controller annotation. Let’s take a look at our HelloWorldController implementation in Listing 11-3.
Listing 11-3. Controller Implementation That Connects Model and View Components
package com.appress.apachetomcat7.chapter11;


import org.springframework.stereotype.Controller;

import org.springframework.web.bind.annotation.RequestMapping;

import org.springframework.web.servlet.ModelAndView;


import javax.servlet.http.HttpServlet;

import java.util.HashMap;

import java.util.Map;
@Controller                                                                     #1

public class HelloWorldController{                                              #2


    @RequestMapping(value = "/helloWorld.html",

                        method = RequestMethod.GET                              #3

    public ModelAndView hello(){                                                #4

        Map<String, Object> model = new HashMap<String, Object>();              #5

        model.put("message", "Hello, Spring-MVC World");                        #6


        return new ModelAndView("index", model);                                #7

    }


}
The class itself is annotated with @Controller annotation, which will tell the Spring MVC framework to treat it as a controller component (#1). The class is just a POJO, without any super class or implementing interface (#2). This approach enables easy out-of-container testing of your controllers, as they don’t have any dependency on the Servlet API at all—for example, we don’t have to extend HttpServlet like we did in earlier servlet examples in this book.
Each implemented method in the controller class acts as a separate web handler. We use @RequestMapping annotation on the method level to configure mapping for the particular handler: the URL pattern it will be mapped to and the HTTP method it accepts. In our example, we mapped our method hello() to /helloWorld.html URL, using GET HTTP method (#3).
The handler method itself does not have any arguments, and has a return parameter of type ModelAndView (#4). ModelAndView class is the Spring’s abstraction of the view MVC component and the model that is used in the view. Each Spring MVC handler returns the instance of ModelAndView to the front controller (DispatcherServlet), which in turn sends the response of the view with model to the calling client (browser in our case).
Model itself is nothing more than a Java Map instance—a collection of String keys with Object values (#5). In our sample controller, we are adding the message object to the model using key message (#6), the same key used in the JSP view to display the message in Listing 11-2.
Finally we return the constructed instance of ModelAndView (#7). We pass two arguments to the ModelAndView constructor: the name of the view ("index") and the instance of the model. Spring will translate the view name to the actual view (JSP file) using the view resolver, which we will cover in the next section.
So far, we have implemented the view that displays the model information, and the controller that populates the model and passes it to the view for rendering. Let’s now wire all these components together in the Spring application context.
Wiring Spring Application Context
Spring application context is configured using XML in the Spring configuration files. In Spring MVC, the DispatcherServlet configured in the web.xml file will automatically load its Spring context from the /WEB-INF/{servlet-name}-servlet.xml file packaged in the web application, where the {servlet-name} is the configured <servlet-name> element used in the web.xml. Because we specified the servlet name chapter11 in the web.xml (Listing 11-1), the Spring configuration file will be /WEB-INF/chapter11-servlet.xml, and we are going to put Spring MVC XML configuration in that file. Listing 11-4 shows the configuration we are going to use for our Spring MVC example.
Listing 11-4. Configuration of Spring Application Context in chapter11-servlet.xml file
<?xml version="1.0" encoding="UTF-8"?>

<beans xmlns="http://www.springframework.org/schema/beans"

       xmlns:xsi="http://www.w3.org/2001/XMLSchema-instance"

       xmlns:mvc="http://www.springframework.org/schema/mvc"

       xsi:schemaLocation="http://www.springframework.org/schema/beans

       http://www.springframework.org/schema/beans/spring-beans-3.0.xsd

       http://www.springframework.org/schema/mvc

       http://www.springframework.org/schema/mvc/spring-mvc.xsd">                       #1


  <mvc:annotation-driven/>                                                              #2


  <bean name="helloWorldController"

        class="com.appress.apachetomcat7.chapter11.HelloWorldController"/>              #3


  <bean id="viewResolver"

        class="org.springframework.web.servlet.view.InternalResourceViewResolver">      #4

      <property name="viewClass" value="org.springframework.web.servlet.view.JstlView"/>#5

      <property name="prefix" value="/WEB-INF/views/"/>                                 #6

      <property name="suffix" value=".jsp"/>                                            #7

  </bean>


</beans>
Spring application context is configured in XML format, using XML schemas defined in the Spring framework. To configure Spring MVC application context, we are using two XML schemas: beans schema to configure Spring components (beans), and mvc schema for Spring MVC specific configuration (#1).
We used @Controller annotation to mark Java class used as controller component. Annotations in Java are only used for code markup; the application itself must understand Java annotations at runtime. That’s why we have to configure Spring runtime to understand the @Controller annotation, and configure classes annotated with it as controller components in MVC architecture. Spring comes with the convenient XML configuration element <mvc:annotation-driven/> that enables us to do just that (#2). In addition to @Controller annotation, this XML element enables all other class-level, method-level, and method-argument-level annotation used in the Spring MVC framework. We will see examples of other Spring MVC annotations in the next section.
All spring-managed components must be defined as beans in the Spring framework. So our next step is to configure HelloWorldController as a spring-managed bean (#3).
The final step is to configure Spring to recognize and use view names referenced in the controller, and map them to the JSP files we created. To do this we configured view resolver (#4). Spring comes with few view resolver implementations, and we are using InternalResourceViewResolver, which is convenient to use with JSP files. We specify three properties for view resolver bean:
viewClass(#5) is set toorg.springframework.web.servlet.view.JstlView, which is the Spring’s implementation of JSP view with support of JSP Standard Tag Library (JSTL).prefix(#6) is set to"/WEB-INF/views"and specifies the prefix path where all our JSP files are located.suffix(#7) is set to".jsp", and is appended to prefix and view name in order to complete the path of the JSP file that represents the view.
If you take a look at our controller implementation in Listing 11-3, you will remember that we referenced our view using its name only ("index"). Now we can understand how Spring uses this view name to reference the actual view: the JSP file that we saved to /WEB-INF/views/index.jsp location. Spring uses a configured view resolver bean to transform the view name to the fully qualified path of JSP view file using prefix and suffix. Starting from the configured prefix ("/WEB-INF/views/"), Spring appends view name reference in controller implementation ("index"), and finally appends the configured suffix (".jsp") to complete the full path tour JSP file, relative to the web application root - /WEB-INF/views/index.jsp.
![]() Note Make sure you have the view resolver bean defined in your web application context, as it’s responsible for translating view names you use in your controller code to actual views (JSP files for example). If you see error messages in your browser stating that Tomcat cannot find a JSP file, make sure your view resolver is configured correctly, as it’s a typical cause of such errors.
Note Make sure you have the view resolver bean defined in your web application context, as it’s responsible for translating view names you use in your controller code to actual views (JSP files for example). If you see error messages in your browser stating that Tomcat cannot find a JSP file, make sure your view resolver is configured correctly, as it’s a typical cause of such errors.
And that completes the configuration of the Spring MVC web application. If you package the web application, and deploy it to Tomcat, you can navigate to http://localhost:8080/chapter11/helloWorld.html URL in your browser to see Spring MVC in action. Figure 11-4 shows the how the page looks in the browser.
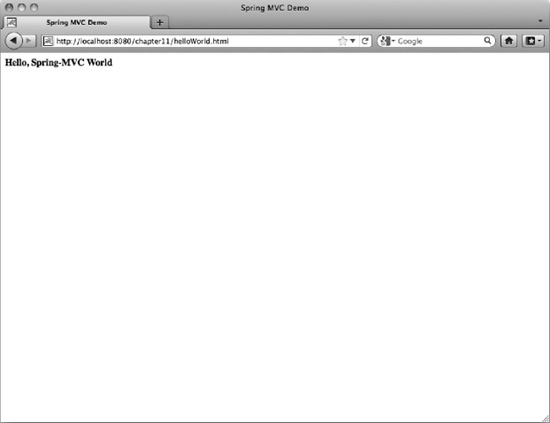
Figure 11-4. Model, view, and controller are combined to display the “Hello, Spring MVC World” message in the browser.
And that’s it: we now have a Spring MVC web application deployed and running in Tomcat.
Spring framework’s vision is to enable developers to write lightweight Java Enterprise applications that are capable of delivering enterprise functionality without the heavy infrastructure usually related to it. Being lightweight as it is, with rich application server functionality, Tomcat has been a good match for Spring application since the beginning of Spring. Using Tomcat and Spring enables organizations to develop and deploy high-level enterprise Java applications at a low cost (as both Tomcat and Spring are open source), and with rich functionality and high performance.
Summary
In this chapter we introduced the Spring MVC framework used for web application design and development. We started by introducing Spring framework itself, following with the description of two core design patterns that Spring MVC implements: the Model-View-Controller pattern and the Front Controller pattern.
In the second part of the chapter we implemented a sample web application using Spring MVC. We discussed the architecture of Spring MVC framework. Next, we implemented model, view, and controller components, and using Spring MVC. Finally, we configured the web application so it can be deployed and run on Apache Tomcat server.
In the next chapter, we are going to take a look at logging mechanisms in Tomcat.