
C H A P T E R 7
Securing Tomcat with SSL
In the previous chapter, we learned how to protect web applications in Tomcat from unauthorized access by configuring security realms. However, securing web resources with usernames and passwords can still leave a web application vulnerable to malicious access. If anyone eavesdrops on the communication between client and server, they can get access to the username and password of the legitimate user and compromise the web application’s security.
In this chapter, we will learn how SSL protocol works, and demonstrate how we can employ SSL protocol to encrypt the traffic between browsers and Tomcat, making sure that information passed to and from Tomcat cannot be intercepted or changed in any way.
In this chapter, we will do the following:
- Introduce SSL protocol and its secure mechanism
- Describe how to generate SSL certificates using Java tools
- Configure Tomcat and a web application for secure access over SSL
- Demonstrate how to use SSL for secure session tracking
Introduction to SSL
Secure Socket Layer (SSL) is a secure transfer protocol used for communication on the Internet using cryptographic methods. SSL was first developed by Netscape to make its own products secure. After its public release, it was quickly adopted by a number of big players in the IT industry, including Microsoft, and it became the de-facto standard for Internet traffic encryption.
![]() Note More recently, the Internet Engineering Task Force (IETF), the organization that develops and promotes Internet standards, developed Transport Level Security (TLS) based on SSL. TLS is a community-standardized protocol and will probably eventually replace SSL. Because almost all current server and client applications support both TLS and SSL, you can decide which one to use. Although there is little difference between the SSL and TLS protocols, TLS is backward compatible with SSL, and thus a safer option. However, due to its widespread usage, SSL is still the more commonly used secure protocol for web applications. For that reason, and to avoid confusion, we’re using the term SSL to refer to the secure communication protocol throughout this chapter.
Note More recently, the Internet Engineering Task Force (IETF), the organization that develops and promotes Internet standards, developed Transport Level Security (TLS) based on SSL. TLS is a community-standardized protocol and will probably eventually replace SSL. Because almost all current server and client applications support both TLS and SSL, you can decide which one to use. Although there is little difference between the SSL and TLS protocols, TLS is backward compatible with SSL, and thus a safer option. However, due to its widespread usage, SSL is still the more commonly used secure protocol for web applications. For that reason, and to avoid confusion, we’re using the term SSL to refer to the secure communication protocol throughout this chapter.
What SSL Does
The main purpose of the SSL protocol is to guarantee that no one can eavesdrop on or tamper with the communication between a browser and the server where the web application is deployed. When accessing the web sites secured by SSL, a user can be sure that no one can intercept and read the information passed to the remote server; for example, usernames and passwords or credit card information when using e-commerce web sites. In addition, the user is safe to send and receive any sensitive information to and from web server, knowing that no one could have tampered with the information during transport, or can change the transported content in any way.
Another purpose of secure communication is the ability to authenticate the server and its owner based on the SSL information – so that a user can be certain that the server that it’s accessing is the one that it’s saying it is. This has become very important in today’s Internet-dependent society, so that we are sure that we are accessing our bank’s web site, for example, and not some malicious web site representing itself as our bank. The term for a site that is masquerading itself as another, tricking a user to pass sensitive information to it, is phishing.
How SSL works
SSL is a cryptographic protocol, using symmetric pair of keys to encrypt and decrypt traffic sent over the Internet.
In a common SSL scenario, when the user accesses the web server for the first time, the server sends its SSL certificate, or public key, to the client. The SSL certificate contains the information about the server, its owner, company, and its validity period. A user can reject a certificate if it does not trust its authenticity, effectively terminating the connection.
If the user accepts the certificate, the certificate itself is stored in the browser, and is used to initiate a secure connection with the issuing server. This key is public, as the server sends it to anyone that asks for it.
The information encoded using the public key can only be decoded using the symmetric private key. The private key is, as its name suggests, private, and kept safely on the server. A client generates the symmetric key, with which both client and server will encrypt all traffic sent to the other side. With the symmetric key, content is encoded and decoded using the same key known to both parties in the communication, which is less secure than the asymmetric public/private key communication. That’s why it’s important that the exchange of the symmetric keys is secure. Therefore, a client encodes the symmetric key using the server’s public key (received in the certificate), and the server encodes it using its private key.
When a server receives the symmetric key, the connection between server and client is secure, and all traffic sent from the browser to the web application, and response content from the web server to the browser, will be encrypted using the generated symmetric key known to client and server only. The exchanged symmetric key is valid only for the duration of the current session, and needs to be re-generated every time a user initiates a new session.
The security of SSL depends on how secure the key used to encrypt data is. SSL is not unbreakable in theory, but with the amount of time required to break standard 128-bit key, in practice it is often assumed as safe from brute-force attacks. For the industry-standard 128-bit key, there are 2128 combinations possible to generate the key. The value of 2128 calculates to 340,282,366,920,938,463,463,374,607,431,768,211,456, or roughly 240 trillion trillion trillions! To put things into perspective, today’s super computers can break the DES encryption algorithm, which uses 56-bit long keys, in around one day. If, in the future, man develops a machine that can perform the same task of breaking a 56-bit key in one second, it would still take 149.7 trillion years to brute force a 128-bit key!
SSL protocol communication over HTTP protocol is referred to as HTTPS (secure HTTP). The web sites that are using SSL encrypted connections display https as the protocol name in the browser’s address bar, for example https://www.mybank.com.
Ensuring that the connection is secure from eavesdropping and tampering, using asymmetric and symmetric cryptography methods is the main purpose of using SSL. However, there is another useful purpose of SSL-certificate protected web sites: the ability to authenticate that the site is what it says it is. SSL certificates, sent by the secure server as public keys to the client, contain basic information about the site to which they belong, such as the domain name, owner name, and company name. Organizations called Certificate Authorities (CA) can authenticate the details of the SSL certificate, so if the user trusts the CA, they can be sure that the secure web site is certified, and its details are correct. There is a number of CAs that can issue a certified SSL certificate. Modern browsers automatically recognize the largest and best-known CAs, and allow connections to the sites providing SSL certificates certified by these organizations automatically.
The secure icon and the registered domain name are displayed in the browser’s address bar if the SSL connection is active. Figure 7-1 shows an example in the Firefox web browser. (Note that the company name is not a mandatory field, as indicated by the “unknown” reference in Figure 7-1.)

Figure 7-1. The secure connection icon and the registered domain name from the certificate are displayed in the browser’s address bar.
If the SSL certificate is not certified by a CA, or is certified by the CA but not recognized by the user’s browser, the user will be presented with a warning screen, where he or she can decide whether to trust the certificate. Figure 7-2 shows the warning received if the certificate is not automatically accepted by the browser.
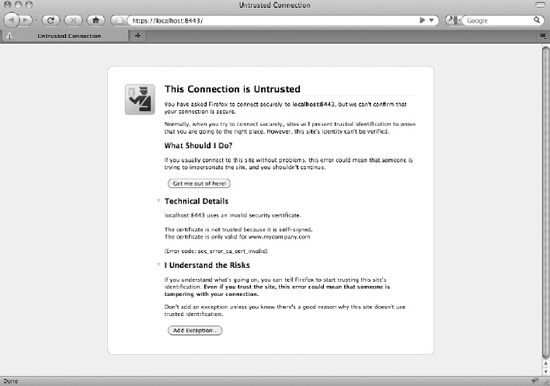
Figure 7-2. If the SSL certificate cannot be accepted automatically, a warning is displayed to the user.
Configuring Tomcat with SSL
In order to use SSL for server access, we need to create our own public key, which we will use as a certificate. The certificate we are going to create is usually called a self-signed certificate, as it will not be verified with an independent CA, so we cannot authorize as web site owners with it. But, having self-signed certificate is sufficient enough to have SSL encrypted communication with our server. For development and testing purposes, or for internal applications not accessible outside the company’s network, this is often enough to provide a usable, secure environment.
Creating Keystore with SSL Certificate
All publicly known certificates are stored in a repository called the keystore. The keystore is a file that contains the public and private key data required to encode and decode information using SSL or TLS. Applications that are using SSL must be able to read the keystore file, and use its data as keys to encrypt and decrypt information. The key data in the keystore file can be stored in a number of formats that depend on the tool used to create keystore. Apache Tomcat 7 can read keystores in one of the following formats: PKCS11, PKCS12, and JSK. PKCS11 and PKCS12 formats belong to the standards called Public-Key Cryptography Standards, developed by the RSA Laboratories, which is one of the leading network security companies in the world. JKS format stands for Java KeyStore, which is a Java-specific keystore format. JKS keystore can be created and manipulated using the keytool utility application, distributed as part of Java SDK from version 1.4. Because JKS is simple enough to use and easily accessible as part of Java SDK, we will be using its keytool application to create JKS keystores, which we will use to configure SSL on Tomcat.
Keytool, which we will use to create a self-signed SSL certificate, is located in the JAVA_HOME/bin/ directory. The file name is keytool.exe (on Windows systems), or just keytool, with no extension (on Unix-based systems). Because JAVA_HOME/bin is on the systems path by default after Java installation, you can execute it from any directory on the file system. In order to check if the keytool is available on your system, just type keytool on the command line in the terminal window. You should see the list of all required and optional command line arguments you can use to invoke the application.
Table 7-1 shows the commands with the required arguments that you should execute for Windows and Unix-based systems, respectively.

We are using the keytool to generate a new SSL certificate by specifying the -genkeypair argument. The genkeypair argument was named genkey in earlier versions of the Java SDK (earlier than version 1.6), and it is still supported for backward compatibility. Because one keystore can contain multiple public/private key pairs, we will be using the alias “tomcat” to identify our new certificate within the keystore (by specifying the command argument -alias tomcat). We can also specify the algorithm used to generate the key pair, using the –keyalg argument. We will be using the RSA algorithm, a commonly used cryptography algorithm for public and private key generation. Finally, we will specify the file where our keystore will be saved using the -keystore argument. If you omit this argument, new file named .keystore, will be created in the home directory of the user running the command.
When you press Enter, you will first be prompted for the keystore password. This password will be used to access any certificate stored in the created keystore, so use the usual precaution when deciding on the keystore password. For the purpose of this example, we will set the keystore password to abc123.
After that, you will be prompted to enter some information about the certificate, the owner’s name, the company, and location (country). You are first asked to enter your first and last name. The information you enter is stored in the keystore as the common name (CN) of the certificate. Although it looks confusing, you should enter the host name for the server for which you are generating a certificate. The reason for this is that, according to HTTPS specification, browsers should match the CN of the provided certificate to the domain name of the requested URL. If they do not match, the user will be presented with a warning in the browser that states that the certificate does not match the domain name of the site they are accessing. Because this decreases the amount of trust users have in the web site, the warning is not something that is desired for the public web site. To avoid this, make sure that any certificate you generate has a valid domain name as the CN, confusingly set as the first and last name value in the keytool interface (see the first question in Figure 7-3).
![]() Note You can only have one SSL certificate for one IP address. If you host multiple domains on the same IP, only one of these host names can have a valid SSL certificate that matches its domain name. If you try to use SSL for any other domain name on the same IP, the browser will display a warning that the domain name does not match the certificate. This is a known limitation of SSL, because an SSL protocol handshake must happen before the hostname is extracted from the HTTP request.
Note You can only have one SSL certificate for one IP address. If you host multiple domains on the same IP, only one of these host names can have a valid SSL certificate that matches its domain name. If you try to use SSL for any other domain name on the same IP, the browser will display a warning that the domain name does not match the certificate. This is a known limitation of SSL, because an SSL protocol handshake must happen before the hostname is extracted from the HTTP request.
Once you enter all the required details, you will be asked for another password, this time the password for this particular certificate within the keystore. For this example, we will set this password to tomcat123. Both the keystore password we set earlier and the certificate password are used for Tomcat configuration later, so remember them or write them down.
Once completed, you will have the chance to confirm all details entered. Once these are confirmed, you will have your certificate generated and stored in the file you specified as the –keystore argument. Figure 7-3 shows the terminal window with the keytool executed.
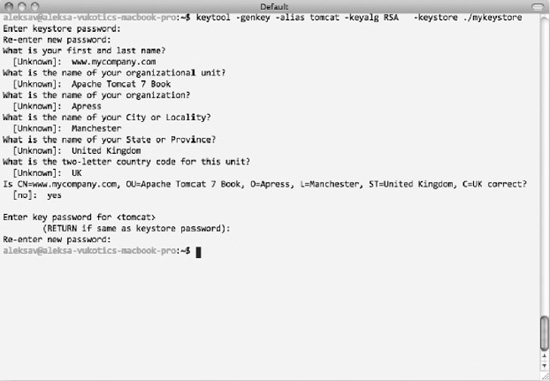
Figure 7-3. Running a keytool from the terminal command line
Now that we have the SSL certificate generated, we can configure Tomcat to use it for SSL server access.
Configuring Tomcat’s SSL Connector
The first step in configuring SSL with Tomcat is to configure Tomcat’s Connector, which will handle SSL connections over HTTPS. To configure the <Connector> element for SSL, all you have to do is set the SSLEnabled attribute to true, and set the scheme and secure attributes in order that the SSL information is correctly interpreted by the servlets deployed in Tomcat. Along with these basic attributes, you can configure additional details for your SSL configuration relating to the keystore and certificate we generated in the previous section. Listing 7-1 shows typical Tomcat SSL Connector configuration in the server.xml file.
Listing 7-1. Tomcat’s SSL Connector Configuration Using Non-Blocking Java SSL Implementation
<Connector

     SSLEnabled="true"                                                        #1

     scheme="https" secure="true"                                             #2

     port="8443"                                                              #3

     protocol="HTTP/1.1"                                                      #4

     clientAuth="false"                                                       #5

     keystoreFile="/Users/aleksav/mykeystore" keystorePass="abc123"           #6

     keyAlias="tomcat" keyPass="tomcat123"                                    #7

/>
We first set the SSLEnabled attribute to true, telling Tomcat that this connector handles SSL connections (#1). In addition, we set the scheme attribute to value https, so that all SSL-secure URLs are recognized by the standard https:// protocol identifier; and we need to set secure attribute to true, if we wish to check for an SSL connection within Java servlet code, by calling HttpServletRequest.isSecure() method (#2). Next, we set the port on which the SSL connector will accept incoming connections (#3). Because 443 is the common port number for HTTPS connections, Tomcat itself uses the slight variation 8443 (using the same convention for port 8080 for standard HTTP request, as opposed to the “common” port 80, adding 8000 for the standardized port).
The next bit is the protocol configuration. We used standard HTTP/1.1 protocol, which is implemented in Tomcat’s class org.apache.coyote.http11.Http11Protocol (#4). Http11Protocol is the standard blocking Java HTTP protocol. It is blocking because it uses a single thread to process the incoming requests and dispatch the response back to the browser. You have a choice to use a non-blocking version of Java Tomcat protocol instead, or even an APR Tomcat native protocol. Non-blocking Java protocol must reference its implementing class as the protocol attribute value: org.apache.coyote.http11.Http11NioProtocol. To use Tomcat’s native APR protocol, you must make sure you have Tomcat’s native library on the Tomcat classpath, and reference the APR HTTP connector class name as protocol attribute value: org.apache.coyote.http11.Http11AprProtocol.
![]() Note In order to use the Tomcat native library, you must compile it from the source code for your specific operating system. The native library compilation is beyond the scope of this book, but you can consult Tomcat’s native documentation about the required steps at
Note In order to use the Tomcat native library, you must compile it from the source code for your specific operating system. The native library compilation is beyond the scope of this book, but you can consult Tomcat’s native documentation about the required steps at http://tomcat.apache.org/native-doc/.
The next attribute we configure is the clientAuth attribute (#5). This attribute specifies whether we are using one-way secure certificate authentication or if the client needs to present the valid SSL certificate to the server as well. When using SSL for web applications publicly accessible on the Internet, we don’t require users to authenticate to the server using SSL certificate; to establish a secure connection, it is enough that the client accepts the certificate from the server. However, sometimes the server requires the client to be authenticated as well, usually in a business-to-business scenario, where both client and server are actually computer programs, without any human influence. For this example, we will configure standard public web site SSL connectivity by setting the clientAuth attribute to false.
Finally, we need to set the attributes relating to the keystore and the certificate our Tomcat server will use to encrypt and decrypt SSL traffic. We configure the keystore file path by specifying the keystoreFile attribute, setting it to the absolute path of the keystore file we created in the previous section (#6). At the same time, we specify the password we used for the keystore. And, as the last step, we specify the alias of the actual SSL certificate that can be used to identify it within the specified keystore (#7). We must use the same alias used when creating the certificate, as well as the password for the certificate itself. As you can see, we used the same values as specified when running the keytool application in the previous section.
Now we need to start Tomcat (or restart it if it’s already running). After the startup is completed, you will be able to access Tomcat’s home page by typing https://localhost:8443 URL to your browser’s address bar.
![]() Note Make sure you start the web address with
Note Make sure you start the web address with https for the protocol name to access the application correctly. If by mistake you use http (for example http://localhost:8443), you will end up with the error page in the browser, because Tomcat expects any URL with HTTP protocol to use port 8080 (and at the same time, any URL with HTTPS protocol must use port 8443). Any other combination will not be recognized by Tomcat as a valid URL.
When you do that for the first time, you will be presented with a warning, exactly the same as the warning shown in Figure 7-2. This is expected, for two reasons. First, we are using a self-signed certificate that has not been validated by any CA, so the browser will warn the user about that. Second, we created the certificate by specifying CN record as www.mycompany.com, and now we access it using the localhost domain name. As expected, the browser is displaying a warning that the CN domain name and the domain name used to access the site do not match.
In order to proceed, you will need to add exception for this certificate by confirming to the browser that you indeed trust this site. After adding the SSL exception, you will be presented with the familiar Tomcat home page, but this time using HTTPS secure protocol on the configured port 8443.
Figure 7-4 shows the browser windows when you access the Tomcat’s home page using the HTTPS secure protocol.

Figure 7-4. Tomcat’s home page access over SSL on port 8443
If you change the port name to 8080 and the protocol to HTTP, you will notice that you can still access Tomcat’s home page using the standard HTTP protocol as before on http://localhost:8080. With the configuration so far, we have enabled the SSL on Tomcat, and users can choose whether to access the site over HTTP or HTTPS. However, for real-world secure applications, we would like to force users to use the SSL-secured protocol when accessing pages with security-critical information. For example, when users are logging in or when users are typing credit card details in the HTML form. In the next section, we are going to configure our sample web application to do precisely that: force users to use the secure protocol for required pages.
Configuring Secure Resources in the Web Application
To demonstrate forcing the use of the HTTPS protocol, we are going to use the sample web application from the previous chapter, the FORM-based authentication example. We will improve the FORM-based login example by forcing Tomcat to load and submit a login page, with user username and password, over SSL. Our login page is located at /WEB-INF/secure/login.jsp file. All we need to do is to specify a new security constraint in the web deployment descriptor (web.xml). Listing 7-2 shows the updated web.xml file from the FORM-based login example, with the added SSL configuration in bold.
Listing 7-2. Updated Web Configuration to Load Login Pages Using Secure Channel
    <security-constraint>

        <web-resource-collection>

            <web-resource-name>JDBC Realm Sample with SSL</web-resource-name>

            <url-pattern>/jsps/*</url-pattern>                                         #1

        </web-resource-collection>

        <auth-constraint>

            <role-name>apressuser</role-name>

        </auth-constraint>

         <user-data-constraint>                                                        #2

            <transport-guarantee>CONFIDENTIAL</transport-guarantee>                    #3

        </user-data-constraint>

</security-constraint>


<login-config>

        <auth-method>FORM</auth-method>

        <realm-name>Apress</realm-name>

        <form-login-config>

            <form-login-page>/secure/login.jsp</form-login-page>

            <form-error-page>/secure/login-error.jsp</form-error-page>

        </form-login-config>

    </login-config>
We are adding SSL configuration to the existing web resource collection, matching all JSP pages in the /jsps directory (#1). For all resources in the configured collection, we apply a security constraint using <user-data-constraint> element (#2). This element requires that transport guarantee be configured, which we set to value CONFIDENTAL (#3). By setting transport guarantee to CONFIDENTAL, we are telling Tomcat to force secure channel (HTTPS) for all resources that match the <web-resource-collection> configuration. So, if a user tries to load the login page over HTTP on port 8080 (by typing the address http://localhost:8080/chapter7/jsps/index.jsp), Tomcat will recognize that this URL matches the pattern set in the web.xml, and automatically redirect user to the secure URL https://localhost:8443/chapter7/jsps/index.jsp. The configured realm will kick in and the user will be presented with the login screen. After login, all password-protected pages will be loaded over the SSL protocol.
We used value CONFIDENTAL to specify the transport guarantee for the configured secure pages, which is the most restrictive setting, guaranteeing that the data hasn’t been tampered with in transit, and that no unauthorized person has read the content while it was in transit. If your security policy allows more relaxed settings, you can use value INTEGRAL, which only guarantees that the content hasn’t been changed while being transported between client and server. The default value is NONE, which disables any security checks.
Although we generated the keystore and the SSL certificate system wide, and configured for the entire Tomcat server, we specified the required security constraints on the web application level, giving developers the freedom to configure web application SSL security as required. SSL encryption and decryption is not a trivial operation, and it adds performance overhead to all requests over HTTPS protocol. By configuring SSL within the web application only for pages that should be secure, leaving access to ordinary public pages without SSL, you can benefit by having secure access to the pages that required such protection, while not affecting the performance of the public pages that have no security-critical content. Common examples of such configuration are using SSL for the password-protected parts of the site, or accessing checkout pages over HTTPS only, so that a user can enter his or her credit card details without fear of someone unauthorized accessing it during transport to the web server.
Installing a Certificate from the Certificate Authority
Using a self-signed SSL certificate will enable us to use the full power of SSL to secure our web application, for development and testing purposes, or for internal web applications used within a private network. However, if we were using self-signed certificate to protect a public web site, we would probably end up with users trusting us less than ever. This is because their browsers will display a warning whenever they access our site, letting them know that the browser cannot determine the authenticity of the certificate. To avoid this, we need to use the certificate signed (therefore authenticated) by the known CA.
Obtaining a CA-Signed Certificate
The first step in the process is to generate the self-signed certificate using the keytool, as we just did in the previous section.
Then, we need to generate a certificate-signing request (CSR) for the generated self-signed certificate, and submit it to the chosen CA. We will use the same keytool to generate CSR. The only difference when generating this self-signed certificate is the different command specified: certreq instead of genkey. The following code snipped shows the example CSR command:
keytool -certreq -keyalg RSA -alias tomcat -file mycompany_csr.csr –keystore

 /Users/Aleksa/mykeystore.
It is important to specify the same keystore where you stored the certificate generated in the previous step. In addition, you have to use the alias with which you stored your self-signed certificate. The CSR will be saved to the file specified with the –file argument, in our case mycompany_csr.csr.
Now you need to submit the generated CSR to your CA, and pay for the service, of course. When the transaction is complete, you will receive your new certificate, signed by the well-known CA.
Importing the CA-Signed Certificate
Before we can import the new certificate to the keystore, we need to import the so-called chained certificate, or root certificate, for the CA we used. The chain certificate is publicly available to download from your CA’s web site, and it’s used to verify that the CA that will, in turn, authenticate our certificate to the browser. Let’s say we downloaded the chain certificate to the /var/chaincert.crt file; you can import this to the keystore using the following command:
keytool -import -alias root -keystore /Users/aleksav/mykeystore -trustcacerts –file

 /var.chaincert.crt
You can pick the alias to import the chain certificate to the keystore, but it is important that it doesn’t already exist in the keystore. By specifying the argument –trustcacerts, we are setting this certificate as the “chain trust,” so it can be used to certify other certificates.
Finally, we can import the certificate received from the CA using the required alias. The following code snippet demonstrates the command used to import valid certificate:
keytool -import -alias tomcat -keystore /Users/aleksav/mykeystore -file /var/myca-cert.crt
Now you can restart Tomcat and, assuming the keystore and the certificate alias and passwords are correctly set, your new, signed SSL certificate will be used for HTTPS connections. Because the trusted CA signed the certificate, no warning will be displayed in the browser when users access your web application using HTTPS.
Secure Session Tracking with Tomcat
When we discussed HTTP sessions in Chapter, we described the session-tracking mechanism available in Tomcat, namely cookie session tracking and URL rewriting. When using cookies, which is the default mechanism, the session identifier is stored in the JSESSIONID cookie in the browser, and its value is sent to the Tomcat on every request. With URL rewriting, the session identifier is passed as request parameter with every URL pointing to a web application deployed in Tomcat; it requires that every link displayed on the web page has the session request parameter encoded in the URL.
From version 7, Tomcat supports a third mechanism: using SSL protocol for session tracking. SSL session tracking is actually part of Java Servlet specification 3.0, which Tomcat 7 supports, and can be used for session tracking on web sites that are using SSL protocol to encrypt/decrypt information sent over HTTP. Therefore, if your web application is not using SSL exclusively, you will not be able to use the SSL session-tracking mechanism.
When tracking sessions using SSL, the session identifier actually is the id of the established SSL session, generated by the server at the start of the SSL handshake, when the client (browser) requests the SSL certificate from the server. The SSL session identifier is passed over an encrypted SSL connection along with all other traffic; therefore, this is the most secure way to track a session between server and client.
![]() Note You can only use SSL session tracking with standard Java connectors, both blocking (BIO) and non-blocking (NIO). The APR Tomcat native connector does not yet support the SSL session tracking.
Note You can only use SSL session tracking with standard Java connectors, both blocking (BIO) and non-blocking (NIO). The APR Tomcat native connector does not yet support the SSL session tracking.
However, there is a bit of configuration required to enable Tomcat to use the SSL session tracking mechanism.
By default, Tomcat checks all available session-tracking modes before deciding which strategy to use. In addition, cookie strategy and URL rewriting mechanisms take precedence over SSL session tracking. So, to use SSL session tracking with your web application, you must explicitly set this mode as the only one available using custom ServletContextListener. Listing 7-3 illustrates the implementation of this listener, and its configuration in the web.xml file.
Listing 7-3. Configuring ServletContextListener for SSL Session Tracking
public class SSLSessionTrackingContextListener implements ServletContextListener {


    public void contextInitialized(ServletContextEvent event) {

        ServletContext context = event.getServletContext();

        EnumSet<SessionTrackingMode> modes = EnumSet.of(SessionTrackingMode.SSL);

        context.setSessionTrackingModes(modes);

    }


    public void contextDestroyed(ServletContextEvent event) {
        // NOOP

    }


}

…WEB.XML:

<listener>

        <listener-class>

                com.appress.apachetomcat7.chapter7.SSLSessionTrackingContextListener

        </listener-class>

</listener>
As per Java Server specification, the configured listener will be instantiated, and its contextInitialized() will be executed before the rest of the web application is configured. This will ensure that Tomcat uses SSL session identifier to track session in our web application.
And that’s it. When you deploy the web application to Tomcat, the session tracking will be performed using the SSL session identifier.
To demonstrate this, we will display the session id in our JSP page. The SSL session id is available as request attribute javax.servlet.request.ssl_session. All we have to do is to add the following code snippet to our JSP page:
SSL Session ID: <%= request.getAttribute("javax.servlet.request.ssl_session") %>
Figure 7-5 shows the SSL session id displayed in the browser.

Figure 7-5. SSL session id accessed as request attribute in the JSP file
When using SSL session tracking, you should pay special attention to session invalidation. You have to make sure you invalidate both standard HTTP session and Tomcat’s SSL session. At the moment, this can only be done using the Tomcat-specific API. In addition, you will need to explicitly close the connection to the client by sending the Connection=close header, as the low-level SSL session will be active until the connection is closed. Listing 7-4 illustrates the code that you will need to write in order to invalidate SSL session correctly.
Listing 7-4. Invalidating an SSL Session Using Tomcat’s API
        HttpSession session = request.getSession(true);

        // invalidate standard HTTP session

        session.invalidate();
        // Invalidate the SSL session

        SSLSessionManager mgr = (SSLSessionManager) request.getAttribute("javax.servlet.request.ssl_session_mgr");

        mgr.invalidateSession();


        // Close the conection

        response.setHeader("Connection", "close");
We use Tomcat’s SSLSessionManager class to invalidate the underlying SSL session. You need to have Tomcat’s jar library tomcat-coyote.jar on the project classpath in order to compile this code.
SSL session tracking has a limitation when used in session replication scenarios, when multiple Tomcat instances are deployed in a cluster. This is because, when a Tomcat instance crashes, session replication will not work when another node takes over users from the failed instance. Because of the way SSL protocol works, SSL session id will be different on each server node, so the existing session id from the client cannot be associated with the replicated session.
Summary
In this chapter we have demonstrated how you can use SSL protocol to secure web applications deployed on Apache Tomcat server. First, we explained what SSL protocol is and how it works. Next, we illustrated how to use Java tools to generate self-signed SSL certificates. We used the generated certificate to demonstrate Tomcat’s SSL configuration, including SSL Connector and specific web application settings in the web.xml file. We also illustrated how you can have your certificate signed by a CA and then import the signed certificate to the keystore so it is used by Tomcat. Finally, we described the SSL session tracking, a new feature of Servlet API 3.0 and Tomcat 7.
In the next chapter, we will describe how to intercept and preprocess HTTP requests and responses, using two different technologies with similar ideas: Tomcat valves and servlet filters.