
Chapter 18. Programming Your App to Make Decisions: Conditional Blocks
Computers, even small ones like the phone in your pocket, are good at performing thousands of operations in just a few seconds. Even more impressively, they can also make decisions based on the data in their memory banks and logic specified by the programmer. This decision-making capability is probably the key ingredient of what people think of as artificial intelligence—and it’s definitely a very important part of creating smart, interesting apps! In this chapter, we’ll explore how to build decision-making logic into your apps.
As we discussed in Chapter 14, an app’s behavior is defined by a set of event handlers. Each event handler executes specific functions in response to a particular event. The response need not be a linear sequence of functions, however; you can specify that some functions be performed only under certain conditions. A game app might check if the score has reached 100. A location-aware app might ask if the phone is within the boundaries of some building. Your app can ask such questions and, depending on the answer, proceed down a certain program branch (or direction).
Figure 18-1 depicts a flowchart of an event handler with a conditional check.
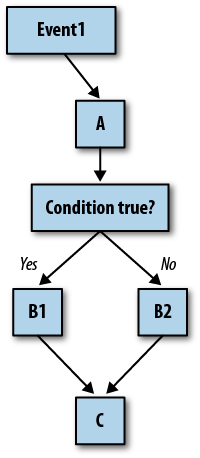
When the event occurs, function A is performed no matter what. Then a decision test is performed. If the test is true, B1 is performed. If it is false, B2 is performed. In either case, the rest of the event handler (C) is completed.
Because decision diagrams like the one in Figure 18-1 look something like trees, it is common to say that the app “branches” one way or the other depending on the test result. So, in this instance, you’d say, “If the test is true, the branch containing B1 is performed.”
Testing Conditions with if and ifelse Blocks
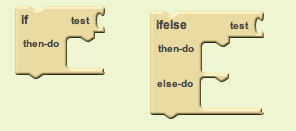
App Inventor provides two types of conditional blocks (Figure 18-2): if and ifelse, both of which are found in the Control drawer of the Built-In palette.
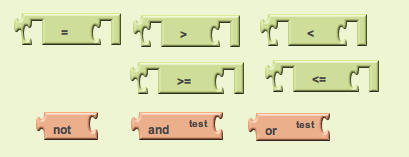
You can plug any Boolean expression into the “test” slot of these blocks. A Boolean expression is a mathematical equation that returns a result of either true or false. The expression tests the value of properties and variables using relational and logical operators such as the ones shown in Figure 18-3.
For both if and ifelse, the blocks you put within the “then-do” slot will only be executed if the test is true. For an if block, if the test is false, the app moves on to the blocks below it. If the ifelse test is false, the blocks within the “else-do” slot are performed.
So, for a game, you might plug in a Boolean expression concerning the score, as shown in Figure 18-4.
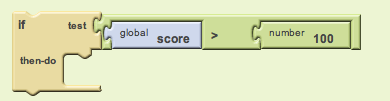
In this example, a sound file is played if the score goes over 100. Note that if the test is false, no blocks are executed. If you want a false test to trigger an action, you can use an ifelse block.
Programming an Either/Or Decision
Consider an app you could use when you’re bored: you press a button on your phone, and it calls a random friend. In Figure 18-5, we use a random integer block to generate a random number and then an ifelse block to call a particular phone number based on that random number.
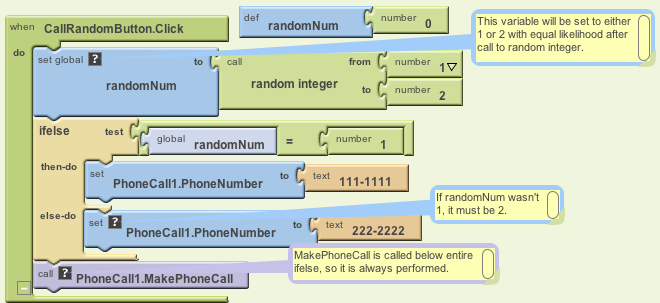
In this example, random integer is called with
arguments 1 and 2, meaning that the returned random number
will be 1 or 2 with equal likelihood. The variable RandomNum stores the random number
returned.
After setting RandomNum, the
blocks compare it to the number 1 in the ifelse
test. If the value of RandomNum is
1, the app takes the first branch (then-do), and the phone number is
set to 111–1111. If the value is not 1, the test is false, so the app
takes the second branch (else-do), and the phone number is set to
222–2222. The app makes the phone call either way because the call to
MakePhoneCall is below the entire
ifelse block.
Programming Conditions Within Conditions
Many decision situations are not binomial—that is, they don’t have just two outcomes to choose from. For example, you might want to choose between more than two friends in your Random Call program. To do this, you could place an ifelse within the original else-do clause, as shown in Figure 18-6.

With these blocks, if the first test is true, the app executes
the first then-do branch and calls the number 111–1111. If the first
test is false, the outer else-do branch is executed, which immediately
runs another test. So, if the first test (RandomNum=1) is false, and the second
(RandomNum=2) is true, the second
then-do is executed, and 222–2222 is called. If both tests are false,
the inner else-do branch at the bottom is executed, and the third
number (333–3333) is called.
Note that this modification only works because the to parameter of the random
integer call was changed to 3 so that 1, 2, or 3
is called with equal likelihood.
Placing one control construct within another is called nesting. In this case, you’d say the blocks had a “nested if-else.” You can use such nested logic to provide more choices in your Random Call app, and in general, to add arbitrary complexity to any app.
Programming Complex Conditions
Besides nesting questions, you can also specify tests that are more complex than a simple equality test. For example, consider an app that vibrates when you (and your phone) leave a building or some boundary. Such an app might be used by a person on probation to warn him when he strays too far from his legal boundaries, or by parents to monitor their children’s whereabouts. A teacher might use it to automatically take roll (if all her students have an Android phone!).
For this example, let’s ask this question: is the phone within the boundary of Harney Science Center at the University of San Francisco? Such an app would require a complex test consisting of four different questions:
Is the phone’s latitude less than the maximum latitude (37.78034) of the boundary?
Is the phone’s longitude less than the maximum longitude (−122.45027) of the boundary?
Is the phone’s latitude more than the minimum latitude (37.78016) of the boundary?
Is the phone’s longitude more than the minimum longitude (−122.45059) of the boundary?
We’ll be using the LocationSensor component for this example.
You should be able to follow along here even if you haven’t been
exposed to LocationSensor, but you
can learn more about it in Chapter 23.
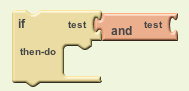
You can build complex tests using the logical operators and, or, and not, which are found in the Logic drawer. In this case, you’d start by dragging out an if block and an and block and then placing the and block within the “test” slot of the if, as illustrated in Figure 18-7.
You’d then drag out blocks for the first question and place them into the and block’s “test” slot, as shown in Figure 18-8.
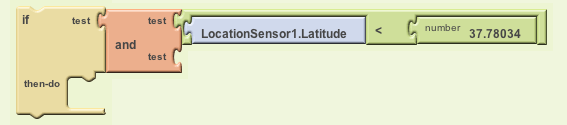
Note that as you fill a (sub-)test of the and block, a new test slot opens. If you fill these slots with the other tests and place the entire ifelse within a LocationSensor.LocationChanged event, you’ll have an event handler that checks the boundary, as shown in Figure 18-9.
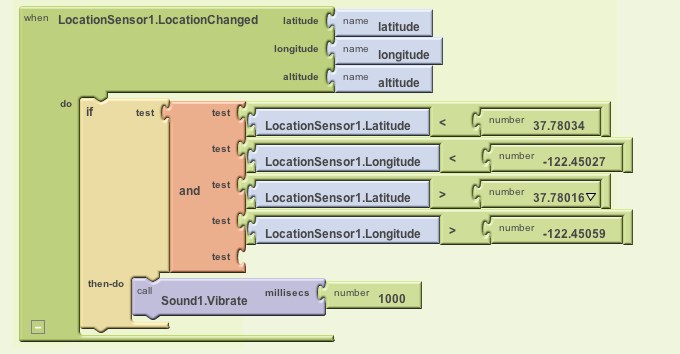
With these blocks, each time the LocationSensor gets a new reading and its
location is within the boundary, the phone vibrates.
OK, so far this is pretty cool, but now let’s try something even more complicated to give you an idea of the full extent of the app’s decision-making powers. What if you wanted the phone to vibrate only when the boundary was crossed from inside to outside? Before moving ahead, think about how you might program such a condition.
Our solution is to define a variable withinBoundary that remembers whether the
previous sensor reading was within the boundary
or not, and then compares that to each successive sensor reading.
withinBoundary is an example of a
Boolean variable—instead of storing a number or
text, it stores true or false. For this example, you’d initialize it
as false, as shown in Figure 18-10, meaning that the
device is not within USF’s Harney Science Center.
The blocks can now be modified so that the withinBoundary variable is set on each
location change, and so that the phone vibrates only when it moves
from inside to outside the boundary. To put that in terms we can use
for blocks, the phone should vibrate when (1) the variable withinBoundary is true, meaning the previous
reading was inside the boundary, and (2) the new location sensor
reading is outside the boundary. Figure 18-11 shows the updated
blocks.
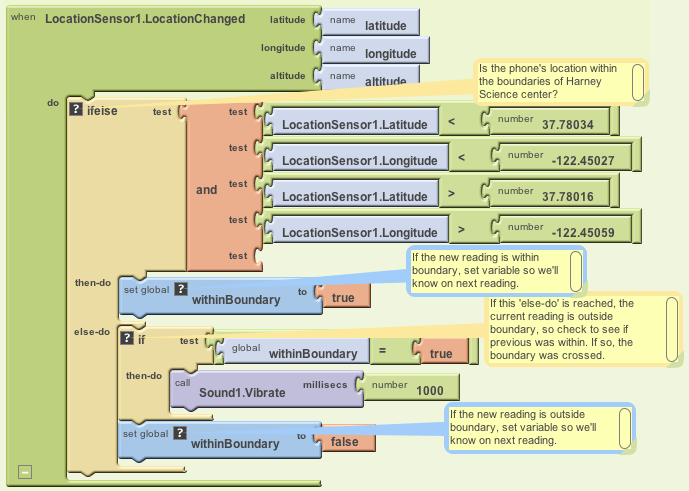
Let’s examine these blocks more closely. When the LocationSensor gets a reading, it first
checks if the new reading is within the boundary. If it is, LocationSensor sets the withinBoundary variable to true. Since we
want the phone to vibrate only when we are outside the boundary, no
vibration takes place in this first branch.
If we get to the else-do, we know that the new reading is
outside the boundary. At that point, we have to check the previous
reading: if we’re outside the boundary, we want the phone to vibrate
only if the previous reading was inside the
boundary. withinBoundary tells us
the previous reading, so we can check that. If it is true, we vibrate
the phone.
There’s one more thing we need to do once we’ve confirmed that
the phone has moved from inside to outside the boundary—can you think
of what it is? We also need to reset withinBoundary to false so the phone won’t
vibrate again on the next sensor reading.
One last note on Boolean variables: check out the two if tests in Figure 18-12. Are they equivalent?

The answer is “yes!” The only difference is that the test on the
right is actually the more sophisticated way of asking the question.
The test on the left compares the value of a Boolean variable with
true. If withinBoundary contains true, you compare true to true, which is true. If the variable
contains false, you compare
false to true, which is false. However, just testing
the value of withinBoundary, as in
the test on the right, gives the same result and is easier to
code.
Summary
Is your head spinning? That last behavior was quite complex! But it’s the type of decision making that sophisticated apps need to perform. If you build such behaviors part by part (or branch by branch) and test as you go, you’ll find that specifying complex logic—even, dare we say, artificial intelligence—is doable. It will make your head hurt and exercise the logical side of your brain quite a bit, but it can also be lots of fun.