Now, we are going to start working with Appium on different mobile apps. We will be acquainted with emulators/simulators to automate mobile apps by Appium. We will take a look at how to install apps from a computer to an emulator, moving on to calling the Chrome browser in an Android emulator to set up the desired capabilities and test web applications. Then, we will learn how to start the Safari browser in a simulator and set up the desired capabilities to test web applications. We will also take a look at how to write automation scripts for native mobile apps. Lastly, we will automate the hybrid apps and switch from native to web view.
In this chapter, we will learn the following topics:
- The automation of native apps
- The automation of hybrid apps
- Working with web apps and a native browser
- Working with web apps and Safari
Before starting with Appium, let's make sure that we have all the necessary software installed.
The prerequisites for Android are as follows:
The prerequisites for iOS are as follows:
- Mac OS 10.7 or later
- Xcode (version 4.6.3 or later; 5.1 is recommended)
- Simulator
- Safari on simulator
- Java Version 7
- Eclipse
- TestNG
- The Appium Server
- The Appium client library (Java)
- The Selenium Server and WebDriver Java library
When working with Appium, we need to set the desired capabilities and initiate an Android/iOS driver. First, we need to understand them one by one.
There are two ways to set the desired capabilities, one with the Appium GUI and another by initiating the desired capabilities object. Desired capabilities object will be more preferable, otherwise we have to change the desired capabilities in the GUI again and again whenever we are testing another mobile app. Let's discuss both these ways.
Let's see the Android Settings in the Appium GUI settings for native and hybrid apps:
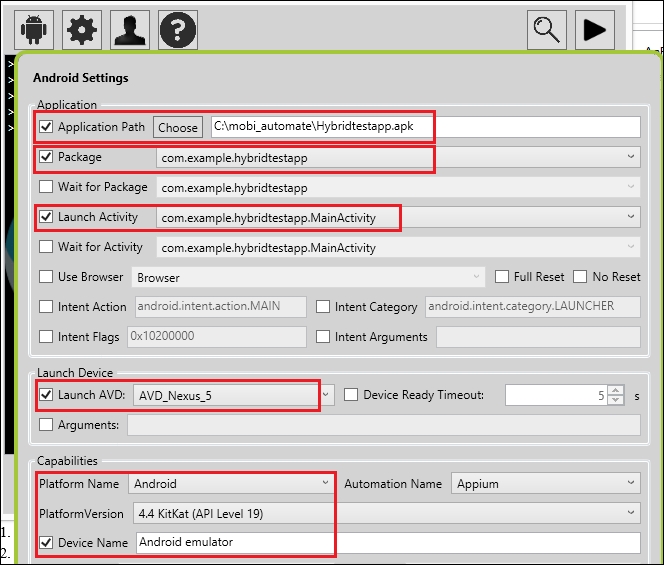
Here are the steps you need to perform for native and hybrid apps:
- Click on the Android Settings icon.
- Select Application path and provide the path of the application.
- Select Package and choose it from the drop-down.
- Select Launch Activity and choose an activity from the drop-down.
Note
If an application is already installed on the AVD, then we don't need to follow steps 2–4. In this case, we have to install the APK info app on the AVD to know about the package and the activities of the app and then set them using the desired capabilities object (which we will see in the next topic).
Here, the question is how to install APK in the emulator? Simply perform the following steps:
1. Start the emulator.
2. Open Command Prompt.
3. Type
adb -e install [path of the apk]. For example,adb –e install c:appapkinfo.apk.4. Click on the Enter button; post this, you will get a success message.
You are done with the APK installation!
- Select Launch AVD and choose a created emulator from the list.
- Select PlatformVersion from the drop-down menu.
- Select Device Name and type
Android emulator. - Now, start the Appium Server.
Let's see the Android Settings in the Appium GUI settings for web apps:
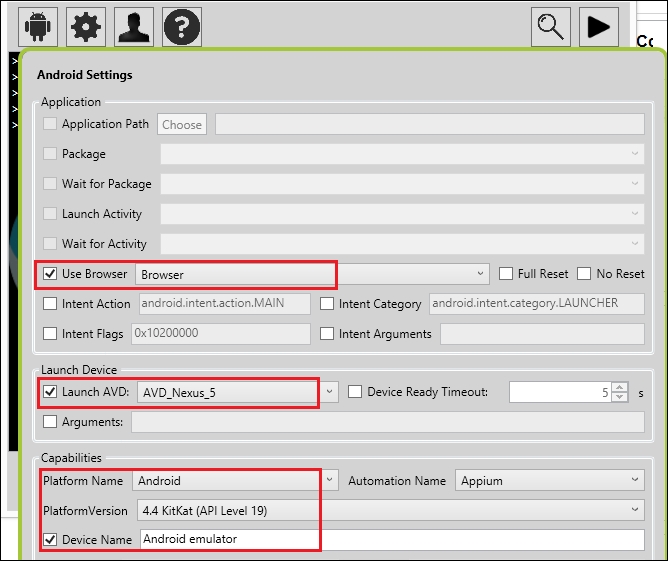
Here are the steps that you need to perform for web apps:
Let's discuss how to initiate the desired capabilities object and set the capabilities.
We already discussed the desired capabilities in Chapter 1, Appium – Important Conceptual Background, so here we will directly dive into the code with comments. First, we need to import the following packages:
import java.io.File;
import org.openqa.selenium.remote.DesiredCapabilities;
import io.appium.java_client.remote.MobileCapabilityType;
Now, let's set the desired capabilities for the native and hybrid apps, as shown here:
DesiredCapabilities caps = new DesiredCapabilities();//To create an object
File app=new File("path of the apk");//To create file object to specify the app path
caps.setCapability(MobileCapabilityType.APP,app);//If app is already installed on the AVD then no need to set this capability.
caps.setCapability(MobileCapabilityType.PLATFORM_VERSION, "4.4");//To set the Android version
caps.setCapability(MobileCapabilityType.PLATFORM_NAME, "Android");//To set the OS name
caps.setCapability(MobileCapabilityType.DEVICE_NAME, "Android emulator");//To set the Device name
caps.setCapability("avd","Name of the AVD to launch");//To specify the AVD which we want to launch
caps.setCapability(MobileCapabilityType.APP_PACKAGE, "package name of your app (you can get it from apk info app)");//To specify the android app package
caps.setCapability(MobileCapabilityType.APP_ACTIVITY, "Launch activity of your app (you can get it from apk info app)");//To specify the activity which we want to launch In Android mobile web apps, some of the capabilities that we used in native and hybrid apps such as APP, APP PACKAGE, and APP ACTIVITY are not required because we are launching a browser here. We need to import the following packages:
import org.openqa.selenium.remote.DesiredCapabilities;
import io.appium.java_client.remote.MobileCapabilityType;
Now, let's set the desired capabilities for the web apps, as follows:
DesiredCapabilities caps = new DesiredCapabilities();//To create an object
caps.setCapability(MobileCapabilityType.PLATFORM_VERSION, "4.4");//To set the android version
caps.setCapability(MobileCapabilityType.PLATFORM_NAME, "Android");//To set the OS name
caps.setCapability(MobileCapabilityType.DEVICE_NAME, "Android emulator");//To set the device name
caps.setCapability("avd","Name of the AVD to launch");//To specify the AVD which we want to launch
caps.setCapability(MobileCapabilityType.BROWSER_NAME, "Browser"); //To launch the Native browser
We are done with the desired capabilities part; now, we have to initiate the Android Driver to connect with the Appium server, but first we need to import the following packages:
import io.appium.java_client.android.AndroidDriver;
import java.net.URL;
Then, initiate the Android Driver:
AndroidDriver driver = new AndroidDriver (new URL("http://127.0.0.1:4723/wd/hub"), caps);This will launch the app in the Android emulator using the configurations specified in the desired capabilities.
Now, you can use the following class to write the test scripts with TestNG:
import io.appium.java_client.android.AndroidDriver;
import io.appium.java_client.remote.MobileCapabilityType;
import java.io.File;
import java.net.MalformedURLException;
import java.net.URL;
import java.util.concurrent.TimeUnit;
import org.openqa.selenium.remote.DesiredCapabilities;
import org.testng.annotations.AfterClass;
import org.testng.annotations.BeforeClass;
import org.testng.annotations.Test;

public class TestAppIication {
AndroidDriver driver;

@BeforeClass
public void setUp() throws MalformedURLException{
//Set up desired capabilities
  DesiredCapabilities caps = new DesiredCapabilities();
  File app=new File("path of the apk");
  caps.setCapability(MobileCapabilityType.APP,app);
  caps.setCapability(MobileCapabilityType.PLATFORM_VERSION, "4.4");
  caps.setCapability(MobileCapabilityType.PLATFORM_NAME, "Android");
  caps.setCapability(MobileCapabilityType.DEVICE_NAME, "Android emulator");
  caps.setCapability("avd","Name of the AVD to launch");
  caps.setCapability(MobileCapabilityType.APP_PACKAGE, "package name of your app (you can get it from apk info app)");
  caps.setCapability(MobileCapabilityType.APP_ACTIVITY, "Launch activity of your app (you can get it from apk info app)");
  caps.setCapability(MobileCapabilityType.BROWSER_NAME, "Browser");// In case of web apps
  driver = new AndroidDriver (new URL("http://127.0.0.1:4723/wd/hub"), caps);
  driver.manage().timeouts().implicitlyWait(30,TimeUnit.SECONDS);
}
@Test
public void testExample(){
//We will put test scripts here
}
@AfterClass
public void tearDown(){
  driver.closeApp();//CloseApp() function is used to close the mobile native and hybrid apps while quit() and close() is used for web apps
}
}Same as Android, we can set the desired capabilities using the Appium GUI and by initiating the desired capabilities object. Let's discuss both.
iOS Settings in the Appium GUI settings for native and hybrid apps:
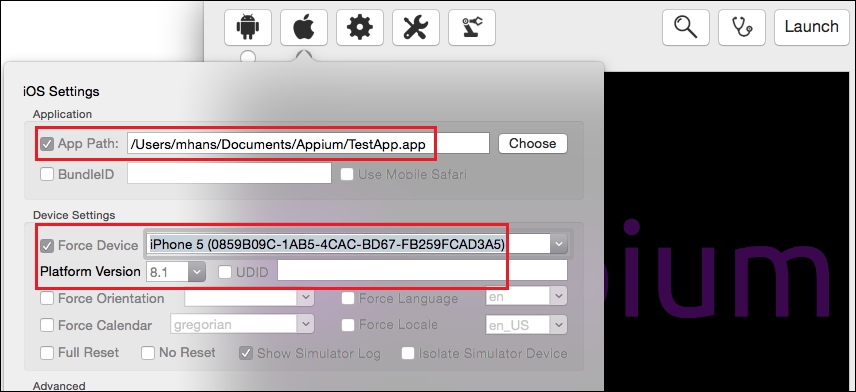
Here are the steps you need to perform for native and hybrid apps:
Let's see the iOS Settings in Appium GUI settings for web apps:
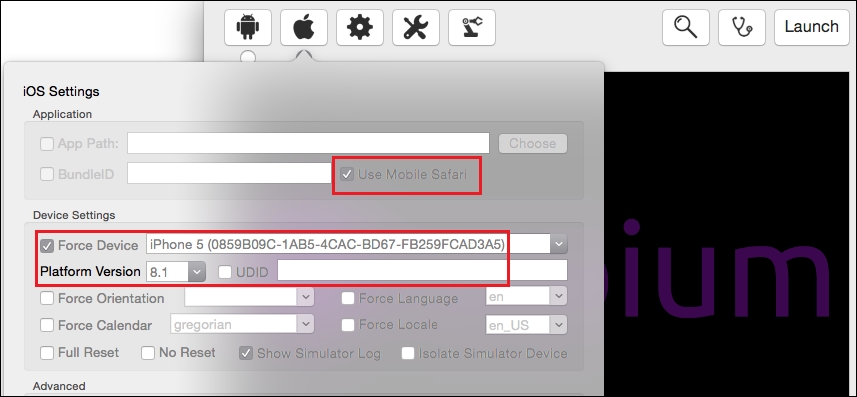
Here are the steps you need to perform for web apps:
- Click on the iOS Settings icon.
- Select Use Mobile Safari.
- Select Force Device and choose a simulator from the list.
- Select Platform Version from the dropdown or you can also type in a value (for example, 8.1).
- Now, start the Appium server.
Let's discuss how to initiate the desired capabilities object and set the capabilities.
We already discussed the desired capabilities for iOS in Chapter 1, Appium – Important Conceptual Background, so here we will directly dive into the code with comments. First, we need to import the following packages:
import java.io.File;
import org.openqa.selenium.remote.DesiredCapabilities;
import io.appium.java_client.remote.MobileCapabilityType;
Now, let's set the desired capabilities for native and hybrid apps:
DesiredCapabilities caps = new DesiredCapabilities();//To create an object of desired capabilities
File app=new File("path of the .app");//To create a file object to specify the app path
caps.setCapability(MobileCapabilityType.APP,app);//To set the app path
caps.setCapability(MobileCapabilityType.PLATFORM_VERSION, "8.1");//To set the iOS version
caps.setCapability(MobileCapabilityType.PLATFORM_NAME, "iOS");//To set the OS name
caps.setCapability(MobileCapabilityType.DEVICE_NAME, "iPhone 5");// Type valid simulator name otherwise appium will throw an exceptionIn iOS mobile web apps, some of the capabilities that we used in native and hybrid apps such as APP, APP PACKAGE, and APP ACTIVITY are not required because we are launching a browser here. First, we need to import the following packages:
import java.io.File;
import org.openqa.selenium.remote.DesiredCapabilities;
import io.appium.java_client.remote.MobileCapabilityType;
Now, let's set the desired capacities for the web apps, as shown here:
DesiredCapabilities caps = new DesiredCapabilities();//To create an object of desired capabilities
caps.setCapability(MobileCapabilityType.PLATFORM_VERSION, "8.1");//To set the iOS version
caps.setCapability(MobileCapabilityType.PLATFORM_NAME, "iOS");//To set the OS name
caps.setCapability(MobileCapabilityType.DEVICE_NAME, "iPhone 5");// Type valid simulator name otherwise Appium will throw an exception
caps.setCapability(MobileCapabilityType.BROWSER_NAME, "Safari"); //To launch the Safari browser
We are done with the desired capabilities part; now, we have to initiate the iOS Driver to connect with the Appium server, but first we need to import the following packages:
import io.appium.java_client.ios.IOSDriver;
import java.net.URL;
Then, initiate the iOS Driver:
IOSDriver driver = new IOSDriver (new URL("http://127.0.0.1:4723/wd/hub"),caps);This will launch the app in the simulator using the configurations specified in the desired capabilities.
Now, you can use the following class for test scripts with TestNG:
import io.appium.java_client.ios.IOSDriver;
import io.appium.java_client.remote.MobileCapabilityType;
import java.io.File;
import java.net.MalformedURLException;
import java.net.URL;
import java.util.concurrent.TimeUnit;
import org.openqa.selenium.remote.DesiredCapabilities;
import org.testng.annotations.AfterClass;
import org.testng.annotations.BeforeClass;
import org.testng.annotations.Test;

public class TestAppIication {
IOSDriver driver;

@BeforeClass
public void setUp() throws MalformedURLException{
//Set up desired capabilities
  DesiredCapabilities caps = new DesiredCapabilities();
  File app=new File("path of the .app");
  caps.setCapability(MobileCapabilityType.APP,app);
  caps.setCapability(MobileCapabilityType.PLATFORM_VERSION, "8.1");
  caps.setCapability(MobileCapabilityType.PLATFORM_NAME, "iOS");
  caps.setCapability(MobileCapabilityType.DEVICE_NAME, "iPhone 5");
  caps.setCapability(MobileCapabilityType.BROWSER_NAME, "Safari");// In case of web apps
  driver = new IOSDriver (new URL("http://127.0.0.1:4723/wd/hub"), caps);
  driver.manage().timeouts().implicitlyWait(30,TimeUnit.SECONDS);
}
@Test
public void testExample(){
//We will put test scripts here
}
@AfterClass
public void tearDown(){
  driver.closeApp();//In case of native and hybrid app
  //driver.quit(); //In case of web apps
}
}