
In the preceding chapters, we covered a lot of things that are quite straightforward with Appium. In this chapter, we will take a look at mobile gestures, such as long press, zoom, and swipe.
In this chapter, we will learn about the following topics:
- The advanced user interactions API
- Mobile gestures, such as long press, drag and drop, so on
- Handling alerts, spinners (dropdowns), the switch button, and the slide seekBar.
- Capturing screenshots
- Capturing screenshots on test failure
In Appium, the advanced user interactions API allows you to perform complex mobile gestures, such as drag and drop, swipe, and zoom by using the TouchAction and MultiTouchAction classes. It simply builds a complex chain of events, similar to what users do manually on their mobile devices. In the upcoming sections, we will see these classes in detail.
Long press is a mobile gesture that is widely used by people. It is a wonderful feature; most people say that you should touch and hold instead of using long press. By using long press, you can get more information about a particular feature. Just like a context-click on the Web, it also enables multiselection in mobile apps.
Let's try and create a long press example using the TouchAction class. Here, we are going to take an example of a dialer pad on an Android real device. In this section, we will long press the number 0 and it will be converted into +. To do this, we need to perform the following steps:
- Open up Eclipse and create an Appium project.
- Create a new class that has the following test code:
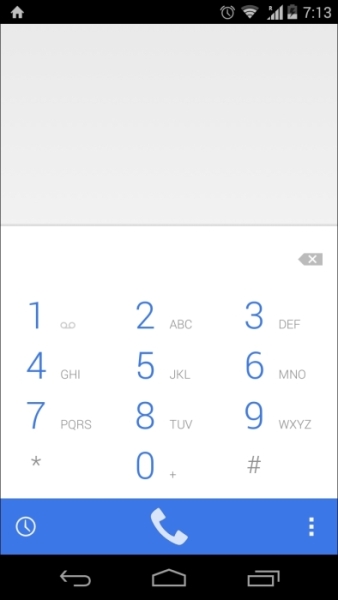
AndroidDriver driver; @BeforeClass public void setUp() throws MalformedURLException{ DesiredCapabilities caps = new DesiredCapabilities(); caps.setCapability(MobileCapabilityType.PLATFORM_VERSION, "4.4"); caps.setCapability(MobileCapabilityType.PLATFORM_NAME, "Android"); caps.setCapability(MobileCapabilityType.DEVICE_NAME, "Moto X");//I am using Moto X as Real Device caps.setCapability(MobileCapabilityType.APP_PACKAGE, "com.android.dialer"); caps.setCapability(MobileCapabilityType.APP_ACTIVITY, "com.android.dialer.DialtactsActivity"); driver = new AndroidDriver (new URL("http://127.0.0.1:4723/wd/hub"), caps); driver.manage().timeouts().implicitlyWait(30,TimeUnit.SECONDS); } @Test public void testExample(){ WebElement dialPad=driver.findElementByAccessibilityId("dial pad"); dialPad.click(); TouchAction tAction=new TouchAction(driver); tAction.longPress(driver.findElement(By.name("0"))).perform(); WebElement results= driver.findElementByClassName("android.widget.EditText"); assert results.getText().equals("+"):"Actual value is : "+results.getText()+" did not match with expected value: +"; } @AfterClass public void tearDown(){ driver.closeApp(); } - Run the test code; initially, you should see the following screen:
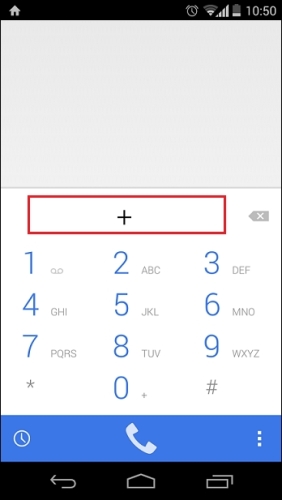
- After running the test code, you will get + in the dialer box, as shown in the following screen:
We just saw how easy it is to perform a long press on the mobile app. For this, we need to create a TouchAction object and using its reference, call the longpress function. We then pass the MobileElement, where we want to perform the long press, and finally call perform() to send the action command to the mobile app.
In the next section, we will take a look at another mobile gesture: scroll and swipe.
In general, scrolling is the process of moving the visual portions of mobile apps in order to see additional information.
On a mobile device, you can use your finger to swipe up or down in order to scroll down or scroll up the screen. Swiping your finger upwards will lead to a scroll down and swiping down will perform a scroll up.
Here, we are going to take the example of a contact app to view the desired contact details on an Android device. In the test code, we will pass the name Nitika.
Let's see this in action, as follows:
- Create a new class in the existing Appium project with the following test code:
AndroidDriver driver; @BeforeClass public void setUp() throws MalformedURLException{ DesiredCapabilities caps = new DesiredCapabilities(); caps.setCapability(MobileCapabilityType.PLATFORM_VERSION, "4.4"); caps.setCapability(MobileCapabilityType.PLATFORM_NAME, "Android"); caps.setCapability(MobileCapabilityType.DEVICE_NAME, "Moto X");//I am using Moto X as a Real Device caps.setCapability(MobileCapabilityType.APP_PACKAGE,"com.android.contacts"); caps.setCapability(MobileCapabilityType.APP_ACTIVITY, "com.android.contacts.activities.PeopleActivity"); driver = new AndroidDriver (new URL("http://127.0.0.1:4723/wd/hub"), caps); driver.manage().timeouts().implicitlyWait(30,TimeUnit.SECONDS); } @Test public void testExample(){ driver.scrollTo("Nitika"); //You can keep another name which is in your contact list } @AfterClass public void tearDown(){ driver.closeApp(); } - Run the test code; initially, you should see the following screen:
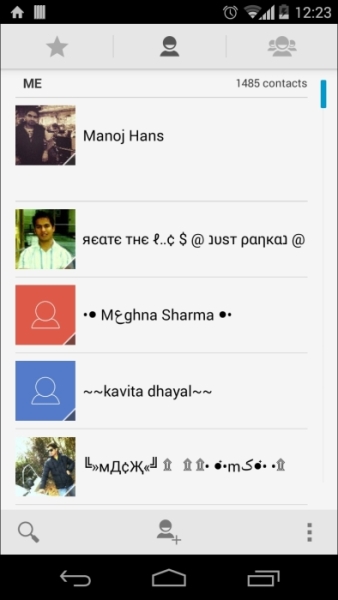
- After the execution of the test code, you should see something similar to the following screen:

We have just seen scrolling on a particular text in the contact list. We need to call the scrollTo("text") function of the AndroidDriver to view the desired contact. We have another function, scrollToExact("text"), to scroll on the page, which we will see later in this chapter while handling spinners.
Let's create an example of swiping using the x and y offsets. We can swipe the screen on the basis of a screen coordinator. Here, we are taking an example of the Google Now Launcher. You can download it from the Play Store and make it your default launcher.
In the following example, we are going to swipe to the right in order to access Google Now:
- Create a new class with the following test code:
AndroidDriver driver; @BeforeClass public void setUp() throws MalformedURLException{ DesiredCapabilities caps = new DesiredCapabilities(); caps.setCapability(MobileCapabilityType.PLATFORM_VERSION, "4.4"); caps.setCapability(MobileCapabilityType.PLATFORM_NAME, "Android"); caps.setCapability(MobileCapabilityType.DEVICE_NAME, "Moto X");//I am using Moto X as a Real Device caps.setCapability(MobileCapabilityType.APP_PACKAGE, "com.google.android.launcher"); caps.setCapability(MobileCapabilityType.APP_ACTIVITY, "com.google.android.launcher.StubApp"); driver = new AndroidDriver (new URL("http://127.0.0.1:4723/wd/hub"), caps); driver.manage().timeouts().implicitlyWait(30,TimeUnit.SECONDS); } @Test public void testExample(){ TouchAction tAction=new TouchAction(driver); tAction.press(300,500).moveTo(600,500).release().perform(); //First tap on the screen and swipe it right using moveTo function } @AfterClass public void tearDown(){ driver.closeApp(); } - Run the test code; initially, you should see the following screen:

- After the execution of the test code, you should see the following screen:

We have just seen how easy it is to do a scroll and swipe on the mobile device. In the next section, we will take a look at the drag and drop gesture.
A drag and drop operation allows you to move objects from one location to another. It is one of those mobile gestures that can really support you to make an interface simple to use.
On Android, if we press the app for a short while, it shows the options Uninstall and App info for the pressed app. Let's write the test code to get the App info option. In the case of stock apps, you will get only one option, that is, App info. Here, we are going to drag the calculator app and drop it in App info using the following steps. We are assuming that you already have Google Now Launcher:
- Create a new class with the following test code:
AndroidDriver driver; @BeforeClass public void setUp() throws MalformedURLException{ DesiredCapabilities caps = new DesiredCapabilities(); caps.setCapability(MobileCapabilityType.PLATFORM_VERSION, "4.4"); caps.setCapability(MobileCapabilityType.PLATFORM_NAME, "Android"); caps.setCapability(MobileCapabilityType.DEVICE_NAME, "Moto X");//I am using Moto X as a Real Device caps.setCapability(MobileCapabilityType.APP_PACKAGE, "com.google.android.launcher"); caps.setCapability(MobileCapabilityType.APP_ACTIVITY, "com.google.android.launcher.StubApp"); driver = new AndroidDriver (new URL("http://127.0.0.1:4723/wd/hub"), caps); driver.manage().timeouts().implicitlyWait(30,TimeUnit.SECONDS); } @Test public void testExample(){ MobileElement appsIcon=(MobileElement)driver.findElementByAccessibilityId("Apps"); appsIcon.click(); MobileElement calculator=(MobileElement)driver.findElementByName("Calculator"); TouchAction act=new TouchAction(driver); act.press(calculator).perform();//we are not releasing calculator icon act.moveTo(driver.findElement(By.name("App info"))).release().perform();// then move the icon into App Info and now released the icon } @AfterClass public void tearDown(){ driver.closeApp(); } - Run the test code; initially, you should see the following screen:

- After the execution of the test code, you should see the following screen:
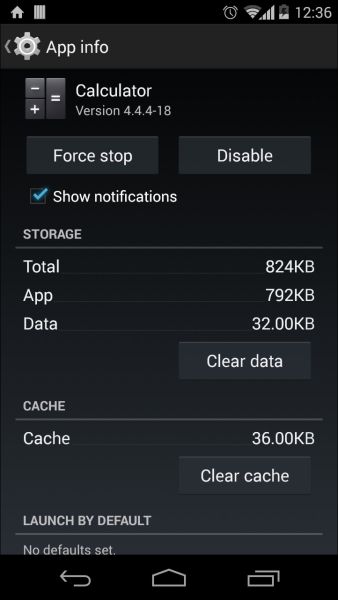
Here, we saw how easily we can perform a drag and drop operation on the mobile device. In the preceding test code, we pressed the calculator app until the App info option became visible; once it was visible, we dropped the app in it.
In the next section, we will see another useful mobile gesture: pinch and zoom.
The pinch and zoom gesture is similar to the drag gesture, but it starts when the second finger is pressed on the mobile screen. Fortunately, Appium also supports multitouch gestures using the MultiTouchAction class. You can add multiple actions simultaneously using the MultiTouchAction class.
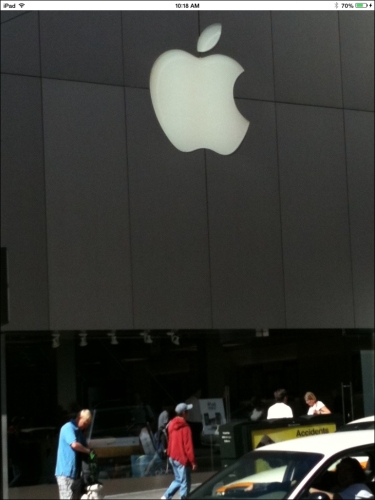
Let's create a sequence of actions using the TouchActions chain generator and then add these actions using the MultiTouchAction class. Here, we are taking an example of an iOS app, which can be downloaded from https://github.com/manojhans/Appium/blob/master/Application/iOS/Native/Zoom.zip?raw=true.
Initially, you will see the following image:

Now, let's perform the following steps to pinch and zoom:
- Create a new class with the following code:
IOSDriver driver; @BeforeClass public void setUp() throws MalformedURLException{ File app=new File("/Users/mhans/appium/ios/Zoom.app"); //You can change it with your app address DesiredCapabilities caps = new DesiredCapabilities(); caps.setCapability(MobileCapabilityType.APP,app); caps.setCapability(MobileCapabilityType.PLATFORM_VERSION,"8.1"); caps.setCapability(MobileCapabilityType.PLATFORM_NAME, "iOS"); caps.setCapability(MobileCapabilityType.DEVICE_NAME,"iPad"); caps.setCapability("udid","Real Device Id"); driver = new IOSDriver (new URL("http://127.0.0.1:4723/wd/hub"), caps); driver.manage().timeouts().implicitlyWait(30,TimeUnit.SECONDS); } @Test public void testExample(){ int scrHeight = driver.manage().window().getSize().getHeight(); //To get the mobile screen height int scrWidth = driver.manage().window().getSize().getWidth();//To get the mobile screen width MultiTouchAction multiTouch = new MultiTouchAction(driver); TouchAction tAction0 = new TouchAction(driver); TouchAction tAction1 = new TouchAction(driver); tAction0.press(scrWidth/2,scrHeight/2).waitAction(1000).moveTo(0,60).release();//press finger center of the screen and then move y axis tAction1.press(scrWidth/2,scrHeight/2+40).waitAction(1000).moveTo(0,80).release();// press thumb slightly down on the center of the screen and then move y axis multiTouch.add(tAction0).add(tAction1); multiTouch.perform();// now perform both the actions simultaneously (tAction0 and tAction1) } @AfterClass public void tearDown(){ driver.closeApp(); } - After the test execution, the image will be zoomed in and this is how it will look:
We learned a lot about advanced user interactions and have finished discussing the core aspects of Appium. In the next section, we will learn how to handle an alert dialog box.
An alert is a small window that requires a user action to make a decision or enter some extra information. We can't interact with the original window while the alert dialog is present; to work with the original window, we need to close the alert dialog.
On iOS, an alert dialog box can be handled by the Selenium Alert API but on Android OS, alert handling is not yet implemented for native apps. However, we have an alternative to handle the alert. We can find the buttons that are present on the alert box using locator strategy.
Let's take an example of the AndroidUI app, which can be downloaded from https://github.com/manojhans/Appium/blob/master/Application/Android/AndroidUI.zip?raw=true. The downloaded app will be look like:

Now, let's perform the following steps to handle the alert:
- Create a new class with the following code:
AndroidDriver driver; @BeforeClass public void setUp() throws MalformedURLException{ File app=new File("C:\mobileapp\AndroidUI.apk");//You can change it with your app address DesiredCapabilities caps = new DesiredCapabilities(); caps.setCapability(MobileCapabilityType.APP,app); caps.setCapability(MobileCapabilityType.PLATFORM_VERSION, "4.4"); caps.setCapability(MobileCapabilityType.PLATFORM_NAME, "Android"); caps.setCapability(MobileCapabilityType.DEVICE_NAME, "Moto X");//I am using Moto X as a Real Device caps.setCapability("appPackage", "com.android.androidui"); // This is package name of your app (you can get it from apk info app) caps.setCapability("appActivity", "com.android.androidui.MainActivity"); driver = new AndroidDriver (new URL("http://127.0.0.1:4723/wd/hub"), caps); driver.manage().timeouts().implicitlyWait(30,TimeUnit.SECONDS); } @Test public void testExample(){ WebElement showAlert= driver.findElement(By.name("Show Alert")); showAlert.click();// it will open the Alert box WebElement yes=driver.findElement(By.name("Yes")); yes.click();// Click on Yes button } @AfterClass public void tearDown(){ driver.closeApp(); } - Now, execute the test script:
We saw how we could handle an alert dialog box by locating the button, but this is not the preferred way to handle it. The Appium community hopes that we soon get some support via the Alert API.
In the case of hybrid and web apps, we first need to switch from web view to native apps, as shown in the following snippet:
Set<String> allContext=driver.getContextHandles();
for(String context:allContext){
  if(context.contains("NATIVE")){
    driver.context(context);// switch on the native app
  }
}
Then, we can handle the alert in the same way as a native app. In the next section, we will learn how to select a value from a drop-down list.
Spinners allow you to select a value from the dropdown list and also show the currently selected value. Now, we are going to take an example of the AndroidUI app, which we used in alert handling.
Now, let's perform the following steps to select the value from drop down:
- First, we need to find the spinner; we will find it using
id:WebElement spinner=driver.findElement(By.id("android:id/text1"));You should get something similar to the following screen:

- Now, click on the spinner; it will open the list of values:
spinner.click();
- Select the country as India, but first we need to scroll in order to view India as name:
driver.scrollToExact("India");
WebElement optionIndia=driver.findElement(By.name("India"));
optionIndia.click();
You should get something similar to this screen:

- This is how the code snippet will look:
@Test
 public void testExample(){
  WebElement spinner=driver.findElement(By.id("android:id/text1"));
  spinner.click();
  driver.scrollToExact("India");
  WebElement optionIndia=driver.findElement(By.name("India"));
  optionIndia.click();
}
We just saw how to select a value from the drop-down list. In the next section, we will learn how to handle the switch button.
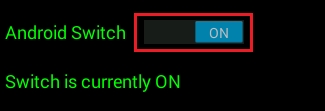
Switches are used to change the settings options; this can be easily handled in Appium.
A switch can be turned ON/OFF by just clicking on it. We can use the following code snippet to handle Android switches (using the AndroidUI app):
@Test
public void testExample(){
WebElement switchbtn=driver.findElementById ("com.android.androidui:id/mySwitch");
switchbtn.click();
}
You should get the following screenshot:
We learned how we can handle the Android switches. In the next section, we will take a look at the progress bar (SeekBar).
A SeekBar is an extension of the progress bar, which allows you to set the progress level by sliding it to the left or right using the thumb.
It is a little tricky to handle this in Appium; let's take an example that shows how to slide the SeekBar. Here, we are going to use the AndroidUI app again.
To do this, we need to perform the following steps:
- First, we need to find the SeekBar; we will find it with
id: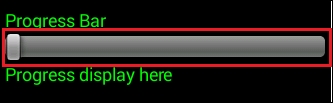
WebElement slider=driver.findElementById("com.android.androidui:id/seekBar1");Then, we need to get the SeekBar's start point and end point locations, as follows:
  int xAxisStartPoint = slider.getLocation().getX();
  int xAxisEndPoint = xAxisStartPoint + slider.getSize().getWidth();
- Now, get the SeekBar's y axis:
int yAxis = slider.getLocation().getY();
- Now, we will use the
touchActionclass to slide the SeekBar:TouchAction act=new TouchAction(driver); act.press(xAxisStartPoint,yAxis).moveTo(xAxisEndPoint-1,yAxis).release().perform();
- This is how the code snippet will look:
@Test public void testExample(){ WebElement slider=driver.findElementById("com.android.androidui:id/seekBar1"); int xAxisStartPoint = slider.getLocation().getX(); int xAxisEndPoint = xAxisStartPoint + slider.getSize().getWidth(); int yAxis = slider.getLocation().getY(); TouchAction act=new TouchAction(driver); act.press(xAxisStartPoint,yAxis).moveTo(xAxisEndPoint-1,yAxis).release().perform();//pressed x axis & y axis of seekbar and move seekbar till the end } - After execution of the test code, this is how the SeekBar will look:

We have just seen how we can slide the SeekBar using the touchAction class. Now, in the next section, we are going to learn how to capture a screenshot of a mobile app.
This topic is not necessary to show Appium functionalities but will be convenient when there are problems with your test application and you want have more information. Basically, a screenshot is captured for reporting purposes, when the test fails.
There are three approaches to taking screenshots:
- Byte
- Base64
- File
Here, we will use a file to save a screenshot. Let's take a screenshot of the calculator app, as shown here:
- Create a new class with the following test code:
AndroidDriver driver; @BeforeClass public void setUp() throws MalformedURLException{ DesiredCapabilities caps = new DesiredCapabilities(); caps.setCapability(MobileCapabilityType.PLATFORM_VERSION, "4.4"); caps.setCapability(MobileCapabilityType.PLATFORM_NAME, "Android"); caps.setCapability(MobileCapabilityType.DEVICE_NAME, "Moto X");//I am using Moto X as a Real Device caps.setCapability(MobileCapabilityType.APP_PACKAGE, "com.android.calculator2"); caps.setCapability(MobileCapabilityType.APP_ACTIVITY, "com.android.calculator2.Calculator"); driver = new AndroidDriver (new URL("http://127.0.0.1:4723/wd/hub"), caps); driver.manage().timeouts().implicitlyWait(30,TimeUnit.SECONDS); } @Test public void testExample(){ WebElement five=driver.findElement(By.name("5"));//this element is use to wait for app open File screenShot=driver.getScreenshotAs(OutputType.FILE); File location=new File("screenshots"); String screenShotName=location.getAbsolutePath()+File.separator+"testCalculator.png"; FileUtils.copyFile(screenShot,new File(screenShotName)); } @AfterClass public void tearDown(){ driver.closeApp(); } - In this section, we have captured a screenshot and saved it in a project under the
screenshotsfolder: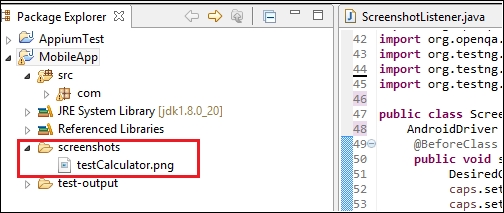
If we can capture screenshots on test failure, it will be the icing on the cake! In the next section, we will see how to take a screenshot on test failure.
Now that we are familiar with capturing screenshots, we are going to take a look at how to capture screenshots on test failure in this section. Here, we will use TestNG listeners; listeners basically run on particular events. An event can be anything such as test passed, failed, or skipped.
TestNG gives us the flexibility to choose listeners as per our requirement, so we are going to use TestListenerAdapter, which has methods to override when the test fails. So, let's write the code for a screenshot on test failure.
We need to create two classes: one for the listener and another for the test code; we need to import the following packages:
import io.appium.java_client.AppiumDriver;import java.io.File;import java.io.IOException;import org.apache.commons.io.FileUtils;import org.openqa.selenium.OutputType;import org.testng.ITestResult;import org.testng.TestListenerAdapter;
Perform the following steps to capture screenshots on test failure:
- Create a new class with the following code:
public class ScreenshotListener extends TestListenerAdapter{ @Override public void onTestFailure(ITestResult tr){ AppiumDriver driver=Screenshot.getDriver();// getting driver instance from TestApplication class File location=new File("screenshots");// it will create screenshots folder in the project String screenShotName = location.getAbsolutePath()+File.separator+ tr.getMethod().getMethodName()+".png"; // Getting failure method name using ITestResult File screenShot=driver.getScreenshotAs(OutputType.FILE); try { FileUtils.copyFile(screenShot,new File(screenShotName)); } catch (IOException e) { e.printStackTrace(); } } } - We can use this listener in any class, which has unit test cases, using the
@Listenersannotation. Let's create another class to use this listener, as shown here:@Listeners({ScreenshotListener.class}) public class Screenshot { static AppiumDriver driver; @BeforeClass public void setUp() throws MalformedURLException{ DesiredCapabilities caps = new DesiredCapabilities(); caps.setCapability(MobileCapabilityType.PLATFORM_VERSION, "4.4"); caps.setCapability(MobileCapabilityType.PLATFORM_NAME, "Android"); caps.setCapability(MobileCapabilityType.DEVICE_NAME, "Moto X");//I am using Moto X as a Real Device caps.setCapability(MobileCapabilityType.APP_PACKAGE, "com.android.calculator2"); caps.setCapability(MobileCapabilityType.APP_ACTIVITY, "com.android.calculator2.Calculator"); driver = new AndroidDriver (new URL("http://127.0.0.1:4723/wd/hub"), caps); driver.manage().timeouts().implicitlyWait(5,TimeUnit.SECONDS); } @Test public void testExample() throws IOException{ WebElement two=driver.findElement(By.name("2")); two.click(); WebElement plus=driver.findElement(By.name("+")); plus.click(); WebElement four=driver.findElement(By.name("4")); four.click(); WebElement equalTo=driver.findElement(By.name("=")); equalTo.click(); WebElement result=driver.findElement(By.className("android.widget.EditText")); //Check the calculated value on the edit box assert result.getText().equals("8"):"Actual value is : "+result.getText()+" did not match with expected value: 8"; } @AfterClass public void tearDown(){ driver.closeApp(); } public static AppiumDriver getDriver(){ return driver; } } - In the example, we are putting the
falsecondition to fail the test; once the test fails, theScreenshotListenerclass will be called automatically and will take a screenshot of the mobile app: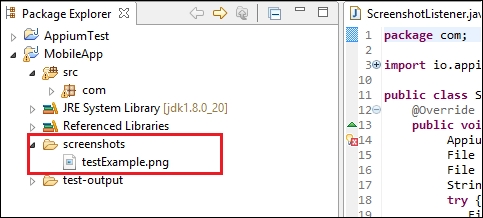
Note
To learn more about TestNG listeners, you can visit http://testng.org/doc/documentation-main.html#testng-listeners.