CHAPTER 1
Introduction
One of Aperture’s biggest assets is that it gives you the ability to work with Raw images without converting them to other formats. At the end of this process, if you want to use the output images in other applications, on the Web, or in commercially printed publications for example, Aperture’s Raw decoder can convert the Raw files into TIFF, JPEG and other image file formats.
You can, of course, use Aperture in a non-Raw workflow to organize and edit TIFF or JPEG files from your camera, but you’d be missing out on the opportunity to obtain the highest quality images that your camera is capable of producing with Aperture’s help.
Aperture’s Raw decoder is designed to help you squeeze the last ounce of quality from your digital images, from the Raw Fine Tuning controls that allow you to influence the way Aperture’s decoder interprets the data in your camera Raw files to the tonal adjustments that allow you to recover apparently lost highlight and shadow detail. Aperture’s tools are designed primarily to work with camera Raw files.
Knowing what camera Raw files are, how they differ from RGB file formats like TIFF, JPEG and PSD, and how camera Raw data are produced and stored will influence every aspect of your digital imaging workflow, from your choice of exposure to how and when you apply sharpening to your images.
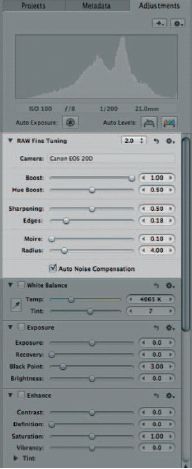
Fig. 1.1 The Raw Fine Tuning brick on Aperture’s Adjustments Inspector.
In this chapter we begin by taking a look at what camera Raw is and what are the advantages and disadvantages of adopting a Raw digital imaging workflow. If you’re not currently shooting Raw, and aren’t sure if this is for you, this information may help you come to a decision.
Following that, we take a fairly technical look at how imaging sensors record the data in a scene and how that information is stored in a camera Raw file. It’s not essential to know this, but it will help you make shooting and editing decisions that produce the final image of best possible quality.
The second half of the chapter deals specifically with the Adjustment controls found in the Raw Fine Tuning brick of Aperture’s Adjustments Inspector (Fig. 1.1). These are available only when working with camera Raw files and determine how Aperture’s Raw decoder interprets Raw data to produce an RGB image ready for further editing. If you’re new to Aperture, you might want to fast forward to Chapter 2 to familiarize yourself with the workspace and how Aperture works with images and Versions before returning to this section.
The chapter ends with an explanation of Adobe’s DNG Raw format and the advantages it offers in an Aperture-based Raw workflow.
What is Camera Raw?
The first thing to understand about camera Raw is that it is not one file format, but many. Camera Raw formats are proprietary, developed by camera manufacturers to best handle the data produced by individual models. Hence, the Raw file format produced by Canon’s EOS 5D will differ from that produced by the Nikon D3 and even from other Canon dSLRs.
Though there are some important differences, Raw is just another file format like JPEG or TIFF. The major difference is that Raw files contain unprocessed data from the camera sensor. Before Raw data can be viewed as an RGB image, they have to undergo a number of processes. If you shoot in an RGB format, such as TIFF or JPEG, this processing is done in the camera. If you shoot Raw, the same is done by Raw decoder software like that used in Aperture.
Raw Support
The proprietary nature of camera Raw formats has a number of important implications for the photographer whose livelihood may depend on the integrity of and future access to a Library of images.
In practical terms, your ability to view and manipulate Raw files from your camera depends upon the availability of software which is able to read those files. Camera manufacturers usually supply a software utility for this purpose and, as well as MacOs 10.5 Leopard and Aperture, an increasing number of applications developed by third party vendors now support a wide range of proprietary Raw formats. Apple maintains a list of Camera Raw formats supported by Aperture 2 on its website at http://www.apple.com/aperture/specs/raw.html (Fig. 1.2).
Raw file formats tend to adapt and change to keep pace with hardware development. Thus, when a camera manufacturer releases a new model it’s possible that the Raw file format will differ in some respect or other from the one used in previous models.
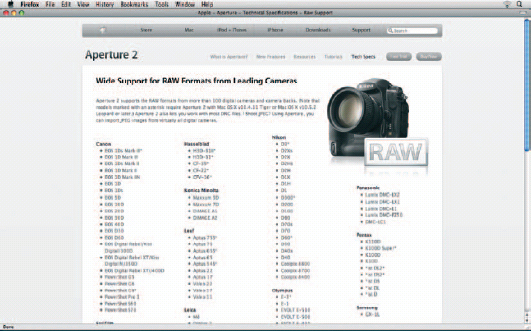
Fig. 1.2 You will find a list of all the Raw formats supported by Aperture at http://www.apple.com/aperture/specs/raw.html.
The practical consequences of this are two-fold. First, it means that if you buy a newly released camera model and shoot Raw with it, you may not be able to import those files to Aperture, or any other third party application until they are able to provide support for it. Given the proprietary nature of Raw formats, this process can take time. In the meantime, you may be forced to rely on the manufacturer’s software to read and convert Raw files into a format that your software can handle.
A second, more long-term issue concerns image archiving. Given the pace of change of digital hardware, it’s not unlikely that in the course of, say, the next decade, you’ll own and use a variety of cameras, each with its own flavor of camera Raw file format. At the end of this period and for the foreseeable future beyond, it would be reassuring to know that you could rely on the availability of software to allow you to open and manipulate those images the way you do today.
Regrettably, if past history is anything to go by, this is by no means a certainty. Camera manufacturers, software companies, hardware platforms and operating systems come and go. Even assuming they are still around for 20 years, how likely is it that they would be willing to support a format for a camera that nobody has used for decades?
There are, however, ways in which you can future-proof your images from this risk. Simply by importing your photos to Aperture you are providing one means of defense. It’s fair to assume that Aperture’s Library and Vault backup files will continue to be readable by future Versions of the program. Another means of ensuring future readability of your Raw files is to convert them to Adobe’s published ‘digital negative’ DNG format. This option is discussed in greater detail later in this chapter.
The Pros and Cons of a Raw Workflow
More and more professional photographers are realizing the benefits of shooting Raw as opposed to TIFF or JPEG. The fact that many dSLRs now provide the option of saving both types of file from a single shot gives you the option of producing a ‘just in case’ Raw file. It may be that your usual workflow involves very little image processing, subjects aren’t problematic from an exposure point of view, and that 8-bit JPEGs provide good-quality images.
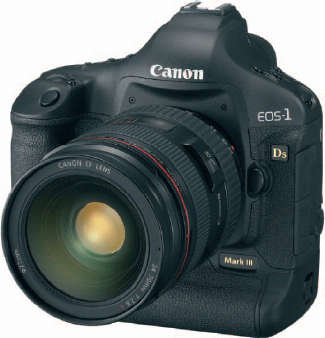
Fig. 1.3 Support for new camera Raw formats is provided in the MacOs operating system. Owners of newer digital cameras like the Canon EOS-1DS Mark III, which was launched in August 2007, had to wait for the MacOs 10.5.2 update in February 2008 before they could work with Raw files from the camera in Aperture. Baseline DNG support in Aperture 2 provides a stop-gap solution for this kind of issue in the future.
In such situations you might think of Raw files as an insurance policy to fall back on should the lighting turn out to be problematic, or the White Balance off. You can correct RGB files in these circumstances, but Raw files will provide you with more options and generate a better quality end result.
There is, of course, a downside to shooting Raw. The files are bigger than JPEGs, they take longer to write and, if you’re not using Aperture, you may have to introduce at least one extra processing stage to your workflow. On balance though, we’d argue that advantages heavily outweigh the disadvantages. If you’re still undecided, the following might convince you in one way or the other (Fig. 1.4).
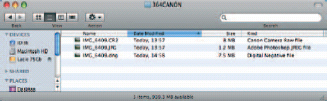
Fig. 1.4 These three files are all from the same image shot in Raw with JPEG mode on a Canon EOS 20D. The Raw file comes in at 8 Mb with the JPEG occupying only 1.2MB. The third file was produced from the .CR2 file using Adobe DNG converter with lossless compression selected.
Benefits
Overall Quality
In a well-exposed image with a full range of tones that do not require processing, the differences between, say, a TIFF file produced from your camera and one produced using Aperture’s Raw converter would probably be marginal. This is probably the only situation in which there is little advantage to be gained from shooting Raw, but probably not one that occurs all that regularly for most photographers.
Bit Depth
Camera Raw files use the full number of bits (usually 12) available in the image data. If you shoot JPEGs, this is downsampled to 8 and the camera, not you, makes the decision about how effectively it uses those bits to represent the tonal levels in the image. For some images this can result in the irretrievable loss of highlight and/or shadow detail.
No Compression
Camera Raw files are not usually compressed, if they are, a lossless algorithm is employed. JPEG compression, even at the highest quality settings, removes a lot of data from your images which can severely limit what your are able to achieve in post-processing.
Increased Latitude
Latitude describes the exposure characteristics of film emulsions or digital sensors in terms of their ability to cope with a range of light levels. When the range of light levels (called the dynamic range) in a subject is within that capable of being recorded by the film or sensor, latitude provides an indication of the degree to which the image can be over- or underexposed while still producing acceptable results (i.e. image detail in the highlights and shadows)
In a Raw workflow, your images have greater latitude than if you’re working with RGB files. By using Aperture’s Exposure, Levels, and Highlight and Shadow tools, you can ensure that the critical tonal regions receive the maximum number of bits. In practise, this means you can pull detail from apparently blown highlights and, to a lesser degree, rescue shadow detail and produce a robust image capable of withstanding further pixel manipulation.
Future Improvements
Currently Aperture’s Raw converter does an excellent job of producing high quality RGB files from camera Raw data, even in relatively inexperienced hands. Future releases will doubtless improve on this, thereby making it possible for you to revisit your archived Library and produce even better images for your 2050 retrospective.
Disadvantages
More to Do
In many digital imaging workflows, Raw images introduce an extra processing stage as they must be converted to RGB files before they can be used, for example, printed, added to a Web page, or undergo further editing. Because Aperture treats all files as Master images, and stores Versions and their edits and adjustments internally, there is, in fact, little difference between working with Raw files and JPEGs or TIFFs.
Bigger Files
Raw files are bigger than JPEGs and this has consequences all the way down the line. It takes longer to write Raw files to a data card in the camera with the obvious consequences for action photography. Raw files will take up more hard disk space and, because of the necessity to generate an RGB TIFF if you want to edit the image in Photoshop, it’s necessary to produce duplicates. On the upside, because Aperture handles all adjustments to the original Raw Master on the fly, there’s no need to keep several edited Versions of images.
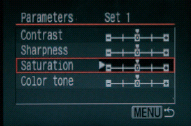
Fig. 1.5 dSLR parameter settings provide in-camera control over some aspects of Raw processing.
Proprietary, Closed Formats
As we’ve seen, Raw is not one format but encompasses many different proprietary file formats. This carries a risk in terms of the availability of future support for existing camera Raw formats.
From Raw to RGB
Raw files contain information about brightness values recorded by each photosite on the camera sensor. These data are analyzed and referenced according to its position on a grid to determine the color value of each image pixel (see ‘How sensor data is captured and stored’ on page 12).
This process, called demosaicing, determines the color of pixels in the data matrix depending on their position and the color of neighboring pixels. The resultant image is then color calibrated according to the camera’s White Balance settings, saturation is determined, and the image may be sharpened. Finally, the image color space is assigned and, if you are shooting JPEGs, the file is compressed.
Some of what happens during this process is determined by your camera settings. Most dSLRs provide ‘parameter’ sets which apply manufacturer- or user-defined presets for all of these settings (Fig. 1.5).
By setting your camera to shoot in Raw mode, you are effectively bypassing this in-camera processing of the sensor data. This means that before you can view the files, you have to process the data yourself and this is where the huge advantage of working with Raw files becomes clear.
When Raw image data is processed in the camera to produce a JPEG or a TIFF file, decisions are made about how the data are interpreted – some of the data are even discarded. The camera’s processing algorithms are designed to produce the best result under all possible conditions, but your camera can’t tell if the image it is processing is correctly exposed, if the scene before it contains a full range of tones, or whether the shadow detail is more important to you than the highlights. By delaying processing of the Raw file until you’ve seen the image, you can decide for yourself how best to interpret the data to produce a robust RGB file.
You can, of course, manipulate tones and colors and make other changes to an 8-bit TIFF or JPEG file processed by your camera, but these edits are destructive. Even minor Levels adjustments in Photoshop can produce tonal discontinuities and exaggerate noise. Such changes applied to Raw files don’t always carry the same penalties because you are not only working with much more of the image data to begin with but also interpreting this to produce a clean RGB file (Fig. 1.6).
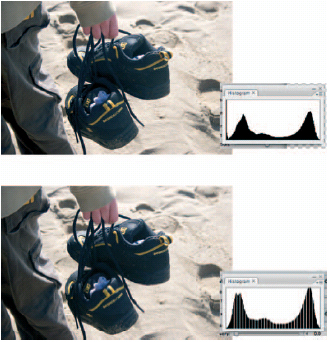
Fig. 1.6 Both of these images have had a Levels adjustment applied to darken the shadows and increase image contrast. Both images are from the same original camera Raw file. For the top image, the Camera Raw Master was Levels adjusted in Aperture and the image was opened in Photoshop as a 16-bit PSD. Despite the Levels adjustment, the Photoshop Histogram is smooth and shows no discontinuities. The bottom image was opened unadjusted in Photoshop, also as a 16-bit PSD, then downsampled to 8 bits per channel using Image > Mode > 8 Bits/Channel. It was then given a similar Levels adjustment to the top image in Photoshop. Because there is less information in this image, the adjustment has produced discontinuities in the Histogram. In severe cases these will appear as posterization or banding. Raw files are much more robust and able to tolerate much greater tonal manipulation than 8-bit RGB files. Whereas the top image still has sufficient information to undergo further editing, further adjustments to the bottom file will likely result in visible posterization, noise and other artifacts.
How Sensor Data is Captured and Stored
A sensor consists of a grid, or ‘array’ of individual photodiode receptors which convert the light that falls on them into an electrical voltage. The voltage varies in direct proportion to the amount of light and is converted into a number by an analog to digital converter.
Image sensors don’t detect or measure color, but only light, or ‘luminance’, which is represented digitally as a grayscale value. The color information is provided by a ‘color filter array’ consisting of red, green, and blue cells placed over the sensor.
As we know from the trichromatic theory of color reproduction, all colors can be composed of the three primaries red, green, and blue. Although each pixel in the sensor array measures only one primary color, the ‘missing’ two components for each pixel are interpolated by analysis of neighboring pixel values in a process known as demosaicing.
It is this grayscale data, along with some metadata, that is stored in the camera Raw file. Among other things, the metadata include the camera’s White Balance setting, the ISO setting, and other exposure and metering values, but, if you are shooting Raw, this information is simply recorded, and is not applied to the data to create an RGB image.
In-Camera Processing and the Aperture Alternatives
By taking a look at how captured sensor data are processed to produce an RGB image file, you can better understand how to use Aperture’s adjustment controls to extract the utmost quality from your Raw files.
Demosaicing and Color Space Conversion
As we’ve seen, camera sensors produce only luminance information that is initially recorded as grayscale values. By making use of a colored grid, or color filter array placed over the sensor, the correct color value for each image pixel can be determined by a process called demosaicing.
The most common type of array in use is the Bayer pattern, which alternates lines of red/green and blue/green cells – there are twice as many green cells as red or blue because the human eye is more sensitive to that portion of the visible spectrum. To determine the correct value for a given pixel, the demosaicing algorithm assesses the value of both that pixel and its neighbors (Fig. 1.7).
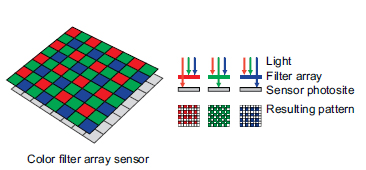
Fig. 1.7 A color filter array placed over the camera’s image sensor filters light to transmit only red, green or blue at specific sensor locations. By analysing the luminance values of a single sensor location and its neighbors the color of individual pixels is determined. This process is known as demosaicing.
This is one process that Aperture doesn’t give you much control over. It happens automatically using profiles which tell Aperture about the color characteristics (e.g. the type of filter array used) of the camera used to create the Raw file.
You do, however, have the option to influence the result using controls in the Raw Fine Tuning brick of Aperture’s Adjustment Inspector. If you are using the Version 2.0 decoder, these include Boost, Hue Boost, Sharpening, Moiré, and Auto Noise Compensation. See Raw Fine Tuning in Aperture for more details on using these adjustments.
In their default positions, all of these are set to produce optimal results for the given camera profile; you may, however, be able to achieve better results through experimentation on individual images. If you find something that works well, you can save it as a preset by selecting Save as Preset from the action menu.
Tonal Mapping
If you want to produce the best possible quality images from your Raw files, understanding how digital cameras record tonal data and how to safely manipulate that data will underpin virtually every adjustment you make to a digital photo from here on.
The human eye doesn’t see light in a linear fashion. That is to say, if twice as much light enters your eye it doesn’t appear twice as bright. It’s this non-linearity of response that enables us to see so well in such a wide range of conditions – from a dimly lit room to bright sunshine. One other thing that’s important to know about the human eye is that it is much more sensitive to shadow detail than it is to highlights. You can differentiate more tones in a dark scene than you can in a light one (Figs 1.8 and 1.9).
Film responds to light in a similar non-linear fashion and if you plot a curve of this response with input along the x-axis and output on the y-axis you get a gamma curve which describes it (Fig. 1.10). Although film stock characteristics vary, the general appearance of a film gamma curve is S-shaped like that in Fig. 1.11.
Unlike our eyes and photochemical emulsions, digital sensors have a linear response with a gamma of 1. Their gamma curve is a 45 degree straight diagonal line.
Most digital cameras use 12 bits per pixel to record tonal information in a Raw image file. Those bits are allocated across the range of tones that the sensor is capable of recording from the darkest black to the lightest white providing 4096 (2 12) discrete levels. Assuming your camera is capable of recording a dynamic range of six stops, which is typical for a modern dSLR, you might expect that one sixth of the available bits is allocated to each stop so that the darkest and the brightest levels contain equal numbers of data. This is not the case.

Fig. 1.8 The way digital camera sensors record light.

Fig. 1.9 The way the human eye perceives light.

Fig. 1.10 Linear gamma curve.
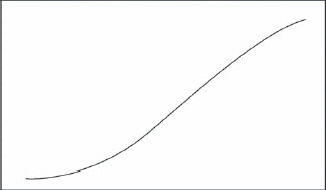
Fig. 1.11 Gamma curve for a typical film emulsion.
In fact, half of the levels, 2048, are used to record the brightest stop, leaving 2048 for the remaining five stops. Half of these (1024) are devoted to the next stop, half of the remainder (512) to the next, and so on down to the darkest stop which gets 64 levels (Fig. 1.12).
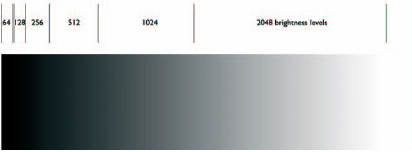
Fig. 1.12 This diagram shows how data are allocated to represent the brightness levels in a 12-bit image. Half of all the image data are used to represent the brightest stop. Half of the remainder are allocated to the next stop and so on. While the brightest stop gets 2048 brightness levels, the darkest gets only 64. This has significant implications both for exposure settings when shooting and for tonal adjustments of shadow detail in Raw images.
Do you see the problem? The shadow details, to which our eyes are most sensitive, are recorded using the least number of data and therefore the fewest grayscale levels. This has important consequences for how you shoot Raw images, how you convert them to RGB files, and how you make tonal and color adjustments.
As we have seen, adjustments to Raw images do not carry the same consequences for data loss and image degradation as with RGB image files. That does not mean your changes will not affect image quality. There would not be any point in working with Raw files if you could not achieve quality improvements, though you could also make things worse if you are not careful.
Clearly, if the shadow regions of an image are recorded using relatively few levels, manipulation of those levels is likely to cause problems. Any adjustment that stretches the Histogram to the right, moving data from the shadows to the midtones, e.g. Levels, or Highlights and Shadows, carries the risk of introducing image artifacts such as posterization or noise.
You are only likely to need to make such adjustments with images that are underexposed, where the Histogram is bunched up on the left. So it clearly pays to avoid underexposure. The generally accepted rule when shooting Raw is to set your exposure so that the highlights are close to blowing out without actually doing so. In doing this, you ensure that tonal detail is recorded using all of the available bits.
Let’s suppose you shoot a subject and subsequently discover the Histogram is bunched on the left with no pixels visible on the right hand side, in the area normally occupied by the brightest stop of image detail (Fig. 1.13). By doing so, you would have effectively sacrificed half of your camera’s capacity to record tonal detail before you have even started processing the image. This is not a good start.
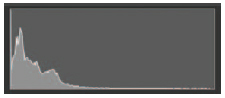
Fig. 1.13 If your Histograms look like this, you are wasting most of your camera’s ability to record tonal information.
When you come to making image Adjustments in Chapter 5, you will discover that the Histogram is your best guide when determining what controls to adjust and how far to go with them. Likewise, when you are shooting Raw, the camera Histogram is your best guide to determining whether your exposure settings are providing you with the most data-rich image it is possible to obtain and the one which provides the best opportunity for processing into a high quality RGB file.
It can often be difficult to determine from a camera Histogram at exactly what point image highlights are blown beyond recovery. For one thing, the displayed Histogram is adjusted to a nonlinear gamma and so it does not tell you the whole story and can exaggerate highlight clipping. For another, Aperture is quite good at recovering lost highlight detail; so a small amount of clipping at the right side of the Histogram is not necessarily the end of the world and, in any case, is preferable to losing shadow detail from the other end (Fig. 1.14).
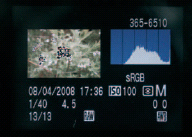
Fig. 1.14 Camera Histograms show the data for a gamma-adjusted image and can exaggerate highlight clipping which, in any case, can easily be recovered in Aperture. A small degree of highlight clipping is infinitely preferable to underexposure.
White Balance
The White Balance setting on a digital camera makes a qualitative assessment of the lighting conditions in the scene being photographed and interprets the data so that white areas in the scene appear white in the image and other colors are accurately reproduced.
You can tell the camera about the ambient lighting conditions by using a White Balance preset, such as ‘Daylight’ or ‘Tungsten’ or by setting a specific color temperature. By using the automatic White Balance setting you can let the camera determine the color temperature of the ambient light, or you can set the White Balance more accurately by using a custom White Balance setting and taking a reading from a neutral surface, such as a white wall, or neutral gray card, in the scene you are about to photograph.
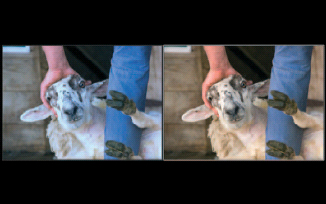
Fig. 1.15 The image on the left has been shot with the camera White Balance incorrectly set for artificial light. Using Aperture’s White Balance Adjustment you can correct for this by indicating the approximate color temperature of the lighting conditions in the scene (or simply judging the result visually). Because the White Balance Adjustment occurs prior to conversion of the raw data, it’s exactly the same as if you’d set the correct White Balance on the camera. This is not the case with RGB files, which will suffer a loss in image quality as a result of such a color correction.
If you are not shooting Raw it is important to get the White Balance right, because inaccuracies will need to be corrected and such corrections to pixel values are destructive and result in a loss, albeit marginal, in image quality.
When shooting Raw White Balance is less of an issue; in fact, it’s not an issue at all because, as the Raw image data hasn’t been colorimetrically interpreted, the White Balance has not yet been determined, and you can do that in Aperture.
In practice, this makes the Camera’s White Balance setting more or less irrelevant. You can adopt whichever of the above mentioned White Balance methods you favor, sure in the knowledge that, if a problem arises, it can easily be dealt with. Aperture will use the camera’s White Balance setting to make the initial conversion so that the image can be displayed and this is what will appear in the White Balance section on the Adjustments Inspector.
It’s important to understand that this White Balance is not ‘fixed’ as it is for RGB files. The white balance information from the file metadata is applied to the Raw image to produce what you see on the screen. You can drag the slider to set any White Balance you want and this is effectively the same as setting the White Balance in the camera.
Noise Reduction and Sharpening
Noise reduction in the camera is a proprietary process developed by the camera manufacturer to reduce image noise. Light falling on a camera sensor produces an electrical charge which is amplified before being converted to a number by an analog to digital (A/D) converter.
Analog systems such as this are subject to noise – a component of the signal that is generated by the circuitry and which, if you like, pollutes the pure signal. Noise in digital images is often compared to film grain and, just as faster films exhibit more graininess, digital images shot at higher ISO rating display more noise (largely as a consequence of analog signal amplification resulting in a lower signal to noise (s/n) ratio). Visible noise can also be generated by long exposure settings.
Camera manufacturers implement noise reduction algorithms to deal with the noise characteristics of sensors at given ISO settings. Aperture’s Auto Noise Compensation is an on or off control that performs a similar function and also removes so-called hot and cold image pixels caused by camera sensor faults (Fig. 1.16).
Additionally, the Noise Reduction adjustment can be applied in varying degrees depending on the amount of correction required. See Chapter 5 for more details on how to use the same.
The demosaicing process produces slightly soft images, and noise reduction tends to exaggerate this softness. In camera, sharpening is usually subsequently applied to redress the balance and produce images with acceptably well-defined edges. Aperture’s Raw fine tuning provides a Sharpening adjustment with two settings – Sharpening (Intensity in the 1.1 decoder) and Edges.
Most digital sharpening tools work by enhancing contrast in edge detail and this tool is no exception. The Sharpening control determines how much the edge contrast is increased and the Radius slider defines the edge boundary – it tells Aperture how far to look on either side of a given pixel to detect a change in contrast.
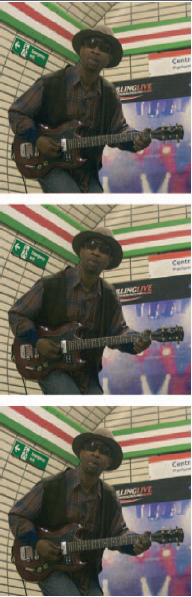
Fig. 1.16 Section from an 800 ISO image with (top) no noise reduction (Auto Noise Compensation turned off, (middle) Auto Noise Compensation turned on and (bottom) Auto Noise Compensation and Noise Reduction.
Raw Fine Tuning in Aperture
Raw Fine Tuning
The Raw Fine Tuning brick at the top of Aperture’s Adjustments heads-up display (HUD) provides some user control over how images are decoded to find out the ones that can be used to adjust the appearance of decoded images to a degree.
Which Decoder?
The Decoder Version pop-up menu provides four options – 1.0, 1.1, 2.0 DNG and 2.0. In most circumstances, 2.0 is the default decoder; it is the most recent Version and will usually produce the best results. For all new images imported into Aperture 2.1 you should use the 2.0 decoder.
![]()
Fig. 1.17 Raw Fine Tuning controls for Decoder 1.0.
The 1.0 and 1.1 decoders are legacy Versions from Aperture 1.0 and 1.1 respectively. They are included to maintain consistency for images originally decoded with them in earlier Versions of Aperture. Images originally decoded in, for example, Aperture 1.1 with the 1.1 decoder will continue to be decoded with the 1.1 decoder when you display them in Aperture 2.1 and will look exactly the same as before.
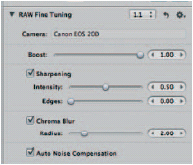
Fig. 1.18 Raw Fine Tuning controls for Decoder 1.1.
Depending on your workflow and the final output destination for your images, you may want to continue with the legacy decoders for older images. If consistency is not an issue you will be able to produce better quality results by switching to the more recent 2.0 decoder. This is particularly the case for images using the 1.0 decoder.
To change the decoder Version used for individual images, simply select the new Version from the pop-up menu. The Version 1.0 decoder has no adjustment sliders – all the decoding parameters are set automatically. The Version 1.1 decoder has a Boost slider, which controls contrast, sharpening controls, a Chroma Blur adjustment, which helps reduce the effects of chromatic aberration and optional Auto Noise Compensation (Figs 1.17 and 1.18).
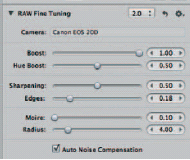
Fig. 1.19 Raw Fine Tuning controls for Decoder 2.0.
The Version 2.0 Decoder
The Version 2.0 decoder adds a Hue Boost slider under the Boost slider (Fig. 1.19). This is used to maintain the hue values in an image as the contrast is increased. Higher Hue Boost settings cause color in the image to shift more as the Boost slider is increased. At lower Hue Boost settings, boost has less of an effect on color values in the image. In practise, high Hue Boost settings work well for images with saturated primary and secondary colors, like flowers. You can use lower Hue Boost settings to maintain natural skin tones in portraits.
The default for Boost and Hue Boost settings is 1.0 and 0.5 respectively. This does not mean that the same settings are applied to all images. 1.0 is the recommended amount of boost for the camera Raw format of the selected image. You can reduce this, but not increase it (Figs 1.20 and 1.21).
Reducing the Boost is often a good first step in recovering highlight detail in overexposed images or those with a high dynamic range. See Chapter 5 for more details on how to go about this.
Sharpening
Next on the Raw Fine Tuning brick are two sliders which control sharpening. The sharpening adjustments on the Raw Fine Tuning brick are designed specifically to compensate for softening of the image which occurs as a result of the demosaicing process.
Like the other Raw Fine Tuning adjustments, Sharpening is applied on the basis of the camera model characteristics – different sharpening parameters will be applied, for example, to images from a Nikon D3, than to those from a Canon EOS-1DS Mark III.
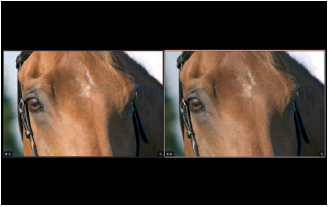
Fig. 1.20 The Version on the left has the default Boost adjustment of 1.0; on the right this has been reduced to 0.5. For most images the Default Boost setting produces excellent results.
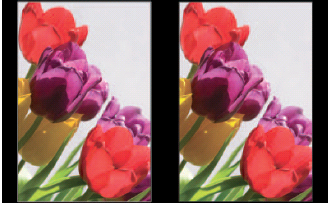
Fig. 1.21 Both of these Versions have a Boost setting of 1.0. The Version on the left has a Hue Boost setting of 0; the one on the right has a Hue Boost setting of 1. The difference is marginal, but most noticeable in the yellows and greens.
The sharpening slider controls the amount, or intensity, of sharpening and the Edges slider defines the largest group of pixels which, for sharpening purposes, constitute an edge. As you drag the Edge slider to the right, more of the image is sharpened.
Sharpening has a very minimal impact on the image compared with Aperture’s Edge Sharpen adjustment. See Fig. 5.29 in Chapter 5 for a comparison of an image with the default sharpening settings applied and that with no sharpening. You will also find a more detailed discussion of sharpening in general.
Given that it has such a marginal effect, you might be tempted to turn Sharpening off altogether. In our view this is not a good idea. For most images, the best option is to leave Sharpening on it default setting and use Edge Sharpen later in your workflow to sharpen images in preparation for output.
Moiré and Chromatic Aberration
The Moiré adjustment and its associated Radius slider are used to reduce the effects of Moiré interference patterns and fringing caused by chromatic aberration in lenses.
Moiré patterns will be familiar to anyone who has experience of commercial printing, where they commonly occur as a result of interference between fine image detail and halftone reproduction screens. In cameras they are similarly brought on by interference between the color array and repeating fine image detail.
Chromatic aberration is a lens fault where light of different wavelengths is focused in different planes. It results in a colored fringe, usually purple, around backlit objects. In good-quality lenses, chromatic aberration is rarely present, but it is difficult to eliminate in ultra-wide-angle lenses and can often be seen in images from digital compacts.
To reduce Moiré or fringing, drag both sliders to the extreme right to apply the maximum amount of Moiré at the largest radius setting – 1.00 and 25 respectively. Reduce the Moiré until the effect starts to reappear, then increase it just enough to eliminate it. Finally do the same with the Radius slider, reducing it until the Moiré pattern starts to reappear in areas of the image and adjusting back up to the minimum setting required to eliminate the effect.
Changing Decoder Settings for Multiple Images
Using the Decoder Version pop-up menu to update individual images to the version 2 decoder is fine if you’re happy to update images on an ad hoc basis when you are working with them. If you want to update all of the images in your Aperture Library to the Version 2.0 decoder, or even a single Project, there’s a better way to do it.
Select the images in the Browser, or select a Project or Album in the Projects Inspector and choose Migrate images from the File menu. You can also migrate books, Web galleries, Web journals, Web pages, Light Tables, and Smart Albums. Select the Library to migrate all of the images in your Library, but be aware that for large Libraries this could take some time.
The dialog box provides a number of ‘upgrade’ options. If you click the first radio button – ‘Upgrade existing RAW images’ (the default setting) existing Masters and Versions will be switched to the Version 2.0 decoder (Fig. 1.22). If you want to keep the existing images in their present legacy-decoded state and produce new Versions using the 2.0 decoder check the ‘Create upgraded Versions of existing Raw images’ radio button.
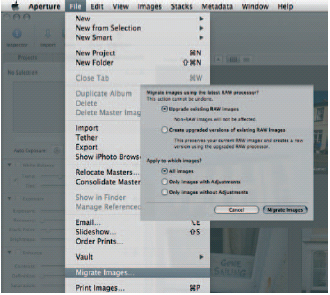
Fig. 1.22 Migrate Images produced using earlier Versions of Aperture’s Raw decoder by selecting > File Migrate Images. In the Migrate Images dialog box you can elect to ‘Upgrade existing Raw Images’ or keep the old ones and create new Versions using the Version 2.0 decoder. Non-Raw images and those that already use the Version 2.0 decoder remain unaffected.
Use the three radio buttons in the lower half of the dialog box to choose to upgrade all images, only images with adjustments, or only images without adjustments. Once images have been upgraded to the Version 2.0 decoder, you can not migrate them back, or undo the process, but you can individually change them back to earlier Decoder Versions using the Decoder Version popup menu on the Adjustments Inspector.
Non-Raw images are ignored by the migration process, as are those Raw files that already use the Version 2.0 decoder.
DNG
If your camera Raw format is not supported by Aperture, one way around the issue is to convert the Raw files to Adobe DNG format. DNG is a Raw format published by Adobe in the hope of creating a single industry standard and open Raw format as an alternative to the multitude of proprietary Raw formats currently in existence.
One advantage of this for developers of software that works with camera Raw files is that it would not be necessary to add support for new formats each time a new camera model is released. And owners of those new cameras would not have to wait for their image management and editing applications to add support; so they can start using them with images from their new hardware.
Although some camera manufacturers, such as Hasselblad, Leica, Ricoh and Samsung, produce models which can write Raw files in DNG format, most manufacturers continue to use proprietary camera Raw formats. But you do not need a camera that writes DNG files to be able to use it in your Raw workflow. Adobe’s DNG converter application converts files from a wide range of camera Raw formats into DNG.
Even if Aperture supports Raw format files from your camera, there are advantages to converting your Raw files to DNG. We have already talked about the risks of archiving images in a proprietary unpublished format and the problems inherent in adding software support for new formats as they become available. As well as standardizing on a single format for all of the images you produce in the future, regardless of hardware developments, DNG can help you work with images for which Aperture does not currently provide support.
Because DNG files can contain embedded IPTC (International Press Telecommunications Council) metadata, they can also provide a vehicle for migrating images that have had metadata added in other applications to Aperture. See Chapter 7 for more details on how to migrate images from Adobe Bridge to Aperture using DNG Converter.
Along with the decoder versions already mentioned, there is a fourth option on the Decoder Version pop-up menu – 2.0 DNG. You might not see this option unless a DNG file is selected in the Browser. The 2.0 DNG decoder is used to decode images which have been converted to the DNG format whose original camera Raw format is not supported by Aperture.
Apple calls this Baseline DNG. In the absence of information about the camera characteristics, Aperture decodes the Raw images using a generic camera profile. One drawback of this is that the conversion may not yield results as good as those for natively supported Raw formats. Another is that, in the absence of information about the sensor and its noise characteristics at different ISO settings, Auto Noise Compensation is not available with the 2.0 DNG decoder. And Baseline DNG does not support cameras with a Foveon X3 sensor, such as one of the Sigma SD dSLR range. Nonetheless, being able to work in Aperture with images from new cameras and those that are not natively supported is a huge advantage.
Using DNG Converter
DNG converter is a free download available from www.adobe.com/products/dng/. All the conversion options are provided from a single panel divided into four numbered sections. The first two of these are used to select the images you want to convert and specify a destination folder and file naming options.
Specify a separate location for the converted DNG files (Fig. 1.23). Depending on your archival requirements you may want to archive the original Raw files to a removable or separate disk.
Panel 3 provides file renaming options. In most cases, the default settings, which keep the original filenames and append a .dng suffix, are fine. If required, you can always rename the files on import to Aperture.
Panel 4 displays the conversion preferences which determine the kind of DNG file produced. Click the Change Preferences button to open the Preferences dialog box. The JPEG Preview pop-up menu sets the size of the JPEG preview. If you checked the ‘Use embedded JPEG from camera when possible’ box in the Preview pane of the Aperture preferences window, this is the preview that Aperture would use. Otherwise, or if you choose none, Aperture will create its own preview.
Image Conversion method provides two options, Preserve Raw Image and Convert to Linear Image. Preserve Raw image maintains the Raw data in its mosaiced format. This is the conversion method you should use for images that you intend to import to Aperture both for cameras whose native formats are supported and for those that are not and for which you plan you take advantage of baseline DNG support using the 2.0 DNG converter (Fig. 1.24).
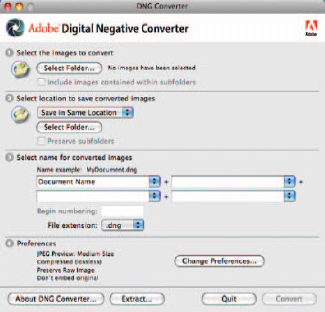
Fig. 1.23 DNG Converter is a very straightforward application. Essentially you just point it at the Raw files you want to convert, tell it where to store the converted DNG files and click Convert.
Convert to Linear Image demosaics the image data. Despite the information which is displayed when you select this option, i.e. ‘This can be useful if a camera’s particular mosaic pattern is not supported by your DNG reader,’ it is not supported by Aperture.
Finally, DNG converter provides the option of embedding the original Raw image file in the DNG file you are about to create. This is an archival option which provides for the extraction and retrieval of the original Raw file should you require it. It is, if you like, a ‘belt and braces’ option. The only drawback is that it increases the size of the DNG file considerably. Though it does not provide the convenience of co-location, a more workable option might be to archive your Raw originals separately. Embedded Raw files can be extracted from DNGs using the Extract button.
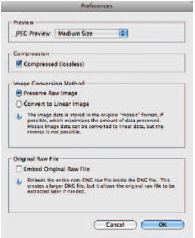
Fig. 1.24 Set conversion options in the DNG Converter Preferences window. For most purposes you would want the Preserve Raw image conversion method which maintains the Raw data in their original format and does not perform a demosaic operation. You can choose to embed the original Raw image for archival purposes, but the conversion will take longer and DNG file sizes will be correspondingly larger.