
CHAPTER 7

Introduction
It’s entirely possible that you might use your Mac and Aperture exclusively to organize and edit your image Library without ever launching another application. But not very likely. Images are usually just the beginning – only when they’ve been organized, categorized, sorted, rated, labelled and edited, are you ready to begin using them. And that’s where Aperture’s ability to integrate with other applications becomes critical.
To begin with, in this chapter we’ll look at what to do if you’re new to Aperture and want to migrate your existing image Library from iPhoto or Adobe Bridge. We’ll also discuss the implications of this for your image metadata and look at some of the differences in the Raw image processing tools provided by Aperture and Adobe Camera Raw (ACR).
Then we’ll take a look at how you can use Aperture in conjunction with a range of applications from Apple’s own iLife and iWork suites to other applications such as Adobe InDesign. We’ll tackle this from two opposing angles: round tripping images to other applications from Aperture and accessing your Aperture Library from within other applications.
The potential for enlisting the help of third party applications to edit your images in Aperture is about to grow exponentially with the introduction of Aperture 2.1’s new edit plug-in architecture. We’ll also take a look at some of the first new plug-ins to become available.
Importing Your iPhoto Library
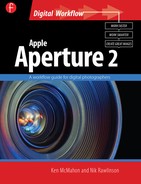
When you first open Aperture, a dialog box appears that allows you to import your iPhoto Library. If you decide to import your iPhoto Library after you’ve been using Aperture for a while, select File > Import > iPhoto Library (Fig. 7.1).
Use the Store Files pop-up menu to tell Aperture where you want to store the imported image files. ‘In the Aperture Library’ will copy the files from the iPhoto Library to the Aperture Library. If you have a large iPhoto Library you’ll need to consider the storage implications of this, and make sure you have sufficient disk space for the duplicates (Fig. 7.2).
‘In their current location’ treats the images in the iPhoto Library as referenced files; they are not imported into the Aperture Library, Aperture maintains a link to them in their current location. For more details about the difference between working with managed and referenced files see Chapter 2. Alternatively, you can choose a location where you want the image files copied or moved to.
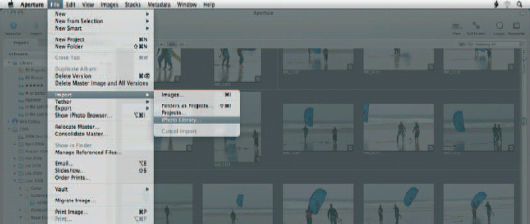
Fig. 7.1 Select File > Import > iPhoto Library to import your entire iPhoto Library into Aperture.
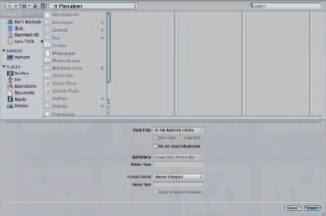
Fig. 7.2 In the dialog box, tell Aperture where you want to store the iPhoto images, how to deal with sub-folders and whether to rename the original files.
Leave the Version Name pop-up menu on its default of Master Filename to import images with their current filenames, or select one of the options if you want to rename the files on import. Finally, click the Import button to import your iPhoto Library.
Aperture maintains the organisation of your iPhoto Library as Projects within an iPhoto Library folder. Albums are imported, but Aperture doesn’t import iPhoto Smart Albums, books or slideshows. The Exif information is included as are any keywords, ratings and image adjustments that you applied in iPhoto (Fig. 7.3).
Importing Individual Images or Albums
You don’t have to import your entire iPhoto Library into Aperture. The iPhoto Browser allows you to select individual images or Albums. To open the iPhoto Browser select File > Show iPhoto Browser or press ![]()
![]()
![]() (Figs 7.4 and 7.5).
(Figs 7.4 and 7.5).
The top panel of the iPhoto Browser shows Events, Photos, Recent Events and Imports and Albums. Selecting any item in the top pane displays its contents in the pane below. To display the contents of an individual Event, click the Events button to display all of the Events in the bottom pane then double-click the Event you want. Selecting Photos displays all images in your iPhoto Library.

Fig. 7.3 The iPhoto Library is added to the Projects Inspector. Events are imported as Projects and Albums are retained, but Aperture doesn’t import iPhoto Smart Albums, Books or slideshows.
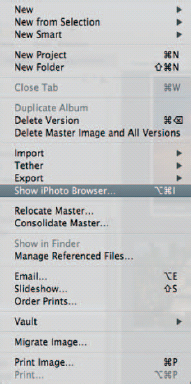
Fig. 7.4
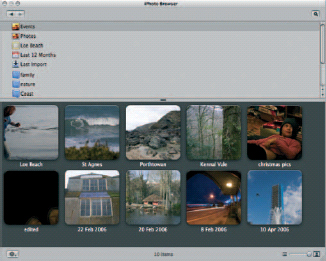
Fig. 7.4 & 7.5 You don’t have to import your entire iPhoto Library. Select File > Show iPhoto Browser to select individual Events, Albums and images and drag and drop them onto the Projects Inspector.
The Browser includes tools to help you sort and locate images within your iPhoto Library. Use the Sort pop-up menu to arrange images by name, rating, date created or other criteria. Click the Search button in the top right of the iPhoto Browser to do a text search for images.
Previews
You can adjust the size of the thumbnail previews in the bottom pane by dragging the slider in the bottom right corner. Alternatively, double-click an image to display a larger preview including Exif and rating information. Use the navigation controls at the bottom of the preview window to move back and forth through the image selection.
When you’ve located and selected the Events, Albums, or images you want to import, drag them onto a Project in the Projects Inspector or HUD. If you drag images or Albums onto the Library in the Projects Inspector a new Project is created for them. If you don’t want to import the images into your Aperture Library, hold down the ![]() and
and ![]() keys while dragging and dropping to reference the iPhoto files in Aperture.
keys while dragging and dropping to reference the iPhoto files in Aperture.
Moving from Adobe Bridge and Adobe Camera Raw
For many photographers not yet utilizing a digital image workflow application such as Aperture, Adobe Bridge and Adobe Camera Raw (ACR) provide the means by which they organize their image collections and convert Raw files to RGB images.
Aperture and Adobe Bridge
The advantages of using Aperture over a Bridge/ACR workflow are numerous. Aperture’s organizational tools and versioning system make it easier to keep track of your images and edited Versions, take up much less disk space and, ultimately, help you work faster than a system which relies on producing multiple RGB files for each edited Version of an image. You’ll also find locating images within a large Library much faster using Aperture.
Suppose you want to produce two Versions of the same Raw file, one color and another black and white. Using ACR you would set the required conversion options for the color image and output an RGB file. Then you’d need to go back to the Raw file and output a second image using ACR’s grayscale conversion parameters. If you then decided you want a cropped version of the mono image a third file would need to be produced. You can do all of this in Aperture without creating a single additional file (Fig. 7.6).
Aperture and Adobe Camera Raw
If you’re used to using ACR to convert your Raw files to RGB images you should find working with Aperture’s Raw Fine Tuning and other Adjustments easy to adjust to. The controls on ACR’s Basic panel – White Balance, Exposure, Recovery, Fill Light, Blacks, Brightness, Contrast, Clarity, Vibrance and Saturation – all have Aperture equivalents and even share the same or similar names.
ACR provides some correction tools that Aperture lacks, or doesn’t implement in the same way. For example, Aperture doesn’t have an equivalent of ACR’s chromatic aberration lens corrections, but the Moiré adjustment in the Raw Fine Tuning brick is an effective tool for the removal of color fringing. Aperture also lacks the equivalent of ACR’s Tone Curve, but again, you can utilize the quarter-tone controls in the Levels brick to effectively change the shape of the tonal curve in much the same way.
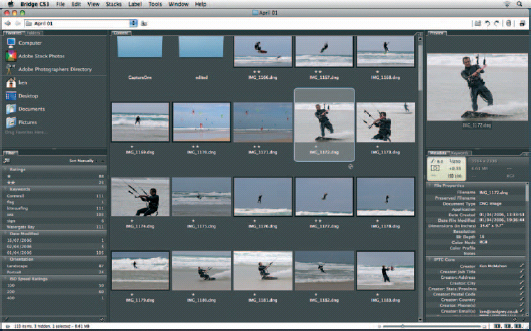
Fig. 7.6 Adobe Bridge CS3 references images and other media types on your hard drive and allows you to organize and display them in a Browser and edit metadata.
And ACR’s Split toning is different in effect to Aperture’s Color Monochrome Adjustment, though, arguably, no more useful.
In its favor, Aperture puts a much broader range of adjustments and editing controls at your disposal. Chapter 5 will tell you everything you need to know about these, but the list of Aperture adjustments that Raw convertors like ACR lack includes selective color replacement, additional sharpening (outside of demosaic compensatory sharpening) and red eye correction. Aperture’s 2.1’s new plug-in architecture adds a whole new range of editing tools to these core features.
Moving from Bridge
The process of migrating your image Library from Bridge to Aperture is, in most respects, relatively straightforward. Bridge references image files in their existing location; it doesn’t store the actual image files. To make a comparison with Aperture’s way of doing things, it works with referenced rather than managed files.
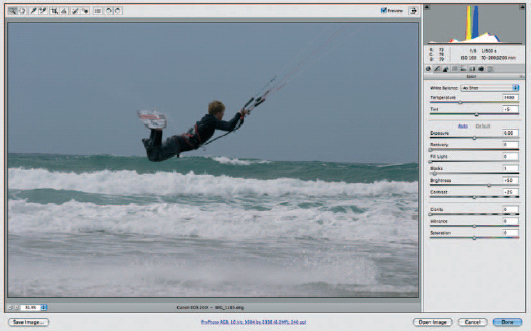
Fig. 7.7 Bridge doesn’t provide Raw decoding. Interpretation and conversion of camera Raw files into RGB is done using the Adobe Camera Raw Utility. ACR can store adjustments to raw images in a sidecar XMP file (or embedded within an Adobe DNG file) and these are used by Bridge to display the adjusted thumbnail. However, you can only have one set of adjustments per Raw file. For more than one Version, it’s necessary to output multiple RGB files.
Because of this, you don’t actually need Bridge to import image that you’ve managed using Bridge into Aperture. In fact, if you’re used to working with Bridge as part of the CS3 suite there’s no reason you can’t continue to do so, provided you configure Aperture to work with referenced rather than managed image files. See Chapter 2 for more details on how to do this.
As we’ll discover shortly, though, if you have added metadata to your images in Bridge, and want to import it with the images into Aperture, things aren’t quite so straightforward.
To import a folder of images that you’ve previously worked with in Adobe Bridge, first you will need to locate them in the Finder. This shouldn’t be too difficult as all you have to do is look in the Folders panel. You can also right-click a folder in Bridge and select Reveal in Finder from the Context menu (Fig. 7.8).
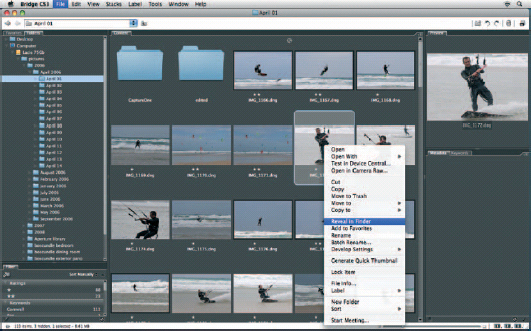
Fig. 7.8 Locating folders of photos using Bridge is straightforward because the Folders pane displays the file structure on your hard disk. Alternatively you can right-click an image or folder and select Reveal in Finder from the Context menu.
Now all you have to do is import the folder into Aperture in the normal way. Either drag and drop it from the Finder into a folder in the Projects Inspector, selecting File > Import > Folders as Projects, or click the Import button. For more detailed information on importing folders of images see Chapter 3.
Metadata
If you’ve used Bridge to add IPTC metadata and keywords to your photos you may be in for an unpleasant surprise when you view their metadata in Aperture – it may not be there. Depending on the image format, metadata is either embedded in the image file itself or it is written to a separate ‘sidecar’ file. Usually, metadata is embedded in TIFF, JPEG and PSD files and Raw file formats have their metadata written to a separate sidecar file (Fig. 7.9).
The sidecar files that Bridge, ACR and many other applications use to exchange metadata are in XMP format. XMP stands for eXtensible Metadata Platform and is a widely used Adobe standard for the storage and exchange of metadata.
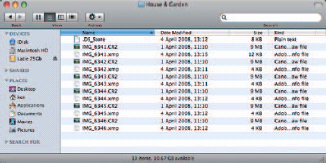
Fig. 7.9 When you add or edit metadata in a camera Raw file in Bridge, it stores it in an XMP ‘Sidecar’ file. These CR2 Raw files from a Canon dSLR were shot on 1 April 2008. On 4 April they were rated, which is when Bridge created the XMP file for each one.
So, if you add IPTC metadata to your camera Raw files in Bridge, it will be stored in a separate file along with the Raw file. For example, if the Raw file is called IMG_6341.CR2 the sidecar file will be called IMG_6341.xmp.
It’s not just Adobe applications that use sidecar XMP files. XMP is supported by other image management and Raw processing applications including iView Media Pro, Extensis Portfolio and Capture One 4. Aperture itself supports the export of XMP sidecar files but, and here’s the bad news, Aperture 2 doesn’t support the import of XMP sidecar files.
This leaves you in a difficult position if you’ve spent many hours adding metadata to your Raw image files in Bridge or any other application that exports that data in an XMP sidecar file.
DNG Conversion
There is currently no way to import the data in XMP sidecar files into Aperture. There is a work-around that will enable you to import the files into Aperture complete with IPTC metadata and keywords intact, though not ratings. This involves converting your camera Raw files to Adobe DNG format.
DNG is Adobe’s Digital Negative format, an open and published alternative to proprietary camera Raw formats. For more detailed information about the DNG format see Chapter 1. To convert your camera Raw files to DNG you’ll need Adobe’s DNG Converter application which you can download free from the Adobe website. Here’s a brief explanation of how to convert your camera Raw files to DNG so that you can import them to Aperture with most of their metadata intact (Fig. 7.11).
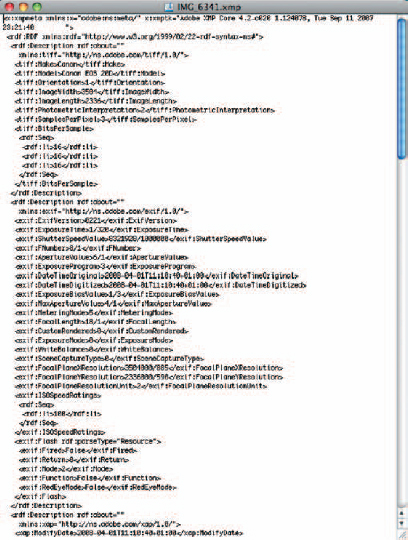
Fig. 7.10 This is what you’ll find if you open an XMP file in a text editor. This section of the file contains the Exif information, further down is the IPTC metadata and the list of adjustments made in ACR.
Launch DNG Converter and make sure the preferences in panel 4 are set to
JPEG Preview: Medium Size
Compressed (lossless)
Preserve Raw Image
Don’t embed original.
If not, click the Change Preferences button and change them. In panel 1, click the Select Folder button and navigate to the folder containing the images to be converted. Make sure the .xmp files are in the same folder as the Raw files. Check the box to include images contained within sub-folders. In panel 2, select Save in New location from the pop-up menu and choose a folder in which to save the converted images. Check the Preserve subfolders box. In panel 3 leave everything as it is, so that your files keep their name but are appended with the .dng file extension.
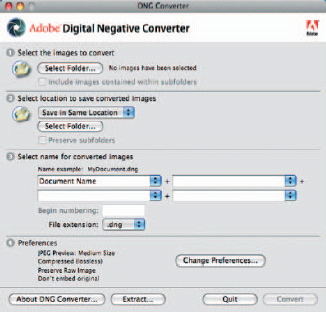
Fig. 7.11 Adobe’s DNG Converter is a utility that converts proprietary camera Raw files into Adobe’s ‘Open’ DNG format. This has future-proofing advantages for your digital archive, and also provides a migration route for your image Library from Bridge to Aperture with metadata intact.
When you click the Convert button, DNG converter will begin the conversion process. You can convert your entire image Library to DNG this way, but it may take a while. Before you embark on a large scale conversion you may want to try a test with a single folder of images. As long as you have a safe backup of the original Raw files and you save the converted files to a new location with a .dng suffix, you’ve got nothing to lose and can always revert to your camera Raw files if you decide against using DNG in future.
When the conversion process is complete, you’ll have a duplicate of your image Library with the same file and folder structure containing .dng rather than camera Raw and .xmp sidecar files.
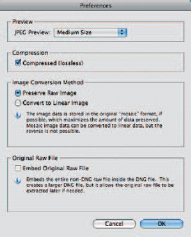
Fig. 7.12 Use DNG converter to convert your camera Raw files to DNG format with the metadata embedded. The Preferences should be set as shown here, though you don’t have to compress your DNG files and you can select a different preview size if you prefer.
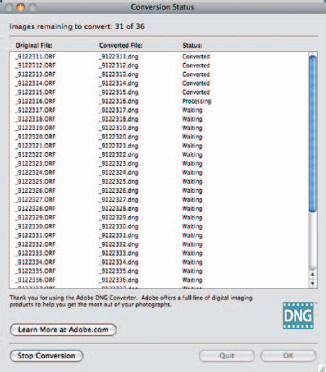
Fig. 7.13 When you click the Convert button, DNG converter will begin the conversion process. For a large Library this could take some time. Do a test run on a small folder of images to ensure everything works as expected.
DNG converter automatically embeds the metadata that was in the sidecar file into the .dng file (Figs 7.12–7.14).
Now you’re ready to import the .dng files into Aperture. Select File > Import > Folders Into a Project and navigate to one of the converted folders. Aperture imports all of the images into a single Project and creates Albums for sub-folders, so you might first want to decide how you want your Projects organized in the Projects Inspector and set up a suitable folder structure.
When Aperture imports the .dng files it also imports the IPTC metadata and keywords. It’s not possible to import image adjustments made to Raw files in ACR, even DNGs into Aperture. Although ACR saves the adjustments to the XMP sidecar file or, if possible, the file itself, and they are imported into Aperture, they are immediately overwritten by the Aperture Raw decoder and default adjustment settings.
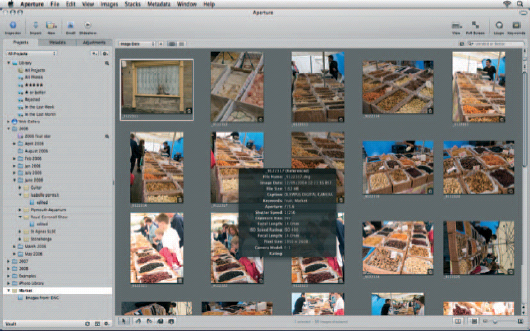
Fig. 7.14 Import the converted images into Aperture. Keywords and other metadata added in Bridge are preserved, but not ratings or adjustments made using ACR.
Aperture and Adobe Photoshop
Although Aperture has everything you’ll need for processing the majority of your images, there will be occasions when you need to turn to an external image editor. For most people that’s going to be Photoshop, but you can use any imaging editing application in conjunction with Aperture.
You define the external image editor you want to use in the Export tab of the Preferences window. Click the Choose button to navigate to the application, then click Select. Choose the file format that you want to use from the External Editor File Format pop-up menu. The range of file formats you can work with has been extended in Version 2.1 of Aperture and now includes 8-bit as well as 16-bit PSD and TIFF files (Fig. 7.15).
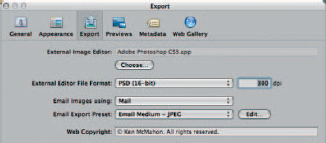
Fig. 7.15 Choose the application that you want to use for external editing in the Export panel of the Preferences window. Aperture 2.1 has extended the range of round trip file formats to 8 and 16, PSD and TIFF files.
The default resolution for opening files in your external image editor is 72dpi. Note that this doesn’t affect the number of pixels in the image, only the resolution. If the Raw Master has pixel dimensions of 3504 × 2332 that remains unchanged whether the resolution of the opened file is 72dpi or 300dpi. In other words images are not resampled.
To open an image in Photoshop (or your chosen external editor) select it in the Browser and choose Images > Edit with > Photoshop. Alternatively, right-click the image thumbnail and choose Edit with > Photoshop, or press ![]()
![]()
![]() (Fig. 7.16).
(Fig. 7.16).
There’s a short delay and the message ‘Preparing IMG_1234 for editing’ appears. What’s happening during this time is that Aperture is producing a file of the format specified in Preferences, e.g. a 16-bit PSD file. All of the adjustments you made to the selected Version using the Raw Fine Tuning controls and other adjustments are applied to the image and then it’s opened for you in Photoshop (Fig. 7.17).
New Masters
Whether you make any changes to the image in Photoshop or not, the new file is added to your Aperture Library and appears stacked alongside the Version from which it was created. With the image still open in Photoshop, press ![]()
![]() T to switch back to Aperture and you’ll see its thumbnail. If you have a metadata display enabled that shows badges, on the new thumbnail you’ll see a badge – a circle with a dot in the middle – that indicates this is a Master created by an external editor.
T to switch back to Aperture and you’ll see its thumbnail. If you have a metadata display enabled that shows badges, on the new thumbnail you’ll see a badge – a circle with a dot in the middle – that indicates this is a Master created by an external editor.
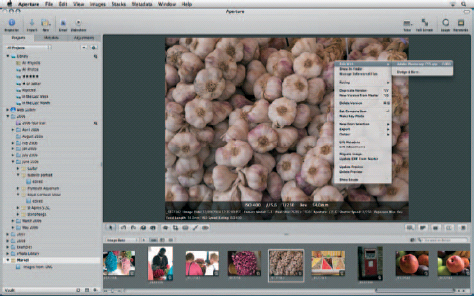
Fig.7.16 Select Images > Edit with [application], right-click and select Edit with [application] or press ![]()
![]()
![]() to open an image in your chosen external editor – in this case Photoshop CS3.
to open an image in your chosen external editor – in this case Photoshop CS3.
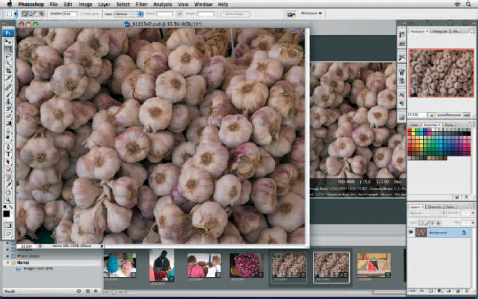
Fig. 7.17 Here the image has opened in Photoshop as a 16-bit PSD file, as defined in the Aperture Preferences. Behind it, you can see the new Master Version that Aperture has added to the Library, stacked with the original Master and denoted with a target badge to indicate it has been created with an external editor.
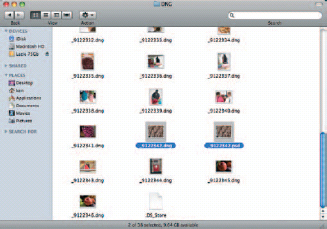
Fig. 7.18 If the original image was referenced, the Master produced by round tripping to an external editor is now stored in the same location, rather than in the Aperture Library.
If the new Master was produced from a managed Master then the PSD file will be stored in the Aperture Library. In Aperture 2, round tripped Masters created from referenced Masters are stored in the same location as the original referenced Master. In earlier Versions of Aperture this was not the case and all new Masters produced as a result of external editing, regardless of whether the original was managed or referenced, were stored in the Aperture Library.
This caused much consternation among Aperture users who wanted to access these images outside of Aperture. The new Master either had to be manually dug out from the Library package or exported from Aperture to the original location and then re-imported to the Aperture Project. Thankfully, Apple has now addressed this issue.
In any case, access of managed Masters from other applications is no longer the issue it used to be as; using MacOs 10.5 Leopard, it is now possible to access your Aperture Library from other applications such as iLife and iWork. This is covered later in this chapter.
Workflow Considerations
One very important consequence of external editing is that the new PSD and TIFF Masters are not editable in the same way as the original Raw Masters or Versions from which they were created. Obviously the Raw Fine Tuning brick will not be available and any other adjustments you made prior to editing the image in Photoshop will have been applied and effectively ‘fixed.
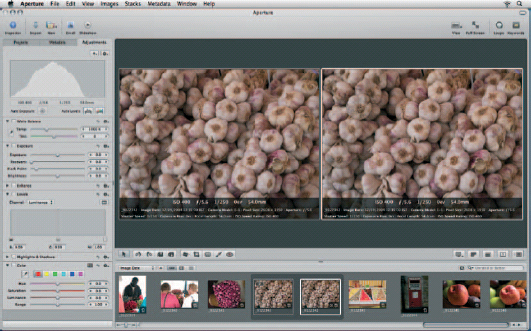
Fig. 7.19 A round-tripped image is no longer a Raw image, so you obviously won’t see the Raw Fine Tuning brick in the Adjustments Inspector. All other adjustments are also set to their defaults – you’re starting afresh with a new image.
For example, if you applied edge sharpening to the original you won’t find the Edge Sharpening brick when you select the new externally edited Master. And if you add more edge sharpening the controls will be set at their defaults – not the sharpening settings you originally applied; those are now undoable (Fig. 7.19). Think carefully about at what stage in the workflow you are going to incorporate external editing. Usually you’ll want to leave it as late as possible, but not always. In the case of sharpening, for instance, you probably wouldn’t want to apply edge sharpening to an image prior to carrying out retouching in Photoshop as this kind of work is best done prior to sharpening.
Transparent Problem
If you do editing work on a Photoshop file, or import into Aperture an existing PSD file that contains Alpha channels, it won’t display properly in either the Viewer or Browser. This problem isn’t confined to Aperture; if you view the image in Preview or iPhoto it will look exactly the same because all of these applications (but not Photoshop) rely on operating system routines to display Photoshop images.
Usually, the Alpha channel causes parts of the image to render as black or white. Note that you don’t get this problem with layer masks, though if you’ve produced a layer mask from a selection that you’ve saved as an Alpha channel you will have the same problem (Figs 7.20 and 7.21).
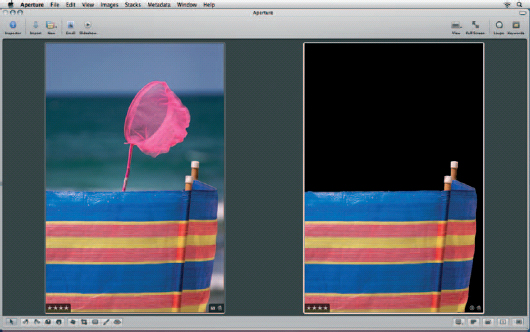
Fig. 7.20 & 7.21 The Master on the left has been externally edited with Photoshop to produce the new PSD Master on the right. A selection has been made around the windbreak which has been saved to an Alpha channel. This displays incorrectly in Aperture previews. In this case, it’s not a huge problem, because you have the original to refer to. If the PSD is the only image you have, if you want to see it properly in Aperture, you’ll have to produce a duplicate with the Alpha channel removed. This problem doesn’t occur with Layer Masks.
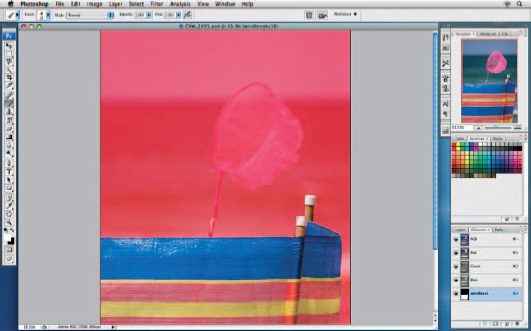
Fig. 7.21
The only way around it, until Apple revises the operating system routine that causes it, is to select the offending PSD file, choose Images > Edit with Adobe Photoshop and delete the Alpha channel in the Photoshop Channels palette. As has been mentioned, there’s no need to delete layer masks; though, given this will just be a reference to correctly display the thumbnail and preview, you may as well take all the steps you can, such as flattening the image, to make the file as small as possible.
Close the image in Photoshop and you’ll find it displays properly in Aperture’s Browser and Viewer. You might find it helpful to rename it something like original file name_no_alpha.
Apple Plug-ins
Shortly after Apple released Aperture 2.0 in February 2008, it announced Aperture 2.1, an upgrade that included support for edit plug-ins from third party developers. The idea is that plug-in developers can produce image editing tools that Aperture lacks and users can choose those tools that are useful in their workflow. In this way users get the tools they want without Aperture becoming overburdened with image editing tools that most users don’t require.
Dodge & Burn
The first of these new plug-ins, Dodge & Burn, developed by Apple itself, is included in the Aperture 2.1 update. To access the Dodge & Burn plug-in select Images > Edit with > Dodge & Burn. There’s a short delay while Aperture prepares the selected image for the plug-in; then it opens in a separate window with its own controls (Fig. 7.22).
Dodge & Burn is a brush tool that works in a similar fashion to Photoshop’s Dodge and Burn tools. Areas of the image to which the brush is applied can be selectively lightened or darkened.
Aperture’s Dodge & Burn brush supports pressure-sensitive tablets – applying more pressure with the stylus increases the amount of dodge or burn applied. Brush strokes are applied on an overlay which can be edited separately during the current session.
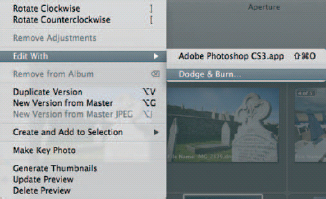
Fig. 7.22 To work with the new Dodge & Burn plug-in in Aperture 2.1, select Images > Edit With > Dodge & Burn.
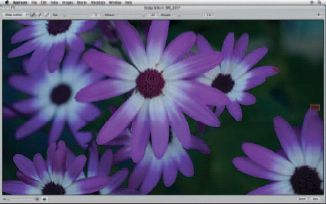
Fig. 7.23 The Dodge & Burn tools open in their own window. There are three brushes – one to apply the effect, an Eraser and a Feather brush for softening edges. Three sliders control brush size, softness and the strength of the effect applied with each brush stroke.
To apply the Dodge brush and selectively lighten parts of an image, first select the brush size using the slider at the top of the screen, and adjust the edge softness and strength. The default setting of 10 is a good place to start. Too strong, and you’ll create tell-tale brush strokes.
You can only undo the last stroke, but if you get carried away and don’t realize you’ve overdone things until it’s too late, all is not lost. You can edit the brush strokes already applied. Select the Erase tool and brush over the dodged area. On the default strength setting of 1 the eraser removes all of the dodging as you brush. Reduce the strength to reduce the dodging without erasing it altogether. If the dodging itself looks OK, but there’s a definable edge, you can soften it using the Feather tool.
After a while it can become tricky to tell what’s been dodged and what hasn’t. Select Show Dodge as Overlay from the Action pop-up menu to display the dodging as a red overlay. You can continue to use the Dodge, Erase and Feather brushes with the overlay turned on. You can also variably adjust the zoom – a feature that’s not generally available in the Aperture workspace – by dragging the Zoom slider in the bottom left corner. Click the button next to it to toggle between 100% view and fit to window (Fig. 7.24).
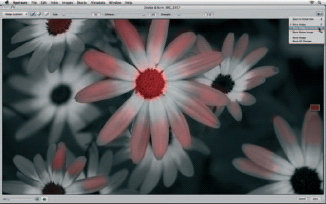
Fig. 7.24 Dodge & Burn effects are applied on an overlay, so you can toggle them on and off and display a mask overlay which clearly shows which parts of the image have had the brush applied. You can continue to edit in this view, using the Brush, Eraser and Feather tools to finesse the retouching.
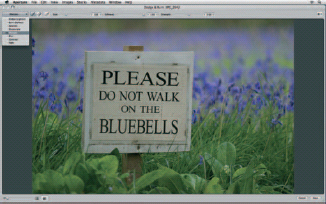
Fig. 7.25 The Dodge & Burn plug-in can also be used to selectively apply Sharpen (shown here), Saturate, Desaturate, Blur, Contrast and Fade.
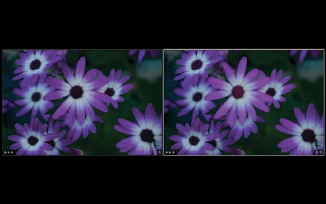
Fig. 7.26 Click the Save button to apply the edits to a newly created Master. The new file will be in the format specified in Aperture’s Export Preferences and the end result is the same as if you had round-tripped the file with an external image editor. For this reason it’s best, in most instances, to save working with plug-ins until the final stages of your workflow.
Other options on the Action pop-up menu include Show Dodge, which toggles the dodging on and off, Show Master image, Reset Dodge and Reset All changes.
While Dodge lightens pixels, the Burn brush darkens them. But Dodge & Burn goes beyond the limited tonal transformations that its name implies. A pop-up menu in the top left corner of the window also provides Saturate, Desaturate, Sharpen, Blur, Contrast and Fade options (Fig. 7.25).
When you’re all done, click the Save button to save the editing. Aperture creates a new Master file with the edits applied.
How Edit Plug-ins Work
Ordinarily, Aperture’s adjustments aren’t applied to Master images or Versions until you export them. They exist in Aperture as lists of edit instructions which are applied to images on the fly as you view them. Image editing plug-ins work differently.
Dodge & Burn, and all of the other image editing plug-ins announced so far, work by first creating an RGB file using the Raw decoder and applying any adjustment, then passing this to the plug-in. When your edits using the plug-in are complete and you press Save, a new PSD or TIFF file is saved to disk and loaded into your Aperture Library. This is a similar process to what happens when you round-trip a version to Photoshop, or another external image editor.
The new Master appears in the Browser with the target badge to indicate that it is a Master created using an external editor. The kind of file produced by the plug-in round-trip process is the same as that produced when you use an external image editor, i.e. an 8- or 16-bit TIFF or PSD, and is set in the Export pane of the Preferences window.
A significant consequence of this approach is that any edits you make using an image editing plug-in are irreversible. Furthermore, as a new TIFF or PSD Master is created you will no longer be able to edit previously applied adjustments.
This has important consequences for your workflow. If possible, it makes sense to leave editing that involves plug-ins to the final stage of your workflow. For one thing, as you’re by now aware, Raw files contain more data and are more robust from an editing standpoint than RGB PSDs and TIFFs.
Aperture, Plug-ins and External Editing
Imagine the following scenario. You have a landscape shot that has some dense foreground detail that would benefit from application of the Dodge brush. You first go through your normal adjustment workflow, creating a new Version of the Master file and applying Raw Fine Tuning settings, adjusting White Balance, and sharpening the image. Finally, you sort out the dense foreground using Dodge & Burn which produces a new master PSD or TIFF file. There are now three thumbnails of the image in your Browser, the original Master, an adjusted Version and the new edited Master.
Now let’s suppose you decide that the images require cropping. So you select the new dodged Master file and crop it using Aperture’s Crop tool, so far, so good. Now you want to open the image in Photoshop to do some cloning that’s too demanding for Aperture’s Retouch tool, so you select Images > Edit with > Adobe Photoshop.
T he file opens in Photoshop, but the cropping hasn’t been applied. Why is this? The reason is that in order to apply crop, Aperture would have to create another Master PSD file. It doesn’t want to do this unless it’s absolutely necessary, so you have to tell it to. You do this by holding down the ![]() key when you select Edit with > Adobe Photoshop from the Images menu. Notice that the Edit with menu choice has changed to Edit a Copy with. Select Images > Edit a Copy with > Adobe Photoshop and the image will open in Photoshop with the latest Aperture adjustments. When you save your Photoshop changes, a further Master PSD file is added to your Aperture Library (Fig. 7.27).
key when you select Edit with > Adobe Photoshop from the Images menu. Notice that the Edit with menu choice has changed to Edit a Copy with. Select Images > Edit a Copy with > Adobe Photoshop and the image will open in Photoshop with the latest Aperture adjustments. When you save your Photoshop changes, a further Master PSD file is added to your Aperture Library (Fig. 7.27).
The Aperture plug-in architecture is written in such a way that not all plug-ins need to create Master PSD or TIFF files, but can work on the Raw data, producing Versions in the same way that Aperture does. These should lead to some interesting future developments which, as well as broadening what you can do with Aperture, may also change the way you work with images and Versions.
In the meantime there are already a number of edit plug-ins on the verge of being released for Aperture. A good place to find details on the Web is Apple’s Aperture resources page at http://www.apple.com/aperture/resources/, the downloads page at http://www.apple.com/downloads/macosx/aperture/ and at Aperture plugged in – http://www.aperturepluggedin.com.
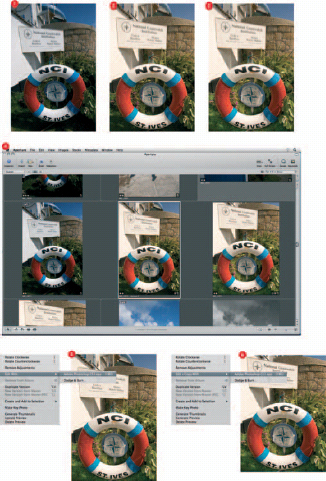
Fig. 7.27
1. This Aperture Master file is in need of some work to prepare it for use in a book.
2. A new Version is adjusted for White Balance, straightened and tonally adjusted using Exposure, Black Point and Highlight and Shadows, but this isn’t enough to bring out the detail in the foreground foliage.
3. The Dodge & Burn plug-in is used to selectively lighten the foliage and when the adjustments are saved a new PSD Master is created and added to the Library.
4. It’s then decided to crop the image, so the Crop tool is used to remove the top section from the PSD Master. The Aperture Browser shows the three files from left to right – the Master, the Adjusted Version and the Dodged PSD with the crop subsequently applied.
5. If you open this Cropped Version using Image > Edit With > Photoshop the crop isn’t applied. Aperture can’t crop the PSD file without creating another new Master and it avoids doing this until you tell it to. (It will, however, apply the crop to exported images.)
6. To create and open a new PSD Master file with the crop (and any other Aperture Adjustments applied after the plug-in was used) hold down ![]() and select Images > Edit a Copy With > Photoshop.
and select Images > Edit a Copy With > Photoshop.
New Plug-ins
In the following sections you’ll find a brief run-through of the first Aperture edit plug-ins to make it onto the market.
Nik Software – Viveza
https://www.niksoftware.com/viveza/en/entry.php
Viveza is a color correction and editing plug-in for Photoshop that uses a system of color control points called U Point. Nikon dSLR owners may already be familiar with U point from Nikon’s proprietary Raw capture application, Nikon Capture NX. U Point control points are placed directly on color critical image areas – e.g. on sky areas, skin tones (Fig. 7.28).
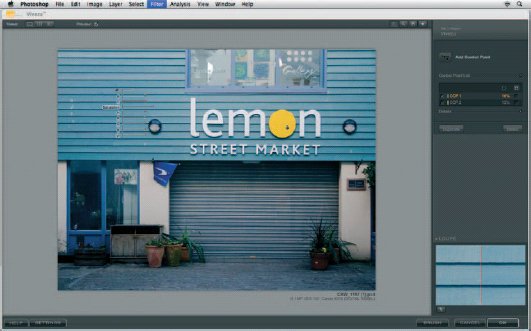
Fig.7.28 The Viveza Photoshop plug-in.
The Photoshop Version of the plug-in features a selective tool which allows you to brush light and color changes onto an image. It will be interesting to see how the Aperture version implements this feature. If you already own the Photoshop version of Viveza you can get a free copy of the Aperture plug-in.
PictureCode – Noise Ninja
Picture Code’s Noise Ninja is another Photoshop plug-in that’s now also available for Aperture 2.1. Noise Ninja has a well-deserved reputation as one of the most effective noise reduction tools around. Its noise reducing capabilities are without doubt in a different class to Aperture’s own Noise Reduction adjustment. If you shoot a lot of images at high ISO ratings this is one Aperture plug-in you won’t want to be without (Fig. 7.29).
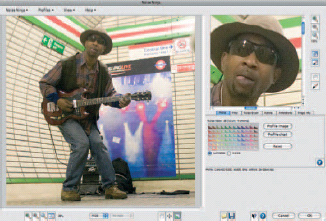
Fig. 7.29 Noise Ninja Photoshop plug-in.
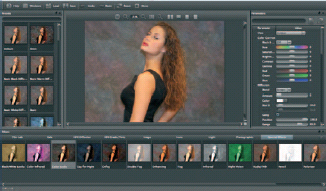
Fig. 7.30 Tiffen Dfx for Aperture 2.1.
Noise Ninja’s success at reducing noise in digital images is down to a two-pronged approach. First, it uses camera profiles to identify the ‘noise signature’ of specific dSLR sensors at given ISO settings. Second, it uses advanced algorithms based on wavelet theory to eliminate noisy pixels while minimizing image softening.
Tiffen – Tiffen Dfx
Tiffen is probably best known as a manufacturer of photographic filters – the glass kind. Dfx is a suite of digital filter effects that’s available as a standalone application as well as plug-in Versions for Photoshop and a wide range of video editing applications.
The Aperture plug-in contains hundreds of filter effects including digital equivalents of Kodak Wratten filters, graduated ND, Faux Film, Split tone and Cross Processing (Fig. 7.30).

Fig. 7.31 Dft Power Stroke Photoshop plug-in.
Digital Film Tools – Power Stroke
http://www.digitalfilmtools.com/powerstroke/
Power Stroke is a plug-in for Photoshop, after Effects, and now, Aperture that provides simple to use selection tools that are used as the basis for selective color correction and other image edits (Fig. 7.31).
dvGarage – dpmatte and HDR Toner
http://www.dvgarage.com/prod/prod_dpmatte.php
dvGarage has announced dpmatte, a chromakey style compositing plug-in which makes cut-outs from subjects shot against a plain color background and composites them onto another background image. The company has also announced a high dynamic range (HDR) plug-in called HDR Toner.
Image Trends – Fisheye-Hemi, ShineOff and PearlyWhites
http://www.imagetrendsinc.com/products/index.asp
Image Trends is making three of its Photoshop plug-ins available for Aperture 2.1 Fisheye-Hemi is actually a collection of three plug-ins that correct the distortion produced by fisheye lenses to produce a more natural looking image. Fisheye-hemi doesn’t produce a rectilinear image, but one in which curved lines are straightened without the edge distortion and severe cropping normally associated with rectilinear conversion.
ShineOff automatically removes shiny highlights from skin tones, a sort of post processing digital makeup artist. And PearlyWhites, if you haven’t already guessed, is a teeth whitener plug-in.
Using Aperture from Other Applications
Up to now, we’ve looked at how other applications work with Aperture. Whether talking about importing images from other applications or round tripping to external editors, the starting and finishing point for these processes is Aperture.
New features of the MacOs 10.5 Leopard operating system make it possible to access your Aperture Library from within other applications. Being able to access your Aperture Library in this way means that you can quickly find images to include in page layouts, presentations, email messages and other documents without having to leave the application you’re working in.
Mostly, sharing your Aperture Library with other applications involves using the preview JPEGs generated by Aperture from Masters and Versions. This makes sense because if, for example, you want to attach a photo to an email, or include one in a presentation, the adjusted JPEG preview will be more appropriate than a full-resolution TIFF.
Preview Preferences
Before you can access your Aperture Library from iLife and other applications you first need to turn on preview sharing in Aperture preferences. Choose Aperture > Preferences, or press ![]()
![]() select the Previews pane and check the ‘Share previews with iLife and iWork’ box (Fig. 7.32).
select the Previews pane and check the ‘Share previews with iLife and iWork’ box (Fig. 7.32).
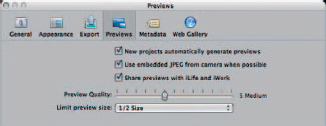
Fig. 7.32 Check the Share previews with iLife and iWork to share Aperture previews with those and other applications. You can also set the size and quality of the previews that Aperture generates here. Bigger, better quality previews will increase the size of your Aperture Library and take a little longer to display.
While you’re here you might also want to have a think about what sort of previews you want Aperture to generate from your image files. The Preview Quality slider sets the amount of compression that is applied to the JPEG previews; the Limit Preview Size pop-up menu determines the pixel size of your previews. Don’t limit makes the preview the same size as the original, so if your camera shoots images 2332 × 3504 pixels, the previews will be that size too. Other options include half-size and a variety of ‘fit within’ options down to a minimum of 1280 × 1280.
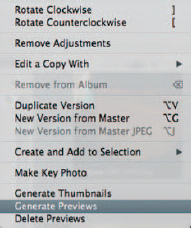
Fig.7.33 If you change the preview settings you’ll need to force previews to regenerate. Hold down the ![]() key and select Generate Previews from the Images menu.
key and select Generate Previews from the Images menu.
If you change the preview quality or size settings in Aperture Preferences, existing previews will not be updated until you either make an adjustment or force the preview to update. To do this, select the images you want to update, hold down ![]() and choose Generate Previews from the Images menu. You’ll need to quit and relaunch Aperture for the Sharing Preferences changes to take effect (Fig. 7.33).
and choose Generate Previews from the Images menu. You’ll need to quit and relaunch Aperture for the Sharing Preferences changes to take effect (Fig. 7.33).
iPhoto
Just as you can import parts of your iPhoto Library into Aperture using the iPhoto Browser, you can access your Aperture Library from within iPhoto. When you configure Aperture to share previews with iLife and iWork applications, a new item appears on the iPhoto File menu called Show Aperture Library. Select this to open the Aperture Photos Browser.
To add items from your Aperture Library to iPhoto, drag and drop them from the Browser into the iPhoto Source List. You can drag entire Projects, Albums, Smart Albums or individual images into iPhoto. Whatever the original format of what you import into iPhoto using the Aperture Photos Browser, a new Untitled Album is created for it. You can’t, for example, copy an Aperture Smart Album as an iPhoto Smart Album, only the images it contains.
It’s also worth a reminder that these aren’t the original Masters you’re bringing into iPhoto, but the JPEG preview files created by Aperture at the size and compression settings you specified in Aperture Previews Preferences (Fig. 7.34).
iTunes
To sync photos from your Aperture Library with your iPod or iPhone, plug in the device to launch iTunes, select your iPod or iPhone and click the Photos tab. Check the Sync photos from box. An alert box appears warning that syncing will replace all existing photos on your device; if you want to proceed, click the Sync Photos button and, unless you want to download your entire Aperture Library, check the Selected Albums radio button.

Fig. 7.34 Select Show Aperture Library from the iPhoto File menu to display a Browser from which you can drag and drop items from the Projects Inspector, or individual images into iPhoto.
iTunes provides a more limited Browser than is available in iPhoto and some of the other iLife applications. There are no thumbnail displays and only Albums are listed along with the number of images they contain. Select the Albums you want to sync with the device and click the Sync button (Fig. 7.35).
iWork Applications
Using Aperture with other iLife and iWork applications, such as iMovie, Pages and Keynote, works in much the same way as described for iPhoto. For example, to add an image from your Aperture Library to a Keynote presentation click the Media button on the Toolbar and you’ll see a similar Leopard dialog box to the one that appears in the other iLife and iWork 08 applications (Fig. 7.36).
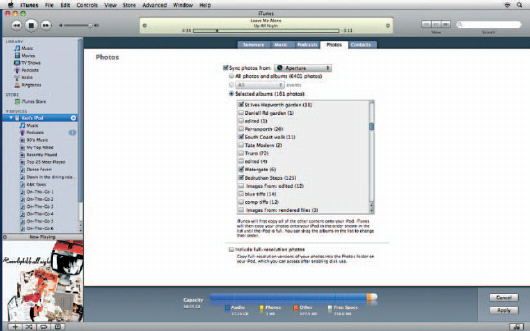
Fig. 7.35 You can sync Projects with your iPod from iTunes, but the Browser is limited to displaying the contents of the Projects Inspector – there’s no thumbnail Browser.
Though they occasional vary in detail they all (except iTunes) share the common layout that allows you to access your Aperture Library in a Project Inspector-style layout in the top panel and display thumbnail images in the lower panel. Double-clicking or pressing the ![]() displays a Quick Look preview of the selected image.
displays a Quick Look preview of the selected image.
You can add selected images to an email attachment from within Aperture by selecting File > Email, or pressing ![]()
![]() This launches Mail and attaches the selected photos to a new message. As we’ve seen, however, most people want things to work the other way around. It’s more likely that you’ll want to access your photos while emailing, than that you’ll want to access your email while organizing and editing your photos.
This launches Mail and attaches the selected photos to a new message. As we’ve seen, however, most people want things to work the other way around. It’s more likely that you’ll want to access your photos while emailing, than that you’ll want to access your email while organizing and editing your photos.
Open Mail and Click the New Message button on the Toolbar. In the New Message window there’s now a Photo Browser button on the Toolbar, click it to open the Photo Browser.
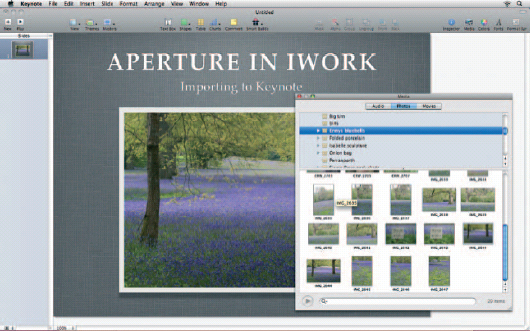
Fig. 7.36 Keynote’s media browser provides full access to your Aperture Library. Drag and drop thumbnails to place them in your slides.
The Photo Browser works in a similar way to the other iLife and iWork applications discussed earlier. In the top panel you’ll see Aperture and iPhoto if you have both installed. Click the disclosure triangle next to Aperture and you’ll see all of your Projects, Albums, Smart Albums and folders as they appear in your Aperture Projects Inspector. You can track down individual images using the Search field at the bottom of the Browser, but this is of limited use as it doesn’t search keywords and other metadata.
Navigate to the Project containing the photos you want to attach to the message and drag the thumbnails from the lower panel into the message window. The photos are automatically resized by Mail and appear actual size in the message window. To resize them select one of the size presets from the pop-up menu in the bottom right corner. The message size is indicated at the bottom left of the message window (Fig. 7.37).
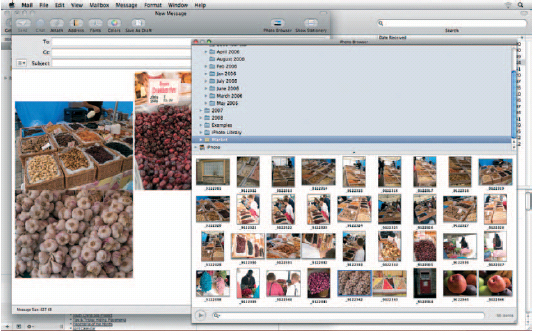
Fig. 7.37 Drag and drop photos from Aperture directly into Mail messages.
Photoshop
To open an Aperture preview from within Photoshop select File > Open in the usual way. The Leopard Open dialog appears; you no longer get the option to choose the Adobe open dialog box as you did with earlier versions of MacOs. Click the Photos button and select Aperture from the list in the top panel. Click the disclosure triangle to display the contents of the Projects Inspector.
As with all applications, what this does is open the Aperture JPEG preview file in Photoshop and there isn’t really much point in doing this. If you need to do Photoshop editing on an image it makes much more sense to work on a full quality, full-resolution Version, which you can do by selecting Image > Edit with external Editor from within Aperture. This method also has the advantage that it will add the edited .psd or .tiff file created to your Aperture Library (Fig. 7.38).
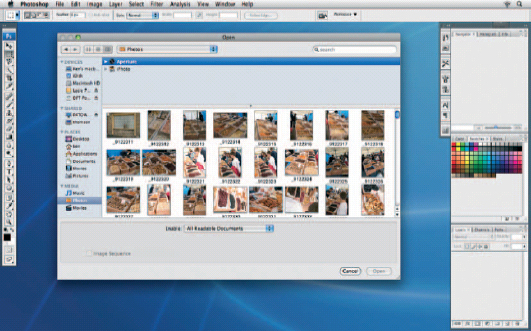
Fig. 7.38 You can open Aperture previews directly into Photoshop, but there’s little point. Either use Image > Edit With > Photoshop, or if you want to open an existing PSD without creating a new Version, right-click it, select Show in Finder, and open it from there. That way, you’ll be working on the full-resolution file, rather than the preview JPEG.
InDesign and Applescript
All of the previews generated in Aperture are referenced to their Versions and the original Raw Masters by a unique ‘fingerprint’ code that is stored in the Special Instructions IPTC metadata field of the preview JPEG. This code helps Aperture keep track of the relationship between Masters and Versions and it can also be used in a desktop publishing workflow to enable the use of Aperture’s JPEG previews as positionals which can be updated with full-resolution Versions prior to output.
You can place Aperture previews into InDesign Documents in much the same way as we’ve already seen with the iLife applications, using the new Open Dialog box in MacOs Leopard. Click File > Place in InDesign, or press ![]()
![]() to place an image or folder from the Aperture Library and the thumbnails are displayed in the lower panel (Fig. 7.39).
to place an image or folder from the Aperture Library and the thumbnails are displayed in the lower panel (Fig. 7.39).

Fig. 7.39 Place Aperture previews in InDesign in the usual way, by selecting File > Place, then use the Browser to locate the image in your Aperture Library. These placeholder previews maintain a link to the Master, so you can automatically replace them prior to output.
If you need to see a thumbnail image at a larger size, select it and press the ![]() . You can then scroll through, previewing all of the images using the
. You can then scroll through, previewing all of the images using the ![]() and
and ![]() arrow keys. Press
arrow keys. Press ![]() to return to the thumbnail panel. Click the Open button to place the chosen image.
to return to the thumbnail panel. Click the Open button to place the chosen image.
Thanks to enhanced Applescript support in Aperture 2, management of placed images in InDesign is made a great deal more manageable than it used to be using the Finder. To demonstrate the potential for Aperture/InDesign integration, Apple has published a small collection of scripts on its website at http://www.apple.com/applescript/aperture/indesign/.
These scripts allow you to create Aperture Albums containing images placed in InDesign, compile InDesign Libraries containing images chosen from Aperture, easily locate and edit Aperture Versions from their InDesign placeholders and automatically export high resolution press-ready Versions of placeholder images from Aperture and replace them in the InDesign document.
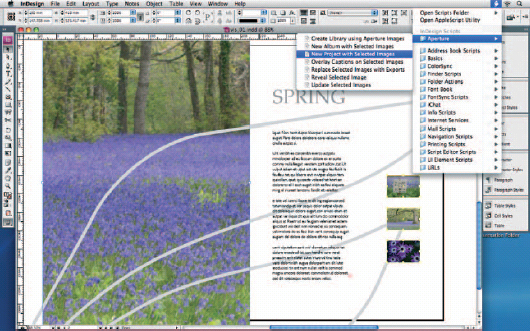
Fig. 7.40
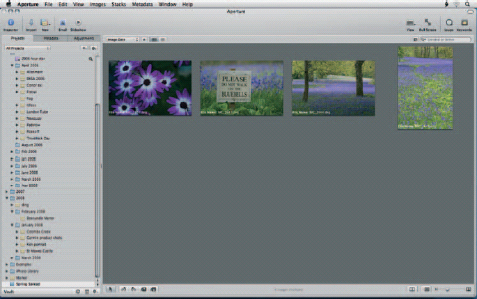
Fig. 7.40 & 7.41 You can create an Aperture Album or Project to hold all the images in an InDesign Spread or document. Select either New Album with Selected Images or New Project with Selected Images from the Aperture group on the Script menu.
To create an Aperture Album from placed images in your InDesign document, select the placed images and choose New Album with Selected Images from the Aperture group on the Script menu at the top right of the InDesign menu bar. Enter a name for the Album in the dialog box and click OK (Figs 7.40 and 7.41).
To create an InDesign Library from images in your Aperture Library, select Aperture > Create Library using Aperture Images from the Script menu. This opens a Choose dialog that works in the same way as the one you use to place images. Navigate to the Project, Album or folder in your Aperture Library and select the images you want to add to the InDesign Library in the lower panel, then click the Choose button.
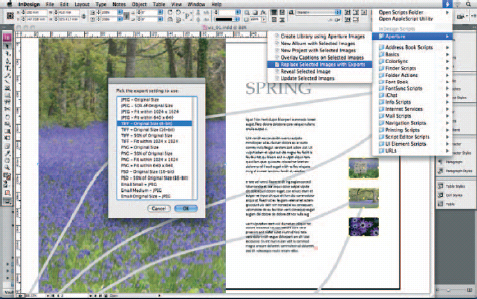
Fig. 7.42 The Replace Selected Images with Exports does what it says. It exports a high resolution version from Aperture and replaces the preview image with it. You can choose from a variety of export sizes and file formats.
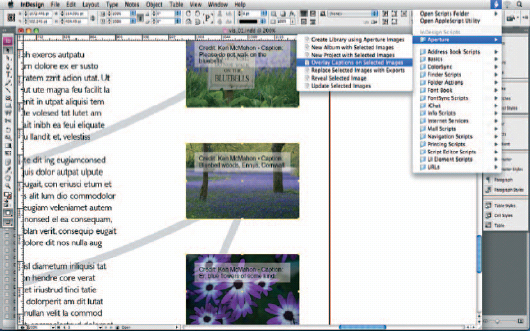
Fig. 7.43 Applescript can be used to automatically include metadata added in Aperture to InDesign layouts. Here credit and caption information has been overlayed in a text box on selected images.
To prepare an InDesign document for prepress by replacing the Aperture preview placeholders with high resolution TIFFs, first save the document then choose Replace Selected Images with Exports. Choose an Export option from the list (Fig. 7.42).
There’s one other interesting script in the suite which overlays captions on selected images. The caption information is pulled from the IPTC metadata fields and can include the image name, Credit, Copyright Notice, Byline and Caption, among other things. The caption appears in a text box with a semi-transparent fill above the image (Fig. 7.43).
These scripts are not only useful in themselves but also demonstrate the potential for Aperture integration with other applications as part of an end-to-end digital imaging workflow.