Lesson Files | Soundtrack Pro book files > 03-04_Projects&Media > 4-1 Start |
Time | This lesson takes approximately 60 minutes. |
Goals | Adjust track volume levels |
Split audio clips in the Timeline | |
Duplicate clips | |
Move clips with precision | |
Edit clips with the Razor tool | |
Transpose music clips | |
Crossfade and truncate overlapping audio clips | |
Select a project timeslice to delete excess media |
In Lesson 3, “Creating Suspense with Sound Design,” you created the initial sound design for the vampire scene. Now you’ll use editing techniques to take your sound design to the next level and finish building the tracks. Your goal here is not only to learn these editing techniques, but also to apply them to your soundtrack and craft the audible elements of suspense within the scene. Along the way you’ll also learn some shortcuts and tricks of the trade that you’ll be able to use on your own projects in the future.
You will begin this lesson with the Suspense Scene project that you created in the previous lesson. If you did not complete the steps from Lesson 3, you can open the 4-1 Start project file.
Quit all open applications, except for Soundtrack Pro.
Open your Suspense Scene project from Lesson 3, or open the 4-1 Start project file located in the 03-04_Projects&Media folder.
Play the project once and listen to the sound effects as you watch the video.
As you just watched the project, your inner sound editor was probably wondering, “What’s the deal with the crickets and wind effects dominating the soundscape?” The ambient sounds are overpowering the other tracks, but don’t worry—you just need to adjust the volume levels. Normally, you’d save that until the mixing process, unless the levels are too distracting to be ignored. This is one of those instances. So your goal in this exercise is to place the wind, crickets, and howling wolves in the background where they belong.
The default level for audio tracks is 0 (zero), which is a relative number assigned to all audio tracks in Soundtrack Pro. Since most audio clips are at a normal volume level when imported, they don’t need to be amplified much louder and you can only raise the audio level by a maximum of six decibels (6 dB). However, you can lower it by as much as 96 decibels (−96 dB), which silences the track completely.
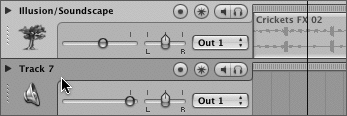
You’ll learn much more about the specifics of mixing levels in Lesson 8, “Creating a Basic Mix.” For now, you’ll just make some general adjustments to make the overall sound more natural for the scene. Let’s start with the track containing Crickets FX 02.
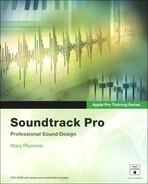
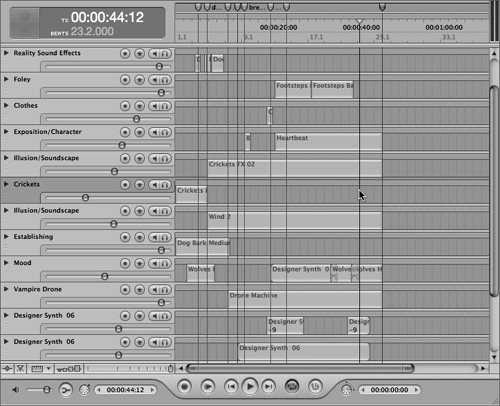
Drag the Volume slider on the first Illusion/Soundscape track to the left to set a level of about −10 dB.
A small numeric display appears to show you the current level as you drag the slider.
Drag the Volume slider on the second Illusion/Soundscape track to about −10 dB to lower the volume of the Wind 2 clip.
Play the project to hear the lowered Illusion/Soundscape tracks.
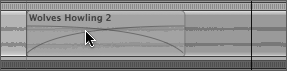
Good—now they feel more like background sounds rather than CRICKETS and WIND! Next you’ll adjust the Mood track so the wolves will sound like they’re somewhere in the distance, rather than in the same room.

Lower the volume level of the Mood track to about −12.
Play the beginning of the project to hear the more distant sound of the Wolves Howling 2 clip.
That’s much better, but there’s one thing that’s still not quite right. The crickets should sound louder when the door opens to the outside.
Part of the job of a sound editor is to make sure that sounds change along with the action on the screen. The more acoustically aware you are of the way sound works in the real world, the better you’ll be at editing sound effects and re-creating reality for the world onscreen.
The Crickets FX 02 clip also makes a fine example for this exercise. Up to this point, you have dragged the edges of a clip to extend or shorten it. You can use the new Split feature to split a clip at the playhead position, creating two separate clips. Once a clip has been split, you can move, delete, copy, paste, and extend each section independently.
First you’ll split the Crickets FX 02 clip when the door opens. Then you’ll create another track and move the first part of the clip to the new track. Finally, you’ll lower the volume level on the new track so the crickets are much quieter before the door opens. Sounds easy, right? It is!
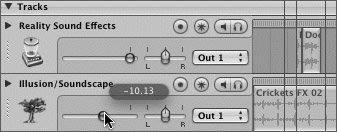
Select the Crickets FX 02 clip in the Timeline.
Move the playhead where you want to make the split, in this case to the door opens marker (07;16).
Choose Edit > Split or press S to split the clip at the playhead position.
There are now two separate Crickets FX 02 clips in the first Illusion/Soundscape track.
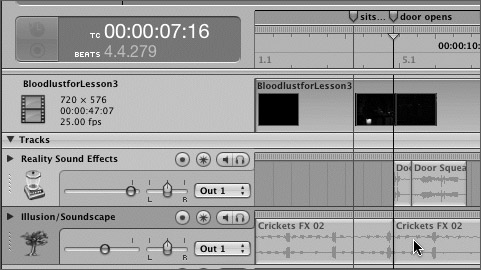
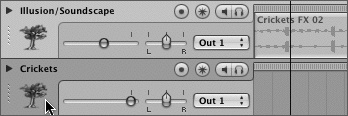
Ctrl-click the drag handle (left edge) of the first Illusion/Soundscape track and choose Insert Track After from the shortcut menu.
A new track appears.
Click the name field on the new track, and type Crickets to change the name; then click the track’s icon and choose a tree icon instead, to match the other Illusion/Soundscape track icons.
Drag the first Crickets FX 02 clip down to the beginning of the new Crickets track.
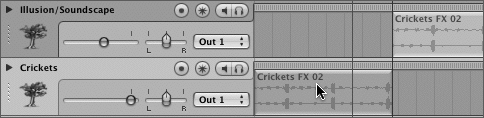
Lower the volume level of the Crickets track to around −20.
Play the project from the beginning to hear the changes.
Mission accomplished.
Don’t forget to save! If you’re working with the 4-1 Start project, choose File > Save As and name the project Suspense Scene in the My Soundtrack Pro projects folder on your desktop. If you’re already working with the Suspense Scene from the previous lesson, simply press Cmd-S.
The preliminary sound is in place, and the basic elements of reality, mood, and ambience are working together to create the overall soundscape. But suspense is all about constantly upping the story ante. At the moment, we hear a dog bark and see the character sit up in bed. But would a barking dog be enough to make you bolt upright from a deep sleep? Probably not, especially since we don’t know what spooked the dog. We need some frightening proof that there is a stranger lurking about. Audiences are very susceptible to audible manipulation. That may sound devious, but it’s part of the craft of sound editing and design. So let’s startle the character (not to mention the dog and the audience) by rattling the doorknob a little. That would certainly make me sit up and take notice.
You already know how to drag clips in the Timeline, but you can also adjust clips with precision using the Edit menu or a handy set of keyboard shortcuts. In the next series of exercises, you’ll add two additional Door Knob sound effects to the Reality track to enhance the suspense and give the character incentive to sit up. Once you’ve added the clips to the track, you can shift or nudge them into position.
It just so happens you have a set of three different Door Knob sound effects in the Bin tab that you selected in the previous lesson. That’s lucky, because with just one effect, it would be difficult to repeat it without it sounding like the same thing twice. For this exercise, you’ll choose one of the Door Knob effects and place it on the Reality track. Technically, it will be used to establish something we don’t actually see onscreen, but you’ll place it on the Reality track because grouping similar sound effects together will simplify the mixing process later on.
Click the Bin tab to view the clips that you added in the previous lesson, along with the clips currently in the project.
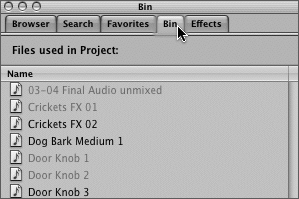
Preview the Door Knob 1 and Door Knob 2 files in the Bin tab.
Door Knob 1 sounds like someone trying to open the door. Context is everything in sound design. This sound effect might be hilarious in a Keystone Cops–type scenario, with a bumbling fool locked in an outhouse. In this case, the same sound effect could be quite frightening because it implies that someone or something is trying to get into the bedroom from outside.
Drag the Door Knob 1 file from the Bin tab to the beginning of the Reality track.

The clip is a bit too long for this scene. A little sound effect can go a long way in establishing a potential intruder. You’ll need to find the part of the track that you want to work with, then split the track and discard the parts that you don’t want. That will be easier if you zoom in on the clip, and there’s a perfect shortcut for just that.
Select the Door Knob 1 clip, if it’s not already selected, and press Option-Z.

Now that you’re zoomed in, you can also use Shift-Cmd-+ (plus) or Shift-Cmd- − (minus) to view the track with a larger or smaller height.
Press Shift-Cmd-+ to see a larger track height.
Select the Door Knob 1 clip, if it’s not already selected.
Play the clip from the beginning and stop the playhead after you hear 3 jiggles of the knob (approximately 01:09).
Press S, or choose Edit > Split to split the clip at the playhead position.
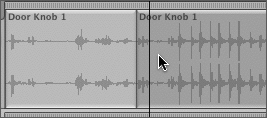
Select the second Door Knob 1 clip (the section after the split) and press Delete.
The excess Door Knob 1 sound effect is deleted from the Timeline.
Note
Deleting a selection means you get rid of it without the intention of using it again. If you want to cut and paste a selection instead, you’d use the Cut command or Cmd-X, which works like a combination of deleting and copying. Similar to the Delete function, Cut deletes a selected item from its current location; but then it copies the item into temporary memory so that it can be pasted in a new location. Each time you Copy or Cut, you replace the old item in temporary memory with the new selection.
Wait! What if you accidentally deleted a section and you want it back? Or perhaps you undid something and changed your mind yet again. No problem. Like most great software, Soundtrack Pro comes fully loaded with fix-it tools.
Undo and Redo are exactly what they sound like: commands that let you move back or forward a step. In fact, you can undo or redo many steps, not just the most recent one. Undo and Redo work with cutting, copying, and pasting—basically anything you add, subtract, or move. Remember the shortcuts for easy access: Cmd-Z to undo, and Shift-Cmd-Z to redo.
Now that you’ve trimmed the Door Knob 1 clip in the Reality track, you can shift it into position so that it acts as a catalyst to make the character sit up in bed. Shifting clips moves a selected clip to the nearest gridline. The more you are zoomed in to the Timeline, the more gridlines and thus the more refined the shifted movement. Fortunately, you planned the project well in the previous lesson, so you already have a marker in the Timeline that you can use as a guide.
Press the down arrow key to zoom out of the track until the sits up marker (the first marker in the project) is visible in the Timeline.
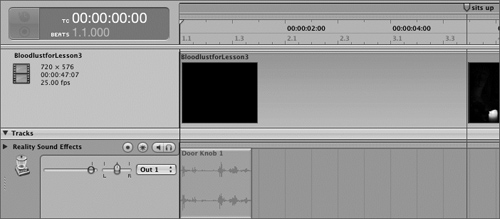
Select the Door Knob 1 clip on the top track, if it is not already selected.
Choose Edit > Adjust > Shift Right or use the shortcut and press Shift-Option–right arrow to shift the clip one gridline to the right. Continue pressing Shift-Option–right arrow until the clip is about halfway over the sits up marker.
As you might guess, to shift a clip to the left you would first select it and then choose Edit > Adjust > Shift left or press Shift-Option–left arrow. You can also simply drag the clip into position, but this technique of using keyboard shortcuts to shift the clip is more precise.
Play the beginning of the project to see how the timing works with the Door Knob 1 clip and the action in the scene.
Perfect! I just got chills watching the scene.
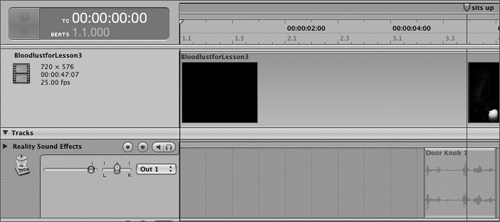
You’ve demonstrated that you can shift a clip one gridline at a time within its track in the Timeline. To move it by an even smaller increment, you can also nudge a clip one frame at a time, overriding gridlines and snapping. For this exercise, you’ll add another Door Knob sound right before the door opens to enhance the suspense further. Then, you’ll nudge it left or right to fine-tune its position in the Reality track. First, let’s create a playback region around the sits up and door opens markers.
Drag the bottom half of the Time ruler from around 4;00 to 8;00 to create a playback region that includes the Door Knob 1 clip (knob rattling sound) and the Door Knob 3 clip (door opening sound).

Click the Solo button on the Reality track to isolate the sound of that track.
Drag the Door Knob 2 clip from the Bin tab to the Reality track and place it in the empty space between the other two door knob clips.

Press Return to move the playhead to the beginning of the playback region and then play the project.
You can nudge a clip while the playhead is moving or paused.
Pause playback and select the Door Knob 2 clip, if it’s not already selected.
Play the project again and, while it’s playing, nudge the clip to the left by pressing Option–left arrow or to the right by pressing Option–right arrow. Continue nudging the clip until you’re satisfied with its position.
The sound effect will work virtually anywhere in that space between the other clips, so adjust to your own liking.
Personally, I find there’s something unnatural about the Door Knob 2 clip, no matter where I place it. If you feel the same, you can fix it in the next exercise.
You just know when sound works. If you’re not sure, it isn’t right. When it works, you don’t have to give it another thought. Why doesn’t it work? As an editor, I can’t help but notice the pause between the new Door Knob 2 sound and the Door Knob 3 clip that is the sound of the door actually opening. The hesitation steals the urgency from the scene and feels like an inept intruder, rather than a determined one. But guess what? It’s your job to fix it. You have the skills, so now put them to work.
First, turn off snapping and then trim the empty space at the end of the Door Knob 2 clip. (The empty space is the part without any waveform showing.) You can either drag the right edge to trim, or use the new Split feature and then delete the excess. Next, move the clip close to the door opens marker so that it sounds like someone rattling the knob just before the door opens. Play the project and nudge the clip until you’re happy with the result.
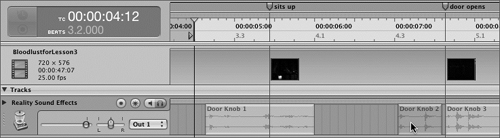
Once you’re finished placing the clip, you’ll need to do a little housekeeping. Remove the Playback region, turn snapping back on, and unsolo the track to hear the modified Reality track with the rest of the project. When you’re finished, save your progress.
When a scene is filmed, the sound mixer records production sound, which includes dialog and whatever sound happens to be picked up by the microphones as the actors perform the actions in the scene. The primary focus of production sound is good clean dialog. The other sounds are usually replaced by more dramatic re-enactments referred to as foley sound. Foley sound is named after Jack Foley, who was a stand-in and screenwriter during the silent era of film and later helped Universal make the transition to sound. Just as actors record the voices of animated characters in an animated film, foley artists re-enact the audible actions of real actors onscreen, including everything from footsteps to door slams, body hits to clothes wrinkling.
What this scene needs next is some foley sounds to bring the actress’s movements to life. Chances are you probably don’t have a foley recording stage, foley actors, and a full assortment of recording equipment to record the sounds. In lieu of the real foley experience, Soundtrack Pro includes an assortment of foley sound effects.
Note
Though they can never be as spot-on accurate to the video as foley sounds recorded for the scene by trained foley artists, prerecorded foley sounds will work fine for many scenes, including this one.
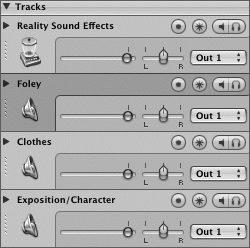
In the next series of exercises, you’ll search for specific foley sound effects and then add them to the Timeline. First you’ll create three new tracks below the Reality track.
Ctrl-click the Reality track header and choose Insert Track After from the shortcut menu.
Repeat step one twice until you have a total of three new tracks.
Rename the new tracks (from top to bottom) Foley, Clothes, and Exposition/Character.
Watch the scene and look for any actions that the actress takes onscreen that should create sound.
I notice three things that need sound: footsteps, breathing, and the movement of the bedspread when she climbs out of bed. If you didn’t pick up on all three, watch the scene again and look for those cues.
Now that you know which sounds you’re looking for, it’s just a matter of searching for the right sound for each action onscreen. Let’s start with the footsteps. You can search for foley sound effects in either the column or button view, whichever you prefer. Once you find effects you think will work, you can audition them with the rest of the project to see how they work before you add them to the Timeline. To audition a file in the Media and Effects Manager, simply preview the file while the project is playing. It’ll be easier to audition the file with the project if you create a playback region. While you’re at it, this might be a good time to set a marker for when the actress climbs out of bed.
Play the project and pause when the actress pulls back the bedspread to climb out of bed (around 23;00).
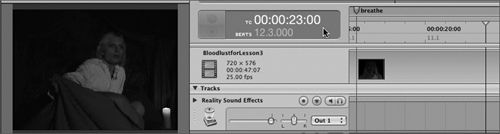
Press M to set a time marker at the playhead position. Then, double click the head of the marker and name the marker out of bed.

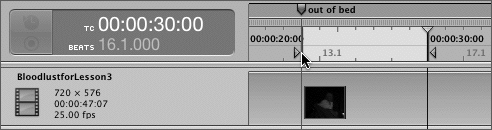
Press the right arrow key to move the playhead one second to the right. Continue pressing the right arrow key until the playhead is at 30 seconds in the Timeline.
Create a playback region from the playhead position (30;00) to the out of bed marker (23;00).
Click the Search tab, then change the search category to Sound Effects.
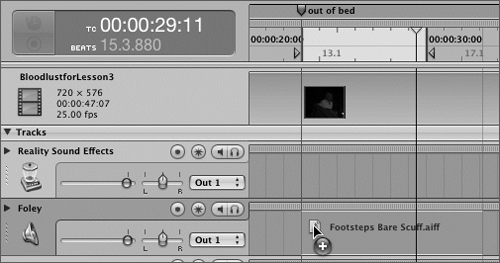
Click the Foley keyword in the Sound Effects category and type footsteps in the search text field.
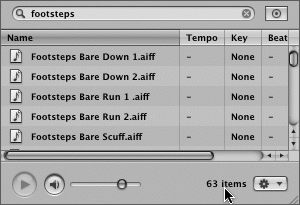
There are 63 different footstep files. Foley artists record footsteps to match the screen by wearing different shoes and walking on surfaces that match those in the scene. For this scene the actress has bare feet and isn’t moving very fast, so you can focus on the footstep files at the top of the list that include the word bare in the file name.
Press the spacebar to begin playing the playback region in the Timeline.
When you audition a foley sound with the project, the audio you’re previewing may not match up exactly with the picture, but you’ll have a good idea if it will work or not.
Select the first file in the list Footsteps Bare Down 1 to preview it along with the project.
Not even close. Next!
Press the down arrow key to move to the next file in the list. Continue pressing the down arrow key until you’ve previewed all of the bare footstep files.
Did you find one that worked? The Footsteps Bare Scuff file seems to work really well with the picture. Let’s try it.
Drag the Footsteps Bare Scuff file from the Search tab to the foley track so that it starts at the out of bed marker.
The first foley sound effect is in the Timeline. Now all you need to do is move it into position so that it matches better with her feet hitting the floor and her first steps. Play the project, and shift or nudge the clip until it works with the video. It doesn’t have to be perfect as long as it sounds like it goes with her movements onscreen. If you have trouble finding a position that you like, try starting the clip at 24;00. When you’re finished, save your progress.
Another handy feature in most applications (including Soundtrack Pro) is the duplicate feature, which automatically duplicates the selected clip and places the duplicate to the right of the original clip in the Timeline. This can be very useful when you are working with non-looping files and want them to repeat, such as the footsteps clip.
There are three standard ways to duplicate a selected clip in the Timeline:
Choose Edit > Duplicate.
Press Cmd-D.
Ctrl-click the clip and choose Duplicate from the shortcut menu.
In this exercise, you’ll duplicate the Footsteps Bare Scuff clip using the keyboard shortcut. First, listen to the project without the playback region to see if you actually need more footsteps.
Time to put together the skills that you’ve learned so far to add a foley sound effect for the bedspread moving as the actress gets out of bed.
Create a playback region around the out of bed marker that includes all of the movement of the bedspread (approximately 21;12 to 23;06).
On the Search tab, type Clothes in the search text field.
Audition each of the five different foley clothes effects to find a good choice for the scene.
Personally, I like Clothes 2, but feel free to use a different file if you prefer.
Drag your choice to the play range area of the Clothes track.
Play the project and shift or nudge the clothes clip until the beginning fits with the movement of the bedspread (about 22;00).
Remove the playback region.
Select and play the clothes clip; pause playback when the bedspread stops moving in the video, around 23;12.
Press S to split the selected clip at the playhead position.
Delete the section of the clip after the split.

Nice work! You’re ready to add another effect on your own.
There are still a few sounds missing to make the character’s fear more audible. The obvious choice would be a scream, except her mouth doesn’t open and she’s hypnotized by the vampire, so screaming isn’t an option. Instead, loud breathing and a pounding heartbeat can express fear or tension. You’ll find these types of sound effects in the People category of sound effects.
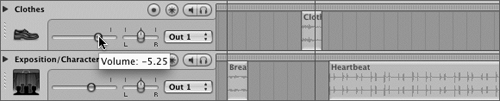
Your goal is to add a sound effect to the breathe marker on the Exposition/ Character Track. You’ll find two Breath Female sounds to choose from. Select the best one for the scene and add it to the track. Breath Female 2 is probably best because it sounds more like quick, fearful breathing, instead of the long, heavy breathing in Breath Female 1. Then trim the sound effect so that it only occurs during her close-up shot when you see her breathing. Trim and nudge the clip as needed for the desired result. Then add a heartbeat sound effect that begins at 24;00, after she gets out of bed. (There is only one heartbeat sound effect and you’ll find it under the People category.) Finally, lower the volume level on the Clothes track to around −5 and the Exposition/Character track to around −8. When you’re finished, save your progress.
There are two things to consider when building the soundtrack for a scene. Is the scene going to be sound-effects based or music-based? Of course, the scene can include both types of elements, but generally one is more dominant. For example, a car chase scene could be driven literally by a heavy music track that keeps the pace and feel moving forward at full throttle with every musical phrase. There are still sound effects when needed, but the music is without question the dominant element. The alternative is a car chase sequence with heavy sound effects—horns honking, tires squealing, people screaming, engines revving at ribcage rattling levels—while the music is merely a light, adrenaline-enhancing highlight. Both scenarios can result in very effective and exciting chase scenes.
Music can completely change the feel of a scene and can turn nearly any performance into a three-hanky tearjerker or goose-bump–inducing thriller. For this scene, the sound design you’re working on is sound-effects based, with a subtle music track. In the next series of exercises, you’ll add several music loops to the soundtrack to build suspense, and take the emotion of the scene to the next level.
Soundtrack Pro includes over 4000 royalty-free musical loops to choose from. Rather than searching aimlessly through that musical haystack of files, you’ll narrow the search to the Designer Synth loops. Still, there are over twenty different Designer Synth loops, so let’s focus on the first six.
To make the auditioning process easier, you’ll start by creating a playback. Then you’ll audition the first six Designer Synth loops with the project to see which one works best with the scene. How will you know when you find the right one? Trust your instincts. You’ll never appreciate how good a music part works until you hear a few that don’t. Here’s your chance. One of the first six Designer Synth loops works really well with the video; the others vary, but definitely lack the same impact.
Create a playback region from the purple Start Music marker to the red End of Song marker.
This is the portion of the Timeline where you’ll add the music.
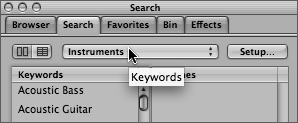
Click the Search tab on the Media and Effects Manager, change the keyword pop-up menu to Instruments, and type Designer Synth in the search text field.
Play the project in the Timeline and select the Designer Synth 01.aiff file to audition it with the scene.
Nope. Too heavy on the synth. Might work for a sci-fi scene about dancing alien fireflies, but not this scene.
Press the down arrow key to audition the next file. Continue auditioning files until you reach Designer Synth 06.aiff.
Wow. The haunting piano sounds like it was written for this scene.
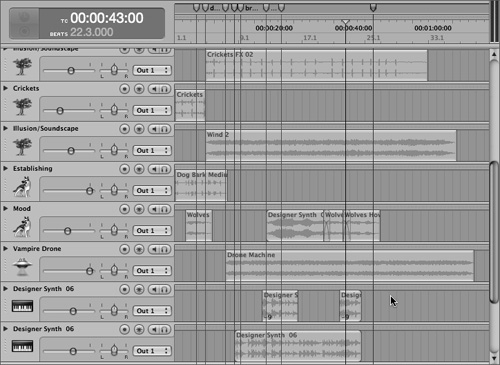
You’ve located the music loop to enhance the scene, now all you need to do is add it to the music tracks. First, you’ll need to create the music tracks, then you can add the music.
Press Cmd-T twice to create two new tracks at the bottom of the Timeline.
Drag the vertical scrollbar on the right edge of the Timeline down to view the new tracks, if they’re not already showing.
You’ll add the music loop to the Timeline so that it begins at the start music marker in the Timeline (15;00).
Drag the Designer Synth 06.aiff file from the Search tab to the start music marker on the lowest track in the Timeline.
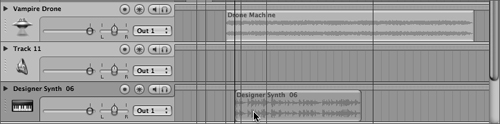
The track’s name changes to Designer Synth 06 to reflect the clip that you just added to it.
Play the project to hear the music with the other tracks in the Timeline.
One way to really “fatten” a track is to double a part. That’s musicspeak for having twice the number of instruments play the same part at the same time, making the piece louder and fuller.
The easiest way to double a part in Soundtrack Pro is to create a new track above or below the part you want to double. Then, copy the original and paste a duplicate in the second track.
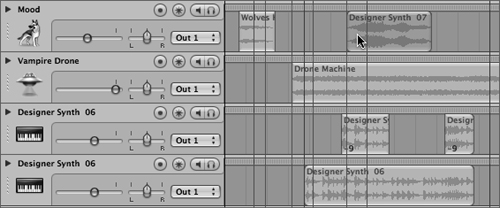
Select the Designer Synth 06 clip on the lowest track of the Timeline, if it is not already selected.
Press Cmd-C or choose Edit > Copy.
Select the empty track above the Designer Synth 06 track.
Move the playhead to the purple start music marker, then press Cmd-V to paste the clip into the selected track.
Note
If you accidentally pasted the clip to the wrong track, press Cmd-Z to undo, and try again. The pasted clip will always go to the playhead position on the selected track.
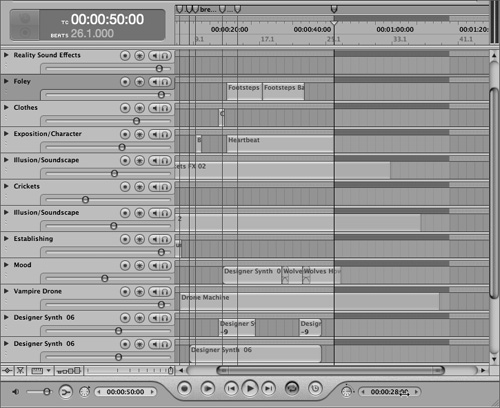
You’ve successfully doubled the track, but doubling also combines the levels of the two clips which raises the volume of the doubled part in the project. Let’s take a moment to lower the volume level of both Designer Synth 06 tracks.

Lower the volume level of each Designer Synth 06 track to −9 dB.
Play the project to hear the doubled music tracks.
Save your progress.
As you can see, doubling music clips is easy and effective. However, it would be even better if you trim away some of the doubled clip so that it’s only doubled for key moments of the music.
Previously, you have trimmed clips in the Timeline by dragging the edges or splitting the clip. In this exercise, you’ll edit the upper Designer Synth 06 clip using the Razor tool. The Razor tool works the same as the Blade tool in Final Cut Pro—they even have the same shortcut, B for blade. You can also click the Razor tool in the top-left corner of the Project window.
Click the Beats-based format button to change the project’s time format.
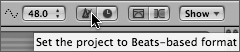
This exercise requires a beats-based time format so that the gridlines and snapping will be in musical time. Feel free to zoom in or out of the Timeline or change the track size as needed so that you can cut the top clip at the 1st beat of the 12th measure.
Move the playhead to 12.1.000 in the Timeline.

Click the Razor tool in the top left-corner of the window, or press B.
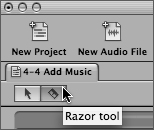
The pointer changes from an arrow to a razor blade.
Click the upper Designer Synth 06 clip at the playhead position with the Razor tool.
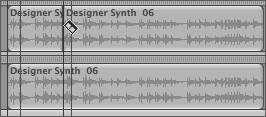
The clip splits into two sections on either side of the razor cut.
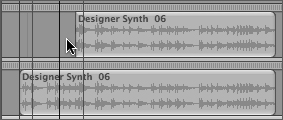
Press A to switch back to the Selection (arrow) tool.
Select the section before the cut and press Delete to remove it from the project.
Tip
To quickly move the playhead to an exact location, double-click the current playhead position in the Time display and type a new destination. For example, for the 1st beat of the 12th measure, type 12.1.000 (that’s the number 12 plus a period followed by 1 and another period; the zeros at the end are optional).
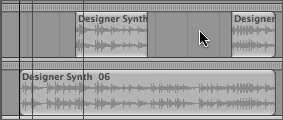
Move the playhead to 16.3.000, press B to select the Razor tool, and click the first Designer Synth 06 clip at the playhead position.
Cut the clip again at 21.4.000.
Press A to switch back to the Selection tool.
Click the section of the edited clip between 16.4.000 and 21.4.000, and press delete to remove it.
Play the project and save your progress.
If you’re wondering why we just went through all of that trouble to create a doubling effect that isn’t very dramatic, hang in there. You’re about to learn a very powerful music editing trick.
Transposing is a musical term for changing the key of a piece of music. Soundtrack automatically transposes every tagged music loop that you bring into the Timeline to match the key of the project. If the natural key for a clip already matches the project key, no change will take place.
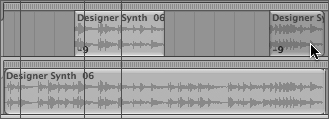
Ctrl-click the first section of doubled clip on the upper Designer Synth 06 track.
A shortcut menu appears with editing options for that clip.
Select Transpose.

Notice the vertical list of numbers from + 12 to −12. These represent semitones, which measure the distance the clip is transposed. This clip is currently set to 0, which is equal to the key of the current project (A). If you want to know the original key of an audio file, you can find it in the Details tab in the Utility window.
A small −12 appears on the clip to show that it has been transposed by −12 semitones.

Press Return to move the playhead to the beginning of the playback region, and then play the transposed clip.
This sounds great. Let’s analyze what you did.
There are seven different musical notes, A to G. Each note can be performed by different instruments and can be distinguished by its own sound or pitch. If you ever saw The Sound of Music, you’ll remember that the musical nanny taught the children the notes by singing each one: “Do-re-mi-fa-so-la-ti-do.” Each sound represents a note, one step at a time, until the whole thing repeats an octave higher. You can also go the other direction, an octave lower.
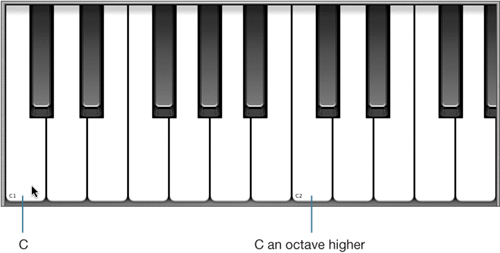
A piano keyboard has white and black keys. The white keys are the notes A to G, and the black keys are sharp and flat variations of the notes, or half steps between. If you pick any piano note or key and count the keys (black and white) until the note repeats, you will count 12 keys. So, if you take any clip in the Timeline and transpose it by +/− 12 (as you did in the last exercise), it will play the exact same notes an entire octave higher or lower.
You can also transpose clips by only a few semitones to alter the key and build a chord. You have to be careful when doing this. If you hit the wrong key, you and everyone else will know it.
Transposing loops by +/− 2 semitones will sound good. If you are going for a happier feel, +/− 3 semitones corresponds with the major chords.
Now that you’ve heard how the doubled part sounds when it’s transposed one octave lower, it’s your turn to try a different variation. Transpose both of the edited Designer Synth 06 clips by −9. Play the project to hear the doubled-andtransposed parts. What a difference three semitones make! The new version has an eerily melodic sound, which works well in the context of the scene.
One of the most powerful musical elements in crafting suspense is the stinger. You know, that subtle string sound that creeps into the scene and stings you emotionally without warning. For example, imagine a scene that involves a character walking down the hall toward his apartment door. He hasn’t a care in the world. He might be talking on a cell phone, and the only music is the light thump of a neighbor’s stereo. But a musical stinger begins as he approaches the door and fumbles for his keys, so tension is starting to mount for the audience even before the character notices that his door is already ajar.
What makes stingers so effective is that they slowly creep into the soundtrack, and by the time the audience notices, their adrenaline is already pumping. Stingers are used for instant suspense. Let’s demonstrate.
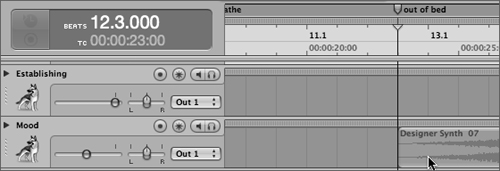
On the Search tab, select the Designer Synth 07.aiff file.
That’s a stinger. It causes an almost Pavlovian response of fear for both the character and the audience. You’ll add the stinger to the Mood track.
Drag the Designer Synth 07 file to the out of bed marker on the Mood track (12.3.000).
Clear the playback region, play the full scene with the finished music tracks, and save your progress.
Did you notice the power of the stinger mixed with the other music? My goosebumps just got goosebumps.
You’ve created a suspenseful soundtrack from scratch that flows well with the scene, adds reality, and enhances the emotion, actions, and mood. Overall it works and you’re nearly done, but it could use a little more mood enhancement after the stinger ends. Onscreen, the young woman turns toward the camera and the vampire slowly moves in front of the camera, essentially fading out the scene. This seems to be the perfect opportunity to reintroduce the sound of howling wolves. Better yet, let’s overlap the end of the stinger clip with the beginning of a howling wolves clip to create a crossfade.
When you overlap clips in the Timeline, you can create either a crossfade or truncate the overlapping clips, depending on the overlap mode of your project. The default overlap mode is crossfade.
When a project is in crossfade mode, a crossfade is created automatically for the overlapped part of two audio files. Crossfades let you create smooth transitions between one audio clip and the next, avoiding abrupt changes in volume that can result from placing audio files back-to-back.
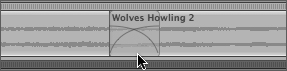
Let’s duplicate the Wolves Howling 2 clip at the beginning of the Mood track and overlap the duplicate with the end of the Designer Synth 07 file. You’ve already learned that you can duplicate a clip with Cmd-D, or copy and paste clips in the Timeline. In this exercise, you’ll learn a new time-saving duplicating trick called option-dragging, which works in all Final Cut Studio applications.
Click the Crossfade Mode button located above the Global Timeline view in the upper-right corner of the Project window.

Press N to turn off snapping, if it is on, so you’ll have more freedom of movement with the duplicate clip.

Select the Wolves Howling 2 clip at the beginning of the Mood track.
Press and hold the Option key (which makes a duplicate) and drag the duplicate clip to the right; then release it so that it partially overlaps the end of the Designer Synth 07 clip.

Solo the Mood track and listen to the crossfade between the clips.
Crossfades are created for the overlapped part of the two audio files. You can drag the boundaries of the crossfade to adjust its length or simply overlap more of the clips to create a longer crossfade.
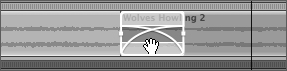
Zoom in to the Timeline for a better view of the crossfade.
Move your pointer over the crossfade in the Timeline.
There are three different ways to use the mouse pointer to modify the crossfade in the Timeline. If your pointer is over the lower middle of the crossfade, the Selection tool becomes a Hand tool that you can use to move the actual crossfade to a different point on the clip without changing its length. If you move the pointer to the right or left edges of the crossfade boundary, you can extend or collapse the crossfade. Or, if you select the crossfade from the center where the two lines intersect and drag left or right, you can overlap the clips further, thus extending the crossfade.
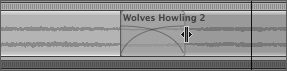
For this exercise you’ll drag the crossfade from the center where the lines intersect to move more of the Wolves Howling 2 clip over the stinger clip, extending the crossfade in the process.
Drag the intersecting lines (center) of the crossfade to the left the distance of one gridline or so, to extend the crossfade and the amount of overlap between audio clips.
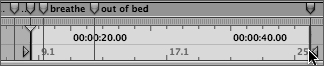
Press the down arrow key several times to zoom out of the Timeline until you can see the entire Mood track up to the end of song marker.
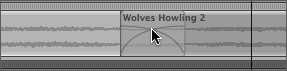
Next you’ll add the Wolves Howling 1 clip from the Bin tab and overlap it with the end of the Wolves Howling 2 clip. If you recall, you didn’t use the Wolves Howling 1 clip in Lesson 3 because the wolves sounded more scared and submissive. If the vampire is dominant over them, it only makes sense that they sound submissive at the end of the scene when he is present. Also, their sound substitutes a voice for the young woman who has no voice of her own because she’s been hypnotized by the vampire.
Drag Wolves Howling 1 to the end of the Mood track and overlap the end of Wolves Howling 2.
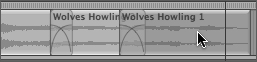
Adjust the crossfade as needed until you’re satisfied with the sound of the overlapping clips.
Unsolo the Mood track and listen to the project in the Timeline.
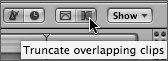
Instead of crossfading overlapping clips, you can truncate them by changing the project’s overlap mode. In this exercise, you’ll truncate the Footsteps Bare Scuff clips, since the footsteps sounds continue in the track even after the woman stops moving onscreen. Your goal is to move the right footsteps clip to the left to start it sooner in the track. That will overlap the previous footsteps clip and cut it short. Let’s try it.
Solo the Foley track and zoom in for a good view of both Footsteps Bare Scuff clips.

Click the Truncate Mode button to change the project overlap mode.
Click the Time-based format button to change the project’s time format.
Move the playhead to 43 seconds in the Timeline (43;00), which is where you want the second clip to end.
Drag the second Footsteps Bare Scuff clip on the Foley track to the left and align the end of the clip with the playhead.
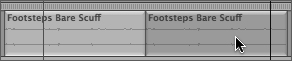
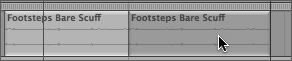
Notice that in truncate mode, the clip on the right overlaps the clip on the left without creating a crossfade.
Unsolo the track and save your progress.
Press Shift-Z to fit the entire project in the window so that you can admire your audio masterpiece.
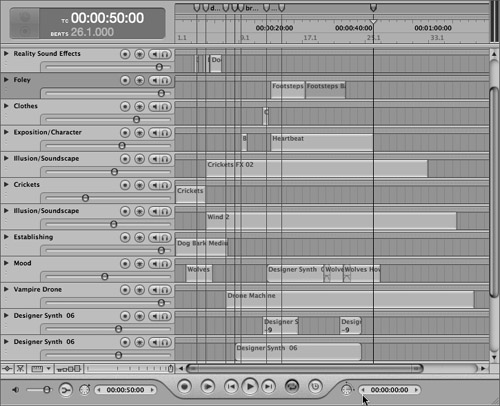
Now that you’ve finished the sound editing, you can take a moment to clean up the end of the project. The red end of song marker works as a period on the soundtrack, so that the playhead knows where to stop playback. Right now you have quite a few clips that extend beyond the red marker. Not that there’s anything wrong with that, but if you want to ensure that everything ends at that moment, you can trim every clip in the Timeline at the same time with a timeslice.
What’s a timeslice? It’s exactly what it sounds like, a slice of the Timeline. You can create timeslices within a track or timeslices that include the entire project. For this exercise you’ll create a timeslice selection that starts at the red end of song marker and extends to include everything beyond the marker (50;00). Once you’ve selected a slice of the Timeline, you can cut, copy, or delete the selection. You can use the Selection Length value slider located in the bottomright corner of the interface to determine the length of the master timeslice.
Press the End key to move the playhead to the end of song marker.
Press Cmd-Shift- − (minus) to zoom out vertically until the tracks are the smallest (minimized) size.
The Selection Length value slider works very much the same as the Playhead Position value slider located at the left of the transport controls. Both value sliders can be modified by typing a new value, clicking the incremental arrows, or click-dragging over the slider's value. The difference is that the Playhead Position value slider lets you view or change the current playhead position, while the Selection Length value slider creates a Master timeslice (selection) starting at the playhead position.
Click-drag the Selection Length value slider to the right until the ends of clips extending beyond the red marker are within the blue selection (28;00 in the Selection Length value slider).
The blue area in the Timeline shows the selected master timeslice.
Press Delete to remove the elements contained within the timeslice.
Click anywhere in the Timeline to deselect the timeslice selection.
Save your progress and play the finished piece. Feel free to click the Zoom button (+) on the Utility window to fit the Video to the screen and play the project again.
Very impressive. You planned and executed the total sound design and editing for this scene from scratch! Now that you’ve finished, just imagine the possibilities for your own projects using Soundtrack Pro.
Answers
Editing | |
|---|---|
S | Split a clip |
Cmd-D | Duplicate |
Cmd-C | Copy |
Cmd-V | Paste |
Cmd-X | Cut |
Cmd-Z | Undo previous step |
Shift-Cmd-Z | Redo previous step |
B | Razor tool |
A | Selection tool |
Zooming | |
Option Z | Zooms in to the selected clip(s) |
Shift-Cmd-+ | Zooms vertically to a larger track height |
Shift-Cmd-− | Zooms vertically to a smaller track height |
Moving Clips | |
Shift-Option–left or right arrow | Shifts clip left or right one gridline at a time |
Option–left or right arrow | Nudges clip left or right by smallest increment |
Tracks | |
Cmd-T | Creates a new track |