
Lesson Files | Soundtrack Pro book files > 01-02_Projects&Media > 1-1 Start, 1-2 Final |
Time | This lesson takes approximately 60 minutes to complete. |
Goals | Launch the Soundtrack Pro program |
Explore the Project window | |
Navigate in the Timeline | |
Explore the Media and Effects Manager | |
Work with the Browser, Favorites, and Bin tabs | |
Search for a file and add it to a project | |
Extend and move files in the Timeline | |
Reverse an audio file in the Waveform Editor | |
Open and close the Mixer |
Soundtrack Pro is powerful enough to arrange, edit, repair, and mix professional audio, yet simple enough that anyone can use it right out of the box.
Over the years, I’ve worked with many frustrated video and filmmakers who can shoot and edit the visual portion of their projects, but struggle to deal with the many audio issues that occur, including background and ambient noise, mixing, recording, and scoring.
That was before Soundtrack Pro. This software incorporates many of the same interface features as the other Final Cut Studio applications, including Final Cut Pro, DVD Studio Pro, and Motion. Best of all, you don’t have to be a computer major or audio engineer to create professional quality soundtracks. If you can click a mouse, you can turn your Mac into an audio post-production studio—it’s really that simple.
In this lesson, you’ll work with the Soundtrack Pro interface and learn how to search for and preview files, use the transport controls, navigate in the Timeline, and open files in the Waveform Editor. Along the way, you’ll also learn some useful keyboard shortcuts as you get to know the program.
Before you start, you need to install the Soundtrack Pro application onto your hard drive. You will also need to copy the lesson files from the DVD in the back of the book to your computer.
The instructions for loading the software and files are in the introduction of this book. Once those two steps are complete, you can move forward with this lesson.
Now that you have the Soundtrack Pro program and lesson files loaded onto your hard drive, you’re ready to begin this lesson.
As with any of the Apple Pro applications, there are three ways to launch Soundtrack Pro:
Double-click the Soundtrack Pro icon in the Applications folder of your hard drive.
Click the Soundtrack Pro icon in the Dock.
Double-click any Soundtrack Pro project file.
For this exercise, you’ll launch Soundtrack Pro by opening a project file.
Locate the Soundtrack Pro book files folder on your computer’s desktop, then double-click the folder to open it.
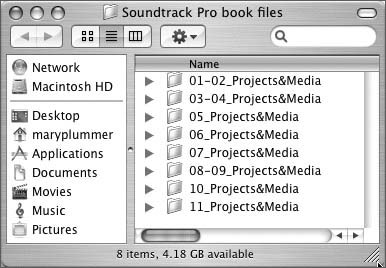
The folder opens, revealing the different lessons organized into Projects&Media folders that correspond with the lessons in the book.
Open the 01-02_Projects&Media folder to see all of the projects and media needed for Lessons 1 and 2.
The Introducing Soundtrack Pro folder contains all of the projects and media that you’ll need to complete this tutorial.
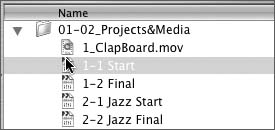
Double-click the 1-1 Start file to launch Soundtrack Pro and open the project.
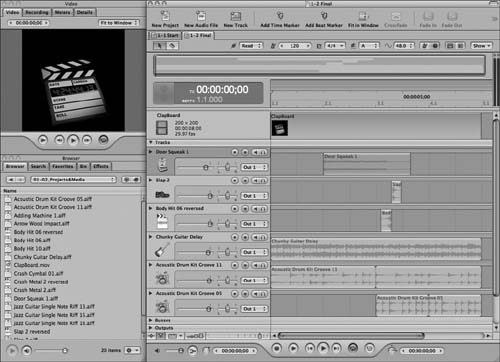
When Soundtrack Pro opens, you will see three windows displaying the current project.
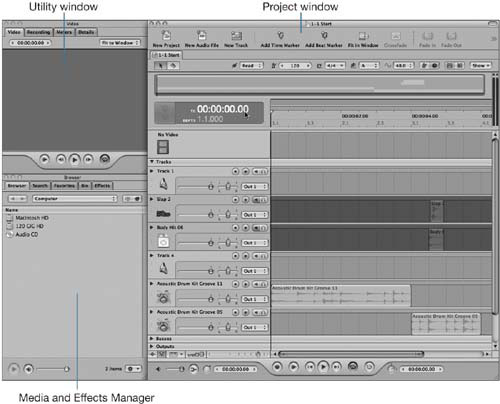
The largest window at the right is the Project window, which includes the Timeline. This is where you arrange audio files for your project. The two smaller windows at the left are the Utility window and Media and Effects Manager. You can use the Utility window to view a project’s video, recording levels, master level meters, and details about individual clips within the project. In the Media and Effects Manager, you can browse, preview, and organize files, as well as add and modify effects.
Let’s start with the Project window and play the current project.
In the Project window, you can create and edit your multitrack projects in the Timeline or edit audio files in the Waveform Editor. If you’re familiar with the other Final Cut Studio applications, the Project window is similar to the Timeline window in Final Cut Pro and the Timing Pane in Motion. You’ll find a customizable toolbar at the top of the window for easy access to common functions. At the bottom of the window you’ll find handy Transport controls, as well as Timeline controls.
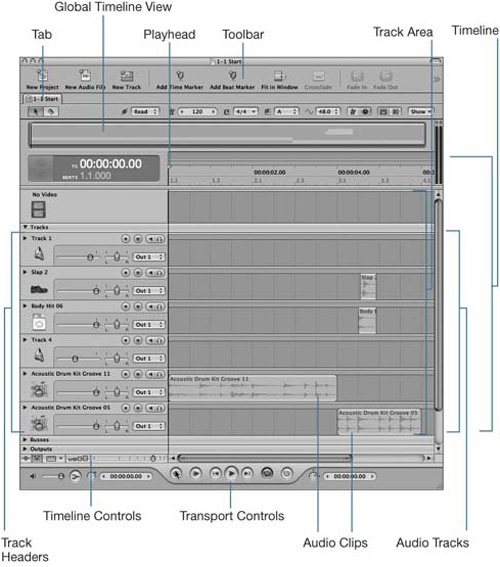
The green audio clips in the Timeline represent audio files that have been imported into the project from the Media and Effects Manager. You can arrange audio clips on tracks in the Soundtrack Timeline similar to the way that you arrange video clips on tracks in the Final Cut Pro Timeline.
The current project has six tracks, containing four different audio clips. These clips come from the Soundtrack Pro content of over 5000 royalty-free audio files included with the application. You can have a combined total of 128 tracks, buses, and outputs in a Soundtrack Pro Multitrack project.
You’ll add additional audio clips to the empty tracks in a few minutes after you finish working with basic Timeline navigation.
Note
If you’ve worked with the Soundtrack program, you’re already familiar with the Timeline portion of the Project window. You can upgrade from Soundtrack to Soundtrack Pro, which will enable you to open your Soundtrack projects in the Soundtrack Pro Timeline.
As with other Apple Professional applications, you can click the play button in the transport controls or simply press the spacebar to play the project.
Press the spacebar to play the project in the Timeline.
The playhead scrubs across the tracks as it moves forward in the Timeline and plays the project. Once the playhead reaches the end of the last clip in the Timeline, it automatically cycles back to play the song again from the beginning.
Note
You can stop the playhead from cycling back by turning off the Cycle button in the Transport controls. But in general, it’s a good idea to leave the Cycle button on unless you need to turn it off for a specific reason. That way whenever you play your project it will automatically repeat so that you can evaluate the sound more easily.
Press the spacebar again to stop playback.
The Return key always moves the playhead to the beginning of the project, while Shift-Return starts playback from the beginning of the project.
Press Shift-Return to start playback from the beginning of the Timeline.
Press the spacebar to stop playback at the current playhead position.
Press Return to move the playhead to the beginning of the project without starting playback.
Now that you’ve played the project, you’ll learn to navigate and zoom in and out of the Timeline. The current playhead position is displayed in both timecode (TC) and beats in the time display in the top-left corner of the Timeline. Timecode is generally used to reference video and is displayed as four pairs of numbers representing hours:minutes:seconds.frames. Beats represent musical time in measures.beats.fractions of a beat.

You can use several different methods to position the playhead in the Timeline: Click anywhere in the Timeline; drag the top of the playhead horizontally in the time ruler; or change the value in the playhead position slider.
Click the green triangle-shaped handle at the top of the playhead, and drag horizontally to the right in the Timeline.
You’ll hear the sound of the clips as you drag the playhead. Dragging the playhead is called scrubbing because it scrubs the playhead across the clips in the Timeline.
Press the End key to move the playhead to the end of the song in the Timeline.
You can also navigate in the Timeline using gridlines.
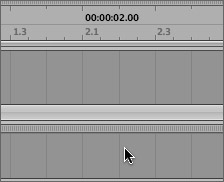
The left and right arrow keys move the playhead right or left one gridline at a time. Gridlines are the vertical gray lines within the tracks that keep beat-based loops in time with the music.
Press the left arrow key several times to move the playhead toward the left one gridline at a time.
Whether you drag the playhead or use the left and right arrow keys, the playhead snaps to the nearest gridline. You’ll learn more about this feature in the next lesson. For now, you just need to understand basic playhead positioning in the Timeline.
Locate the Playhead Position value slider at the bottom-left of the Project Window.

This value slider is similar to the Current Frame value slider used in the Motion interface. Value sliders are unique because you can modify the value by clicking the incremental arrows, selecting the slider and typing a new number, or dragging over the slider with the mouse. Let’s try it.
Your goal is to move the playhead to the timecode position 00:00:04.00 (four seconds, zero frames).
Click the Playhead Position value slider to select the timecode.
The timecode within the slider turns blue to indicate that it has been selected.
Type 4.00 (that’s the number 4, followed by a period and two zeros), and press Return to change the current playhead position to 4 seconds.
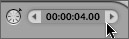
The playhead jumps to exactly 4.00 in the Timeline.
Now that you can move the playhead around, it’s a good time to learn how to zoom in and out of the Timeline.
To zoom in and out of the Timeline, you can use a zoom slider and keyboard shortcuts. The Zoom slider is located directly above the Playhead Position value slider at the bottom-left of the Project window. Since you’re already in that neighborhood of the interface, let’s take a moment to look at a few of the other Timeline controls.
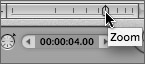
The Zoom slider always zooms in and out of the playhead or selected clips. Since there are no clips selected, you will be zooming into the playhead position at four seconds in the Timeline.
Drag the Zoom slider to the left to zoom in to Timeline at the playhead position.
Drag the Zoom slider to the right to zoom out of the playhead position.
Notice that the dark gray scrollbar at the right of the Zoom slider changes size depending on the current zoom scale in the Timeline.
You can also drag the left and right edges of the horizontal Zoom slider to zoom in and out of the Timeline.

Drag the right edge of the scrollbar to change the scale in the Timeline.
Keep in mind that the scrollbar moves left and right to view different portions of the Timeline. If you happened to drag the entire scrollbar to the right, you may not see any of the clips in the Timeline.
Once you are zoomed in or out of the Timeline, you might want to condense or expand the entire project to fit in the Timeline window.
At the top of the Project window, click the Fit in Window button on the Toolbar.
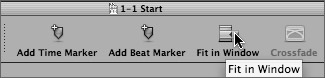
The Timeline scale changes to show the project from the beginning to the last clip at the end.
One of the easiest ways to zoom in and out is to use the up and down arrow keys. The up arrow zooms in, and the down arrow zooms out.
Press and hold the up arrow key to zoom all the way in to the Timeline.
When you’re zoomed into the Timeline, or working with a large project with many tracks, you may need to use the Global Timeline View, located above the Time ruler, for navigation. The Global Timeline View shows a miniature version of the entire project.
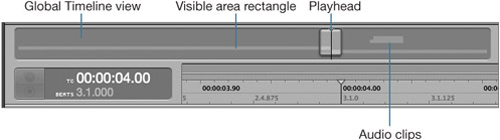
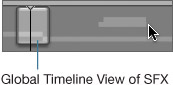
The visible area rectangle within the Global Timeline View represents the portion of the project that is currently visible in the Timeline window. Let’s use the Global Timeline view to navigate to the beginning of the Sound Effects (SFX) clips on tracks 2 and 3.
In the Global Timeline View, drag the visible area rectangle to the right until you see the Slap and Body Hit sound effects appear in the Timeline.
Press the down arrow key several times to zoom out of the Timeline until you can see the entire sound effects clips on tracks 2 and 3 in the Timeline.
The visible area rectangle in the Global Timeline view grows longer to reflect the zoom level change in the Timeline.
To fit the entire project in the Timeline, you can click the Fit in Window button again or use the handy shortcut.
Press Shift-Z to fit the project in the Timeline window.
The visible area rectangle in the Global Timeline view fits the entire global view, illustrating that you can currently see the entire project.
Now that you’re familiar with the Project window, let’s move on to the Media and Effects Manager.
The Media and Effects Manager does exactly what its name suggests; it helps you manage your media and effects. In the next series of exercises, you’ll work with several of the different tabs within this window as you add media files to the current project.
The Media and Effects Manager includes five different tabs. The Browser, Search, and Favorites tabs offer three different ways to locate your media files. The Bin tab displays all of the files in the current project, and the Effects tab can be used to add or modify effects.
Like other Apple Pro Applications, the Browser allows you to access any compatible media file on your computer or network. For this exercise, you’ll use the browser to locate the 01-02 Projects&Media folder in the Soundtrack Pro book files folder on your hard drive.
Back and Forward buttons: Move through previously viewed levels of the hierarchy
Computer button: Displays your computer’s hard disk, internal drives, and other storage media currently connected to your computer
Home button: Displays the contents of your computer’s home directory
Path pop-up menu: Displays the different levels of the file path to the current location, letting you view and move back to a previous level
File list: Displays the files and folders at the current location
Click the Browser tab, if it is not already selected.
The title bar at the top of the Media and Effects manager reflects the name of the selected tab.
On the Browser tab, navigate to the 01-02_Projects&Media folder in the Soundtrack Pro book files folder.
Double-click the 01-02_Projects&Media folder to view the media contents of that folder in the Browser.
At the top of the list you’ll see a file called 1_ClapBoard.mov. This is a QuickTime movie file that you will add to the current project. First, it’s a good idea to preview the file.
You can preview both audio and video files in the browser by selecting the file and pressing the play button in the bottom-left corner of the Media and Effects window.
Click the 1_ClapBoard.mov file on the Browser to select the file.
Click the Play button at the bottom of the Media and Effects window to preview the file.
The Details tab in the Utility window becomes active and displays detailed information about the selected video file.
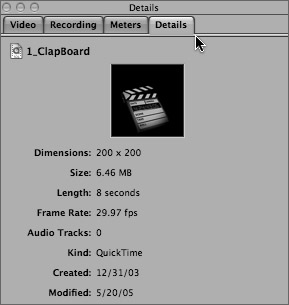
You can now preview a small thumbnail version of the 1_ClapBoard.mov video file in the details tab.
Note
You can preview audio files without using the Details tab. Previewing video clips requires the Details tab because there is no other way to see a video file without first importing it into the project.
The Details tab includes video file information such as the Dimensions of the clip, Size, Length, and Frame Rate. This clip is 8 seconds long, therefore the length of the finished project will also be 8 seconds.
Now that you’ve located the video file that you’ll be scoring for this project, it’s time to add it to the current project.
Keep in mind that Soundtrack Pro is an audio program. That means it can only be used to create and modify audio. Of course, you can add a video file to a project; you just can’t modify the video file once it has been imported into the Timeline.
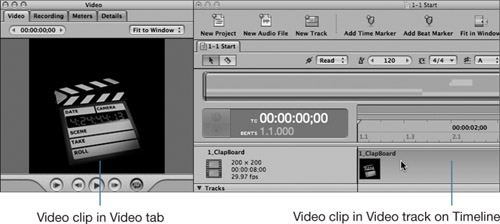
To add a video file, simply drag it to the video track at the top of the Timeline or drag it directly to the Video tab in the Utility window. Since you’re already looking at the Details tab of the Utility window, you can just switch tabs and drag the file there.
In the Utility window, click the Video tab, or press Cmd-1.
The Video tab becomes active.
Drag the 1_ClapBoard.mov file from the Browser tab to the empty space in the Video tab.

A small green circle with a plus sign (+) appears before you release the file to indicate that you’ll be adding a file to the project.
Once you’ve added a video clip to a project, you can see it in the Video tab, and it also appears as a clip in the Video track at the top of the Timeline.
Click the Play/Pause button on the Video tab, or press the spacebar, to begin playback of the project.
Now you know why there are sound effects along with the drum loops in the project. The sound effects were added to accentuate the slap of the clapboard in the video.
You’ve probably also noticed by now that the drum clips need to be extended to last the entire length of the video clip. You also might have noticed that the project continually loops over and over from beginning to end until you stop it.
Pause playback, if you haven’t already done so.
Time to add some more audio files to finish the project.
The Browser tab is used for locating files anywhere on your computer. Once you’ve located a file or folder, you can add it to the Favorites tab for easy access in the future.
While the Browser tab is still selected in the Media and Effects window, this is a perfect time to add a file to the Favorites tab using a shortcut menu. Like most of the Apple Pro Applications, Soundtrack Pro is loaded with handy shortcut menus, also known as contextual menus, which you can use to choose certain functions and features without going to the menus at the top of the interface.
You can access a shortcut menu by holding the Ctrl key and clicking the mouse, or clicking with the right mouse button if you have a two-button mouse.
On the Browser tab, Ctrl-click the 1_ClapBoard.mov clip.
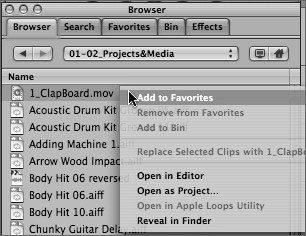
A shortcut menu appears with several choices pertaining to the selected file in the browser.
Choose Add to Favorites from the Shortcut menu.
Once you’ve completed a selection, the Shortcut menu disappears, and you’ve successfully added the 1_ClapBoard.mov to your Favorites tab. How do you know? Just check the Favorites tab.
Click the Favorites tab on the Media and Effects Manager to view any files or folders that you’ve added to Favorites.
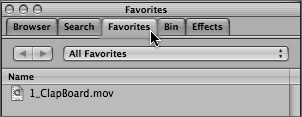
The 1_ClapBoard.mov appears in the Favorites tab.
Files in the Favorites tab are easily accessible without additional navigation, and can be used in any of your Soundtrack Pro projects.
To the right of the Favorites tab you’ll find the Bin tab. The Bin tab contains a list of all the files used in the current project. The Favorites can be accessed from any project, including new projects, while the Bin tab only shows the files used in the current project. In this exercise you’ll add a file to the project from the Bin tab.
Click the Bin tab to view the files used in the current project.

The Bin tab shows five different audio files, while the project clearly contains only four.
Click any of the audio files in the Bin tab to hear it.
Click the up or down arrow keys to select clips higher or lower in the list.
If you look closely, you’ll see that four of the files are listed in black type, while the Door Squeak 1 file is in lighter gray type. File names that appear in gray in the Bin tab have not been used, or are no longer in the current project, but can be added in the future. This is actually a very useful feature because if you change your mind and want to add a file that had previously been deleted, you don’t have to go back and search for it again.
Sounds good, but actions speak louder than words. Let’s add the Door Squeak 1 file to Track 1 in the Timeline.
Drag the Door Squeak 1 file from the Bin tab to Track 1 in the Timeline, and drop it around the middle of the track.

The green add symbol (circle with plus sign) appears to show that you are adding an audio file to the Timeline.
Now that the Door Squeak 1 clip is in the Timeline, the file no longer appears gray in the Bin tab.

Also notice that the name of the track in the Timeline changed from Track 1 to Door Squeak 1. That’s because empty tracks will assume the name of the first audio file added to that track.
Press Shift-Return to play the project from the beginning and hear the new sound effect with the rest of the clips.
Press the spacebar to pause playback.
Don’t worry if you’re Door Squeak sound effect doesn’t match the video clip—you’ll fix it shortly.
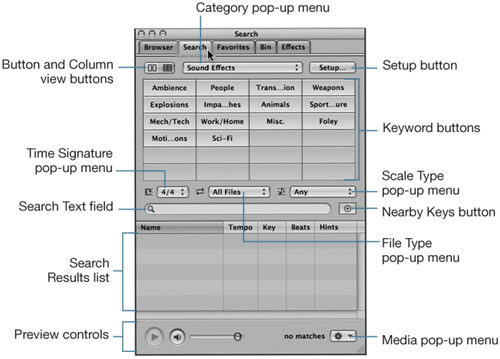
The Search tab is the last tab that you’ll explore in the Media and Effects manager. The Search tab lets you easily access the 5000 audio files that come with Soundtrack Pro, along with any other audio files you add to your collection. The powerful search engine uses metadata (tags) within the audio files as search criteria. You’ll learn more about tagging files with metadata in a later lesson. For now, you’ll just familiarize yourself with the Search tab.
Button and Column view buttons: Change the keyword view to either Button or Column view
Category pop-up menu: Allows you to choose a particular category for the search
Setup button: Opens the Search Setup dialog, so that you can add items to the Search database
Time Signature pop-up menu: Allows you to limit search results to files with the selected time signature
File Type pop-up menu: Allows you to choose whether to display all files, or only looping or non-looping files
Scale Type pop-up menu: Limits your search results to audio files using the selected scale
Keyword buttons (Button view only): Displays files matching the keyword in the Results list
Keywords list (Column view only): Displays files matching the keyword in the Results list, and displays subcategories in the Matches list
Search Text Field: Allows you to type text in the field to display matching files in the Search Results list
Nearby Keys button: Limits search results to keys within two semitones above or below the current project key
Search Results list: Shows the files matching the selected search criteria, in alphabetical order. Includes additional file information in columns displaying the tempo, key, and number of beats of each file
Preview controls: Allows you to Play, Mute, or adjust the volume of selected items in the search list as you preview them using these controls
Media pop-up menu: Allows you to choose menu items to add a Favorite, add a file to the Bin, open a file in the Waveform Editor, and perform other functions
In this exercise, you’ll use the Search tab to locate a specific guitar part for the current project, then add it to Track 4 in the Timeline.
Click the Search tab in the Media and Effects Manager.
The Search tab opens in either Column or Button view.
Click the Button view button to change the search keywords to buttons, if you are not already in button view.

Change the Category pop-up menu to Best Mix.
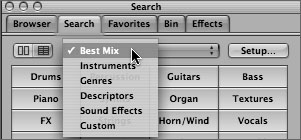
This button category includes a mix of common instruments, descriptors, and genres.
Click the Guitars keyword button.

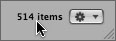
At the bottom-right corner of the Search tab, you’ll see that the results include 514 items. You may see a different number if you have indexed additional files.
It could take a while to preview that many files. Instead, let’s narrow the search further. Since you’re looking for a guitar part with a nice delay effect already applied, you could try using the search text field.
Type delay in the search text field.
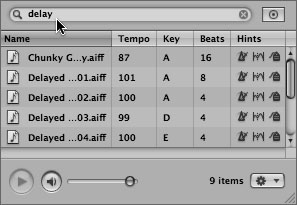
The search results narrow to 9 items—that’s much more reasonable for this exercise.
If you can’t read the filenames in the Name category, you can simply drag the right edge of the Name column header to extend it.

Drag the right edge of the Name column header toward the right until you can read the full names of the files in the list.
Select the Chunky Guitar Delay.aiff file at the top of the list to preview (listen to) the file.
Press Cmd-I (I for Information), or click the Details tab in the Utility window to see details on the selected file.
By now you’ve noticed that the Chunky Guitar Delay.aiff file plays over and over. That is because it is a Looping file, designed as a musical part that can be repeated continually. Feel free to click the pause button at the bottom of the Media and Effects manager once you’ve heard the file loop a few times.
The Details tab includes information about the file, including the author’s name, Sample Rate, Tempo, etc. If you look in the bottom-right corner of the Details tab, you’ll see that it shows Looping file: Yes.

Drag the Chunky Guitar Delay.aiff file from the Search tab to the beginning of Track 4 in the Timeline to add the file to the project.

That’s it. You’re finished with the Search tab. Just one bit of housekeeping before moving on to the project in the Timeline. It’s always a good idea to clear the search text field once you’ve completed a search so that your next search isn’t limited to your previous search text.

Click the Reset button, which looks like an X, on the right side of the Search Text field.
Click the Video Tab, or press Cmd-1.
Now you’re ready to finish the project in the Timeline.
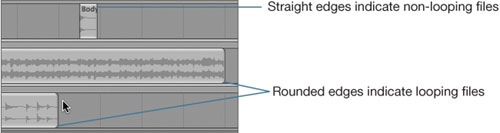
Before you perform the last step for completing this project—extending or moving some of the files in the Timeline—you need to understand the difference between looping and non-looping files. (Soundtrack Pro supports both.) Most audio files, such as sound effects, are non-looping and do not change key or tempo as the project changes. But looping files, or loops, are designed and recorded to repeat and are usually used for musical parts. Loops are also tagged with information so that they will automatically adjust to match the project’s key and tempo. You’ll work more with the different file types, and changing project key and tempo in the next lesson.
First, you’ll extend the looping drum files, and trim the end of the Door Squeak 1 file. Then, you’ll move the Door Squeak 1 file into position so that it matches the action on the screen.
Click the Project window to make it active.
Press Shift-Z or Click the Fit in Window button on the Toolbar to fit the project to the window, if it is not already sized accordingly.
The musical files on the lower three tracks are all loops. The Chunky Guitar Delay loop is already the same length as the video clip, so it does not need resizing. The Acoustic Drum Kit Groove 11 and 05 loops will need resizing. As you can see, all three loops in the project are different lengths. The length of the loop depends on the length of the original recording.
Rounded edges are just one of the features that distinguish looping files from non-looping files.
Move the pointer over the right edge of the Acoustic Drum Kit Groove 11 loop in the Timeline.
Selection Tool
Resize Tool
The Selection arrow changes to a Resize tool.
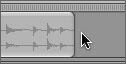
With the Resize tool, drag the right edge of the Acoustic Drum Kit Groove 11 loop toward the right to extend it one full loop segment.

The extended loop now repeats twice, with notches showing where the first looped segment ends and the second segment begins.
Extend the Acoustic Drum Kit Groove 05 loop on Track 6 one full segment to the right.
The original Acoustic Drum Kit Groove 05 loop was shorter in length, so the looped segments are also shorter than those in the track above.
Press Shift-Return to play the project; then pause playback.
Next, you’ll resize the Door Squeak 1 file to trim off the excess on the right edge of the clip in the Timeline. For this maneuver, you’ll apply some of the skills that you learned earlier in the lesson, and learn a few new ones along the way.
Move the playhead over the middle of the Door Squeak 1 clip in the Timeline.
Press the up arrow key several times to zoom into the Timeline at the playhead position.
Now you have a pretty good view of the clip, but this would be a good time to make the tracks a little larger by clicking on the different track height buttons at the bottom of the Timeline. These buttons work the same in Final Cut Pro and Motion.
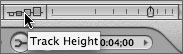
Click one of the larger Track Height buttons to resize the Timeline tracks.
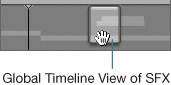
On the Global Timeline View, drag the visible area rectangle up to view the top track in the Timeline, if you don’t already see it.
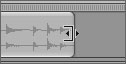
When you make the tracks larger, the waveforms within each clip become larger as well. Now you can clearly see the waveform within the Door Squeak 1 clip. The waveform is the visual representation of the sound wave.
Waveform
Extending a non-looping file only reveals more of the waveform or empty space. In this case, you can already see the complete file, so extending it will only reveal empty space.
Extend the right edge of the Door Squeak 1 file to the right to demonstrate the empty clip space on a non-looping file.
Resizing files will always snap to the nearest gridline, unless the snapping feature is turned off. In this exercise, you’ll work with snapping turned on.
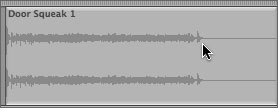
Next you’ll trim off the empty clip space to remove the portion of the clip without any audio. You can determine where the audio starts and stops by viewing the waveform within the clip.
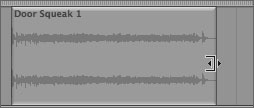
Drag the right edge of the same file to the left as close as you can get to the end of the waveform without trimming any of the waveform off.
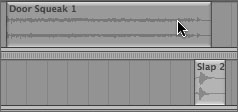
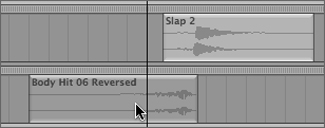
Now that you’ve trimmed the file, you’ll need to move it so that the waveform ends right as the waveform for the Slap 2 file begins on the lower tracks.
To move a file rather than resize it, you simply select it from somewhere in the middle, away from the edge.
Select the Door Squeak 1 file and drag it to the left or right, depending on the starting position, until the end of the waveform ends near the beginning of the Slap 2 sound effect clip on the track below.
Play the project.
The Door Squeak 1 clip should now match the video, and end right as the clapboard slaps closed.
You’ve added files and modified their lengths and position in the Timeline. This is a good time to save your work before moving on to the rest of this lesson. As a rule, you should save often to protect your work. For this exercise you’ll choose Save As from the File menu, and create a new folder to save all of your Soundtrack Pro book projects.
There are different saving methods and details that you will learn throughout this book. At this time, you’ll start with the basics.
Choose File > Save As to open the Save As dialog.
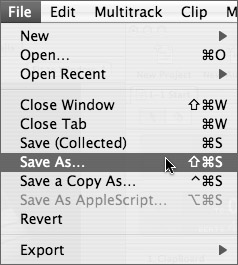
The Save As dialog opens.
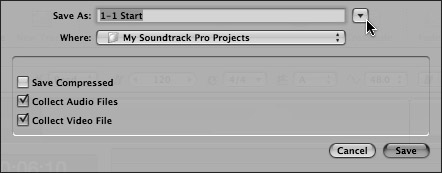
Chances are, you are looking at a condensed dialog window. To expand the window, simply click the downward pointing triangle next to the Save As name field.
Condensed Save As dialog
Click the downward pointing triangle to expand the dialog window.
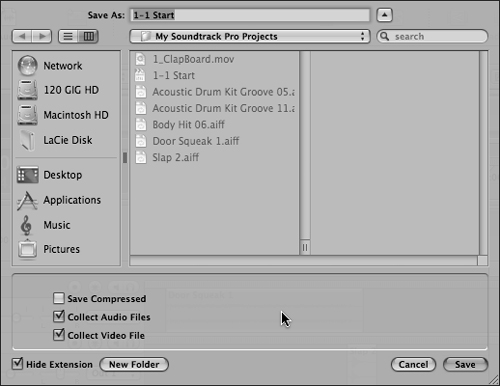
Click the Desktop icon on the Sidebar of the expanded Save As dialog.
You’ve now selected the Desktop as the location for the saved file.
Click the New Folder button in the lower-left area of the dialog to create a new folder on the desktop.
A New Folder window appears.
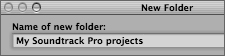
Type My Soundtrack Pro projects in the Name of new folder field of the New Folder window. Then click the Create button to create that folder.
The new folder has now been created and selected on the Desktop.
In the Save As dialog, deselect the Collect Audio Files checkbox at the lower left of the window.
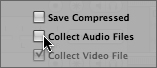
Deselecting the Collect Audio Files checkbox means that you will save only the current project file rather than all of the files included in the project. The other checkbox option, Save Compressed, is used when you are finished with a project and need to save it with all the media files so that you can archive it or move it to another computer.
Click the Save button to save your 1-1 Start project into the new folder on the desktop.
Once you’ve initially saved the file, you can now save revisions by pressing Cmd-S.
The project is fine as is, but why settle for fine when you can add some finesse and make it even better? Plus, as part of the overview in this lesson, it’s time to take a quick look at the Waveform Editor. You’ll be doing extensive work in the Waveform Editor later in the book, but at this time you can open it and modify one file as a sneak preview. Your goal in this exercise is to open the Body Hit 06 clip in the Timeline into the Waveform Editor as an audio file project, and reverse the waveform.
There are many different ways to open a file in the Waveform Editor. You can open a file and edit the actual file, or open the file as an audio file project, which is a non-destructive way to modify a clip without changing the original file. That sounds like a wise choice for this lesson.
On the Timeline, double-click the Body Hit 06 clip.
The Double-Click Preference dialog opens.
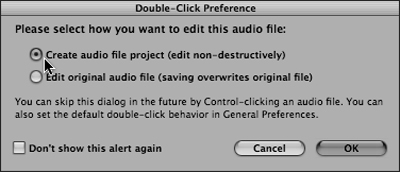
The dialog allows you to choose between destructive and non-destructive audio editing.
Make sure the first option to Create audio file project (edit non-destructively) is selected, then click OK.
A Create Audio Project window opens so you can save the project file. For this exercise, you’ll save the file in your My Soundtrack Pro Projects folder, which should already be selected.
Change the name of the Audio Project to Body Hit 06 Reversed, in the Save As field.
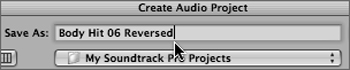
Choose the Desktop > My Soundtrack Pro Projects folder as the location, if it is not already selected, then click the Save button.
The Project window changes to the Waveform Editor and displays the Body Hit 06 Reversed audio project.
The Waveform Editor has similar features to those in the Timeline, except that you only work on one file at a time, instead of multiple tracks and files.
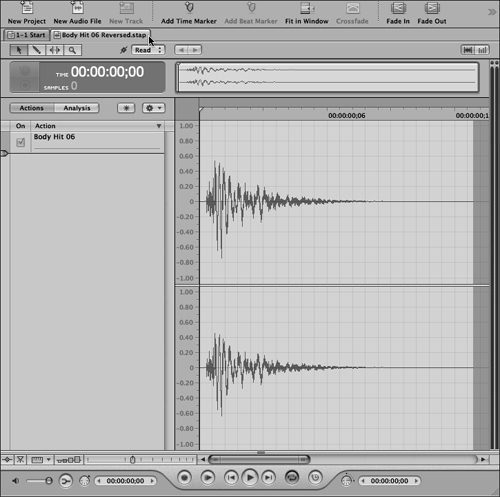
Press the spacebar to play the file in the Waveform Editor. Press it again to pause playback.
For this exercise, you’re going to apply a Reverse action from the Process menu. You can combine many actions to a file within the Waveform Editor, which you will work with more in Lesson 5, “Designing Sound in the Waveform Editor.”
Choose Process > Reverse to apply a Reverse action to the Audio File project.
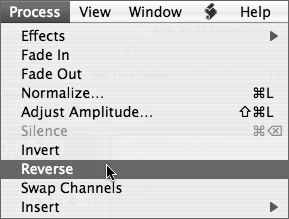
The waveform reverses.
Play the reversed waveform.
Reversing a waveform is a sound design technique to create a more dramatic or interesting sound effect.
Press Cmd-S to save the reversed Audio file project in the Waveform Editor.
Press Cmd-W to Close the Waveform Editor.
The audio file project that you created is now in the Timeline instead of the original Body Hit 06 clip.
The reversed sound effect sounds good, but it needs to be earlier in the Timeline.
Now’s your chance to exercise your newfound skills. Your goal is to move the Body Hit 06 Reversed file to a place earlier in the Timeline, so that it finishes before the Slap 2 waveform begins. Be sure to zoom in to the Timeline as needed, and adjust the track heights for a clear view. When you are finished, fit the Timeline in the window, and change the track heights back to a smaller size. Have fun!
There’s one last window to look at in your tour-de-interface, and that’s the Mixer window. You’ll be working with the Mixer later in Lesson 8, “Creating a Basic Mix,” but for now, it’s good to know what it looks like. To open the Mixer window, you can use the Window menu, the Toolbar button, or a keyboard shortcut. For this exercise, you’ll use the Window menu. While you’re at it, though, be sure to notice the keyboard shortcut for opening the Mixer, which is Cmd-2. Shortcuts are always listed to the right of the menu choices.
Choose Window > Mixer to open the Mixer.
The Mixer window opens as a separate window and includes one channel strip for each track, plus an output strip.
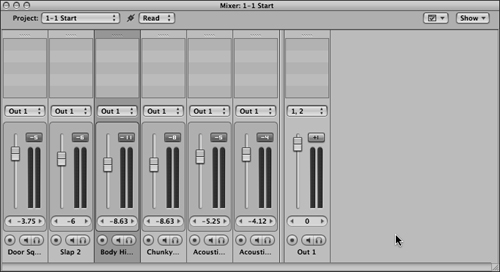
You can use the Mixer to adjust volume and pan levels for the different tracks, as well as record new files and add effects.
The Mixer can be used as a separate window or incorporated into the Interface below the Project window.
Press F2 to change the interface so the Mixer appears below the Project window.
Note
If you’re working on a laptop computer, you may need to press the function key (Fn on the lower left of the keyboard) to use the function keys at the top of the keyboard.
This Layout condenses the size of the Mixer to accommodate the Project window.
Press F1 to hide the mixer and return to the standard layout.
Play the project once more for nostalgia.
Press Cmd-S to save the project.
Press Cmd-W to close the current project.
Congratulations! You’ve completed your tour and finished the first project.
Answers
Spacebar | starts playing or pauses the project |
Return | moves the playhead to the beginning of the project |
Shift-Return | starts playback from the beginning of the project |
Right arrow | moves the playhead to the next gridline |
Left arrow | moves the playhead to the previous gridline |
Up arrow | zooms in to the Timeline |
Down arrow | zooms out of the Timeline |
Shift-Z | fits the project in the display size |
Windows | |
Cmd-W | closes the active window |
Cmd-I | opens the Details tab |
Cmd-1 | opens the Video tab |
Cmd-2 | opens the Mixer window |
Cmd-4 | opens the Browser tab |
F1 | displays the Standard window layout |
F2 | displays the Mixing window layout |