Lesson Files | Soundtrack Pro book files > 11_Projects&Media > 11-1 Scoring Marker, 11-3 Bloodlust Tempo, 11-5 PSA Transpose, 11-7 Files and Loops, 11-8 Timeslice, 11-10 WCS_Intro |
Time | This lesson takes approximately 60 minutes to complete. |
Goals | Automate a Project Key |
Automate a Project tempo | |
Score a marker to the playhead | |
Work with timeslices | |
Change the Offset of an audio clip | |
Replace the Source Audio in a clip | |
Work with multiple outputs | |
Learn to set up Control Surfaces |
At this point, if you’ve been following along with all of the lessons, you know how to work with the interface; arrange and edit multitrack projects; plan and build soundtracks; work in the Waveform Editor; repair, enhance, and modify dialog; add effects; mix tracks; and output the finished project as a mix, selected tracks, or with Compressor. So what’s left? Now that you understand the basic Soundtrack Pro features and techniques, there are some advanced features that may be useful as you create more complex soundtracks.
The goal in this lesson is to cover a lot of different advanced Soundtrack Pro features, functions, tips, and techniques. Rather than start each project from scratch, you’ll work on just the parts necessary to learn the new techniques. Along the way, you’ll also be reminded of many of the shortcuts and features that you’ve already learned. So be prepared to proceed into uncharted territories. And by all means, do try these techniques at home.
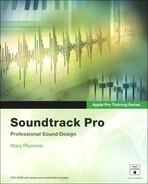
You’ll begin this lesson by opening the first project, 11-1 Scoring Marker, located in the 11_Projects&Media folder.
Quit all open applications, except for Soundtrack Pro.
Close any open Soundtrack Pro projects.
Open the 11-1 Scoring Marker multitrack project, if it’s not already open.
This project is a temporary score for The Tangerine Dream trailer.
Save the project uncollected to the My Soundtrack Pro projects folder on your desktop.
Press Cmd-1 to show the Video tab, if it’s not already showing.
Play the project once to see the video with the music.
Note
The music in this project is a temporary score that was created in Soundtrack Pro, then exported as a mix to Final Cut Pro for the video edit. Once the video editing was finished, a QuickTime movie was exported with scoring markers from Final Cut Pro and imported into this project. This process is also referred to as a round trip.
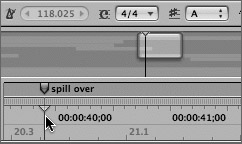
Move the playhead to the spill over marker located at 39;27 in the Time ruler.
Remember that you can use Shift-M to move forward to the next marker, or Option-M to move to the previous marker.
Press the up arrow key to zoom in to the playhead/marker until you can clearly see both the elk horns and spill over markers.
Create a playback region between the elk horns marker and about one gridline to the right of the spill over marker.

Press the spacebar to listen to the playback region and watch the video clip.
Toward the end of the playback region, there’s a shot of a guy spilling over on his snowmobile (hence the spill over marker). A shot like that deserves a little acoustic attention. As luck would have it, there is a perfect drum hit right before he spills over that would work much better if it was synched to the actual event. But how do you do that without actually moving the drum loop in the Timeline? Remember, moving music loops to match video can throw them out of musical time. Is it possible to sync music that is beats-based to video that is timecode-based?
You are about to try one of the coolest, most amazing features in the entire Soundtrack Pro program. As you know, scoring markers can be added to a project in Final Cut Pro, then exported with the video file and imported into Soundtrack Pro. In fact, if you look at the Timeline, you will see all of the orange scoring markers that you worked with in Lesson 5, “Designing Sound in the Waveform Editor.”
So what’s the big deal with scoring markers? They are useful for several things. First, they create a new thumbnail in the video track—all markers do that. Second, you can score the marker to the playhead!
In other words, you can click and drag the scoring marker to the playhead to sync the audio to the picture. This is the exact feature we need to pull off our snowmobile-spill-drum-hit-timing thing.
Let’s take a closer look at the drum hit located in the Drummers of Motown 09 track (4th track from the top).
Press Cmd-9, or Ctrl–up arrow several times to change the track height.
The track height is now the largest size, giving you a front-row seat—and a much better view—for this awesome Soundtrack Pro stunt.
Scroll downward in the Timeline until the Drummers of Motown 09 track is just below the playback region in the Time ruler.

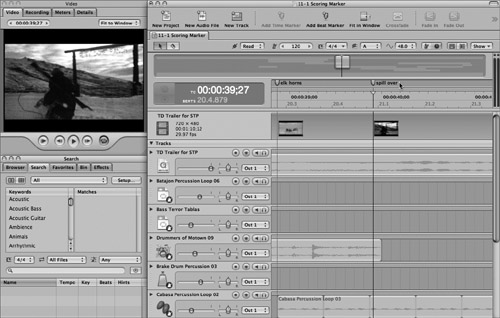
Now you need to identify the waveform of the drum hit. It’s actually a large hit followed by several short hits. You’ll focus on the large hit. It’s easy to see, as it’s the largest part of the waveform, near the middle of the playback region.
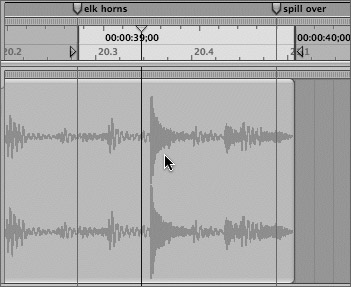
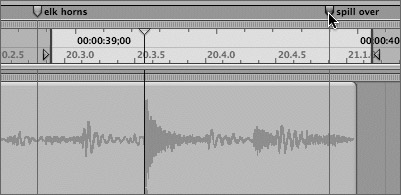
Turn off snapping, if it is on, then drag the playhead to the start of the large drum hit waveform (39;07).
There is a gap between the playhead and the spill over marker.
When we sync the playhead to the marker, we will close that gap.
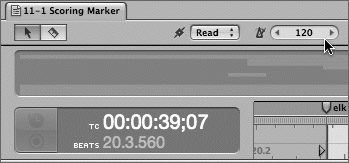
Before you make the move, take a look at the Project tempo in the Tempo Value slider above the Global Timeline view.
Press Cmd-S to save your project before proceeding.
Click the head of the spill over scoring marker to select the marker.
Choose Mark > Score Marker To Playhead.

That’s it. Operation completed.
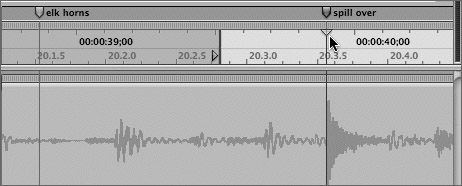
The gap is gone, and the snowmobile spill and large drum hit should now be in perfect sync.
Press Cmd-7 to change the track height back to small.
Clear the playback region, and play the project from the elk horns marker through the snowmobile spill and watch the action in the Video tab.
Amazing. So how did it work? Did the video track change speed? Did the audio track change speed? Did the laws of physics cease to exist on your Timeline? Listen to the playback region before continuing to see if you can figure it out.
Move the playhead to the elk horns marker, and look at the Project tempo.
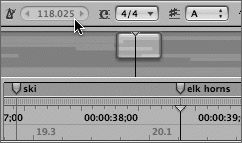
The Tempo Value slider is grayed out, and shows a value of approximately 118.025 BPM.
Press Shift-M to move the playhead to the spill over marker, and look at the tempo.
The tempo is 118.025 BPM here too.
Press Shift-M to move to the next marker (race car) and check the tempo.
The race car marker has a tempo of 120 BPM.
Press the Home key to move the playhead to the beginning of the Timeline. Look at the Project tempo.
The opening tempo has changed to 118.025 BPM.
Press the End key to move the playhead to the end of the Timeline. Look at the Project tempo (120 BPM).
You can sync a scoring marker to the playhead to change the Project tempo on all beats-based (musical) tracks. This allows you to sync music to a specific frame of timecode.
When you synced the scoring marker to the playhead, the tempo changed to accomplish your goal. In other words, you slowed down the tempo slightly so that it would to take longer to get to the large drum hit, allowing it to sync up with the spill in the video clip. The best part is that the tempo changes only between the beginning of the Timeline and the scoring marker—or between other tempo changes if you’ve already made changes within the Timeline.
Unsolo the Drummers of Motown 09 track and press Shift-Z to fit the project to the Timeline window.
Scroll to the bottom of the Timeline to see the Tempo envelope, located in the Master Envelopes.

Note
If the Master Envelopes aren’t showing, click the Master Envelopes disclosure triangle to show the envelopes in the Timeline.
Notice the envelope point at the spill over marker on the Tempo envelope. The Project tempo to the left of the envelope point is around 118.025 BPM and the envelope line is red to show it has been changed. The tempo to the right of the envelope point is 120 BPM.
The tempo changes created by scoring a marker to the playhead are abrupt. You can also create more subtle tempo changes with envelope points. You’ll try that in the next exercise. To prepare, let’s listen to the project once more to hear it from start to finish with the newly synched drum hit spill effect in context.
Play the project once more, then save and close the project.
The project still looks great with the temporary score. The next step would be to add more music loops to complete the score.
Note
You can score a marker to the playhead at any step along the way in building a soundtrack. It’s important to make sure that you are working with the finished video edit before you try syncing beats-based tracks to the picture. You can also wait until the entire score is completed to tweak the tempo using this method.
Music is a vital component in motion-picture editing. Whether you are creating a promo, a movie trailer, an action sequence, or a commercial, it’s the music that drives the pacing and emotion of the piece. So, when do you create the music?
The previous project was an example of one of Soundtrack Pro’s most valuable scoring techniques—creating a temporary score. An editor needs music as a foundation to edit the picture; meanwhile, the composer needs the edited project to create the right music. The solution to this age-old dilemma is a temporary score. Editors use temporary music to edit a scene, knowing that eventually the music will be replaced with a real score. Soundtrack Pro not only makes it easy to create a temp score before the picture edit, but also makes it possible to use that temp score as a foundation for the final score.
Once you’ve created a temp score, usually consisting of rhythm tracks, you can export it as a mix. Then the video editor can use the mix in Final Cut Pro to edit the picture and add scoring markers. Once the picture edit is finished, the video editor can export a QuickTime movie with scoring markers. You can then bring the finished QuickTime back into the Temp Score project in Soundtrack Pro and finish editing the music and sound. That workflow is also referred to as a “round trip” because the project starts in Soundtrack Pro, goes to Final Cut Pro, then comes back to Soundtrack Pro for finishing.
Feel free to work on the music after this lesson. For now, you should keep moving forward to learn more advanced tricks and techniques.
Automating a project’s tempo and key can create either subtle or dramatic changes within the project’s beats-based tracks. Scoring a marker to the playhead was one example of automating a project’s tempo. In the next series of exercises, you will use the Master Envelopes to automate the tempo of one project to change the tempo over time, and then automate the key of another to transpose the entire song. Many self-taught Soundtrack Pro explorers never venture into the Master Envelopes, but you should appreciate their value as advanced scoring tools.
Open the 11-3 Bloodlust Tempo project.
This is a slightly modified version of the project that you built from scratch in Lessons 3 and 4.
Press Shift-Cmd-S, and save the project uncollected to the My Soundtrack Pro projects folder.
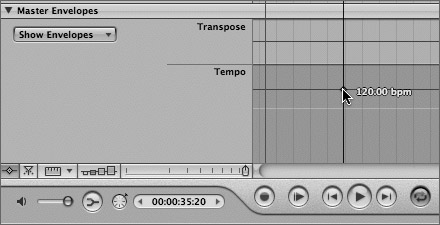
Scroll to the bottom of the Timeline to see the Master Envelopes.

Notice that the Volume envelope on the Out 1 track has been automated to fade out the volume at the end of the project.
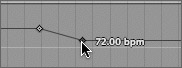
Automating tempo is a composer’s trick to change the feel of a score gradually or suddenly to enhance the scene. To automate Project tempo, double-click the Tempo envelope line to create envelope points, then adjust them as needed. Remember that the Tempo envelope only changes the beats-based tracks, which include the Designer Synth music tracks in this project. Your goal is to gradually slow down the music, and the character’s heartbeat, at the end of the project. The current Project tempo is 120 BPM. You’ll slowly lower it starting when she is outside, so that by the time she turns around to face the vampire, the tempo and her heartbeat will be 72 BPM. The effect should be quite haunting and really work well with this scene.
Scroll up to the Exposition/Character track (which contains the Heartbeat clip).
Ctrl-click the drag handle (the line of vertical dots on the left edge of the Exposition/Character track header) and choose Make Beats-Based from the shortcut menu.
The metronome icon appears, showing that the track is now beats-based.

Scroll back down to the bottom of the Timeline to see the Master Envelopes.
Play the project once to hear the sound design and remember all of your hard work.
Turn off the Snap feature if it is turned on.
Move the playhead to 35;20 and double-click the Tempo envelope line to create an envelope point at that position with a value of 120 BPM.
The entire project before this envelope point will remain at 120 BPM.
Move the playhead to 40;20 and set another envelope point on the Tempo envelope line.
To lower the tempo, you could drag the envelope point downward, you could press Option–down arrow, or you could Ctrl-click the envelope point and set the value. Since you’ve never tried the third option, let’s try it now.
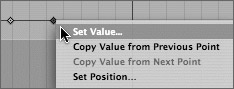
Ctrl-click the tempo envelope point at the playhead position and choose Set Value from the shortcut menu.
A dialog opens.
Type 72 in the Enter the envelope point value field.
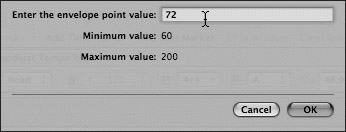
Click OK to close the dialog and set the envelope point’s value.
Click the selected envelope point to see its new value.
Play the second half of the project and listen carefully for the change in tempo.
Save and close the project.
Nice work. Did you notice that the music slowed but the pitch never changed? That’s because Soundtrack Pro allows you to modify tempo without changing pitch (key). In the next exercise you’ll change a project’s key in the middle of a song.
In this exercise you’ll work with the music project for the ADA Tour de Cure PSA and use the Transpose envelope to change the project’s key in the middle of the song. Your goal is to change the second half of the song from the current Project key (A) to the native key of the Classic Rock Standup loops (C). First, you’ll need to open and save the project.
Open the 11-5 PSA Transpose project, and save it uncollected to the My Soundtrack Pro projects folder.
Play the project once to see and hear how the song was arranged in the Timeline.
Select one of the Classic Rock Standup Piano loops on the Digital Piano Loop 28 track (2nd track from the top).

Press Cmd-I (for info) to see the selected clip’s info in the Details tab.
Click the File button on the Details tab and locate the clip’s Key in the lower-left corner of the window.

The Project key is A, and the clip’s original key is C, which is three semitones higher. If you transpose the project three semitones, the Project key will become C. Let’s try it. Of course, you don’t have to transpose a project to match the native key of the music loops, but generally, music loops sound better when they are played within a few semitones of their native key.
Scroll down to the bottom of the Timeline to see the Master Envelopes. If they aren’t showing, click the Master Envelopes automation disclosure triangle.
A purple Song Change beat marker has been added to indicate the position where the piano parts change, which is where you’ll transpose the song.
Double-click the Transpose envelope line at the purple song change marker.
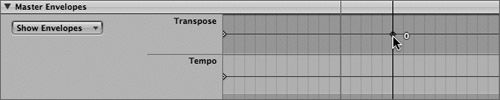
A Transpose envelope point appears with a value of 0 (zero change to the Project key).
You’ll change the value of the envelope to 3 (3 semitones higher), but first listen to the incremental changes along the way.
Mute the ADA TDC PSA track so you can focus on the music tracks without hearing the dialog.
Select the Transpose envelope point, if it isn’t already selected.
Press Option–up arrow key once to transpose the keyframe by one semitone higher and play tempo change to hear how it sounds.
Press Option–up arrow key again to transpose another semitone higher, then listen to the change in key.
You still need to raise the value to 3 full semitones higher. You can do this in four ways: Use the Value slider in the Details tab; Ctrl-click the envelope point, choose Set Value, then change the value in the dialog; drag the Transpose envelope point upward to a value of 3 semitones higher; or press Option–up arrow three times.
Drag the envelope point upward until you see the value of 3 next to the pointer to indicate a total change of 3 semitones higher.

Press Cmd-1 to show the Video tab in the Utility window.
Press Shift-Return to start playback from the beginning of the Timeline, and listen to the key change in the middle of the song.
Sounds great. The music changes key just as the piano part changes.
Note
If the envelope point isn’t exactly on the purple song change marker, the song won’t change key smoothly. The trick to making a quick key change is to do it on a beat between parts. You can always nudge the envelope point left or right by holding the Option key and pressing the left or right arrow keys.
Before you move on, try experimenting with the transpose envelope point. Try moving it a few measures earlier to hear the change within the earlier piano part. Try making it higher or lower to hear the changes to the song.
You can shift the selected envelope one gridline at a time left or right by pressing Shift-Option–left or right arrow key. To nudge it, simply press Option–left or right arrow key.
When you’re finished, move it back to the purple song change marker, and feel free to transpose it as much or as little as you like. Then save and close the project.
Soundtrack Pro includes a handy replace feature that lets you replace any selected clip or clips in the Timeline with another file. This project is a simple example containing only four different loops, but you’ll be able to apply what you learn to any of your own projects.
Open the 11-7 Files and Loops project and save it to the My Soundtrack Pro projects folder.
Play the project once.
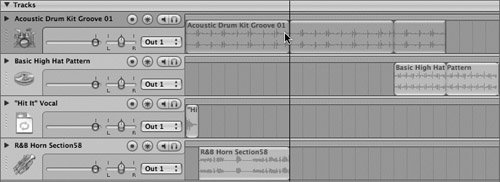
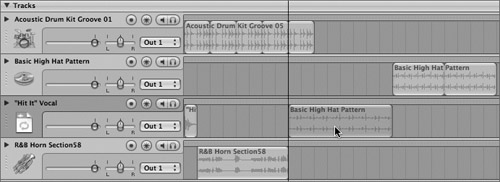
It’s not much, but it will work for the next series of exercises. If you played the project, you may have noticed that the Acoustic Drum Kit Groove 01 loop doesn’t fit well with the R&B Horn Section 58 loop or the Basic High Hat Pattern. There’s nothing particularly wrong with the loop—it will be perfect for some project, just not this one. Luckily, if you come across a file in your project that you’d like to change, all you need to do is select it and find a replacement file in the Media and Effects Manager.
Select the Acoustic Drum Kit Groove 01 clip in the top track of the Timeline.
Click the Search tab in the Media and Effects manager, click Button view, and choose Best Mix from the category pulldown menu.
Click the Drums button on the Search tab.
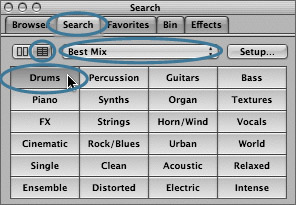
Select the Acoustic Drum Kit Groove 05.aiff loop from the results list to preview the loop.

This drum loop is more upbeat and will work better with the other loops in the project.
Ctrl-click the Acoustic Drum Kit Groove 05.aiff file in the results list and choose Replace Selected Clips with Acoustic Drum Kit Groove 05 from the shortcut menu.
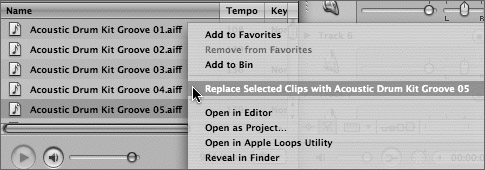
The selected loop in the Timeline is replaced with the loop from the Search tab.
It really is that easy.
Play the project to hear it with the new drum loop.
Press Cmd-S to save your progress.
You learned how to transpose a clip in Lesson 4, “Building Suspense with Editing Techniques.” You can also change the speed of a clip to play it faster or slower. This feature works for looping files. In this exercise you’ll duplicate the Basic High Hat Pattern clip to double it. Then you’ll halve the clip speed of the duplicate to create an interesting drum pattern.
Turn on snapping, if it isn’t already on.
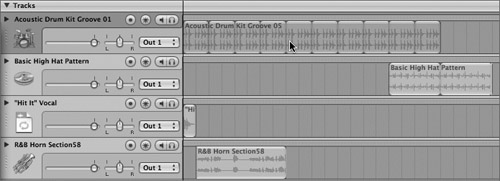
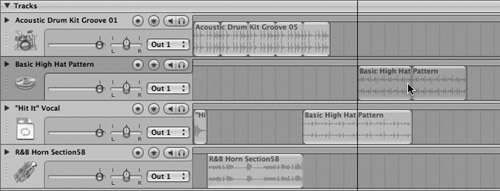
Option-drag the Basic High Hat Pattern clip on the 2nd track to the 3rd track to create a duplicate on the 3rd track.
Ctrl-click the Basic High Hat Pattern loop on the 3rd track and choose Clip Speed > Half Speed from the shortcut menu.
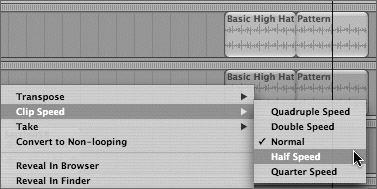
The speed of the Basic High Hat Pattern slows to half-speed and you can see that where there were two loops, there is now only one. Let’s modify the drum arrangement so that you can hear the half-speed version, then bring in the full-speed version of the clip. You’ll start by making the Acoustic Drum Kit Groove 05 clip half its current length.
Drag the right edge of the clip on the 1st track to the left until it is only 5 looped segments in length and ends at 10.00 in the Timeline.

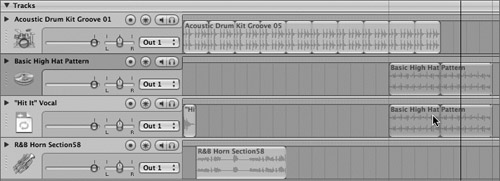
Drag the Basic High Hat Pattern clip on the 3rd track to the left so that it starts at 8.00 in the Timeline.
Drag the Basic High Hat Pattern clip on the 2nd track to the left so that the first loop segment overlaps the High hat clip on the 3rd track (12.00).
Play the project and listen to the combined High Hat parts.
Save the project.
As you’ve just demonstrated, changing a clip’s speed can be an effective way of creating interesting drum patterns. Changing the speed of a musical part does not alter the pitch, only the speed at which the part plays. This technique is also handy with synth patterns and other musical parts that may be too fast or too slow and you’d like to change their speed to better fit your project.
Changing the offset of an audio clip allows you to change where a clip’s waveform begins or ends without changing its length. This feature is similar to the Slip feature in Final Cut Pro. In this exercise you’ll change the offset of the R&B Horn Section58 loop to reveal a solo horn blare at the beginning of the clip. The solo horn blare is normally at the beginning of this loop, but was trimmed off. The media is still available; it just needs to be slipped to the right to reveal what is no longer showing in the Timeline.
To change the offset of an audio file, press and hold the Option and Cmd keys while dragging the waveform within the clip either left or right.
Locate the R&B Horn loop in the 4th track of the Timeline.

Notice that the right edge of the loop is curved to show the end of a full loop segment, but the left edge is straight to indicate that it has been trimmed.
Option-Cmd–drag the waveform in the horn clip on the 4th track to the right as far as you can until you see the curved edge at the front of the loop and the solo horn blare waveform at the beginning of the clip.
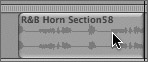
You successfully changed the clip’s offset so that it now starts with the beginning of the loop.
Play the project to hear the change in the clip’s offset.
Save, and then close the finished project.
Sure, this is a song in progress, but you’ve just learned three very powerful tools that you can use when building your projects to replace, change the speed, or change the offset of clips in the Timeline.
Take a moment to try all three of your new skills. First, replace one of the clips in the project with another loop in the Search tab. Then change the speed of one of the clips. Finally, trim one of the loops and change the offset. Feel free to add more than one new loop to flesh out the piece and make it your own. Although you may not use these tricks every day, knowing how to apply these techniques when you need them brings you closer to mastering Soundtrack Pro.
In Lesson 4 you created a master timeslice to select all tracks at once and delete the excess media at the end of the project.
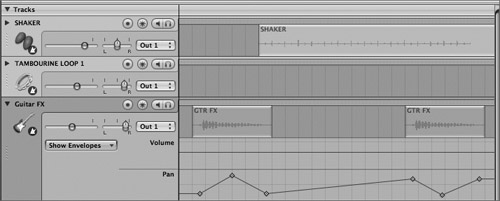
You can also select timeslices within a track or tracks for editing within the Timeline. You can cut, copy, paste, and delete timeslices the same as you would clips or envelope points. The difference is that timeslices let you select the contents of a track or multiple tracks, and the track’s envelopes for a specific section of time. In this exercise you’ll create timeslices for the guitar and percussion parts in the song “Something About You.”
To create a timeslice, drag the selection bar at the top of the track in the Timeline. Let’s start with the Guitar FX track.
Open the 11-8 Timeslice project and save it uncollected to the My Soundtrack Pro projects folder.
Select both of the GTR FX clips on the Guitar FX track and press Option-Z to zoom in and fit the selected clips in the Timeline window.
There should be gridlines at the beginning and end of the selected clips.
Turn on snapping, if it is not already on.
Locate the selection bar directly above the track. It looks like a belt of thin vertical lines.
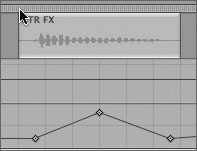
Click-drag the selection bar from the beginning of the first GTR FX clip to the end of the second GTR FX clip.

You have just created a timeslice. The timeslice selection area is highlighted in blue, including the envelopes and envelope points.
Press Cmd-C to copy the timeslice.
Press Shift-Z to fit the clips in the Timeline window.
Select the Guitar FX track, if it is not already selected.
Move the playhead to 17.1.000 in the Timeline, and press Cmd-V to paste the timeslice at the playhead position on the selected track.
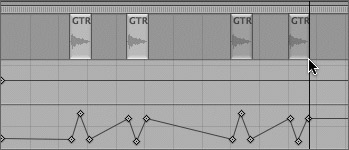
Both clips plus their envelope points are pasted into the track.
This technique can be very handy for copying and pasting timeslices of repeating parts within songs. The timeslice will include all envelopes, even those with automation.
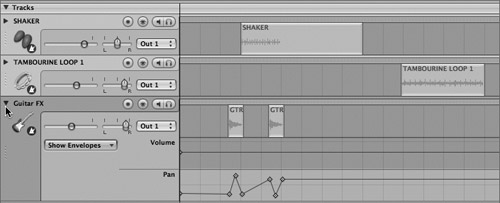
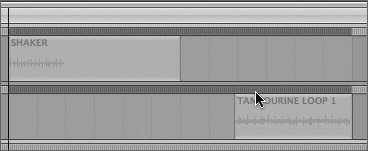
For this exercise you’ll create a timeslice in the SHAKER track from the beginning of the SHAKER clip to the end of the TAMBOURINE LOOP 1 clip. Then you’ll select the same timeslice on the TAMBOURINE LOOP 1 track. Once both tracks are highlighted, you can copy and paste the information from both tracks simultaneously.
Zoom in until there are gridlines at the beginning and end of the SHAKER and TAMBOURINE LOOP 1 clips.
Create a timeslice on the SHAKER track that is the length of the clips in both tracks.

Cmd-click the selection bar on the TAMBOURINE LOOP 1 track to add the same timeslice selection to that track.
Press Cmd-C to copy the selections, or choose Edit > Copy.
Select the Shaker track, if it is not already selected, then press Cmd-V to paste the clips.
The Shaker and Tambourine timeslices are pasted into their respective tracks at the playhead position (33.1.000).
Pasted timeslices always start at the playhead position, on the selected track and paste downward. If you select a lower track in the Timeline and don’t have enough tracks to paste the timeslice, more tracks will be created at the bottom of the Timeline.
Save and Close the project.
Note
Timeslices can be inserted into tracks at the playhead position by choosing Edit > Paste Special > Insert. You can also ripple delete a timeslice, which removes that entire section of the track or tracks and moves the remainder of the track or tracks to the left to the position of the deleted timeslice.
The next time you need to cut, copy, paste, delete, or insert clips, tracks, or parts of the entire song, you can use timeslices to save time, maintain musical time, and make sure that the clips and the envelopes are included in the editing operations.
Your mission is twofold. First, you’ll trim the silence off of the right edge of the Shaker clip (both instances) in the Timeline. Then you’ll create a new timeslice that includes all of the clips in the Shaker track, with the newly trimmed shaker clips, and the same timeslice in the Tambourine track. Copy and paste the timeslice after the last clip in the Timeline. Make sure that you select the Shaker track before pasting, and move the playhead to the beginning of a measure. Viola! If you need your score to go on another measure or you need to add another verse or chorus, you can use timeslices to copy and paste as much as you need from any or all tracks!
All Soundtrack Pro multitrack projects include one output (Out 1). You can have up to a total of 128 tracks, busses, and outputs in a multitrack project. All of the projects you’ve worked with so far in this book have had only one output. In this exercise, you’ll work with three outputs that are common in professional film and video projects. Your goal will be to record automation in the output envelopes for the Dialog, Effects, and Music outputs. Why separate the dialog from the music and effects? Because if you ever need to dub the project in a different language, it’s important that the dialog is mixed separately from the music and effects so that it can be replaced without needing to rebuild and remix all of the other tracks. The combined Music and Effects outputs are often referred to as the M&E mix.
Open the 11-10 WCS_Intro project and save it uncollected to the My Soundtrack Pro projects folder.
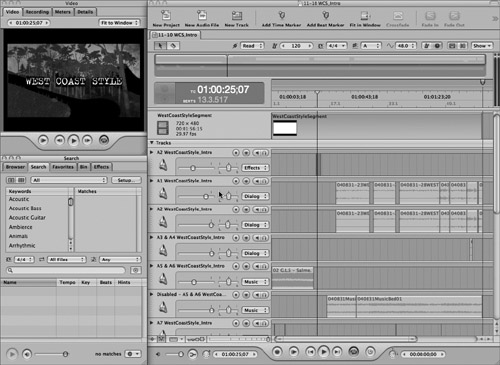
Play the project once to see and hear it for the first time.
This project is part of the intro for an instructional DVD that was edited in Final Cut Pro, and the DVD was then authored in DVD Studio Pro. The current project was exported from Final Cut Pro and includes a combination of Dialog, Music, and Sound Effects tracks. Each track has already been balanced for volume levels, and now it’s time to create the overall mix.
Scroll down to the bottom of the Timeline to see the three different outputs.
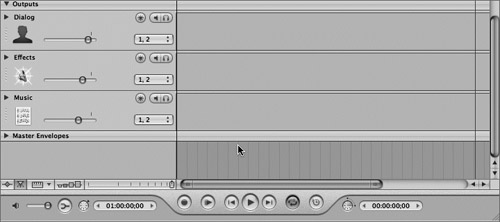
Each track has been assigned to one of the three outputs. For example, the various FX tracks are assigned to the Effects output.
Note
By default you are capable of exporting two channels of audio (1, 2). If you have approved audio hardware, you may be able to export up to 24 channels of audio. You can choose which channel the output will be assigned to when you create the output. All of the outputs in this project are set to channels 1, 2 so they will work on every computer setup without additional hardware.
Click the Output pop-up menu on the FX Mix 2 track (lowest track in Timeline) to see the three different outputs.
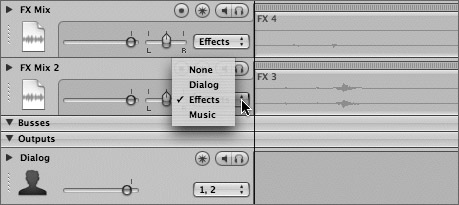
Make sure that you leave the menu selected to the Effects output.
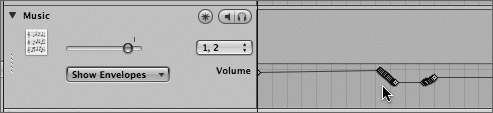
Each output includes a Volume envelope that you can automate with envelope points, just as you would a track or bus envelope.
Click the automation disclosure triangles for each of the outputs to see the envelopes in the Timeline.

As you can see, the output envelopes have not been automated—yet. You’ll record automation to them using the Mixer in the next section.
Press Cmd-2 to open the Mixer.
Scroll to the far right of the Mixer to see the three Output faders.
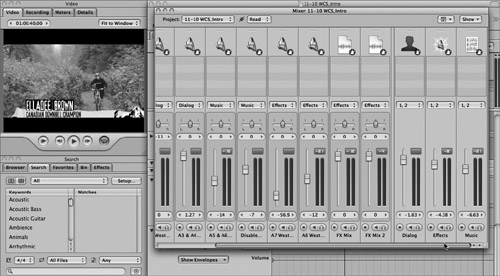
Press Shift-Return to start playback from the beginning of the Timeline.
Adjust the Dialog, Effects, and Music levels using the corresponding outputs in the Mixer.
You can solo or mute outputs as it plays. You’ll notice that there is no dialog at the beginning of the project, and very few effects toward the end. The Music changes once the dialog starts. Your goal is to adjust the levels so that the dialog can always be at a clear level, and the music level doesn’t compete with the dialog. At the beginning, where there is no dialog, you can keep the music levels louder. The effects can be mixed to taste. Also, you’ll want to make sure that the output levels don’t exceed 0 dB and cause clipping.
Practice adjusting the levels for one full pass of the project.
It’s much easier to balance the levels of three outputs than to balance a lot of separate tracks in the Mixer. Another advantage of using multiple outputs is that you can create multiple mixes easily and save each with a different name. For example, you could create a mix that is heavier on the effects and another with no effects, or one mix with only music and effects and another with only dialog.
Now that you’ve practiced mixing the different output levels, you’ll record the automation for the final mix. First, you’ll check the Automation Recording Sensitivity in the Soundtrack Pro General Preferences.
Press Cmd-, (comma) or choose Soundtrack Pro > Preferences to open the Preferences window.
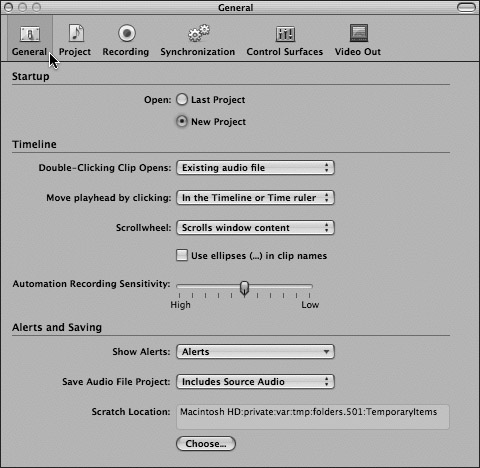
In the middle of the window you’ll see the Automation Recording Sensitivity slider.

The default sensitivity level is in the middle. The lower the sensitivity, the fewer envelope points will be recorded; the higher the sensitivity, the more envelope points will be recorded. Leave the slider in the middle for now. If later you decide you’d like to record more or fewer envelope points, you know where to adjust the sensitivity.
Set the Automation Recording Sensitivity slider to the middle setting, if it is not already in that position.
Close the General Preferences window.
In the top-left region of the Mixer, change the automation pop-up menu to Latch mode.

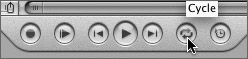
Turn off the Cycle button in the transport controls so the project will automatically stop playing when you reach the end of the project.
Press Shift-Return to begin playback, and adjust the different output faders as needed until you reach the end of the project.
Mix the different output levels and pause playback when the project finishes.
Once you finish recording your mix, close the Mixer window and look at the automation that you recorded in the Timeline outputs.
If you’d like to try again, you can undo the previous automation recording and record again, or you can just modify the envelope points by selecting them and moving them in the Timeline.
When you’re finished mixing the tracks, set the automation mode pop-up menu back to the Read mode.
Save and close the project.
Once you’ve completed mixing and recording the output automation, you can select the outputs and export them as selected outputs for Final Cut Pro.
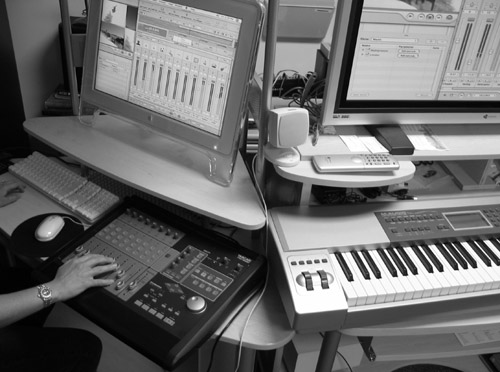
You can use external mixing hardware (control surfaces) to automate recording, mixing, and other tasks in Soundtrack Pro.
Control surfaces provide a set of hardware controls that let you edit and mix your projects with greater flexibility and precision than using a mouse to move onscreen controls. You can also modify multiple parameters at once using a control surface.
Most control surfaces include faders, knobs, and buttons, including channel strip controls for volume, pan, mute, solo, and track selection. There are a variety of control surfaces available for use with video and audio production applications. When you use a control surface with Soundtrack Pro, some controls are premapped to common functions. You can also map other controls to Soundtrack Pro commands and functions in the Control Surfaces Preferences pane.
To use a control surface, you first need to connect it to your computer, then add it to Soundtrack Pro. Once the control surface has been added to Soundtrack Pro, you can record control surface automation data in your project.
Soundtrack Pro supports control surfaces that use the Mackie Control and Logic Control protocols to communicate with your computer. To use a control surface, you first need to connect the control surface to a MIDI interface, and connect the MIDI interface to your computer, unless the control surface allows direct connection to the computer.
Once the MIDI interface and control surface is connected to your computer, you can add the control surface in Soundtrack Pro Control Surface Preferences. If you don’t have a control surface, you can follow along for future reference.
Choose Soundtrack Pro > Preferences, then click the Control Surfaces button.
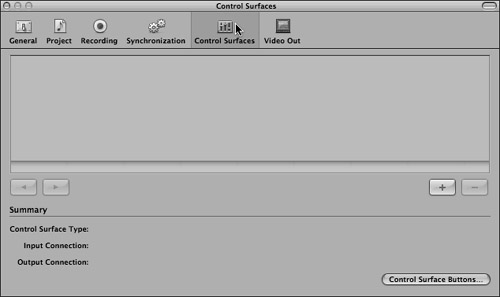
Click the Add (+) button to add the control surface.
Select the Control Surface Type, Input Connection, and Output Connection from the three pop-up menus.
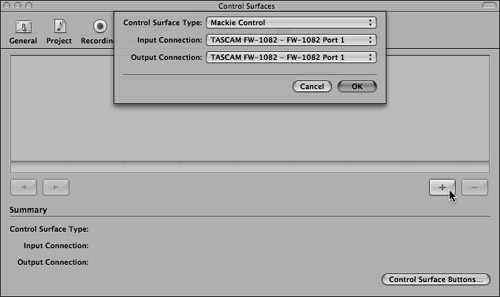
In this example I’m using the TASCAM FW-1082 Port 1, with the Mackie Control as the Control Surface Type.
Click OK.
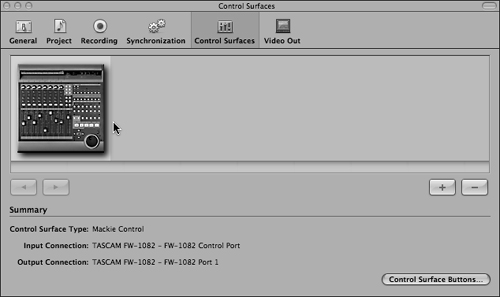
A visual representation of the control surface appears in the panel in the upper part of the window.
If you want to map controls to Soundtrack Pro commands and functions, click Control Surface Buttons.
Close the Preferences window.
Once you have connected the control surface, you can use it to adjust the faders in the Mixer and other track controls.
More Info
For more specific information on your mixing hardware, check the documentation that comes with your hardware. You can also find more information about working with control surfaces in the Soundtrack Pro Manual available through the Help menu.
Congratulations! You’ve finished the lesson and learned many new techniques and tricks that you can apply to your own projects.
Answers