
Lesson Files | Soundtrack Pro book files > 08-09_Projects&Media > 9-1 Effects Start, 9-5 Final FX |
Time | This lesson takes approximately 60 minutes to complete. |
Goals | Add effects to a track |
Adjust effect parameters | |
Turn off and bypass effects | |
Automate effect parameters in the Timeline | |
Work with effects in the Mixer | |
Create a bus and send | |
Set the overall Project volume level | |
Listen to a temporary mono mix |
Sound designers and engineers use effects as tools to enhance, modify, and perfect a project’s overall sound. Effects are the icing on the acoustic cake that adds flavor, color, and style to complete the sound mix. As with effects, too much icing can distract from, or even ruin the cake. Mastering audio effects and how they manipulate sound is enough for an entire book in itself. The Soundtrack Pro User Manual (accessible through the Help menu) includes a nice overview of effects and what they do.
In this lesson, you’ll focus on the big picture: finishing the sound mix and adding effects to enhance the overall sound. First you’ll learn to apply effects to a track. Then you’ll modify the effect’s parameters, automate parameters in the Timeline, add effects in the Mixer, and create busses and sends to apply effects to groups of tracks. Finally, you’ll apply a nice EQ effect to the entire song and set the overall project volume to eliminate clipping. Let’s get started.
You will begin this lesson by opening the 9-1 Effects Start project file located in the 08-09_Projects&Media folder. You’ll work with the same project that you mixed in the previous lesson, only this time you’ll focus on applying and modifying effects.
Soundtrack Pro includes a complete set of professional-quality audio effects you can use in your projects. These audio effects can be used to add both dramatic and subtle changes to audio file projects or clips in a multitrack project. You can also apply effects to outputs, such as equalization, to enhance the entire project. In addition to the effects that come with Soundtrack Pro, you can also use third-party Audio Units effects plug-ins in both multitrack and audio file projects.
Processing effects are added as actions from the Process menu in the Waveform Editor and can modified in the Action list. Realtime effects can be added to tracks, busses, or outputs in a multitrack project, or to an audio file project. Realtime effects modify the audio as it passes through the effect, so you can hear any changes you make to the effect as the changes occur (in real time). All realtime effects include parameters that can be adjusted to control how the effect modifies the audio. You can also view and automate effect parameter envelopes in the Timeline to create changes to the effect over time.
In the next series of exercises, you’ll explore and modify a realtime effect that has already been added to the DRUM MIX track, then you’ll apply a series of realtime effects to the LEAD VOCAL track.
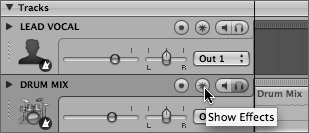
First, let’s start with a close examination of the DRUM MIX track header.
Solo the DRUM MIX track.
Notice that the Effects button (*), which looks like an asterisk, is purple. When the Effects button is purple, it means that effects have been applied to the track. You can see which effects have been applied to the track on the Effects tab in the Media and Effects manager.
Click the Effects button (*) on the DRUM MIX track header.
The Effects tab becomes active in the Media and Effects manager.
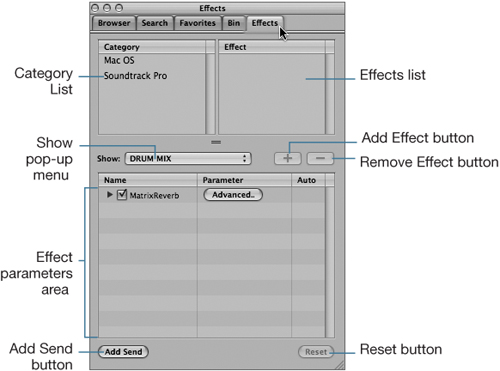
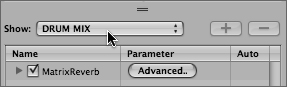
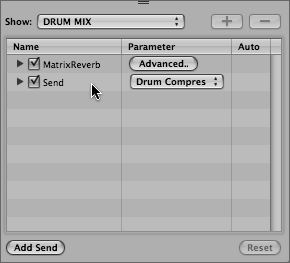
The Show pop-up menu shows which track, bus, or output the effect or effects have been applied to. In this case, the DRUM MIX track has been selected, and has the MatrixReverb effect applied to it.
Press the spacebar to begin playback of the DRUM MIX track and listen to the sound of the track with the MatrixReverb effect applied.
Deselect the MatrixReverb checkbox to turn off the effect and listen to the difference in the sound of the drums.
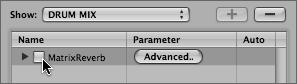
The effect no longer modifies the sound of the drums. Notice that the Effects button on the track header is still purple. That is because it still considers the track to have an effect applied to it, even if the effect is turned off.
Select the checkbox again to turn on the effect.
The disclosure triangle at the left of the effect allows you to view the parameters for that effect. Many effects also include an Advanced graphical interface.
Click the disclosure triangle next to the MatrixReverb effect to view the different parameters.
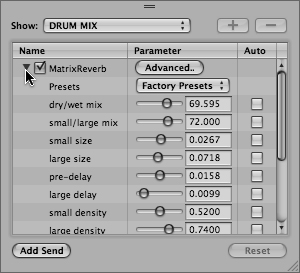
Each parameter can be modified individually. The Auto checkboxes in the right column allow you to select parameters to be displayed as envelopes in the Timeline. You’ll work with that feature later in the lesson.
For now, let’s look at the Factory Presets. The presets are handy settings that eliminate much of the guesswork in selecting the effect parameter settings. Not all effects include factory presets.
Begin playback, if it’s not already playing, and click the Factory Presets pop-up menu to see the different MatrixReverb presets that come with the effect.

Choose one of the factory presets such as Large Room 2 and listen to how the effect changes the sound of the drums.
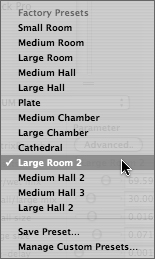
Notice that the parameter values change to accommodate the preset settings.
Choose another factory preset from the Presets pop-up menu.
Pause playback, and then click the disclosure triangle again to hide the MatrixReverb parameters.
Some effects, like the MatrixReverb, include an Advanced Settings button that shows the parameters in a floating Advanced Settings window.
Click the Advanced button located on the right of the MatrixReverb effect.

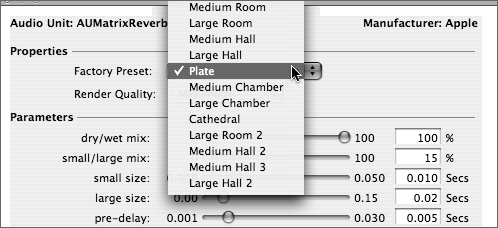
The AUMatrixReverb Advanced Settings window opens. You’ll use this window to make the final parameter adjustments for this effect. The song’s producer, Adam Green, used a Plate reverb on the drums during his professional mix. The MatrixReverb effect also includes a Plate preset, which changes the sound of the drums and makes them feel more distant rather than too dominant in the mix.
In the Advanced Settings window, choose Plate from the Factory Preset pop-up menu. Then press the spacebar to begin playback and listen to the effect on the drums.
You can easily bypass an effect to hear the track without it by toggling on the Effect Bypass button in the lower-left corner of the Advanced Settings window.
Click the Effect Bypass button, which looks like a curved arrow jumping over a circle.
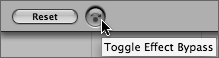
The Effect Bypass button darkens when it is on and the effect has been bypassed.
Note
In the previous exercise, you learned that you can use the MatrixReverb checkbox to turn an effect on or off at any time. If you uncheck an effect, you can leave the effect applied to the track without turning it on. The Effect Bypass button, which is only available in the Advanced Settings window, controls the same checkbox in the Effects list. You can toggle it on and off to hear the track with or without the effect.
Click the Effect Bypass button again to turn it off and hear the full effect.
It’s good, but a little extreme. Let’s lower the amount of the dry/wet mix slider from 100% to 70%.
Drag the dry/wet mix slider to the left until the value is 70%.

Sounds pretty cool. Definitely a more stylized drum sound. Of course you only know how the drum sounds by itself. The real test is to hear it with the other tracks.
Click the Close button (x) in the upper-left corner of the Advanced Settings window to close it.
Unsolo the DRUM MIX track and play some of it with the other tracks to hear the effect.
The volume is a little low. Applying effects can change the perceived volume of a track in the mix. However, before you change the drum volume levels, let’s first add effects to the lead vocals, since they are the backbone of the entire piece. Then you can adjust the drums accordingly.
Now that you’ve seen what an effect looks like, and know how to bypass the effect and turn it on and off, it’s time to add some realtime effects to a track. Lead vocals typically use three effects: compression to bring out the sound of the vocal frequencies, reverb, and a touch of delay. Of course, there is no limit to the number of effects that you can apply to a vocal track. The professional effects that come with Soundtrack Pro are powerful enough to completely change a voice. For example, you can change the pitch to make it lower, higher, or sound like an animated mouse or robot if that’s what you’re going for. Fortunately, the lead singer for Turn to Stone has a great voice, so you won’t need to perform any dramatic effects to disguise (save) the vocals. Instead, you’ll just enhance them a bit to make them stand out more in the song.
Solo the LEAD VOCAL track, and create a playback region over the entire LEAD VOCAL DOUBLE clip within the track.
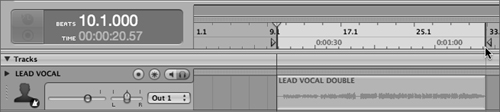
Click the gray Effects button on the LEAD VOCAL track to show that track in the Effects tab.
On the Effects tab, choose the Soundtrack Pro category, and then scroll down through the Effects list and click Compressor to select that effect.
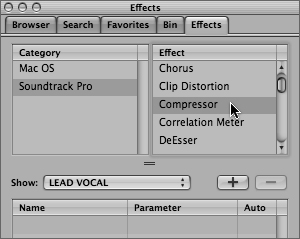
Click the Add Effect button (+) to add the selected Compressor effect to the track.
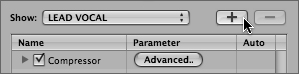
The Compressor effect appears in the Parameter list. The Advanced Settings window for some effects includes a Graphical Effects interface available through the Advanced button. These interfaces are designed to look and respond like comparable effects hardware used in professional recording studios.
Click the Advanced button to open the Advanced Settings window.

The Graphical Effects interface of the Advanced Settings window includes a variety of knobs, radio buttons, and sliders to modify the parameters. If you’re not familiar with external compression hardware, you’re in luck because this effect comes with a nice assortment of presets.
Click the Show Presets button in the lower-right corner of the Advanced Settings window to show the Presets drawer.

Click the disclosure triangle for the User Presets on the Presets drawer.
The User Presets are organized by four categories, including Vocal Compressors. Since you’re working with a lead vocals track, the Vocal Compressors seem like a good place to find the perfect preset.
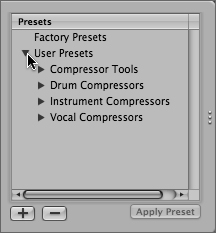
Click the disclosure triangle for the Vocal Compressors and drag the scrollbar at the right of the presets list down to view all of the different vocal presets.
Start playback, select the first preset, Rap Vocal Compressor, and then click the Apply Preset button to hear how it sounds with the lead vocals.
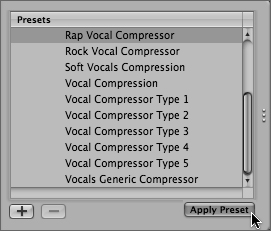
Continue playback and listen to all of the different Vocal Compressor presets.
Let’s go with the Vocals Generic Compressor for this exercise. If you’d like to use a different one, feel free to change the compressor preset after the lesson.
Apply the Vocals Generic Compressor preset, and then unsolo the Lead Vocal track to hear how it sounds with the other tracks.
Sounds great! Compressors are designed to focus certain frequencies to make them stand out more in the mix, especially vocals. In this case, the lead vocals are really emphasized nicely.
Tip
Compressors can be extremely useful in bringing out a vocal track by raising the vocal frequencies, while limiting the peaks of other frequencies. Vocal compressors also work well to enhance poorly recorded voice over tracks, or dialog that may have been recorded too low. You can read more about compressors and other dynamic effects in the Soundtrack Pro User Manual accessible through the Help menu.
Toggle on and off the Effect Bypass button in the lower-left corner of the Advanced Settings window to hear the vocals with and without the effect.
Close the Advanced Settings window.
The compressor really focuses the vocals without distorting them. Of course, now the lead vocals sound a little loud in the overall mix. Before you change the volume level of the track, let’s finish adding the other two effects to the track.
Now it’s your turn to add another effect to the LEAD VOCAL track. First, you’ll need to solo the LEAD VOCAL track. Both of the effects that you’ll add are located in the Soundtrack Pro category on the Effects tab.
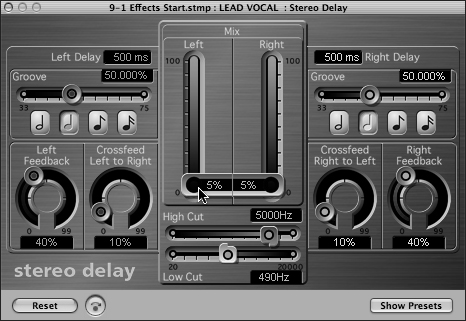
Add the Stereo Delay effect. Open the Advanced Settings window. Lower the Left and Right Mixers each to 5%.
When you’re finished adding the effect, be sure to save your progress.
You can also add effects to a track, bus, or output in the Mixer. First you’ll open the Mixer and select the LEAD VOCAL track. Then you’ll add the PlatinumVerb effect to the track in the Mixer. Once the effect has been applied, you’ll modify the settings.
Press Cmd-2 to open the Mixer.
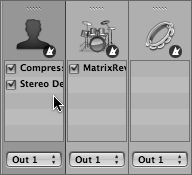
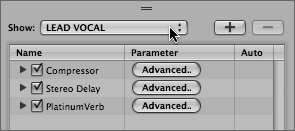
The LEAD VOCAL track shows both of the applied effects in the Effects list.
Note
If you do not see the Effects list in the channel strips, you’ll need to choose Effects from the channel strip menu in the upper-right corner of the Mixer next to the Show pop-up menu. Remember, in Lesson 8, “Mixing Audio,” you deselected Effects and Outputs from the same menu.
You could add another effect using the Effects tab, as you did previously, or you could use a shortcut menu. Since you’ve already mastered the Effects tab method, let’s try using the shortcut menu for this effect.
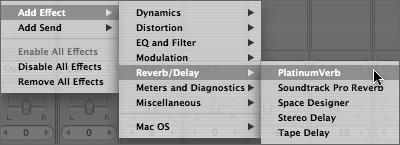
Ctrl-click the Effects list on the LEAD VOCAL track in the Mixer and choose Add Effect > Reverb/Delay > PlatinumVerb.
The PlatinumVerb effect appears on the LEAD VOCAL channel strip. Each effect in the Effects list also includes a checkbox to turn the effects on and off.
You can open the Advanced Settings window from the Effects tab, or double-click the effect in the Effects list in the Mixer window.
Double-click the PlatinumVerb effect to open the Advanced Settings window.
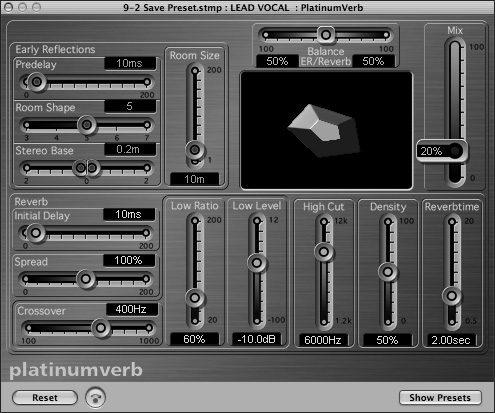
You’ll only change two settings, both located on the upper half of the Graphical Effects interface.
Press the spacebar to begin playback.
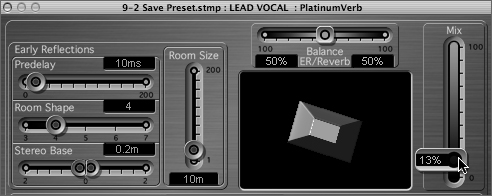
Drag the Room Shape slider left to a value of 4.

The purple room shape changes to a room with four sides, similar to a recording studio.
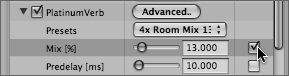
Drag the Mix fader down to a value of 13%.
The Mix fader determines how much of the effect you are mixing into the original sound of the file. A mix of 0% would be no effect, while a mix of 100% would be 100% effected with none of the original file’s sound mixed in.
Unsolo the LEAD VOCAL track and listen to the vocals with the full mix.
Pause playback and close the Mixer.
Nice effects! I bet the PlatinumVerb effect would sound great on the background vocal tracks.
You’ve already seen how useful the presets can be for some of the effects settings. You can also save your own customized presets that can be applied to other tracks or projects. In this exercise you’ll save the new PlatinumVerb settings as a preset, and then apply the preset to both of the HARMONY tracks. You can save presets in the parameters list on the Effects tab.
Close the Advanced Settings window and the Mixer if they are still open.
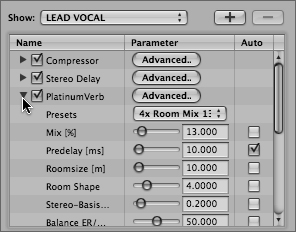
On the Effects tab, click the PlatinumVerb effect’s disclosure triangle to view the various parameters.
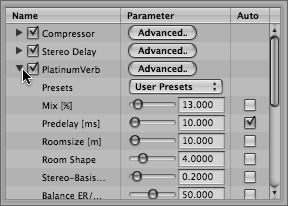
Choose Save Preset from the User Presets pop-up menu.
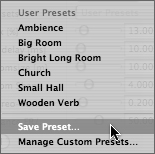
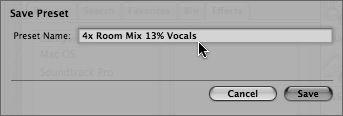
A Save Preset dialog opens.
Type 4x Room Mix 13% Vocals in the Preset Name field.
Click the disclosure triangle again to hide the parameters.
Press Cmd-S to save your progress.
Now that you’ve saved the effect preset, you can apply it the same way you would any other preset. First you apply the effect, and then choose the preset. Let’s try it.
Click the Effects button on the HARMONY Mix 1 track.
The Show pop-up menu in the Effects tab changes to the selected track.
This time, instead of clicking the Add button (+) you’ll double-click the desired effect to automatically add it to the track.
On the Effects tab, double-click the PlatinumVerb effect from the Soundtrack Pro category.
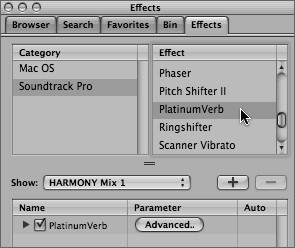
Click the disclosure triangle for the effect in the Parameter list.
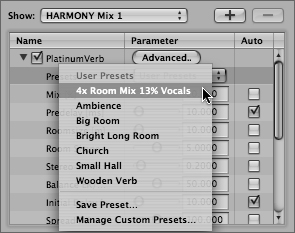
From the Preset pop-up menu, choose 4x Room Mix 13% Vocals.
That was easy. Now let’s add the preset to the other HARMONY Mix track, this time using the Mixer and the Advanced Settings window.
Press Cmd-2 to open the Mixer.
Ctrl-click the Effects list on the HARMONY Mix 2 track’s channel strip and choose Add Effect > Reverb/Delay > PlatinumVerb.
The PlatinumVerb effect appears in the channel strip’s Effects list.
Double-click the PlatinumVerb effect on the HARMONY Mix 2 channel strip to open the Advanced Settings window.
Click the Show Presets button in the lower-right corner of the Advanced Settings window.
Click the User Presets disclosure triangle and choose the 4x Room Mix 13% Vocals preset. Then click the Apply Preset button.
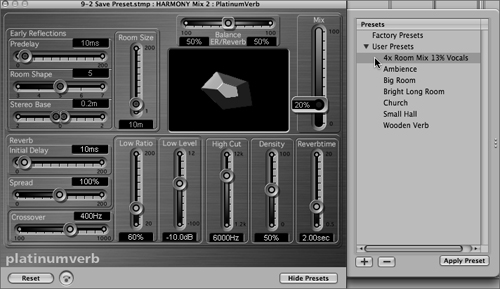
The effect updates with the preset settings.
Close the Advanced Settings window and the Mixer, and then listen to the last part of the song with the HARMONY tracks.
Press Cmd-S to save your progress.
In the previous lesson you learned how to automate volume and pan envelopes over time using envelope points. Most effects parameters can also be automated as envelopes in the same way. Your goal in the next series of exercises is to modify the PlatinumVerb mix parameter so that it gradually gets stronger at the end of the LEAD VOCAL track. In other words, it’s automation time! Not only will you automate the envelope points on the Mix parameter, but you’ll also record them as you move the mix fader in the Advanced Settings window. Sound complicated? It isn’t.
Solo the LEAD VOCAL track.
On the Effects tab, select LEAD VOCAL from the Show pop-up menu.
Click the PlatinumVerb disclosure triangle to show the parameters in the Parameter list.
Deselect any checkboxes in the Auto column that are already selected.
Selected checkboxes in the Auto column appear as envelopes in the Timeline. If you’re not careful, you could have a lot of envelopes to deal with.
Select the Mix checkbox in the Auto column.
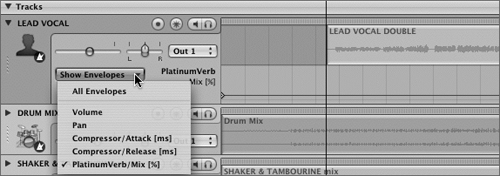
On the Timeline, click the automation disclosure triangle on the LEAD VOCAL track to view the envelopes for that track.
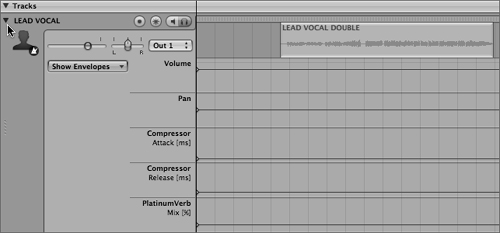
The LEAD VOCAL track includes five envelopes: Volume, Pan, Compressor/Attack, Compressor/Release, and PlatinumVerb/Mix.
As you can see, five envelopes can take up a lot of the Project window.
Deselect all of the envelopes under the Show Envelopes pop-up menu except for the PlatinumVerb/Mix. You’ll need to deselect them one at a time.
Press Cmd-S to save your progress.
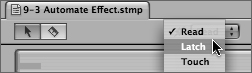
Previously you recorded envelope points using the Touch automation mode. This time you’ll use the Latch automation mode to record the changes that you make to the PlatinumVerb/Mix envelope in the Timeline.
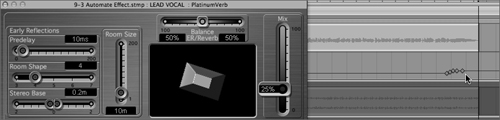
Your goal is to raise the Mix level from 13% to 25% on the last vocal phrase “Feeling it oh so strong.” If all goes well, the last word “strong” will be at the full 25% mix level.
You could change the level from the Effect Parameter list or the Advanced Settings window. The Advanced Settings window has a nice easy-to-use fader, which might lend itself to a smoother recording experience.
Click the Advanced button for the PlatinumVerb effect to open the Advanced Settings window.
Move the Advanced Settings window to the left of the playback region and LEAD VOCAL DOUBLE clip in the Timeline so the Mix fader is close to the envelope you’ll be automating.

Set the Automation pop-up menu to Latch mode.
Use the right or left arrow keys to move the playhead to the beginning of the 27th measure.
Begin playback and listen to the vocals. When you hear the last phrase start (around 30.1.000), drag the fader up to 25%.
Tip
The slower you drag the fader, the more gradually the envelope points will be recorded. The faster you drag the fader, the more abrupt the change in envelope points will be. You can adjust the automation recording sensitivity (number of points recorded) in the General Preferences window.
If you’d like to try again, press Cmd-Z to undo the automation, then move the playhead back to the beginning of the 30th measure and try again.
Once you have successfully recorded automation to the Mix envelope, close the Advanced Settings window. Hide the envelopes on the LEAD VOCAL track and change the automation mode back to Read.
Tip
It’s a good idea to always return the project to the Read automation mode when you aren’t planning to record automation. That way if you decide to tweak a few levels you won’t accidentally record the changes as automation.
The LEAD VOCAL track sounds great with the new effects, but it’s now a little loud in the mix.
Lower the LEAD VOCAL track’s Volume slider to –10.50.
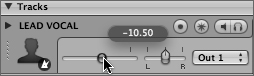
The LEAD VOCAL track still stands out acoustically, but is not as overpowering in the mix.
Press Cmd-S to save your progress.
You already know that you can apply effects to a track. You can also create busses to add effects to groups of tracks. For example, what if you wanted to add a compressor to all of the percussion and drum tracks? You could add the effect to the individual tracks, but then you could only adjust it at the track level one track at a time. Creating a bus allows you to modify the levels of that group of tracks using one fader.
This project includes a DRUM MIX track and a SHAKER & TAMBOURINE mix track. The volume and pan levels have already been adjusted on those tracks. Also, the drum track already includes a MatrixReverb effect. Your goal in this exercise is to create a bus that will then be applied to both tracks. Once you’ve created a bus, you can create a send, which determines the tracks the bus will affect. Any effects applied to the bus will automatically be applied to any tracks that are sent to that bus.
First, let’s scroll down to the bottom of the Timeline to see where the busses and outputs are located.
Scroll down to the bottom of the Timeline.
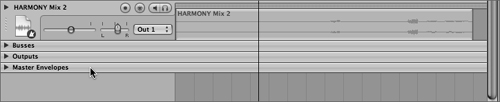
Click the disclosure triangles for Busses, Outputs, and Master Envelopes. You’ll need to click them one at a time.
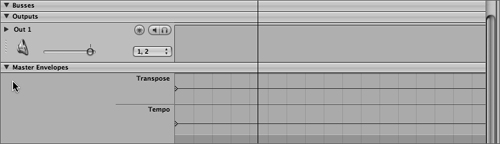
There are currently no busses in the project, and only one output called Out 1. The Master Envelopes allow you to automate the project’s key (transpose) and tempo over time. You’ll work with the Master Envelopes in Lesson 11, “Advanced Mixing, Editing, and Sound Design Techniques.” For now, you’ll focus on the busses.
Click the Master Envelopes disclosure triangle again to hide the Master Envelopes.
Click the Outputs disclosure triangle to hide the output.
That leaves the busses. You can leave it open for now because you’re about to add a new bus.
Choose Multitrack > Add Bus, or press Ctrl-Cmd-T to add a new bus.

A bus called Bus 1 appears in the Timeline under the Busses Timeline divider.
You can change the name of busses and outputs, just as you change the names of tracks.
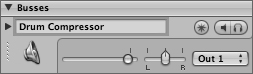
Click the name field (Bus 1) on the Bus, and type Drum Compressor.
Great. You’ve created the bus; now all you need to do is send the tracks to the bus.
You can add a send to a track from either the track itself or the Effects tab. In this exercise you’ll use both methods as you add sends to both the DRUM MIX and SHAKER & TAMBOURINE mix tracks. Let’s start with the DRUM MIX track.
Click the Effects button on the DRUM MIX track to show it in the Effects tab.
Click the Add Send button at the bottom-left corner of the Effects tab.
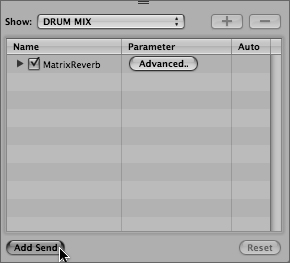
A send appears in the Parameter list, and it’s automatically connected to the Drum Compression bus because that is the only bus. If you had multiple busses in the project, you could select a different bus from the pop-up menu.
Click the Send disclosure triangle to see the additional Send parameters.
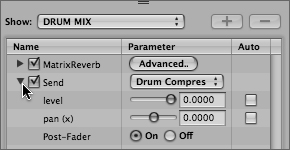
The level and pan sliders allow you to further adjust the DRUM MIX volume and pan settings on their way to the bus. These adjustments are independent of the volume and pan levels set on the DRUM MIX track header.
The Post-Fader on and off choices allow you to determine if the sound from the DRUM MIX track will be modified by the bus before or after it passes though the fader on the DRUM MIX track. For this exercise, you’ll retain the default settings for the send parameters, including leaving the Post-Fader on. This means that the effect is applied after the sound has passed through the track’s volume and pan levels.
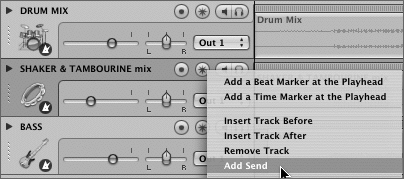
Now let’s send the SHAKER & TAMBOURINE mix track to the Drums & Percussion bus. This time you’ll add a send from the track header.
Ctrl-click the SHAKER & TAMBOURINE mix track header and choose Add Send from the shortcut menu.
That’s all there is to it. You’ve now sent both tracks to the bus. Now all you need to do is add the compressor effect to the bus.
You can add effects to a bus or output the same way that you add them to a track. In this exercise you’ll add a Compressor effect to the bus, and then set it to one of the Drum Kit presets.
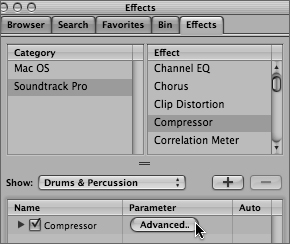
Click the Effects button on the Drum Compressor bus to show it in the Effects tab.
Choose the Compressor effect from the Soundtrack Pro category on the Effects tab, and add it to the bus.
Click the Advanced Settings button for the Compressor effect.
In the Advanced Settings window, click the Show Presets button.
Click the User Presets disclosure triangle, then click the Drum Compressors disclosure triangle.
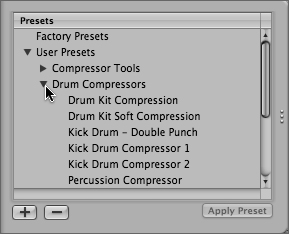
Begin playback of all the tracks and try each of the different Drum Compressor presets. Feel free to click the Effect Bypass button in the Advanced Settings window to hear the song with and without the added compression on the bus.
Choose your favorite Drum Compressor for the bus. If you’re not sure which one to pick, try the Percussion Compressor preset.
Close the Advanced Settings window and listen to the song.
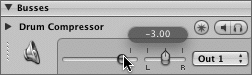
How do the drums sound with the compressor? Mine sound great, but they’re a little hot (too loud) in the mix. Instead of lowering the DRUM MIX track, you can simply lower the volume fader on the bus. Why adjust the bus instead of the DRUM MIX track’s volume? Trace your steps. If the DRUM MIX track levels were okay before you added the bus, then the track level is fine. The drum compressor effect that you added to the bus is supposed to bring out the sound of the drums. You just need to adjust the level of the bus to make sure it doesn’t add too much. You can also make adjustments to the levels in the Compressor that can affect volume levels.
Begin playback and lower the Drum Compressor bus as needed until the drums fit well in the mix.
Clear the Playback region and save your progress.
Once you’ve added effects to the individual tracks and busses, you can then add EQ or other effects to the output or outputs. In this song, there is only one output, which is common with music projects. For a video project, you may have multiple outputs to separate the dialog tracks from the Music and Effects. You’ll work with multiple outputs in the next lesson. For now, you’ll focus on working with the Equalizer effect (EQ) that has already been added to the song’s output.
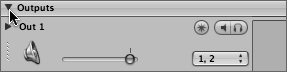
At the bottom of the Timeline, click the Outputs disclosure triangle to view the project’s output.
Click the Effects button on the Out 1 output to show it in the Effects tab.
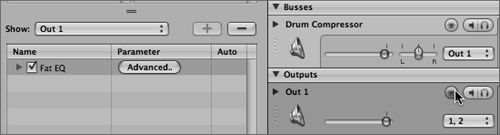
As you can see, a Fat EQ effect has already been applied to the output.
Click the Advanced Settings button on the Fat EQ effect.
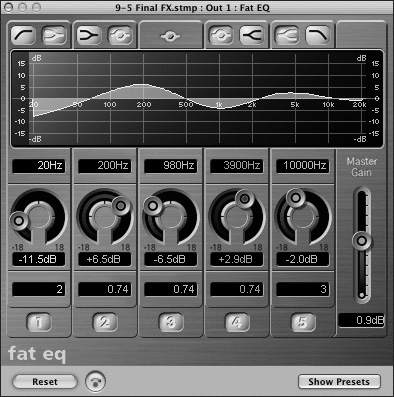
The settings have already been modified slightly for this song, however you can easily reset them to factory standards by clicking the Reset button.
Press the Home key and spacebar to begin playback.
Adjust the different Fat EQ parameters as you play the project. See if you can come up with something better than the original. Do not adjust the master gain; it could make the overall volume too loud for the project.
When you’re finished, close the Advanced Settings window.
Before you do set the overall project volume level, make sure you’re satisfied with the mix. Now is your chance to balance a particular track a little differently, make the harmony vocals a little louder, or raise the level of the acoustic guitar. And don’t forget to adjust the drums. You can even try adding effects or modifying the existing effects. When you’re happy with the mix, save the project uncollected and move on to the next exercise.
Before setting the overall project volume, let’s quickly recap what you’ve done so far to reach this point in the mix.
First you balanced the volume levels on each track, starting with the lead vocals. Then, you balanced the Panning for each track to spread the sound within the stereo field. Next, you added effects to some of the tracks to enhance their sound, and created a bus to group the two percussion tracks together and add compression to them at the same time. Finally, you adjusted the EQ of the entire song.
Nice work. The song has come a long way. You would follow the same process if you were mixing the sound for a dialog scene. The difference is that you’d be adding effects to the dialog, music, and sound effect tracks, rather than instrument tracks.
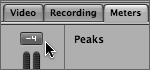
The final step to your mix is to check the overall project volume to make sure that it’s loud enough, without clipping. Remember, clipping means that an audio signal is overmodulated and will cause distortion. Soundtrack Pro includes meters and Peak indicators in the Timeline, Meter’s tab, and Mixer that you can use to gauge the overall project’s volume. In the next series of exercises, you’ll locate the different meters, and modify the output and Master Volume level.
Press Cmd-2 to open the Mixer.
Click the Meters tab, if they are not showing in the Utility window, then adjust the Mixer until you can see all of the tracks, plus the bus and output.
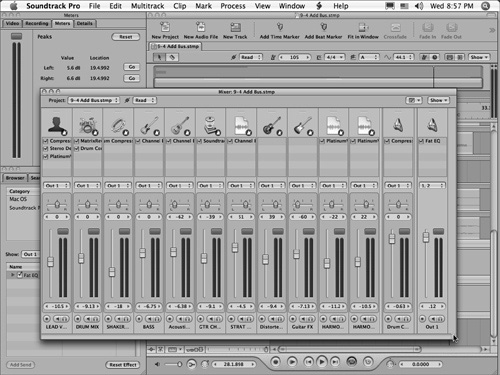
You can now see the Meters in the Meters tab, Mixer, and Timeline. The Timeline meters are the hardest to see because they are fairly small, and located on the far-right edge of the Time ruler.
If you think all of those meters seem uneventful now, wait until you start playback.
Press Shift-Return to begin playback from the start of the Timeline.
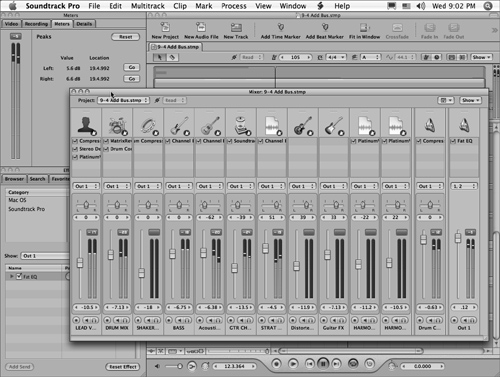
As the song plays, watch the meters in the Meters tab, Timeline, or the Output in the Mixer. These three show the same thing—the overall level of the song.
The lowest portion of the meter is green, which indicates the quietest levels. The highest part of the meter is red, indicating that the levels are dangerously high. The Timeline meters include clipping indicators that are the small circles above the meters. They light up anytime the levels are loud enough to distort.
All of the other meters include Peak indicators that look for the highest volume levels as you play your project. The highest levels are then recorded in the Meters pane and displayed in decibels for both the left and right channels. The precise location of the highest level is also recorded so you can find and fix the excessively loud clips.
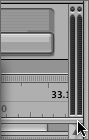
There are also two convenient Go buttons on the Meters tab, which will instantly send the playhead to the loudest peak in the Timeline.
Notice the Peak indicators above the Out 1 volume fader in the Mixer, and the meters in the Meters tab.
The level within the Peak indicator is the highest peak that has been played since the meters were reset, using the Reset button on the Meters tab. If the amount in the Peak indicator is red, the level is dangerously high and clipping.
Continue playback until you finish playing the song, and look for any clipping (red) in the Peak indicators.
If you find any evidence of clipping, lower the Out 1 fader slightly, then click the Go buttons in the Meters tab to take the playhead to that position. If you’d rather work in the Timeline than the Mixer, you can also adjust the Out 1 fader in the Timeline. Click the Reset button on the Meters tab and play that section again to see if you eliminated the clipping. If not, lower the output level again and repeat the steps until there is no evidence of clipping in the song.
When the song levels are good, pause playback and save the song.
Close the Mixer.
An output is a flexible way to adjust a project’s overall volume level when it is exported. It also includes a volume envelope so that you can automate the project’s level over time. A project may have more than one output.
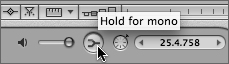
Now that you’ve finished the song, you might want to hear a temporary mono mix. With a temporary mono mix you won’t hear any of the stereo nuances like the panning effect you created for the Guitar FX track. On the other hand, you will hear what the song might sound like over a single speaker, or nonstereo output. This is also useful to hear what the project will sound like if it’s played on a television or computer with a mono speaker. It’s always a good idea to hear a project in both stereo and mono, so you know the mix will hold up in either case.
To hear a temporary mono mix, click the Mono Mix button at the bottom left of the Project window at the right of the Master Volume slider.
Note
The Master Volume slider adjusts the overall volume when you play the project. The volume level defaults to 0 dB when you create a project. Adjusting the master volume slider does not affect export volume, which is only affected by the project’s output(s).
Begin playback of the song in the Timeline.
Click and hold the Mono Mix button during playback.
Release the Mono Mix button to hear the song in stereo.
Click and hold the button again to hear the Mono Mix.
You don’t have to play the entire project at this time to see if it works in mono and stereo. The point is that you now know the importance of checking a project in both stereo and mono in the future.
Pause playback and save the final project.
Nice mix! The mixing process may seem like a lot of work, but it’s necessary to make your projects sound professional and be worthy of the work you put into creating them. In Lesson 10, “Exporting, Managing Media, and Preferences,” you’ll learn how to output the project so you can play it in iTunes.
Answers