
5. Editing Basics
Final Cut Pro provides edit functions you can use to build a project with simple and complex edits. The fundamental goal of editing is to craft a story. Every edit revolves around the primary storyline.
Append, Insert, Connect, and Overwrite
These four commands make editing swift and easy. Here is an example of each being used on this Timeline:
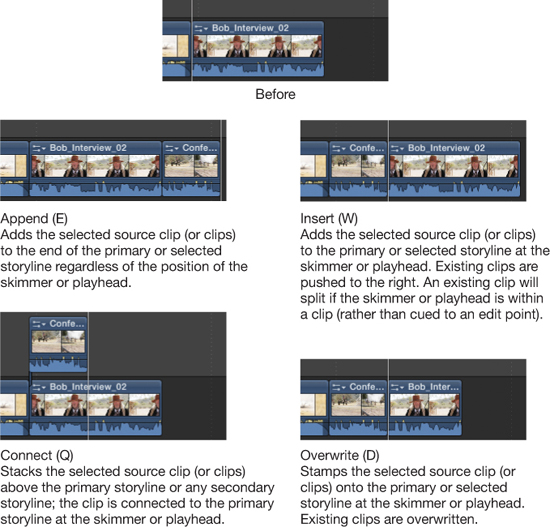
In all four of these commands, the duration of the selected source clip determines the edit duration.
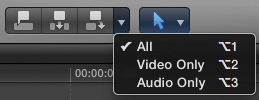
Edit Pop-Up Menu
The four commands (Append, Insert, Connect, and Overwrite) obey this source media control whether you are using the keyboard commands or drag-to-edit.
Drag-to-Edit
You can achieve all four edit commands (Append, Insert, Connect, and Overwrite) by dragging clips to the Timeline. However, an Insert edit requires the Select tool, while an Overwrite edit requires the Position tool.
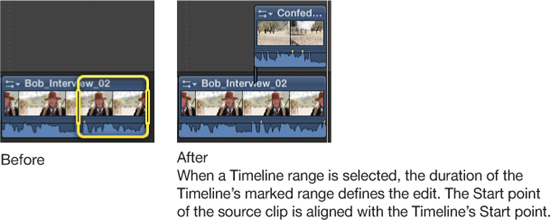
Editing with Timeline Ranges
You can set the duration for an edit in the Timeline with a range selection. This applies to Connect, Insert, and Overwrite edits.
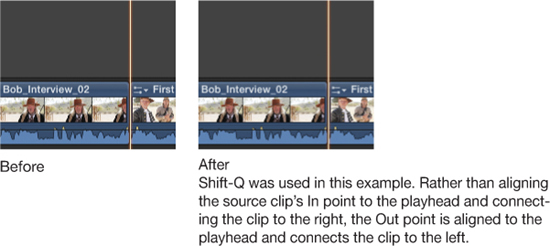
Backtiming
You can backtime an edit by using the playhead or a marked Timeline duration. This applies to Connect, Insert, and Overwrite edits and requires the addition of the Shift key (Shift-Q, Shift-W, and Shift-D).
Note
When a Timeline range is selected, the duration of the Timeline’s marked range defines the edit. The End point of the source clip is aligned with the Timeline’s End point. The range is backfilled from the clip’s End point.
Moving a Selection
The Magnetic Timeline feature of Final Cut Pro helps you avoid creating gaps (although it will honor gap clips you create). Dragging a clip or group of clips left, right, or vertically with the Select tool shifts surrounding clips horizontally or vertically (or both) to avoid leaving gaps or colliding with other clips. If you wish to leave gaps or overwrite surrounding clip or range, use the Position tool.
Nudging a selection via the keyboard shortcuts works as if you were dragging the selection with the Position tool. The selection will overwrite clips and leave gaps behind. The shortcuts are: left by one frame (,), left by ten frames (Shift-,), right by one frame (.), and right by ten frames (Shift-.).
Deleting a Selection
Pressing the Delete (Backspace) key deletes the selected clip or range. The clips to the right of the selection in the storyline, if any, ripple left to fill in any resulting gap. Pressing Shift-Delete (or the Forward Delete key) replaces the selected clip with a gap clip.
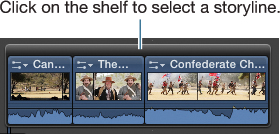
Secondary Storylines
The following are some notes regarding secondary storylines:
• To group connected clips into a secondary storyline, select the clips and press Command-G.
• To add connected clips to a secondary storyline, hold the G key while dragging the clip to the storyline (or drag until the Insert bar appears).
• Create as many secondary storylines as needed; they can be stacked vertically as well as placed horizontally.
• Secondary storylines can be moved and trimmed as one clip.
• Connected clips must be in a secondary storyline to use transitions.
• Storylines can be audio-only when needed for crossfades.
• Break a secondary storyline into connected clips by selecting the storyline and then pressing Shift-Command-G.
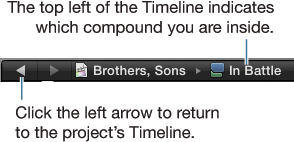
Compound Clips
Compound clips are mini-projects within a project. Compound clips are also known as nests.
• You can create compound clips in the Event Browser or from Timeline clips (Option-G).
• You can open compound clips into their own Timeline to see the clips and edits within them.
• Compounds may be placed inside other compounds.
• You can place compounds inside a storyline (Command-G).
• Compounds cannot receive transitions (only the clips within can).
• Compounds can be moved, can be trimmed, and can receive effects as one clip.
• You can rename compounds via the Info inspector.
• Shift-Command-G breaks a compound apart into its individual clips.