9. Format Conversions
Format conversions (also known as standards conversions) are the results of transcoding source media in one format into another format.
A golden rule of transcoding is that higher-quality source media produces better-quality output. You will produce significantly better results transcoding from HD to SD, from larger frames to smaller ones (such as 1280×720 to 320×240), and from uncompressed to compressed formats (10-bit to DV). You’ll produce lower-quality results by transcoding any of those examples in reverse.
HD to SD DVD Downconversions
Material shot in any HD format (including HDV) has stunning quality compared with the SD video formats. The downside is that HD formats currently have far fewer distribution options than SD. The upside is that Compressor can downconvert HD into SD formats destined for tape, digital, or DVD delivery.
Creating SD DVD assets from HD material follows most of the steps for DVD creation outlined in Lesson 5, but with a few modifications:
1. Import HD footage into Compressor.
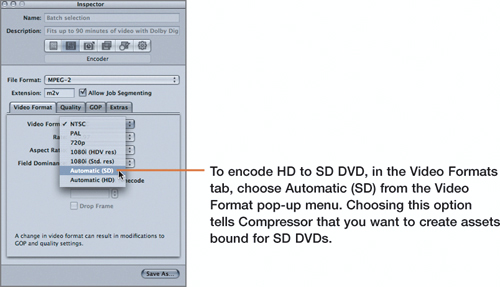
2. Based on the length of the source media, select one of the 16:9 SD DVD presets from the Settings pop-up menu or in the Setting column of the Batch window.
Selecting 16:9 applies the proper aspect ratio for HDV footage.
3. Select the applied preset in the Batch window to open it in the Inspector window.
4. Make changes in the Encoder pane settings as needed (see Lesson 5 for more information).
5. Submit the batch for encoding.
Compared with SD material encoded for SD DVDs, HD material will take considerably longer to compress because, in addition to applying the MPEG-2 codec, Compressor conforms the frame size of the HD source media to the standard 720×480 DVD resolution.
Video Format Conversions
In addition to downconverting HD material to SD DVDs, Compressor offers several presets that let you convert HD source media to SD media by using QuickTime container files.
Compressor also produces high-quality cross-conversions. NTSC and PAL, for example, are SD formats that differ in frame rate and frame size. Converting from one to the other requires retiming and reframing—two operations that benefit greatly from Compressor’s Optical Flow technology contained within the Frame Controls pane (see Lesson 10).
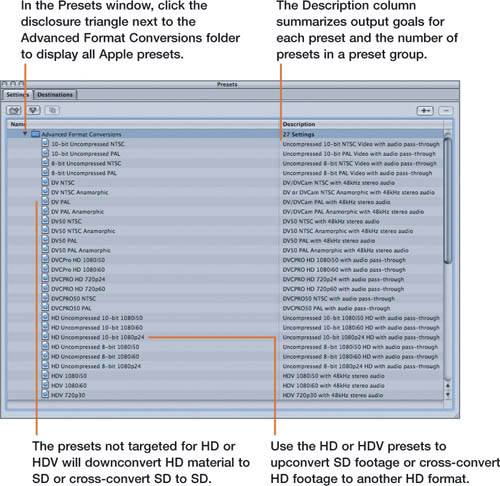
To transcode source media using Advanced Format Conversions, import the source media into Compressor, and apply a preset from the Advanced Format Conversions group for the desired output format. Then open the applied preset in the Inspector window, and follow these steps:
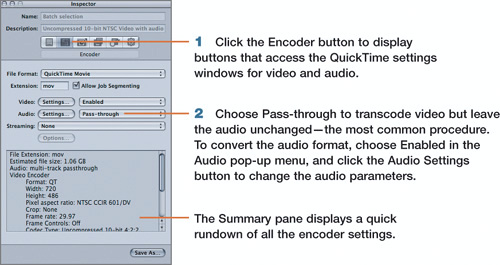
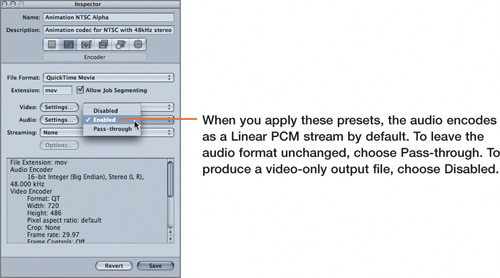
The Video and Audio Settings buttons open QuickTime settings dialog boxes.

Selecting Automatic from the Frame Controls pop-up menu works only when transcoding HD to SD MPEG-2 assets for SD DVDs or when encoding H.264 assets for HD DVDs.
Motion Graphics Conversions
Postproduction is a highly collaborative environment in which a project can have multiple artists working on different sections of media. Compressor addresses the conversion needs of postproduction workflows by including a series of stock presets that transcode source media into common Motion Graphics codecs, such as Animation and Pixlet.
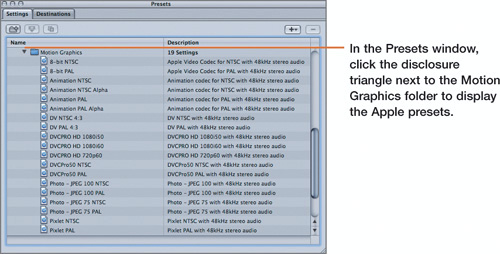
Apply these presets in the same manner as the Advanced Format Conversions. (See “Video Format Conversions” earlier in this lesson.)
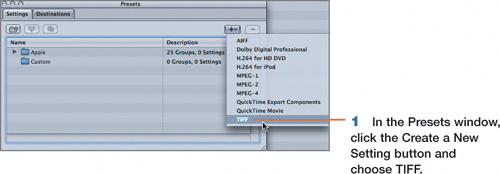
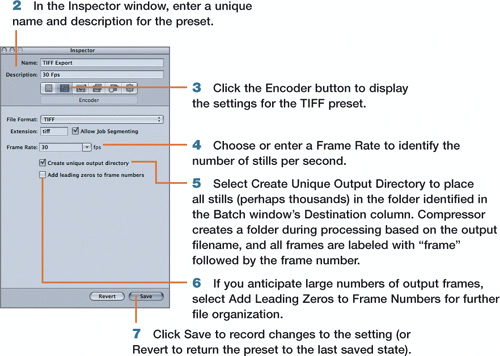
Converting Video into Image Sequences
When working on effects shots or complex composites, you may need to convert media to a series of individual frames. Follow these steps to create a custom preset in Compressor that converts source media to a sequence of TIFF (Tagged Image File Format) images.
Using QuickTime Components
Compressor can encode content with third-party codecs outside the QuickTime format by using the QuickTime components plug-in architecture. This delivers huge time savings because you can stay not only within the Mac system environment, but also within Compressor itself when encoding for these alternative platforms.
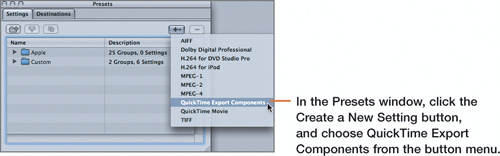
In addition to using the Mobile Devices (3GPP) presets in the Apple folder, you can create custom QuickTime component presets.
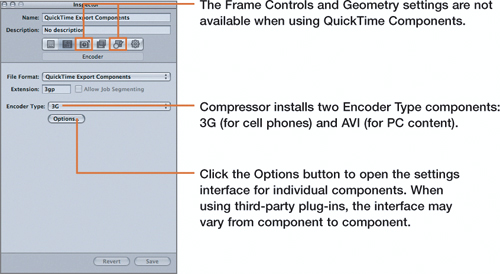
Load a custom preset into the Inspector window to make changes to the settings.
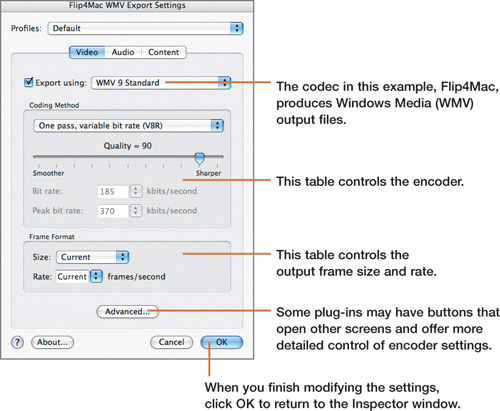
Third-party vendor Telestream publishes the Flip4Mac codec. The plug-in is compatible with QuickTime components and encodes in Windows Media format.
Apply QuickTime component presets just as you would apply any other preset to a job in the Batch window.
Note
This workflow may create files that encode correctly for their target platforms but will not play in QuickTime Player.
Consult the Compressor support pages on the Apple Web site (www.apple.com/support/compressor) to verify the compatibility of third-party plug-ins.