
So far, we have covered three pillars of our four pillars of cryptography. We discussed integrity and how cryptographic primitives, like hashing with SHA-256, can help us solve that problem. We then discussed authentication and I explained hashed message authentication codes, such as HMAC-SHA-256. A HMAC is similar to a standard hashing function, but it differs in that you have to provide a key to the hashing function which means for anyone to calculate the same hash code for a piece of data, they also need to be in possession of that key, this is why it is authenticated.
We then covered confidentiality by looking at both symmetric and asymmetric encryption. For symmetric encryption, we used primitives like DES, Triple DES, and the Advanced Encryption Standard (AES), where you use the same key for both encryption and decryption. For new systems, I recommend going straight to AES with at least a 256-bit (32 bytes) key. You may still encounter DES and Triple DES if you have to work with older legacy systems, but I don’t recommend using DES or Triple DES for new systems. For asymmetric cryptography, we looked at RSA which uses a split public and private key system for managing encryption. You use your recipient’s public key for encryption, and then the recipient uses their private key to decrypt the data.
The final pillar we want to look at is non-repudiation. An essential function of cryptography is to ensure non-repudiation of a sent message, which is where the receiver of the message cannot deny that the message is authentic. A digital signature is a technique used to help demonstrate this authenticity of the message. A digital signature gives the recipient of the signature the reason to believe that an identified sender created the original message, this is important because it means that the sender cannot deny sending the message in the first place.
Before I go into detail about digital signatures, let’s look at an example from the physical world that works as an analog to digital signatures. Let’s say you are a contractor/consultant, and you are singing a contract for some work that pays $30,000 on completion. When you sign the contract with the company, you sign it, the company director signs it and they have a representative from human resources sign it too as a witness. You go and do the work, and once it is completed, you invoice the company but instead invoice for $40,000. The company can turn around and easily say that, no, you signed a contract for $30,000, and prove it with the signature of the director and the witness from human resources, so if it ever went to a legal battle, they have that signed contract to refer too; this is non-repudiation at work in the real world. Digital signatures give us an electronic way of achieving the same thing. Once a contract or agreement has been signed, neither party has a way of denying what was in the original terms of the contract.
There are many Internet websites that provide this service, with DocuSign being one of the most popular. In a service like this, the contract writer uploads the contract information, generally as a PDF, and it is sent to the recipient to sign. They put their electronic signature on the paper by clicking the signature field. In reality, the visual signature is not essential here; the cryptographic signing that takes place behind the scenes is important. Once the signee has signed the contract, the original sender, or a representative from that company, also endorses the contract. Once that has happened it means we have a countersigned, electronic document that is in possession of both parties.
If anyone tries to modify the terms of the contract, then when the agreement is electronically verified, none of the digital signatures will be correct, meaning tampering has occurred.
High-Level Look at Digital Signatures
Digital signatures are based on asymmetric cryptography. For the receiver of the message, a digital signature allows the receiver to believe the correct sender sent the message, this can be thought of as a digital equivalent to a signature on a letter, except a digital signature is much harder to forge.

Creating a digital signature from a hash of the original document
Public and private key generation using RSA.
A signing algorithm that uses the private key to create the signature.
A signature verification algorithm that uses the public key to test if the message is authentic.
A Digital Signature Relies on the Private Key of the Sender
Public Key | Private Key | |
|---|---|---|
Encryption (RSA) | Encrypt | Decrypt |
Digital signature | Verify signature | Sign message |
The digital signing process from sender to receiver
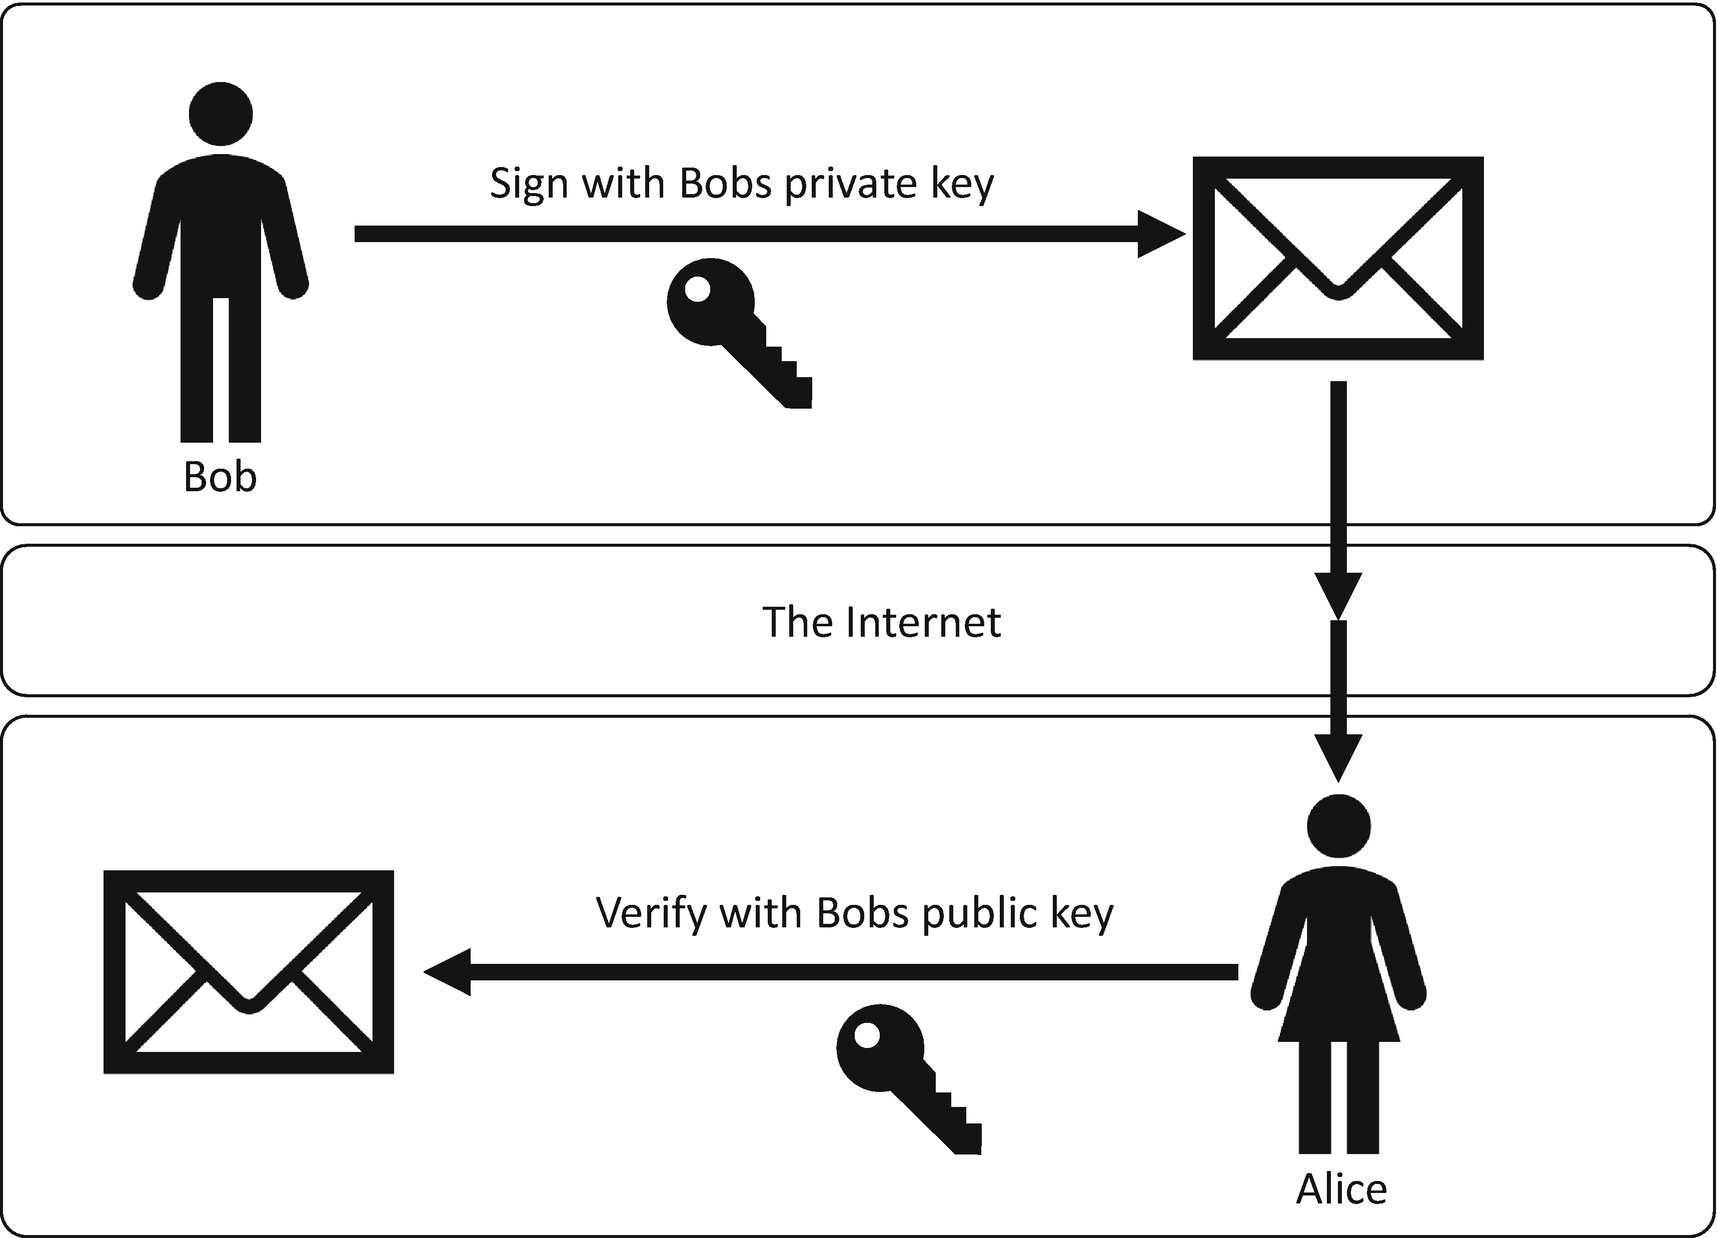
In the example, Bob is sending a message to Alice, and that message is signed with a digital signature.
First, Bob encrypts some data that he wants to send to Alice. For this example, it doesn’t matter whether that data is encrypted with a symmetric or asymmetric encryption algorithm. Once this data is encrypted, Bob takes a SHA-256 hash of the data, where he signs the information with his private signing key; this creates the digital signature. Then Bob sends the encrypted data and the signature to Alice.
Once Alice has received the encrypted data and the digital signatures, she first recalculates the hash of the encrypted data (see Figure 8-3). Alice verifies the digital signature using the calculated hash and Bob’s public signing key, which tells Alice if the signature is valid or not. If it is valid, Alice can be confident that Bob sent her the message because it could only have been signed using Bob’s private signing key, which only Bob knows. If the signature is not valid, then Alice should not trust the origin and authenticity of the message and discard it entirely.
The receiver of a digital signature verifying the signature
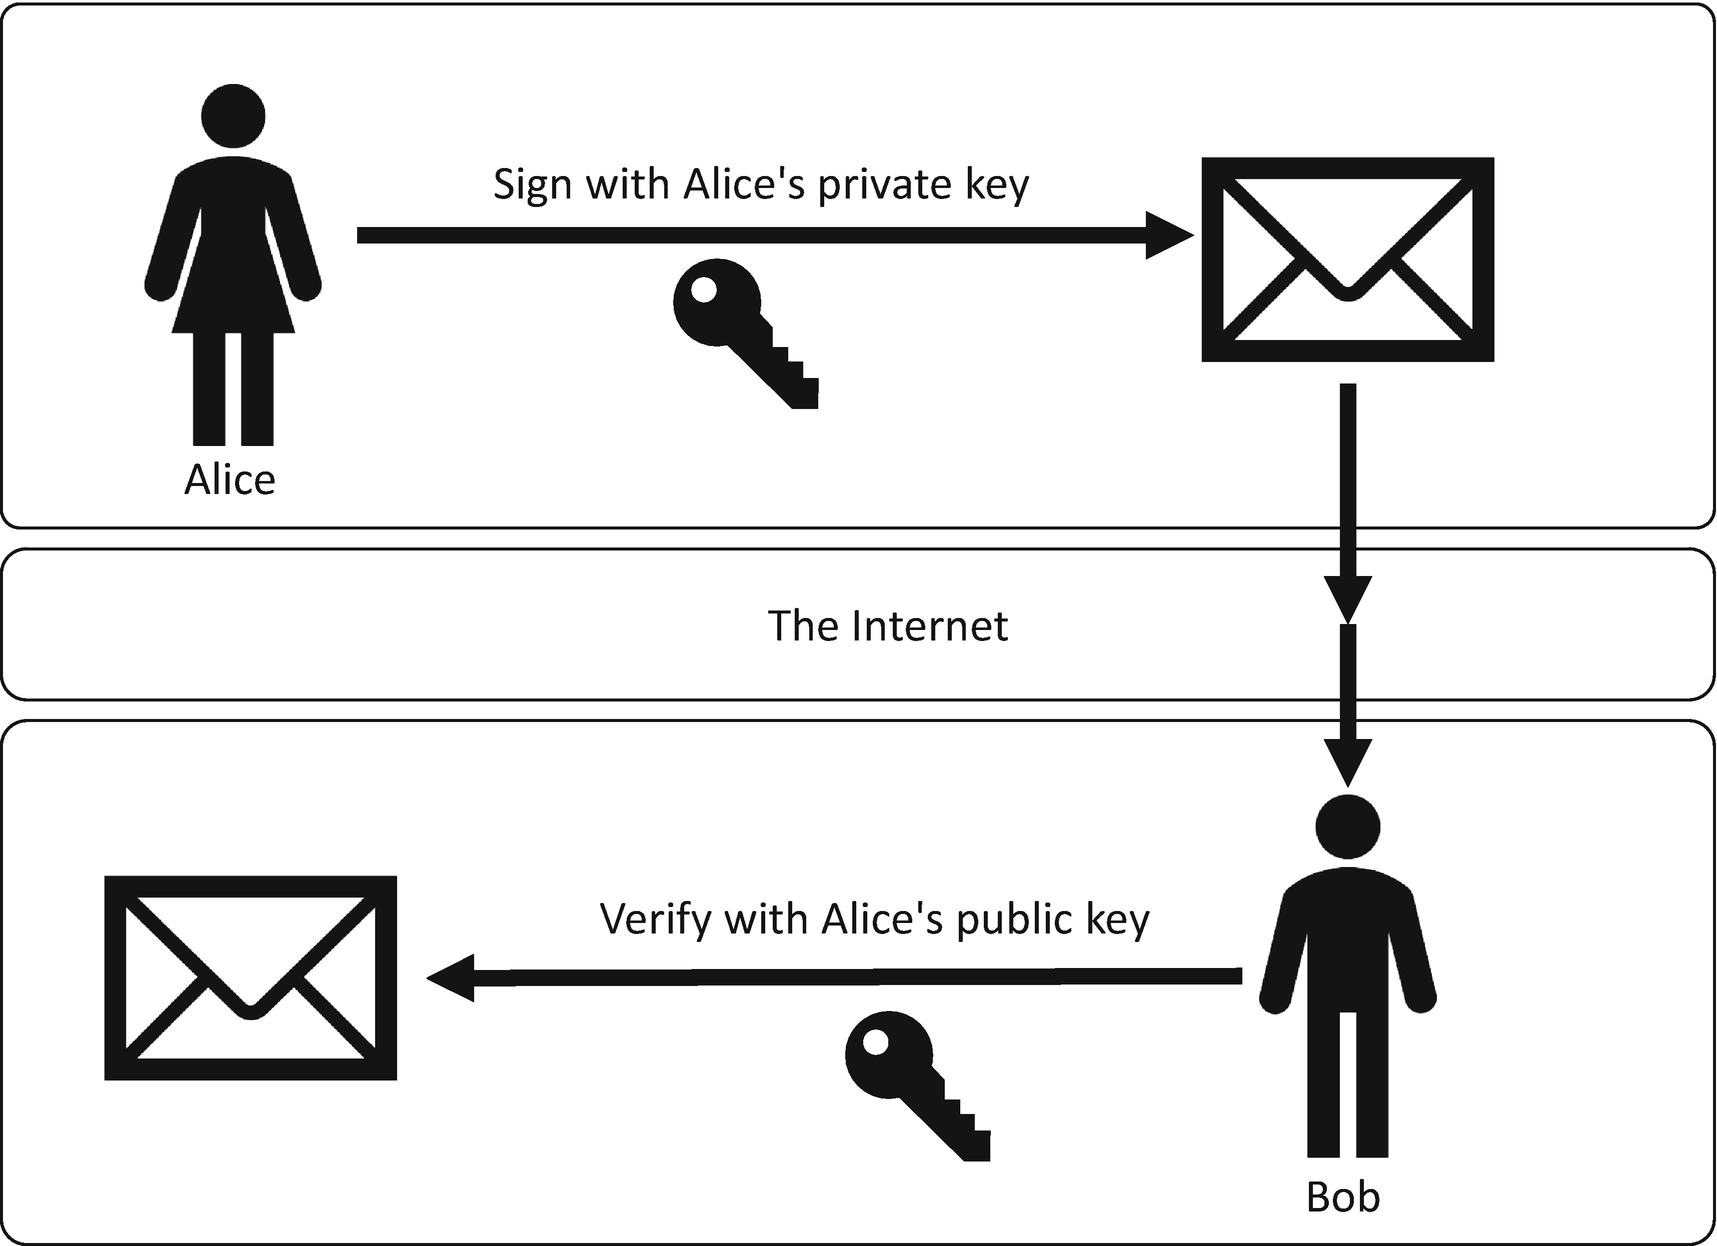
First Alice encrypts some data that she wants to send to Bob. Once this data has been encrypted, Alice takes a hash of that data and then she signs the hash with her private signing key; this creates the digital signature. Then Alice sends the encrypted data and the signature to Bob.
First, Bob recalculates the hash of the encrypted data. Bob verifies the digital signature using the calculated hash and Alice’s public signing key. This tells Bob if the signature is valid or not. If it is valid, Bob can be confident that it was Alice that sent him the message because it could only have been signed using her private signing key, which only Alice knows. If the signature is not valid, then Bob should not trust the origin and authenticity of the message.
As illustrated in the two-way communication between Bob and Alice, it is because we sign with the senders’ private key that the recipient can trust the message as only the sender should know the private key. Naturally, this means the sender is responsible for making sure that their private key is safe and secure. I cover that in more detail later in the book when we look at Azure Key Vault.
Now that we have looked at how a digital signature works in theory, let’s now look at how it is implemented in the .NET Framework/.NET Core.
Digital Signatures in .NET
In the preceding code example, you can see that the RSACryptoServiceProvider class is first constructed with a key size of 2048, and you then import your private key, which you have already created. Then the RSAPKCS1SignatureFormatter object is created, and you pass in the rsa object containing the private key. Alternatively, you can create the RSAPKCS1SignatureFormatter with the default constructor and then call SetKey by passing in the rsa object.
Once the RSAPKCS1SignatureFormatter class has been instantiated, you then set the hashing algorithm that is going to be used in the signature creation process. The hash name has to be configured as a string.
MD5
SHA-1
SHA-256
SHA-512
Verifying a digital signature is a similar process to creating a signature, the only difference, as you can see in the preceding code, is that instead of importing the private key, you import the public key. Instead of using the RSAPKCS1SignatureFormatter class, you use RSAPKCS1SignatureDeformatter. To verify the digital signature, you call VerifySignature and pass in the hash of the data that you want to verify and the actual signature that was returned from the SignData method.
If the hash that is provided doesn’t match what was used to create the original digital signature, then you get false returned from VerifySignature. Let’s think about that in practical terms. Bob has a PDF contract that he is sending to Alice, so he creates a hash of the PDF, and then creates the digital signature of that hash using his private key. Bob then sends the digital signature and the PDF file to Alice. Alice recalculates the hash of the PDF and passes that hash and Bobs digital signatures into VerifySignature, and if it returns true, then she trusts the integrity of the document that was sent, and she trusts that it came from Bob as he used his private key to create the digital signature.
Let’s now assume that after Bob sent the PDF and the digital signature, it was all intercepted by Eve, and she edits the PDF and changes some of the information within it. When they finally get to Alice, she recalculates the hash code for the PDF and calls VerifySignature with the new hash code and the original digital signature. This time it returns false, which means that she should not trust the document. Alice can’t trust the integrity of the file or the origin of the digital signature.
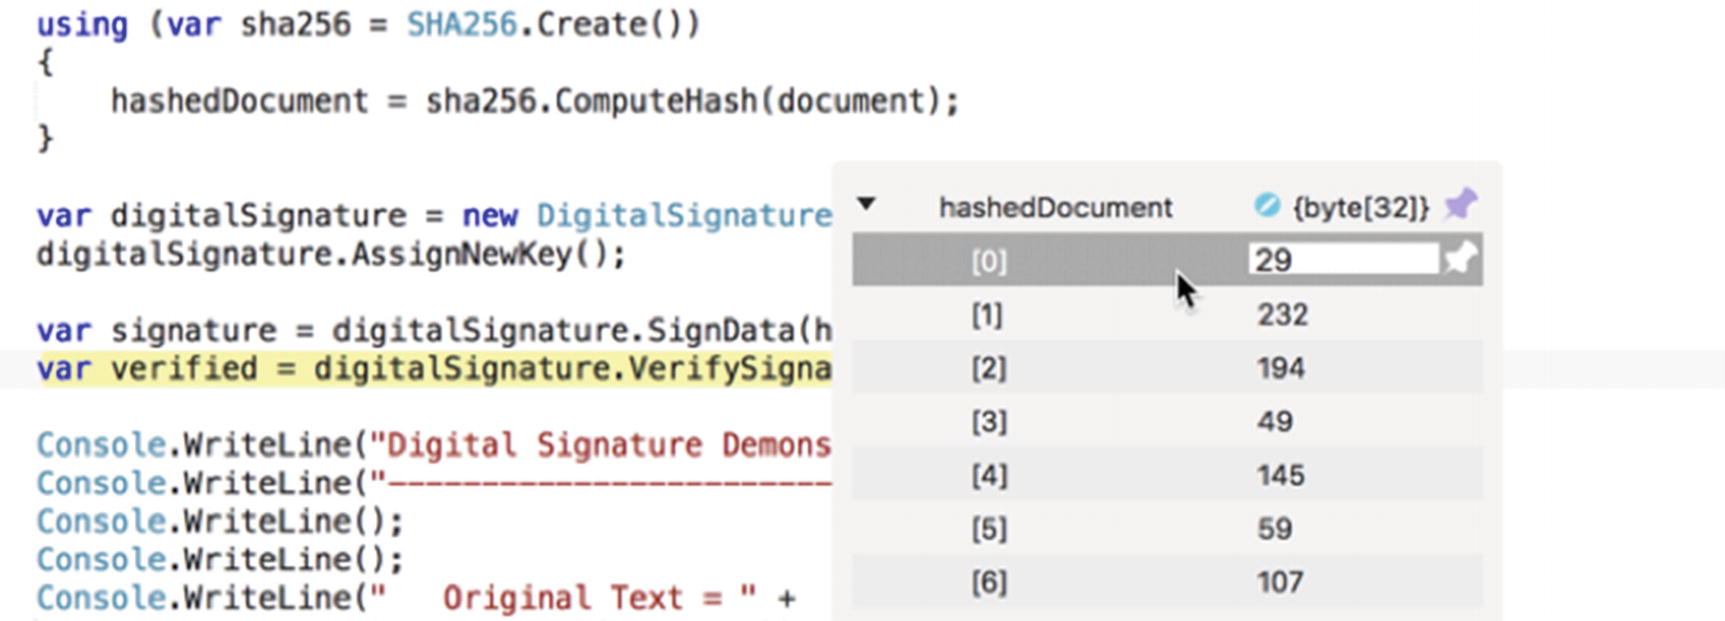
Next, we create an instance of our DigitalSignature class that contains our AssignNewKey, SignData, and VerifySignature methods. Once the class has been instantiated, we create new keys by calling the AssignNewKey method. I discuss better ways of managing these signing keys later in the book.

The result of a new digital signature and its verification
Modifying a document after the digital signature has been created

The digital signature does not match the modified document
This example demonstrates that if the document is tampered with and a new hash calculated, it will not match the original digital signature. This is a powerful property that we explore when I talk about hybrid encryption in Chapter 9.
Summary
In this chapter, we explored the final pillar of our four cryptographic pillars, which was non-repudiation. Non-repudiation is where the receiver of the message cannot deny that the message is authentic. We get the authenticity due to the fact that the message sender has to use their private key to create a digital signature, and only they know their private key, so when the recipient verifies the signature using the recipient public key, they can be assured that the signature is valid if the signature verifier returns true.
We have now covered all the primitives needed to satisfy our four pillars of cryptography. Each of these primitives is incredibly useful on their own, but when we start to combine them we can get some compelling benefits, and this is what we are going to explore in our next chapter on hybrid cryptography.