Cryptographic primitives to be used for hybrid encryption
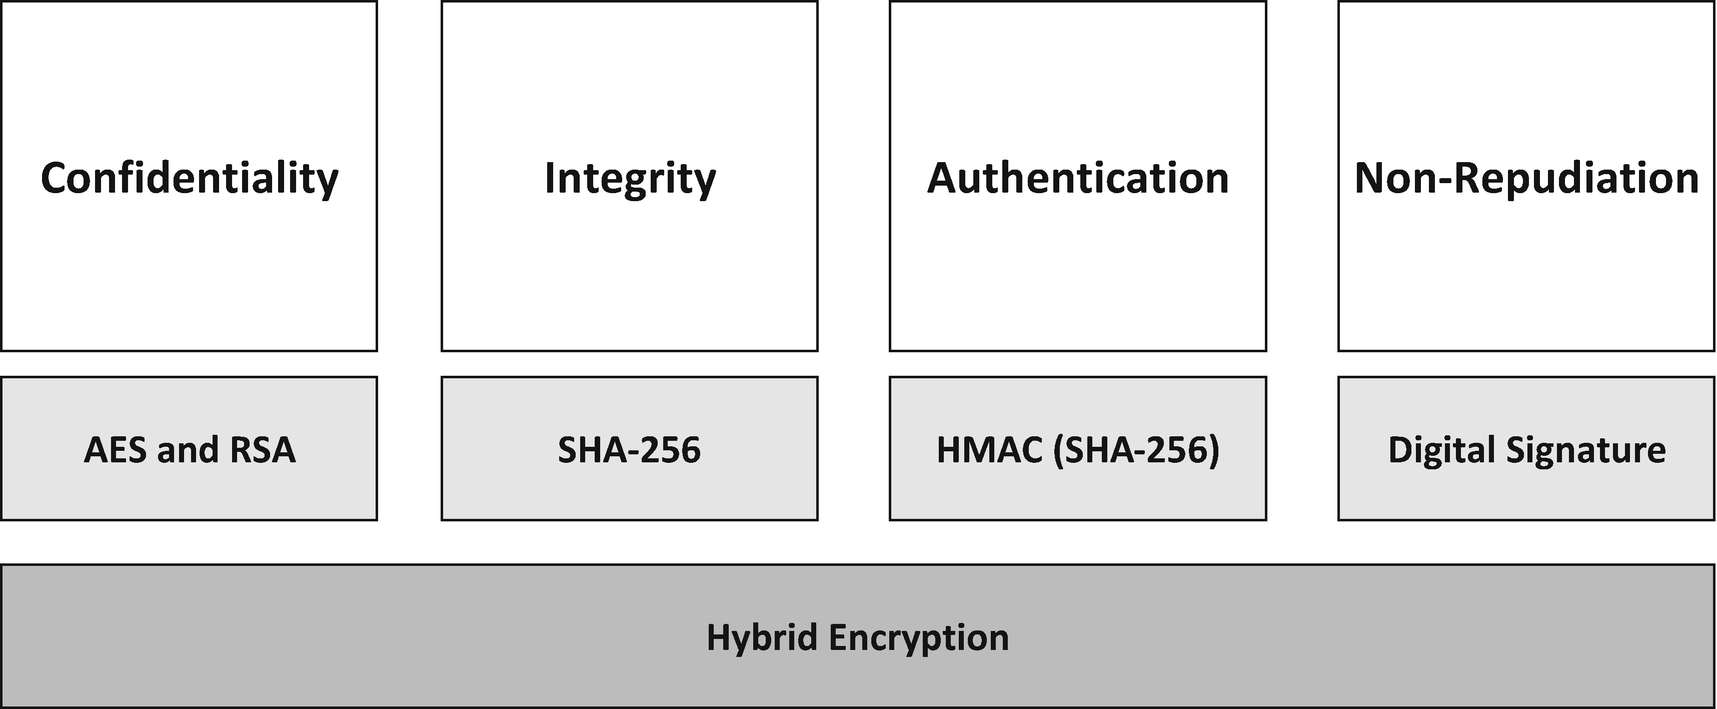
First, confidentiality is what you traditionally associate with cryptography, which is where you take a message or some other data and encrypt it to make the original data completely unreadable. There are many cryptography algorithms, including symmetric encryption with DES, Triple DES, and AES. We also covered asymmetric encryption using RSA.
The second type of security operation is integrity. In information security, data integrity means maintaining and assuring the accuracy and consistency of data over its entire lifecycle; this means that data cannot be modified in an unauthorized or undetected manner. Integrity is violated when a message is actively changed in transit. Systems typically provide message integrity in addition to data confidentiality. We covered different techniques for giving integrity with our look at MD5, SHA-1, SHA-256, and SHA-512. We also covered hashed message authentication codes (HMACs) that also make use of MD5, SHA-1, SHA-256, and SHA-512. HMAC’s form the third pillar of cryptography.
The fourth type of security pillar is that of Non-Repudiation. Non-repudiation is the assurance that someone cannot deny something happening. Non-repudiation gives you the ability to make sure that one of the parties to a contract cannot end up rejecting the authenticity of their signature on the contract. Non-repudiation also means that the sender of a contract cannot deny that the message originated from them. Another good example is where you send a letter or parcel by recorded delivery which means the recipient has to sign for the shipment which means they cannot deny their package was delivered. Similarly, a legal document typically requires witnesses to its signing so that the person who signs it cannot deny having done so.
In the digital age, a digital signature ensures that a message has been signed by the person who claimed to sign the message. One person can only create the digital signature, and this ensures that person cannot deny that they signed the message.
The fifth pillar of cryptography is authentication. A good example of authentication is when we want to establish the identity of a server using an SSL or TLS certificate. A certificate enables us to prove identity to a user that he or she is connected to the correct server. When we talk about identity, we are not talking about the identity of a direct user, that a cryptographic key. If you have a weak key, then this lowers the trust that you place on that identity. Authentication is also commonly used by everyone when they enter their user name and password to gain access to a system. Your social media accounts are an excellent example of this. To interact with your friends, you have to authenticate yourself with the social media website to prove who you are. We investigated authentication when we looked at the secure storage of passwords, by using a hashing, salting, and time delaying scheme that would guard against Moore’s law and the ever-increasing speed and power of computer processors. The technique we looked at was using a password-based key derivation functions.
Now we want to combine some of the techniques to create an encryption system that is powerful and flexible. We start by combining the best of both worlds of symmetric and asymmetric encryption.
Combining Symmetric and Asymmetric
Symmetric encryption with algorithms, such as DES, Triple DES, and AES, are fast and efficient when it comes to encrypting data, but the problem with symmetric encryption is sharing keys. Sharing keys securely between two or more people is very hard to do.
For asymmetric encryption, the actual process of encryption is much slower due to the modular-based mathematical nature of the RSA, and there are limits to the amount of data that you can encrypt at once. A real benefit for RSA is how keys are managed. With RSA, you use a public and private key pair. The recipient of the message knows the private key, and they keep that key safe and secret; anyone can know the public key. If Alice wants to send a message to Bob, she first gets his public key; encrypts the message with that public key and sends the message to Bob. Bob then uses his private key to read the message; which is a much better solution to keys exchange than with symmetric encryption algorithms like AES.
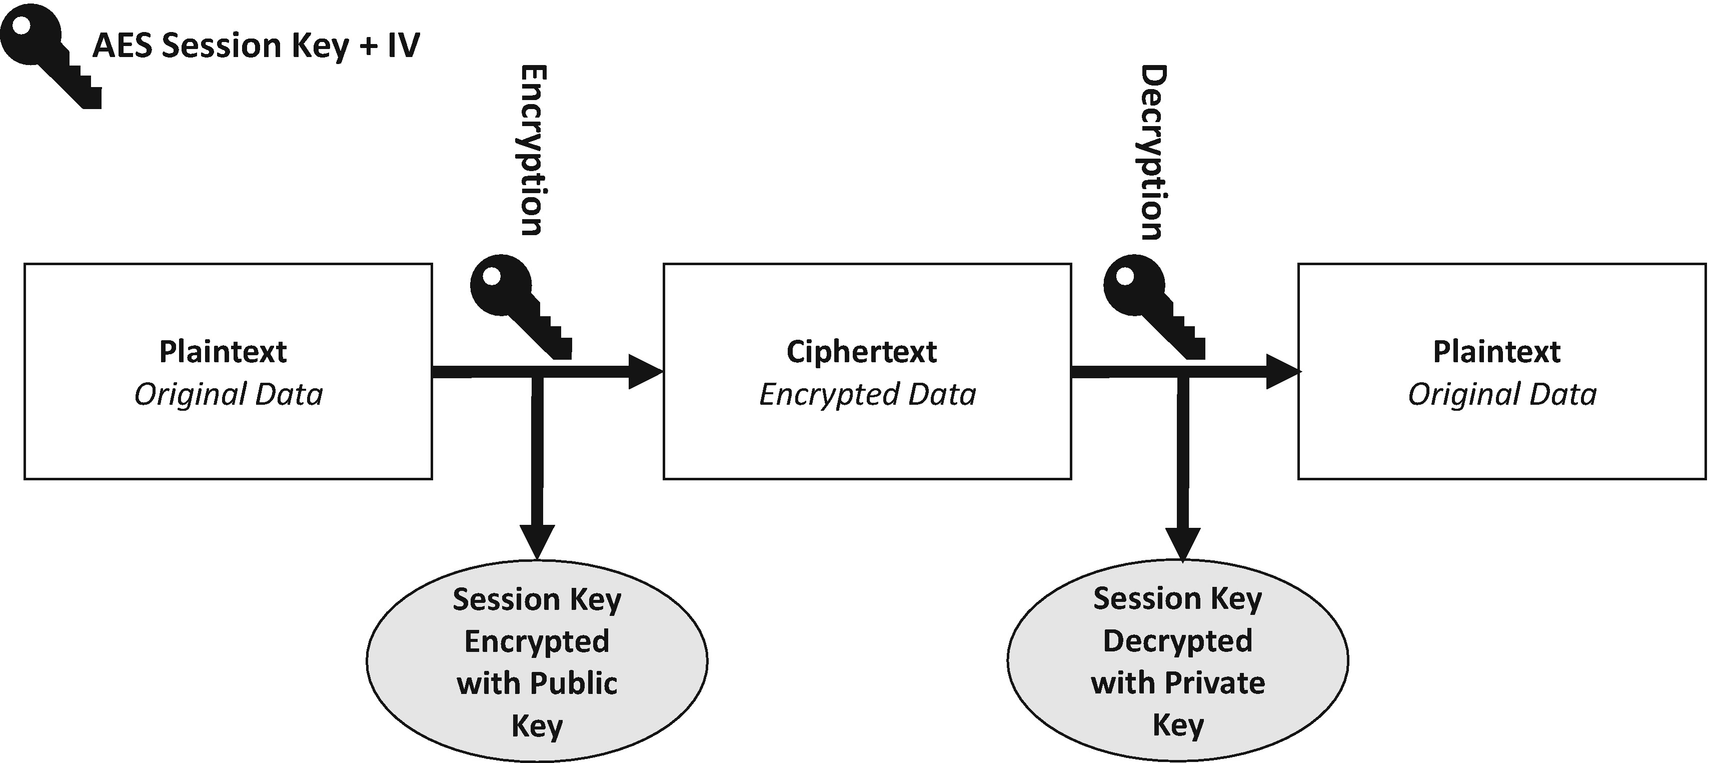
Using RSA to protect our AES session key
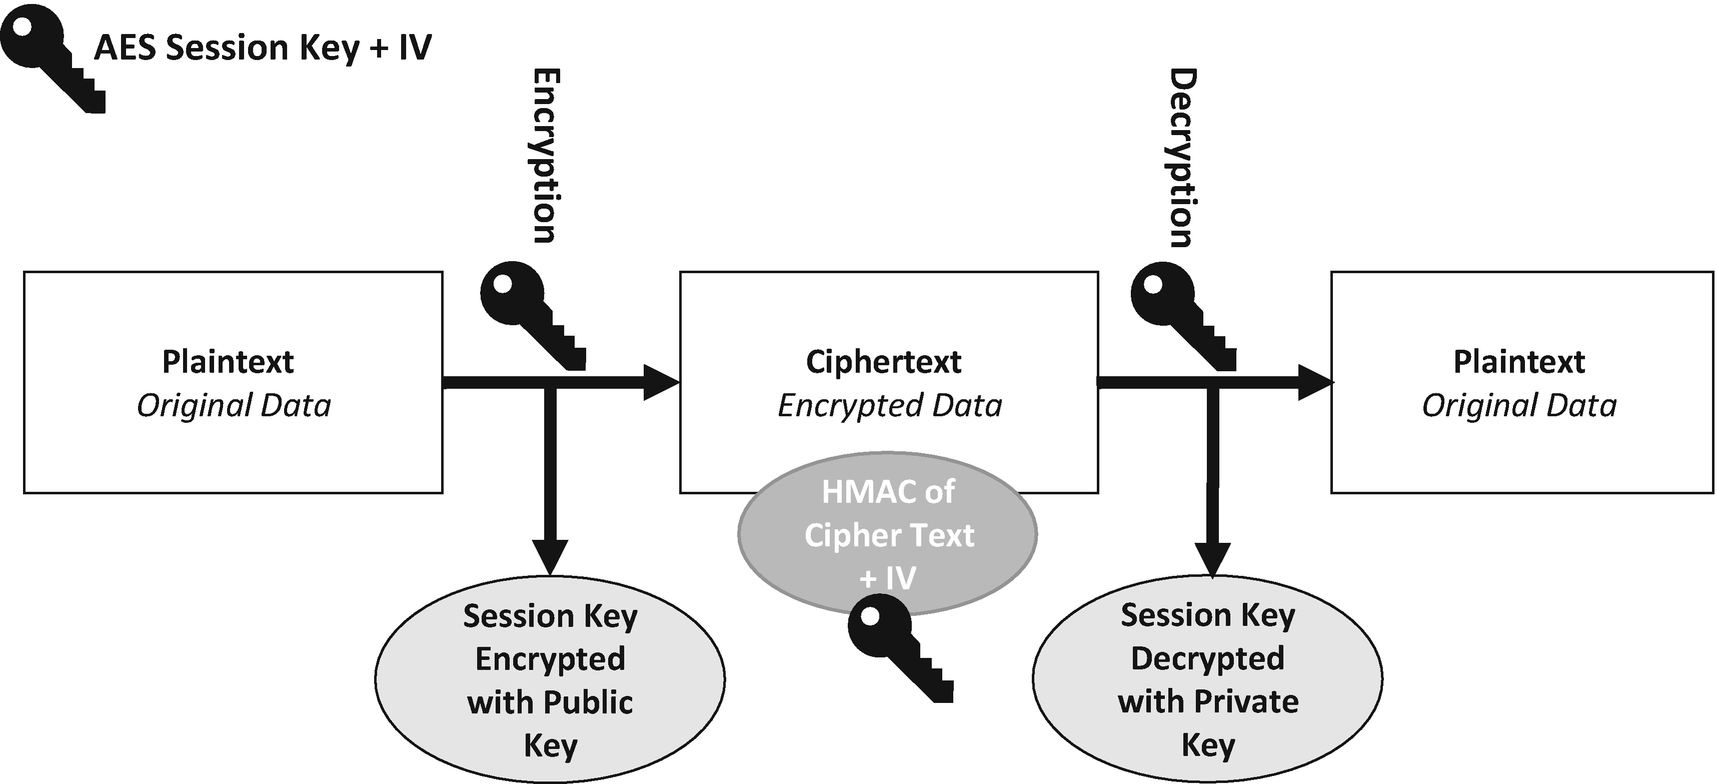
The sender first uses the recipient’s public key to encrypt a freshly generated AES session key. The data you want to send to the recipient is encrypted with AES and that session key, and that encrypted message along with the RSA encrypted session key is sent to the recipient who then uses their private key to decrypt the session key. Once the session key is recovered, it is then used to decrypt the message.
The combination of encryption methods has various advantages. One is that a connection channel is established between two users’ sets of equipment. Users then can communicate using this hybrid encryption technique. A downside of asymmetric encryption is that it can slow down the encryption process, but with using it along with symmetric encryption, both of them together use their best parts, the efficiency of the symmetric encryption and the key splitting of the asymmetric encryption. The result is added security to the message sending process along with overall improved system performance.
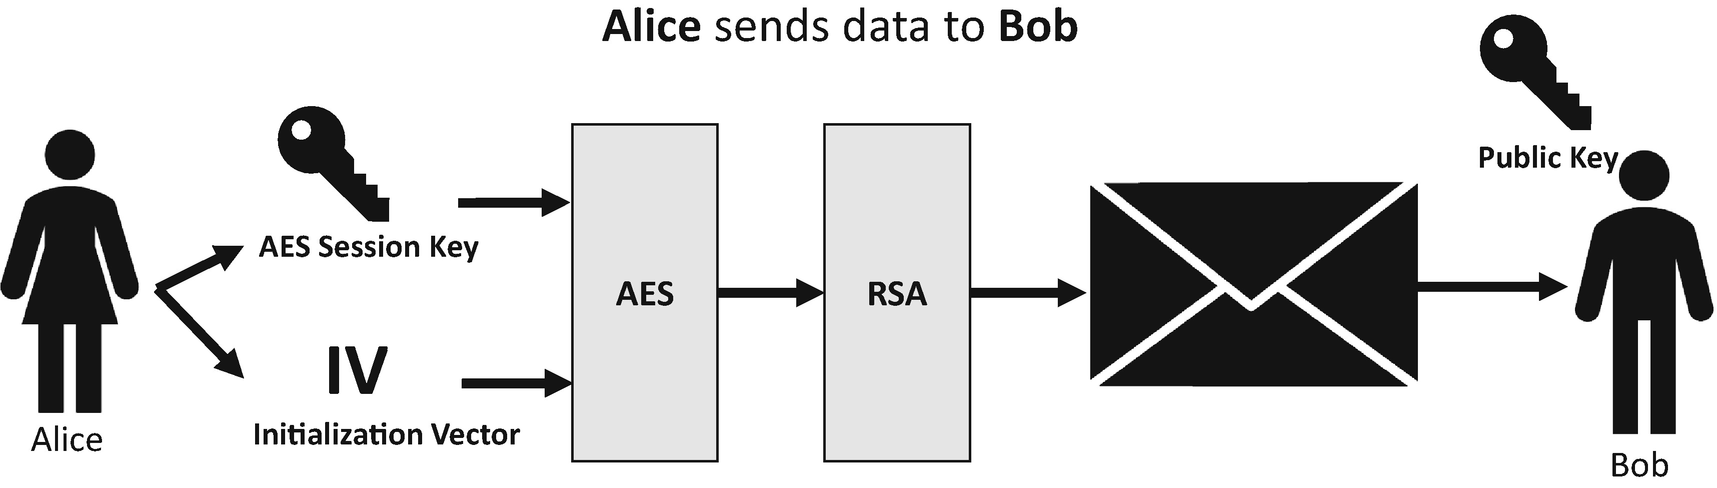
Alice sends Bob a message using RSA and AES
We have two people: Alice and Bob.
First, Alice sends a message to Bob using hybrid encryption.
Alice generates a 256-bit (32-byte) AES key. This key is called a session key in this process.
Alice then generates a 128-bit (16-byte) initialization vector (IV). The IV is a block of random data that is passed into the AES algorithm to add additional entropy to the encryption process. Remember that the IV doesn’t have to be kept secret.
Alice encrypts her message with AES using the session key and the IV, which is the same as any normal encryption operation with AES.
Alice then encrypts the session key with RSA and Bob’s public key. Here we are wrapping the AES session key with the strength of RSA. If anyone wants to decrypt the original message with AES, they first need to decrypt this RSA encrypted key with Bob’s private key.
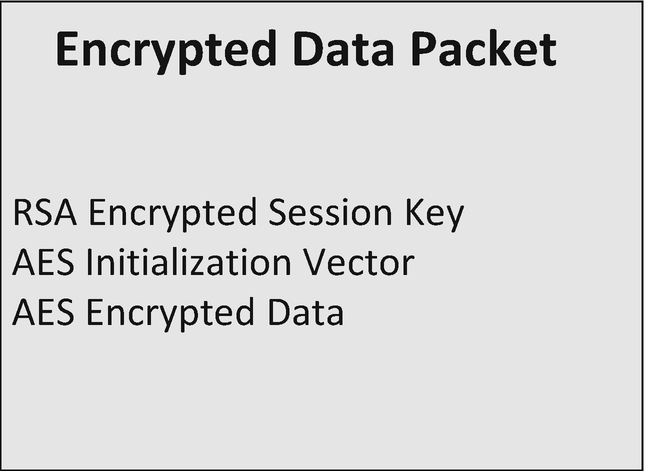
The packet of data containing everything needed to decrypt the message
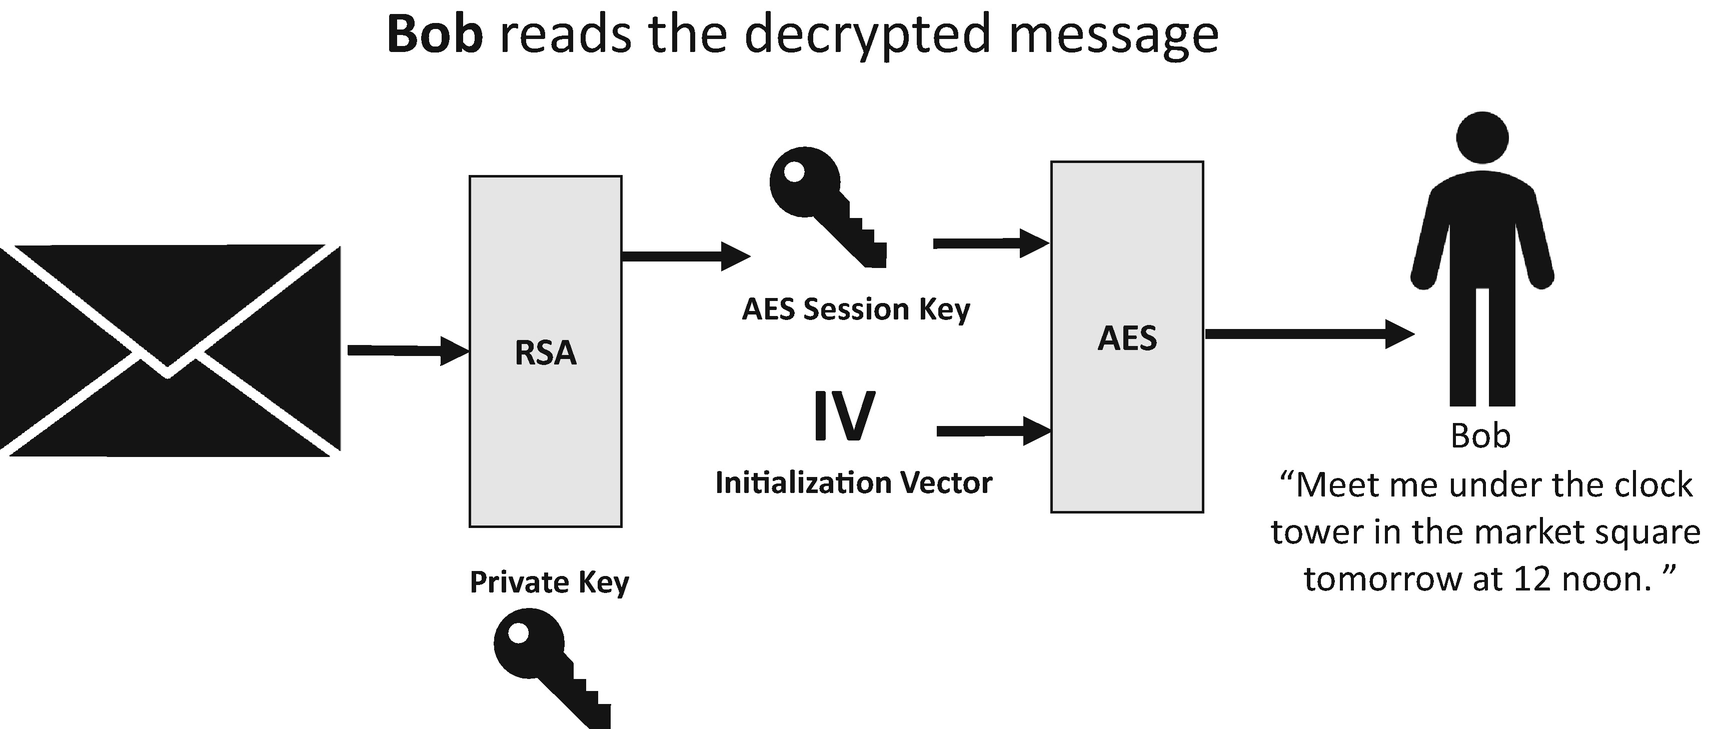
The process for Bob to decrypt the message
Bob first decrypts the encrypted AES session key with RSA and his private key.
Bob decrypts the encrypted data by using the recovered AES session key and the original IV that was sent to him.
Bob reads his decrypted message. The message says, “Meet me under the clock tower in the market square tomorrow at 12 noon.”
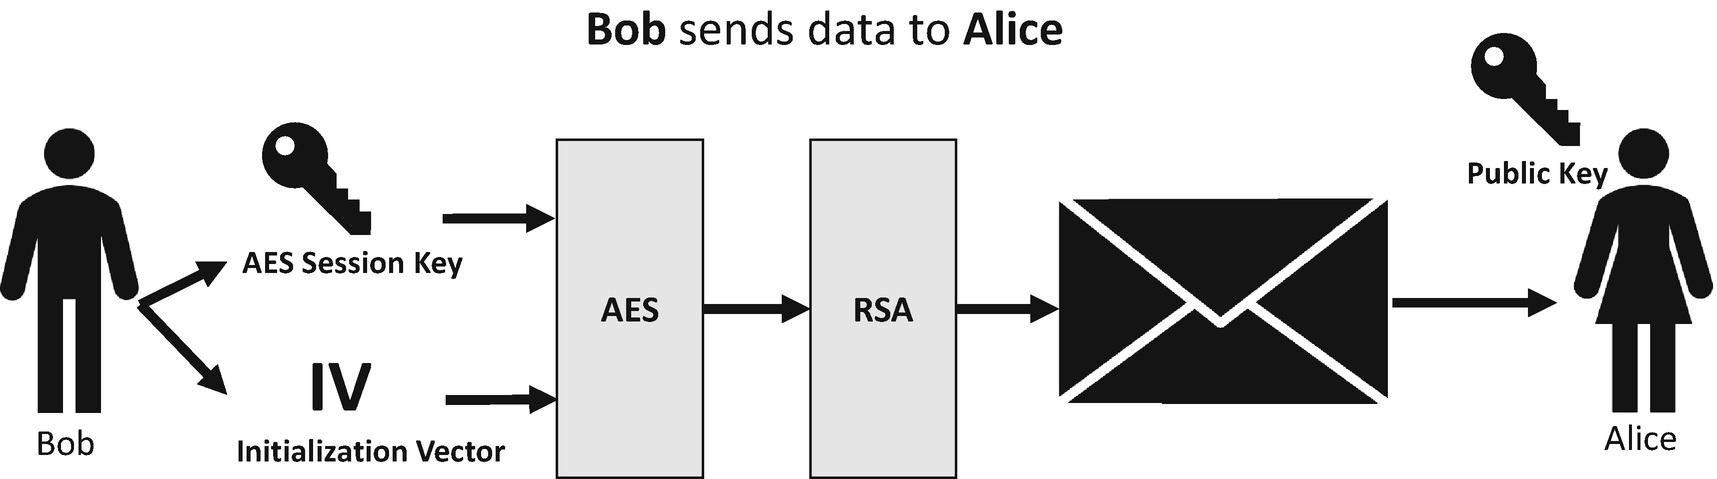
Bob sends a reply to Alice using the same process
Bob generates a 256-bit (32-byte) AES Key which is our session key.
Bob generates a 128-bit (16-byte) IV.
Bob encrypts his reply to Alice with AES by using the session key and the IV.
Bob encrypts the AES session key with RSA and Alice’s public key.
Bob stores the encrypted data, encrypted AES session key, and IV in a separate data structure which is the packet of data that is sent to Alice.

Alice decrypts the message from Bob
Alice decrypts the encrypted AES session key by using RSA and her private key.
Alice decrypts the encrypted message from Bob by using decrypted AES session key and the IV.
Alice reads the decrypted message, which says, “I will meet you as requested. I will be wearing a red hat and green boots.”
Let’s now put this into practice with a code demonstration. Before we look specifically at the hybrid encryption example, let’s review the AES and RSA implementations that we will use. To cover our symmetric encryption needs, we have a class called AesEncryption that contains three methods. The first is GenerateRandomNumber, which we use for creating symmetric keys and IVs. The method takes a length as a parameter, which is the length in bytes that we want to key to be, and then the method returns us a byte array of the desired length containing the random number.
The next method is our Encrypt method which takes a byte array of the data we want to encrypt, a byte array containing our key (32 bytes for our example) and the IV, which is 16 bytes. Once our data has been encrypted, the ciphertext is returned as a byte array.
For our asymmetric encryption needs, we are using RSA, and more specifically for this example, the RSA with parameter keys version that stores the public and private key pairs as in-memory objects. Later in the book, we look at a more robust way of managing the RSA keys.
The RSAWithRSAParameterKey class contains three methods; the first of which is AssignNewKey, which generates our public and private key pair. Our example code is set to create 2048-bit keys, which are strong at the time this book goes to press. You can go higher to 4096-bit keys if you wish, but you will suffer a performance penalty.
The next method is EncryptData, which takes a byte array of our plaintext as it’s the only parameter. EncryptData loads the public key and then encrypts the data, where the ciphertext is returned as a byte array to the caller.
Then the EncryptData method performs the hybrid encrypt. This method takes a byte array containing our plaintext and an instance of the RSAWithRSAParameterKey class that contains our predefined public and private key. The EncryptData method first starts by generating the 32-byte AES session key. Next, an instance of the EncryptedPacket is created, and the 16-byte IV is generated and stored in the IV field of the EncryptedPacket instance.
The next step is to encrypt our plaintext data using AES and the newly generated session key. The result of this is stored in the EncryptedData field of the EncryptedPacket. The next step is to encrypt the AES session key then using RSA; this is done by calling the EncryptData method on the RSAWithRSAParameterKey instance that was passed into our hybrid encryption method. This encryption operation uses the public key, and when the AES session key is encrypted, it is stored in the EncryptedPacket instance, which can then be sent to the recipient.
The DecryptData method takes two parameters; the first is the EncryptedPacket object that has been sent by the sender, and this contains the encrypted AES session key, the encrypted message, and the IV. The second parameter contains the RSA keys, the private key which is used in this decryption method.
Before we can do anything, we first have to recover the encrypted AES session key; this is done by calling DecryptData on our rsaParams parameter, which decrypts the session key using the RSA private key of the recipient. Now that we recovered the session key, and have the IV, we can use AES to decrypt our encrypted message from the sender, which returns the original ciphertext as a byte array.
First, we define the message we want to encrypt. In this case, it is a string, but it could as easily be a file. Next, we create an instance of the RSAWithRSAParameterKey class and then call AssignNewKey, which generates a public and private key pair. Then, we create an instance of the HybridEncryption class and then call the EncryptData method on it. We pass in the message to encrypt (converted to a byte array first), and the class instance, rsaParams, containing our RSA key pair. We are left with an instance of our EncryptedPacket object containing the encrypted session key, encrypted data, and IV. To decrypt the data, we call the DecryptData method on the HybridEncryption class instance and provide the encrypted packet and the RSAWithRSAParameterKey class instance that contains our private key. Once the plaintext byte array is returned, it is turned back into a string and displayed to the console.
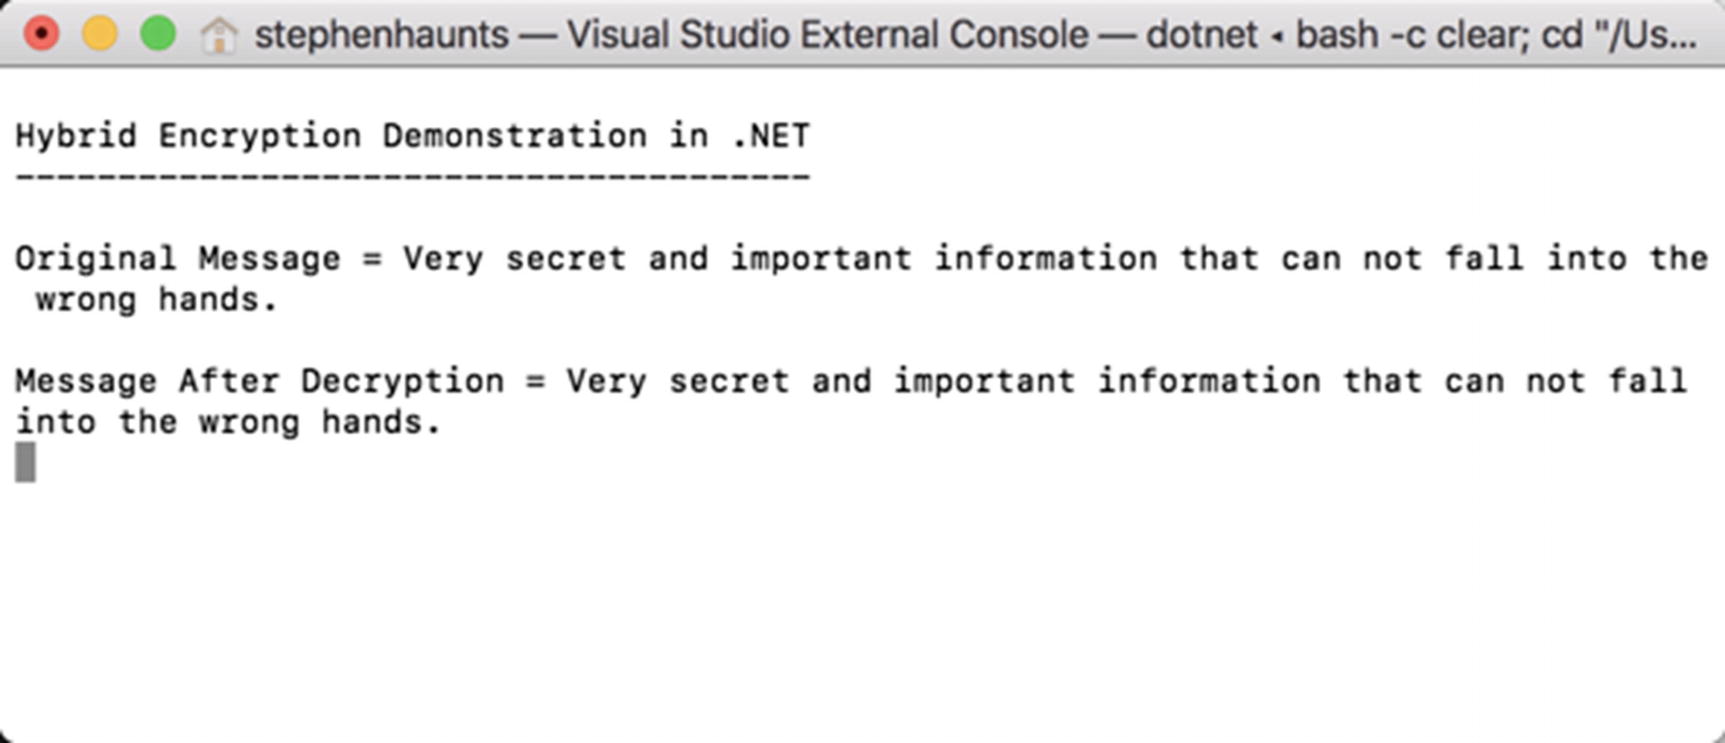
The results of running our first hybrid encryption example
Adding Integrity Checks
Now that we have started our hybrid encryption example, we have covered the confidentiality security requirement by incorporating symmetric and asymmetric encryption. To extend the example, let’s add integrity checking to the code to ensure that the message that Alice sends to Bob is not corrupted or tampered with in transit.
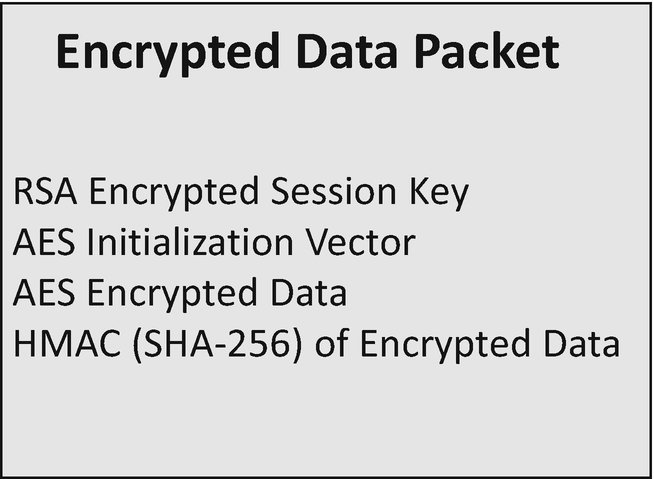
The encrypted packet of data containing the new HMAC
When the recipient wants to decrypt the message, they first recalculate the hash of the encrypted message and IV. If the hashes match, then the data is intact and hasn’t been corrupted or tampered with, which means the recipient can safely decrypt the message. If the hash codes do not match, then there has been an issue during transmission of the message; it has either been corrupted or tampered with. The recipient should not trust it and discard the message entirely.
As a solution, this works quite well, but we can go one better. With this solution of hashing the encrypted data and IV, nothing is stopping an attacker intercepting the message, corrupting the encrypted data or IV and then recalculating the hash. It would be much better if the strength of our session key could also protect the hashing of the data; this is possible by a hashed message authentication code or HMAC like we discussed in Chapter 4.
Like plain hash code, HMACs are used to verify the integrity of a message. HMACs also allows you to verify the authentication of that message because only the person who knows the private key to recover the session key can calculate the same hash of the message. Without that session key, you cannot recalculate the same hash code of the encrypted data. HMACs can be used with different hashing functions, such as MD5 or the SHA family of algorithms. In the examples in the rest of this chapter, we use SHA-256. The cryptographic strength of HMACs depends on the size of the key that is used.
The hybrid encryption process incorporating HMAC for integrity
First, Alice is going to send a message to Bob using hybrid encryption with built-in integrity checking.
Alice generates a new 256-bit (32-byte) AES session key. When establishing a communication channel like this, you should never reuse the same key.
Alice generates a new 128-bit (16-byte) IV; again, as with the session key, you should never reuse the same IV. The IV is a block of random data that is passed into the AES algorithm to add additional entropy to the encryption process; remember that the IV doesn’t have to be kept secret.
Alice then encrypts her message with AES using the session key and the IV.
Alice encrypts the session key with RSA and Bob’s public key. Here we are again wrapping the AES session key with the strength of RSA. If anyone wants to decrypt the original message with AES, they first need to decrypt this RSA encrypted key with the private key which should only be known to Bob.
Alice then calculates the HMAC of the encrypted data and IV combined using the unencrypted AES session key as the key for the HMAC which means that the recipient can only recalculate the same hash once they have decrypted the AES session key with their private key.
Alice stores the encrypted message, encrypted AES session key, IV and HMAC in a separate structure or file to send to Bob.
Now Bob has this packet of information he wants to decrypt it.
To do this, he uses the following process.
Bob decrypts the encrypted AES session key by using RSA and his private key.
Bob recalculates the HMAC of the encrypted data and IV using the decrypted AES session key.
Bob compares his HMAC to the HMAC sent with the message. If the HMACs match, then the data is intact and hasn’t been corrupted, and it is safe to decrypt the message. If the HMACs do not match, then we don’t have message integrity, and the message should be discarded.
If the HMACs match, then Bob decrypts the encrypted data by using the decrypted AES session key and the IV.
Bob reads the decrypted message.
Once the session key has been created, the IV set, our message encrypted with AES and our session key encrypted with RSA; the next step is to create our HMAC. First, an instance is created for the HMACSHA256 class, and we pass in our session key. It makes sense to use the HMAC over a straight SHA-256 hash because we already have our session key, which means the recipient needs to recover the session key before recalculating the HMAC.
Once the session key has been decrypted with RSA, the first thing we want to do is check the integrity of our message. First, we create an instance of the HMACSHA256 class and provide it with our recovered session key. Then we want to calculate a new version of the HMAC that was provided in the encrypted packet; this means we combine the encrypted data and the IV again and then create the HMAC of the result.
Next, we compare the HMAC we just created to the HMAC that we were sent in the encrypted packet. If they do not match then we throw an exception and abort the method as this means the integrity of the encrypted data and the IV has been compromised, and we don’t trust the message. If they do match, then we can go ahead and decrypt our message as we trust that the data hasn’t been tampered with or corrupted.
This example extends our previous hybrid encryption example, which gave us confidentiality, with both integrity and authentication. We get integrity from the fact we are calculating and storing a hash for the encrypted data and IV, and we get authentication from the fact we used a hashed message authentication code instead of a standard hash. Utilizing the HMAC means that we need to provide the key to the hashing operation, which in our case is the unencrypted session key. This key needs to be decrypted using the RSA private key before the HMAC can be calculated to get a matching hash code.
Securely Comparing Byte Arrays
In this example, the Compare method takes two-byte arrays and returns true if they are equal and false otherwise. This works by first checking if the array lengths are the same. If they are not, the method returns false. It then iterates through the first array and checks each element of the array against the second array. If it finds an item that is not equal, it returns false.
On the surface of it, this sounds like a reasonable implementation and efficient because it aborts as soon as it detects that the arrays are different. However, when dealing with cryptographic processes, this isn’t such a good idea. A potential attacker can use this type of comparison as a vulnerability and perform a side-channel timing attack , which uses information from a physical implementation of a cryptosystem, instead of from a brute force or theoretical weaknesses in the algorithms. For example, you could use timing information, electromagnetic interference, or power consumption, or sound as a way to gain extra insight, which can help an attacker exploit a system.
In our example, which compares a byte array, an attacker can glean information from the method because it executes at different times based on the arrays that are fed into it. Ideally, you need a Compare method that executes at the same time no matter how equal (or not) the arrays are.
This version of Compare has the same method signature as the previous example. First, there is a length equality check done against the length of the two-byte arrays, and this sets the result field to either True or False. Even if the result is False, the method continues to run. Next, the method iterates through the arrays and checks each element. If any element is not equal, then the result gets set to False, and the method carries on testing, which means that no matter whether the arrays are identical or not, the comparison method takes the same length of time to execute and, therefore, will not leak information to an attacker.
Extending with Digital Signatures
Extending our example using HMACs for integrity gives us a lot of benefits when it comes to sending data from the sender to the receiver because we can detect if the encrypted messages have been corrupted or tampered with. By using the HMAC, we can ensure that the recipient can only recalculate the HMAC if they first recover the session key using their private key.
What we want to do now though is extend the example by incorporating non-repudiation with digital signatures. What this means is that before the sender (Alice), sends the message to the recipient (Bob), she first takes a digital signature of our HMAC using her private key. What that means for Bob is that when he receives the packet of data and verifies the digital signature, if it returns true, he is confident that Alice sent the message.

The extended hybrid encryption process containing a digital signature
First, Alice sends a message to Bob using hybrid encryption with built-in integrity checking and a digital signature.
Alice generates a new 256-bit (32-byte) AES session key.
Alice then generates a new 128-bit (16-byte) IV.
Alice then encrypts her message with AES using the session key and the IV.
Alice encrypts the session key with RSA and Bob’s public key.
Alice calculates the HMAC of the encrypted data and IV combined using the un-encrypted AES session key as the key for the HMAC which means that the recipient can only recalculate the same hash once they have decrypted the AES session key with their private key.
Alice now calculates the digital signature of the HMAC, which we just created, using her private signing key.
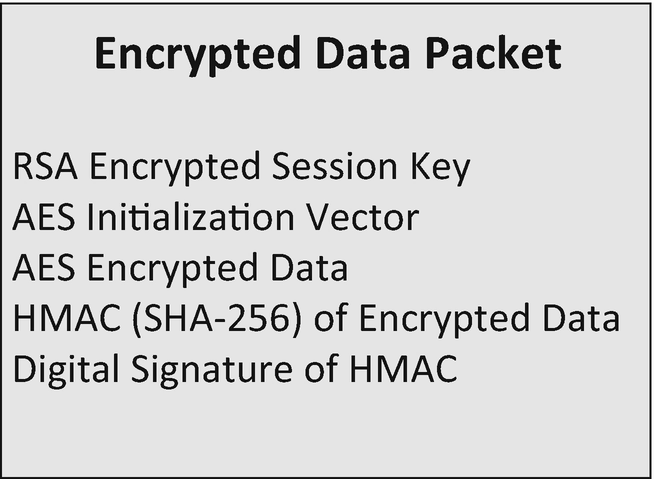
The encrypted packet extended to contain a digital signature
Now Bob has this packet of information he wants to decrypt it.
To do this, he follows the following process.
Bob decrypts the encrypted AES session key by using RSA and his private key.
Bob recalculates the HMAC of the encrypted data and IV using the decrypted AES session key.
Bob compares his HMAC to the HMAC sent with the message. If the HMAC fields match, then the data is intact, and it is safe to decrypt the message.
If the HMACs do not match, then we don’t have message integrity, and the message should be discarded. Now that we have verified the HMAC, we can verify the digital signature to verify the authenticity of the message. If the HMACs match, then we know the data hasn’t been corrupted or tampered with while in transit. If they don’t match, then we abort the process as we do not trust the message.
The signature is then verified using Alice’s public signing key. If the signature returns true, we have a valid digital signature. We trust that it was Alice who sent the original message because she needed to use her private key to sign it. If the signature verification returns false, then we do not trust the origin of the message because either the message was not signed by Alice’s private signing key, or the data that was signed is different from what we expect.
Bob then decrypts the encrypted data by using the decrypted AES session key and the IV if the HMACS matched and the digital signature was valid.
Bob reads the decrypted message.
Let’s now show this in practice in the next code demonstration.
Our new version of the hybrid encryption scheme requires the calculation and verification of digital signatures. The following code is the class we are going to use for implementing the digital signatures. This is the same implementation that we worked through in Chapter 8. The DigitalSignature class contains three methods. First, the AssignNewKey method generates public and private key pairs, which are needed to create and verify the signatures.
Then the SignData method takes a byte array of a hash to create the digital signature. Digital signatures in .NET are based on RSA, which means there is a limit to the amount of data we can encrypt at a time which is why we create the signature of a hash instead. When the digital signature is created, it is returned as a byte array.
Once the HMAC has been calculated of the encrypted data and IV and stored in the EncryptedPacket, the final step is to create the digital signature. We create the digital signature by passing in the HMAC. This digital signature is then stored in our EncryptedPacket, ready to for the whole structure to be sent to the message recipient.
In the update DecryptData method , as soon as we check that the HMAC for the message is valid, which indicates that the message hasn’t been tampered with or corrupted in transit, we can verify the digital signature. We do this by calling VerifySignature on our digital signature implementation and provide the HMAC from our encrypted packet; we also provide the digital signature that also is stored in the EncryptedPacket. At this point, we are happy that the HMAC is valid. If VerifySignature returns true, then we can proceed to decrypt our original data with AES. If VerifySignature returns false, then we throw an exception and then abort the method.
By including the facility to store and verify a digital signature, if the signature verifies correctly, we can be sure that the sender of the message was indeed who they claim to be. Because the digital signature has to be generated using the senders private key, and we use the senders public key to enable verification of the digital signature; this gives us non-repudiation on our hybrid encryption example.
Earlier in the book, we discussed the four pillars of cryptography, confidentiality, integrity, authentication, and non-repudiation. What we built in this hybrid encryption example satisfies all four of those pillars.
Summary
In this chapter, we took a lot of what we learned so far, including random number generation, hashing and authenticated hashing, symmetric encryption with AES, asymmetric encryption with RSA, and digital signatures, and combined them to create a hybrid encryption scheme.
Public key cryptography systems are very convenient to use because they don’t require the sender and receiver of a message to share a secret key, such as an AES symmetric key, in order to communicate securely. However, they do rely on complicated mathematics and are much more inefficient than comparable symmetric-key algorithms.
Encrypting all of your data using an asymmetric encryption system such as RSA can be very inefficient, which means it is a good idea to use a blended approach called hybrid cryptography. A hybrid cryptosystem uses the best of both asymmetric and symmetric cryptography.
For large pieces of data, the majority of the encryption and decryption is done by the more efficient symmetric-key scheme such as AES in our case, while the inefficient public-key scheme, RSA, is used to encrypt and decrypt our key used for AES.
Once we had a hybrid encryption system running that uses AES and RSA, we extended this concept further by adding built-in integrity checking and authentication. This took the form of using HMACs to hash the encrypted data using the unencrypted AES session key. This meant that only the recipient who controls the private key could decrypt the session key and then recalculate the hash to check if the message has been corrupted or tampered with.
Finally, we extended the hybrid encryption system by adding in non-repudiation so that we can ensure that we trusted who the sender of the original message was, as only the sender could create the digital signature using their private key.
In the next chapter, we extend our hybrid scheme further by improving how we manage our public and private keys. We do this by exploring hardware security modules using Microsoft Azure Key Vault.