In previous chapters, we built a sophisticated encryption example that had the ability to use symmetric encryption to encrypt our data while protecting the symmetric encryption keys utilizing an RSA public and private key pair. While symmetric encryption is fast and efficient, moving the keys between multiple parties is very hard to achieve safely; this is why we use RSA to encrypt the symmetric key. The key is encrypted using the recipient’s public key (which can be known by anyone) and is then decrypted using the recipients private key (which only they know).
The next step in our quest for robust encryption is to now think about how we can protect the RSA encryption key. In this chapter, we are going to explore an exciting feature of Microsoft’s Azure cloud computing platform called Azure Key Vault. Key Vault gives regular developers, and smaller companies access to robust key protection hardware that was traditionally only accessible to large corporations like banks and pharmaceutical companies. Azure Key Vault gives any company access to the same level of protection and using the techniques over the next few chapters; you can get the costs down very low.
Exploring Key Management Options
The example code we built up in the preceding chapters did not put any emphasis on protecting the RSA keys that were generated. For ease of use with the examples, we kept the RSA keys loaded into in-memory objects. While this was ok for the examples, we need to look at better protecting those keys. Let’s explore some key management options that are available to us before I go into more detail with Azure Key Vault.

Do not store key material in flat files on the file system
The next key management option is certificates. The idea of using certificates to store key material has been around for a very long time. It is one of the most common ways of approaching the problem. A certificate stores information on who the certificate was issued by and who it was issued to, along with key material that is digitally signed by a root certificate issued to an organization. Signing the key material and other certificates offers a chain of trust between the issued certificate and a trusted authority.
Certificates are loaded into a certificate store directly on a server to make them available to the applications that require them. Certificates are well supported and understood by IT professionals. They need minimal to no involvement from an end user of a system as they can be preloaded as part of an installation process and they don’t require any additional hardware, although certificates can be loaded into hardware certificate stores. The vast majority of enterprise systems in existence today use certificates either directly by the software they have developed, or due to a third-party system that they have integrated with; certificates are a common way of authenticating with third-party systems and APIs.
The next level of key management protection is to use a hardware security module (HSM), which is a hardware appliance that is directly installed into a data center for the express purpose of storing encryption keys and certificates. Typically, it is a 1u or 2u rackmount appliance that is tamper resistant, which means that if anyone tries to perform a software hack or physically penetrate the box, it wipes itself clean. It has multiple sensors that can detect if the screws are removed, or there is a change in temperature within the box. The internal chips can also be covered in resin as well as being electronically shielded to stop an attacker trying to read electric signals within the device. HSMs provide a secure and robust way to store encryption key material for enterprises, but they have one downside. They are very expensive. The costs can quickly run between tens of thousands of dollars up to and over one hundred thousand dollars. Typically, you would have at least two of these devices that are co-located in different data centers so that if one unit is compromised and it wipes itself, the other device still has access to the key material.
For a large corporation like a bank, the cost isn’t so much of an issue, but for smaller companies, these costs can be prohibitive making them not be an option; which is where Microsoft Azure comes into play with their excellent Key Vault service.
Introducing Azure Key Vault
Azure Key Vault is a service provided by Microsoft as part of their Azure Cloud Computing platform that makes the functionality of HSMs available to anyone for a fraction of the cost. Even though Microsoft provides a software abstraction to the service, underneath there is real HSM hardware being used. Microsoft has put into each of its regional data centers a series of devices called the nShield by a company Thales Security, which means Microsoft has taken the financial hit on the cost of the hardware that they rent out to software developers for a minimal price. The fundamental shift between you paying for an HSM to a pay-as-you consume model has enormous implications as this means you can now take advantage of the same level of secure key management that banks have been enjoying for many years.
When you set up Azure Key Vault, which we look at in a moment, you can configure it to work in two modes, software, and hardware, which both have cost implications in their use. The one common feature between both hardware and software mode is that your encryption keys are always stored and protected on the HSM hardware. You get that no matter what configuration you use, but there are other differences between them.
Azure Key Vault Hardware Mode
When you configure Key Vault to work in hardware mode, you get the most benefit from the service because not only are keys stored in the hardware, but all operations such as encryption, decryption, and digital signatures are also performed on the device, which gives you the high level of protection when using Key Vault. The extra level of security that this affords does come at a cost as you need to use a premium service plan, but the additional cost gives you the extra protection that you would want in a production system.
Azure Key Vault Software Mode
On the flip side, when you configure Key Vault to work in software mode, your keys are stored on the hardware, but any other operations, such as encryption, decryption, and digital signatures are performed outside of the HSM hardware using standard Azure compute virtual machines. Since there is less work on the HSM, you save money. From a software interface point of view, there is no difference in how you use Key Vault between hardware and software mode; the differences are transparent to a developer.
When you are planning your testing and production environments for your software application, it is a good idea to use Key Vault in software mode for your testing environments as you can keep the costs low, and then use the hardware version for your production environment as this gives you the most significant level of protection.
Keys vs. Secrets
Azure Key Vault allows you to store three objects within the vault. The first is certificates where you can store certificates instead of a local machine key store on Windows. Then there are keys, which are stored by Key Vault. RSA keys range in length from 2048 bit to 4096 bit. You can also store secrets. Secrets are up to 25K blocks of text that are encrypted using a master key that is managed by Key Vault.
Secrets are a fantastic way of storing application secrets that you don’t want to expose in configuration files or source control. Examples of such secrets might be database connection strings or any API key or authentication information for third-party services. We look at some patterns of working with secrets in the next chapter as they provide a compelling way to protect application secrets that you don’t want to be exposed to third parties.
Azure Key Vault Example Costs
I mentioned that purchasing HSM hardware can cost tens of thousands of dollars, but using a service like Azure Key Vault significantly reduces that cost by letting you pay for what you use.
Let’s run through some example costs to illustrate just how low the costs are. As with any cloud service, prices are liable to change, so treat these prices shown in Table 10-1 as an illustration only to see that there is a big price difference between buying the hardware and renting it on a cloud system like Azure.
Non-Key Operations
Service | Standard | Premium |
|---|---|---|
Secret Operations | $0.03 per 10,000 operation | $0.03 per 10,000 operation |
Certificate Operations | Renewals $3 per request All other operation $0.03 per 10,000 | Renewals $3 per request All other operation $0.03 per 10,000 |
The costs between the standard and premium tiers here are the same. Secrets cost $0.03 per 10,000 operations. Certificates cost $3 for renewals and $0.03 per 10,000 read operations.
Software HSM Key Operations
Service | Standard | Premium |
|---|---|---|
RSA 2048-bit keys | $0.03 per 10,000 operations | $0.03 per 10,000 operations |
RSA 3072 – 4096-bit keys | $0.15 per 10,000 operations | $0.15 per 10,000 operations |
These prices are low. The software configuration is ideal for test environments. The prices start to change and go higher if you are using the full hardware configuration. For this configuration, you have to use the premium pricing tier. To use the full hardware HSM encryption operations, you are looking at $1 per key and $0.03 per 10,000 operations for an RSA 2048-bit key. If you need to use stronger keys, such as 3072- to 4096-bit RSA keys, then the costs are much higher.
Hardware HSM Key Operations
Service | Standard | Premium |
|---|---|---|
RSA 2048-bit keys | N/A | $1 per Key + $0.03 per 10,000 operation |
RSA 3072 – 4096-bit keys | N/A | First 250 keys = $5 per key 251 – 1500 keys $2.50 per key 1501 – 4000 keys £0.90 per key 4001+ keys $0.40 per key + $0.15 per 10,000 operations |
As you can see, the high-strength keys with full hardware encryption and decryption are significantly more expensive, which is why it is a good idea to use this configuration for your production environment and the less expensive software configuration for your test environments.
Setting up Azure Key Vault
Before we look at how to program against Azure Key Vault, let’s first look at the setup and application registration process. In the fast-moving world of cloud computing, it is possible for the installation instructions to change slightly, so in this section, I cover how they were at the time of writing, but it is always prudent to check the latest documentation provided by Microsoft at https://docs.microsoft.com/en-gb/azure/key-vault/key-vault-get-started .
The best way to set up Key Vault is by using Azure PowerShell commands. You can use commands in Azure Cloud Shell, which is available in the online Azure Portal, or you can install them onto your local machine to use from the PowerShell command line. Instructions for installing and configuring the Azure PowerShell commands can be found at https://docs.microsoft.com/en-us/powershell/azure/overview .
Creating a Key Vault
This creates a new resource group named MyResourceGroup, which is located in the East US data center. To find the location code for your desired region, you can access the latest list from Microsoft at https://azure.microsoft.com/en-gb/global-infrastructure/locations/ .
When you execute this command, you see two important properties displayed: the vault name, which in this case is MyAzureVault, and the Vault URI, which is https://myvault.vault.azure.net . The vault URI is important when we connect to the vault later in this chapter.
At this point, we could add keys and secrets to Key Vault. Before we look at this, let’s first look at how to register your application to work with Key Vault.
Registering Your Application with Azure Active Directory
Now that we have looked at how to create the Azure Key Vault, we need to register our application with a token for Azure Active Directory. Once this is done, you receive two pieces of information that you need to supply your application; this is the application ID and an authentication key. Your software application needs to provide these two pieces of information to get a token to use Key Vault.
- 1.
Sign in to the Azure Portal.
- 2.
On the left panel, click App Registrations. If you cannot see this, click “All services”, then find App Registrations.
- 3.
Click New Application Registration.
- 4.On the Create blade, you need to provide a name for your application and select Web app / API from the application type drop-down menu. You also need to provide a sign-on URL for your application, such as https://www.myapplication.com . It doesn’t matter if the site actually exists, you need to specify a URL. This is seen in Figure 10-2.
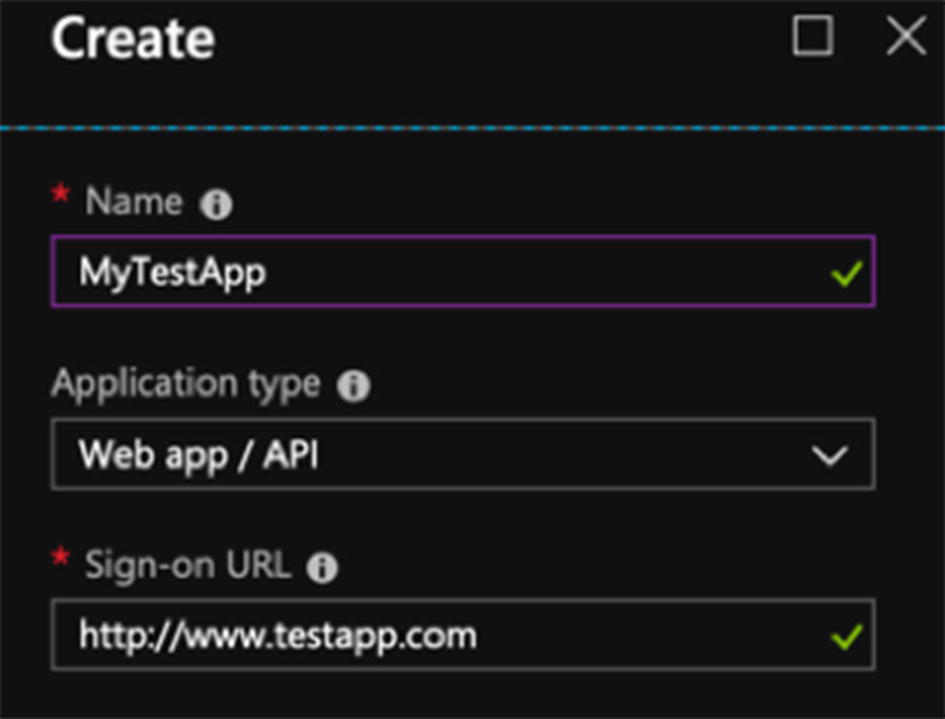 Figure 10-2
Creating an app registration
- 5.
Click the Create button to register your application.
- 6.
When the application is created, click your application name in the list.
- 7.Click the registered app blade and copy the application ID, and store it for use in your application, as seen in Figure 10-3.
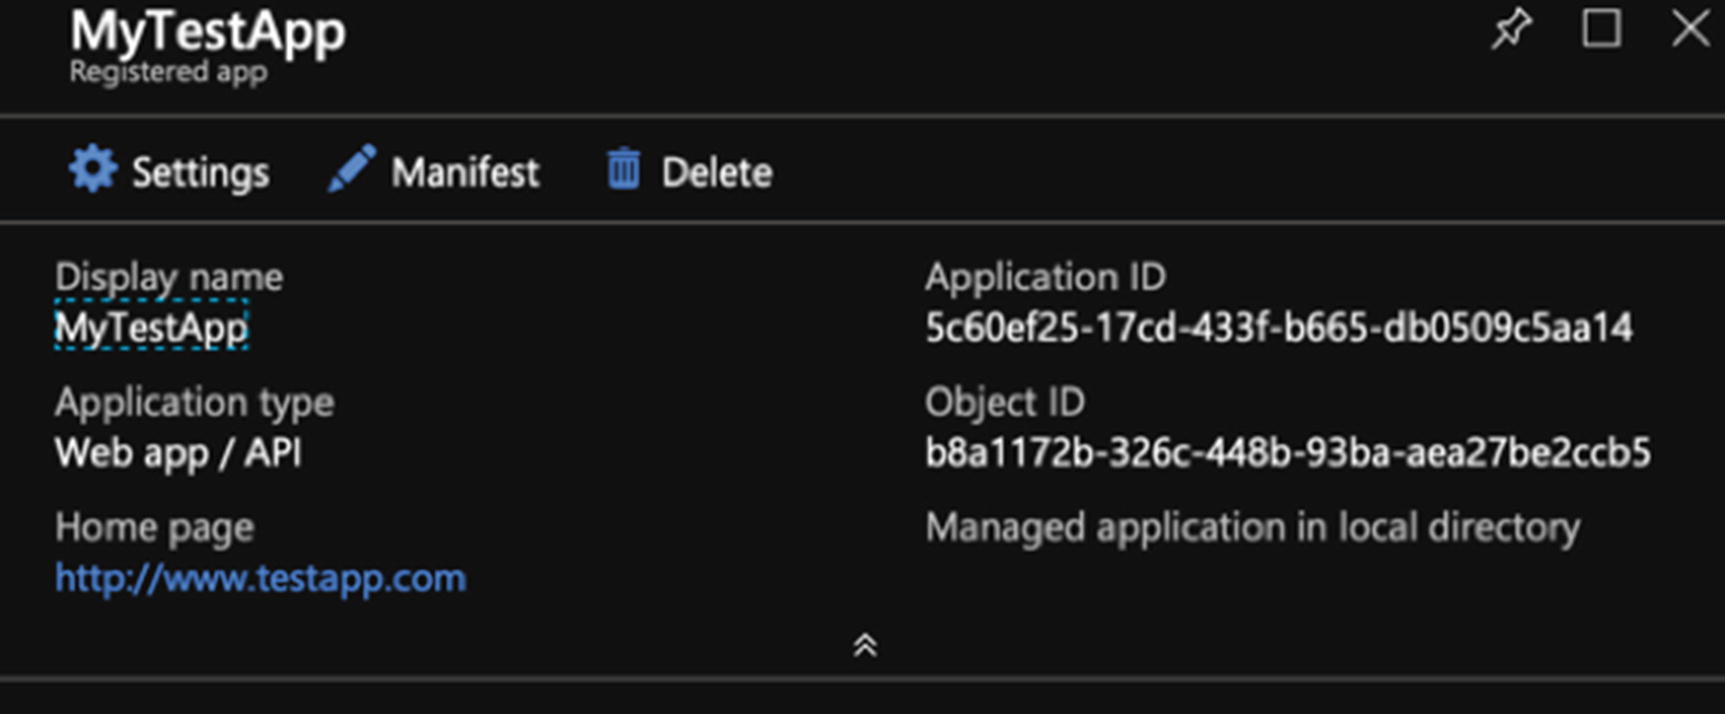 Figure 10-3
Make note of the application ID for your application
- 8.Click Settings, which shows the blade, and then click Keys (see Figure 10-4).
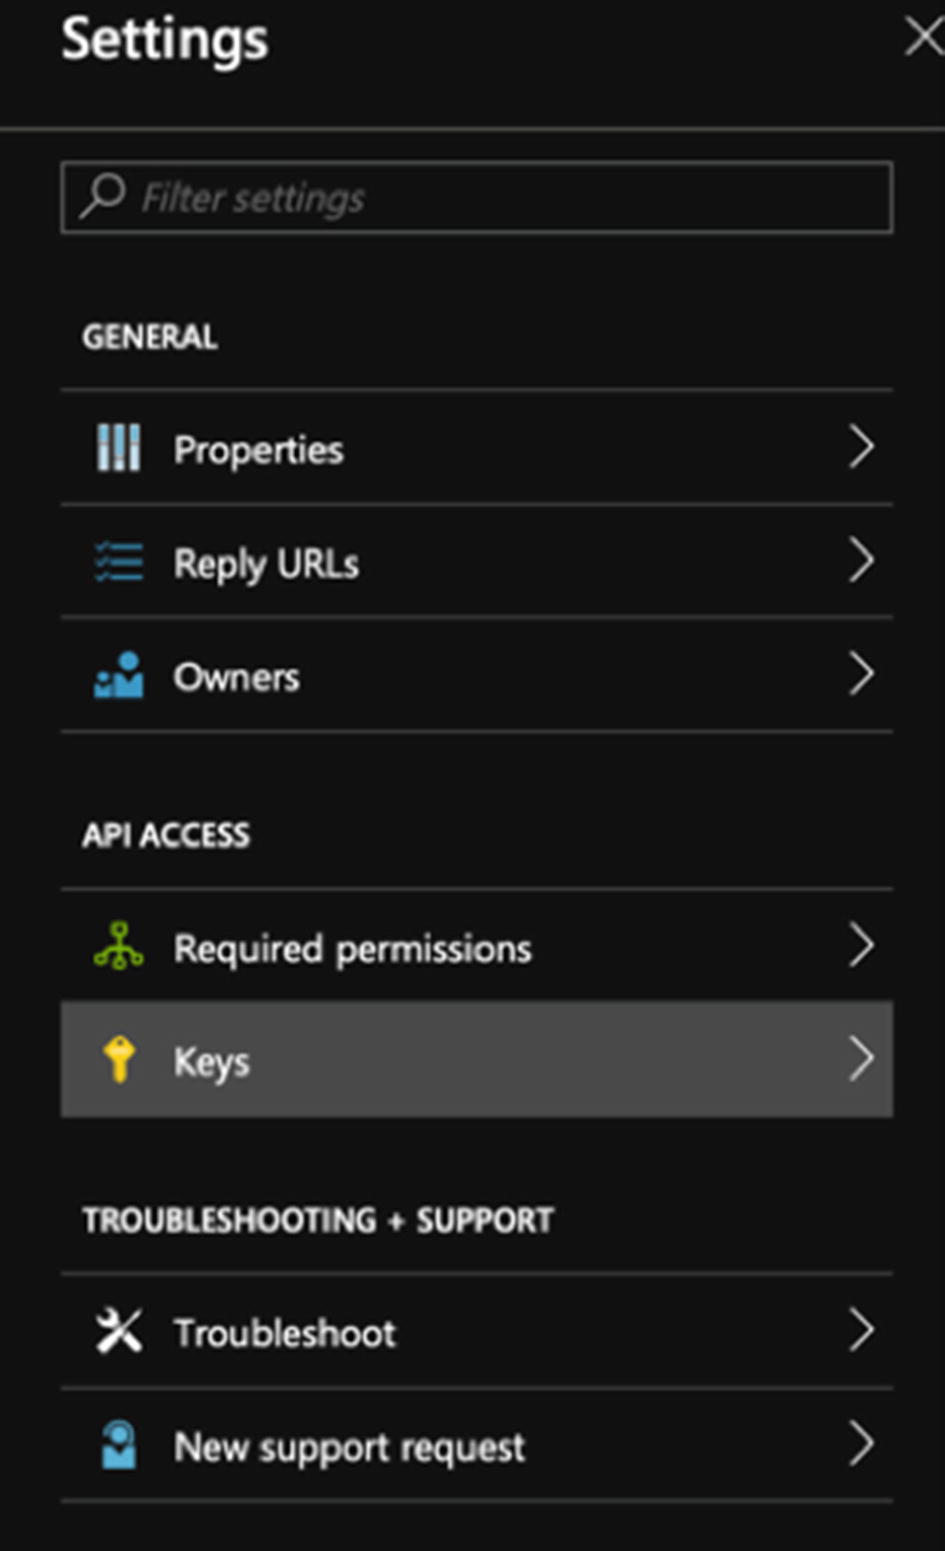 Figure 10-4
Accessing the shared secret that you need for your application
- 9.Type in the description of the application in the Key Description field, and select a duration for the authentication key. Click Save. When the page has refreshed you see a shared secret value be displayed. This shared secret expires after the elapsed duration, so this step needs to be reproduced when the shared secret expires (see Figure 10-5).
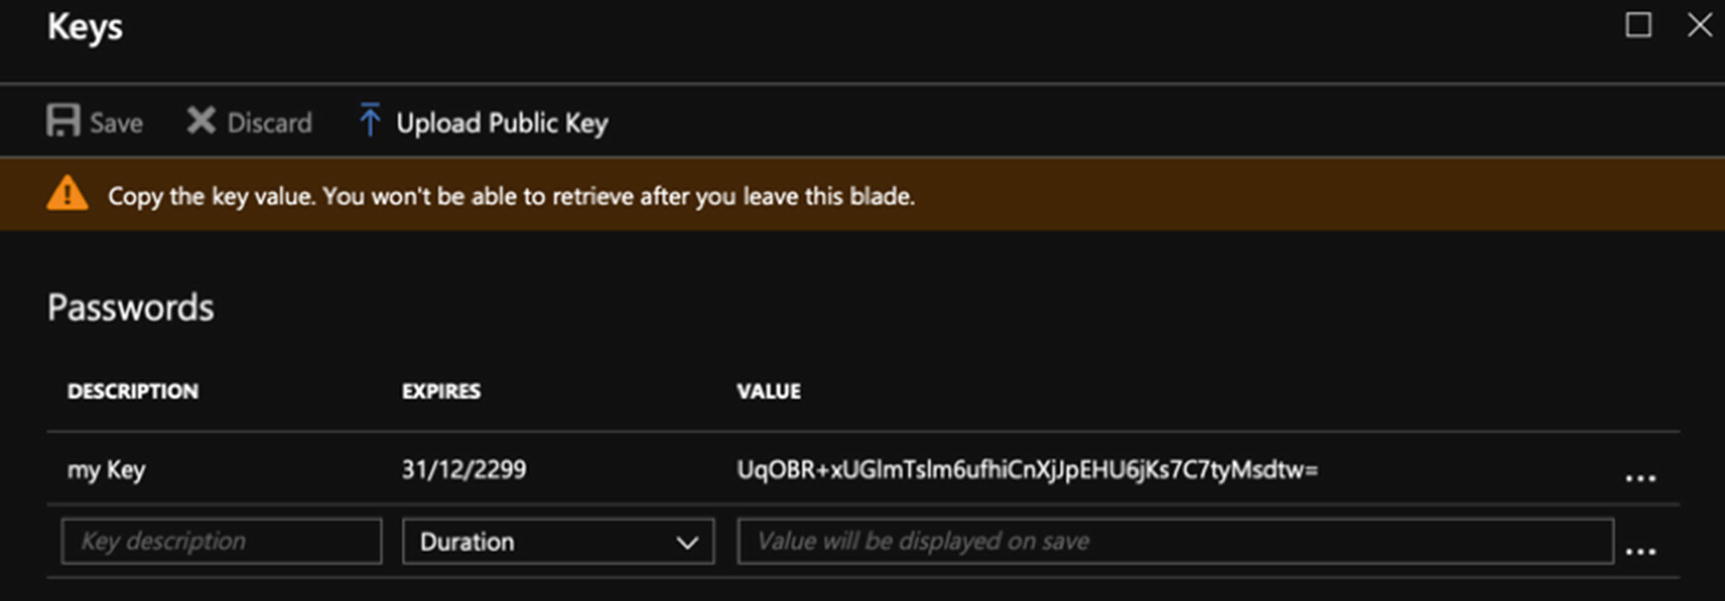 Figure 10-5
Copy the shared secret value because you can only view it once
- 10.
Make a note of this shared secret value because you need to provide it for your application. You only have one opportunity to copy this value as it is not shown in the clear again.
Now that you have registered your application with Azure Active Directory and you have access to your application ID and authentication key, you need to authorize your application to use keys and secrets.
Authorize Your Application to Use Keys and Secrets
To authorize your application to encrypt/decrypt and sign/verify data you need a PowerShell command called Set-AzureRmKeyVaultAccessPolicy. To execute this command, you need your Key Vault name and the application ID that was created when the application was registered with Azure Active Directory.
Key Vault Name: MyKeyVault
Application ID: 1f3dcdd-465a-56ea-75a9-3edf23ddd32dac
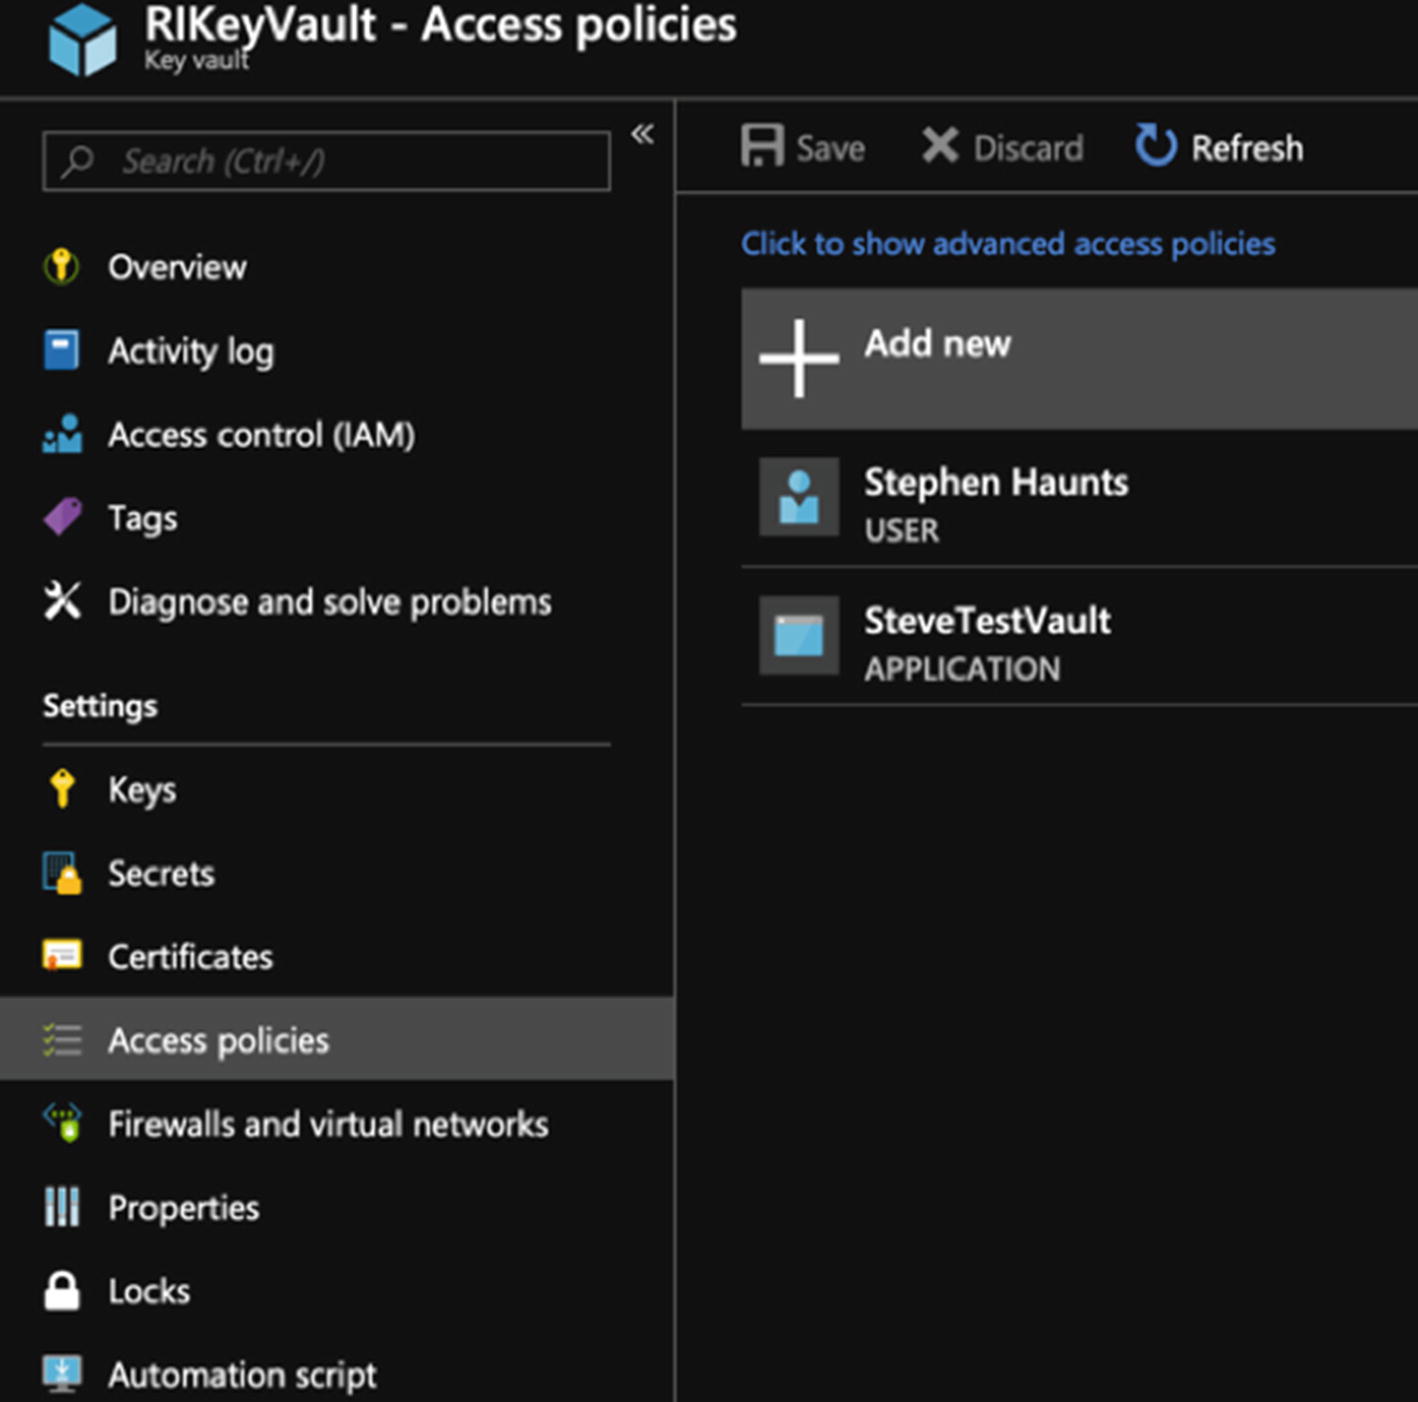
Assign your app registration to your Key Vault access policy
Insert the app registration that you created
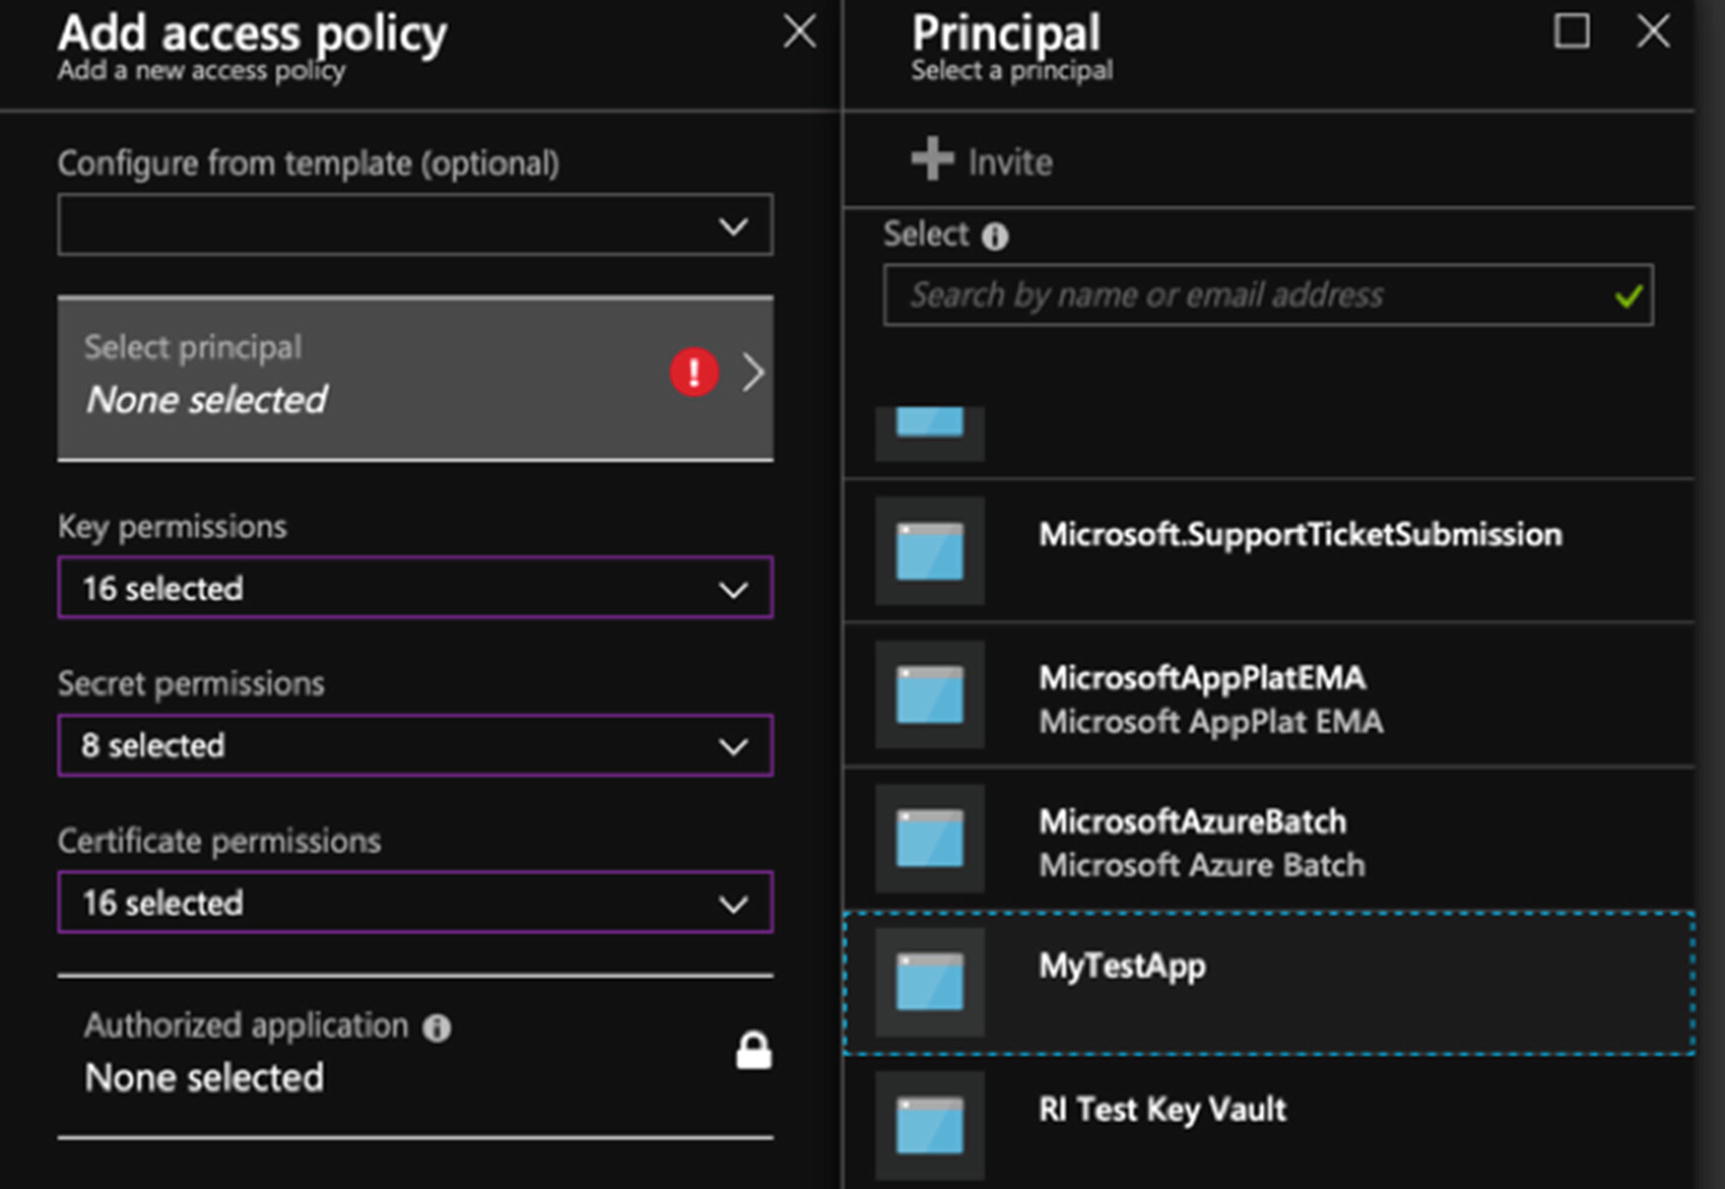
When you have selected the key, secret, and certificate permissions, click “Select principle” and select the app registration that you created. This links that application ID and shared secret to Key Vault, so that it knows which set of authentication permissions to use. When you have done this, hit OK, and then Save. The app registration and permissions are set for your Key Vault.
Manually Creating Keys and Secrets
Now that we have looked the creation of Key Vault and registering/authorizing the application with Azure Active Directory, let’s look at how to manually create keys and secrets in the vault before we explore doing this from our sample application.
Add a Software Protected Key
A software-protected key means the key is stored at rest in the actual HSM hardware, but any encryption or decryption operations that happen with that key occurs on a virtual machine outside of Key Vault. All of this happens transparently behind the scenes when you use the key, but it is an excellent way to keep your costs down, which makes the software-based key ideal for test environments.
This creates the key and gives it an ID, which is a URI. In this case, the URI for the key is https://MyKeyVault.vault.azure.net/keys/MyKeyName .
This retrieves the latest version of that key.
Add a Hardware-Protected Key
If you have created a Key Vault that supports hardware keys by using the SKU flag, then you can create hardware keys where encryption and decryption operations are carried out in the actual HSM hardware as opposed to a software-based virtual machine. Using these types of keys incur a higher cost as we discussed earlier, but they are an excellent option for production environments.
Add a Key from a PFX Certificate File
This command loads the certificate using your converted password from the file and creates a new Key Vault key called MyImportedKey. From here, you would use the key the same as a Key Vault specifically generated key.
Once this is done, the key is available to use in your application.
Add a Secret
As well as manually creating keys and importing PFX files, you can also manually add secrets to the vault from PowerShell. Secrets are up to 25K blobs of text that you can store in Key Vault. Secrets are ideal for storing configuration items that you would not want to be exposed in your source code or configuration files like database connection passwords.
As with keys, the secret can be accessed with a URI. When our sample application uses a secret from the vault, it uses a URI (see https://MyKeyVault.vault.azure.net/secrets/DatabasePassword ).
Now that we have looked at the setup and application registration process with PowerShell, let’s look at how to access Key Vault from C#.
Azure Key Vault “Hello World” Application
Before we look at some specific usage patterns around using Azure Key Vault, let’s first try a Hello World style application that creates a key in the vault and then perform a simple encrypt and decrypt operation with that key. If you have the sample code for this book, then we are going to be using the SimpleEncryptDecrypt project.
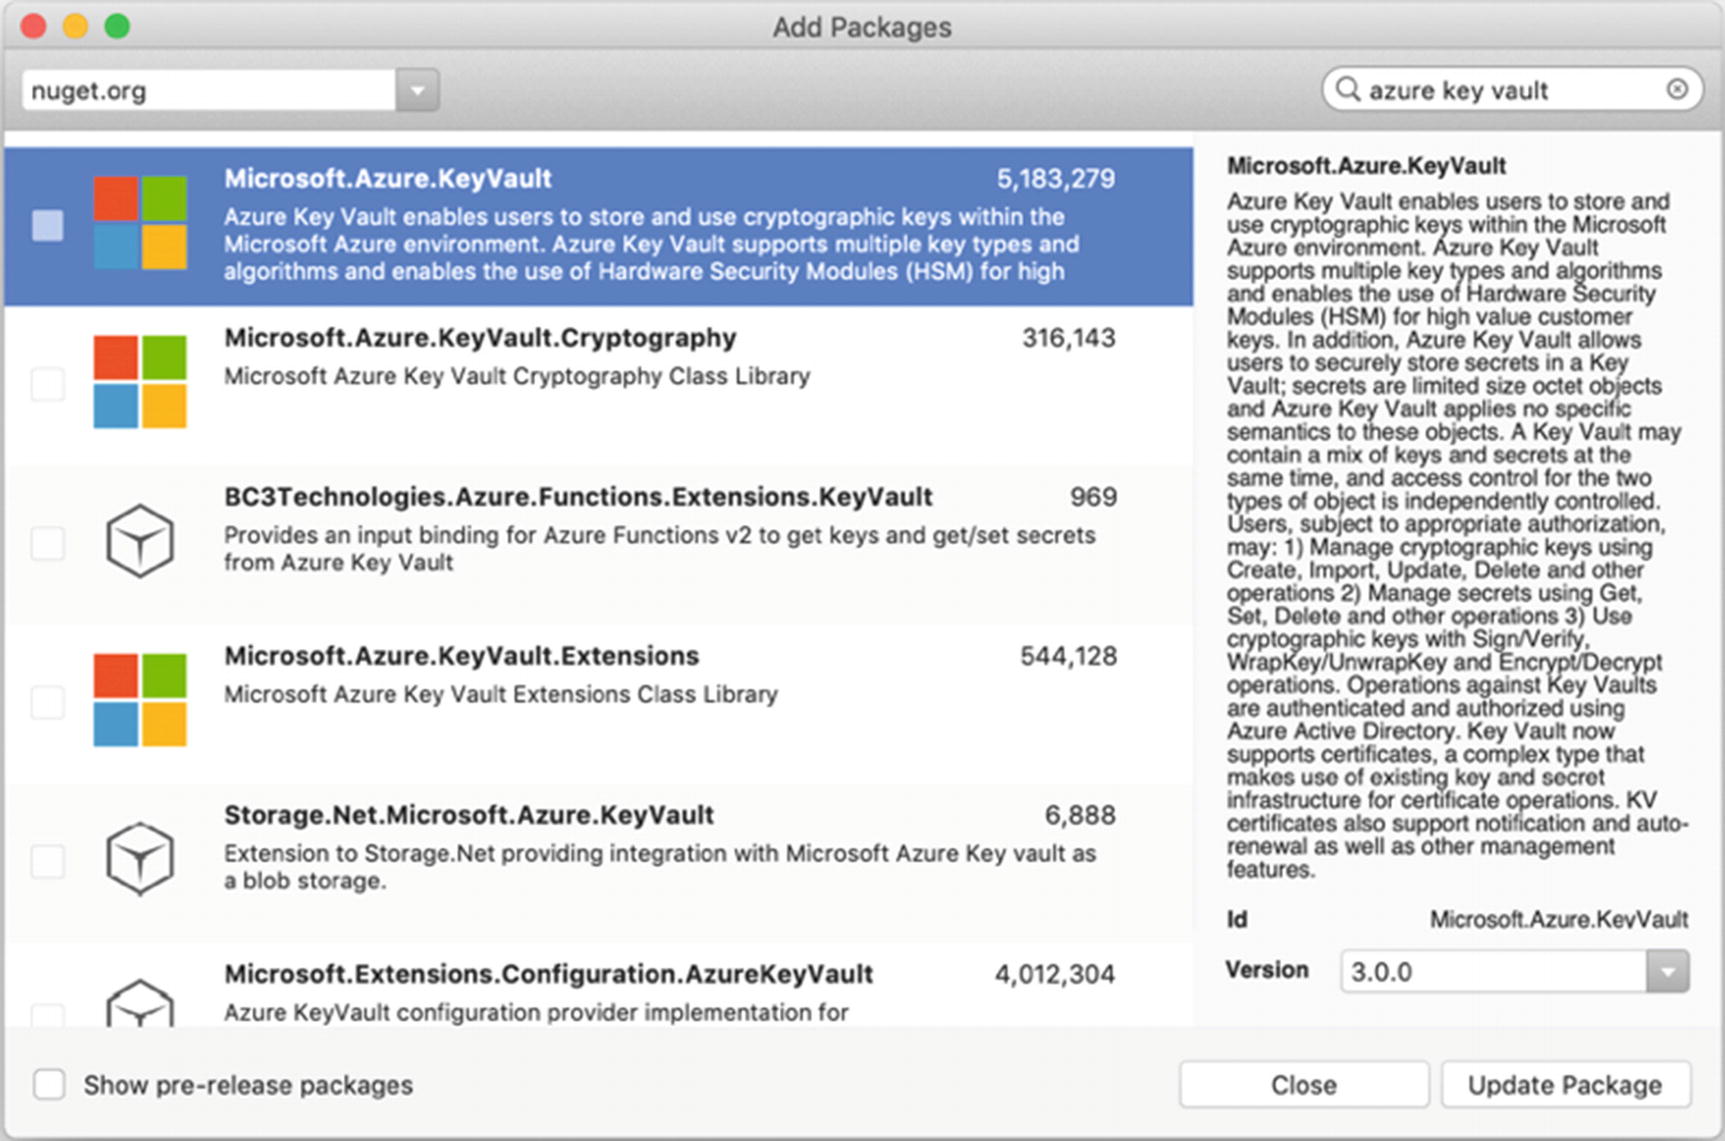
Install the Microsoft.Azure.KeyVault NuGet package
Creating and deleting encryption keys
Encrypting and decrypting with RSA
Getting and setting secrets
Creating and verifying digital signatures
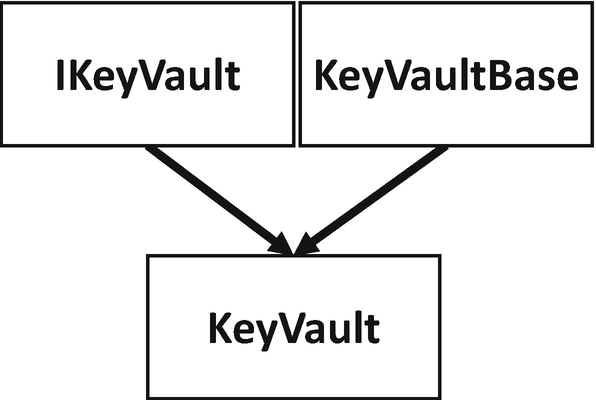
Class hierarchy for the Key Vault helper code
Finally, there are two methods that are used for creating and verifying digital signatures. The first is Sign, which takes a reference to a keyId to use for generating a digital signature, which uses the stored private key. The second parameter, hash, is a byte array of a hash for the data we want to create the signature against. Remember back to when we discussed digital signatures earlier in the book. You hash the data you want to create the signature for because there are length limits on the amount of data you can use with RSA and RSA based digital signatures. The Sign method returns a byte array containing the digital signature.
Create a named RSA key in Key Vault
Encrypt some data with that key
Decrypt the data with the same key
Delete the original key from Key Vault.
First, a key is created called MyKeyVaultKey, and the resulting URI is stored in a variable called keyId . Then using that keyId, we encrypt a simple Hello World!! string and store the results in a byte array. We then decrypt that data straight away using the same keyId.
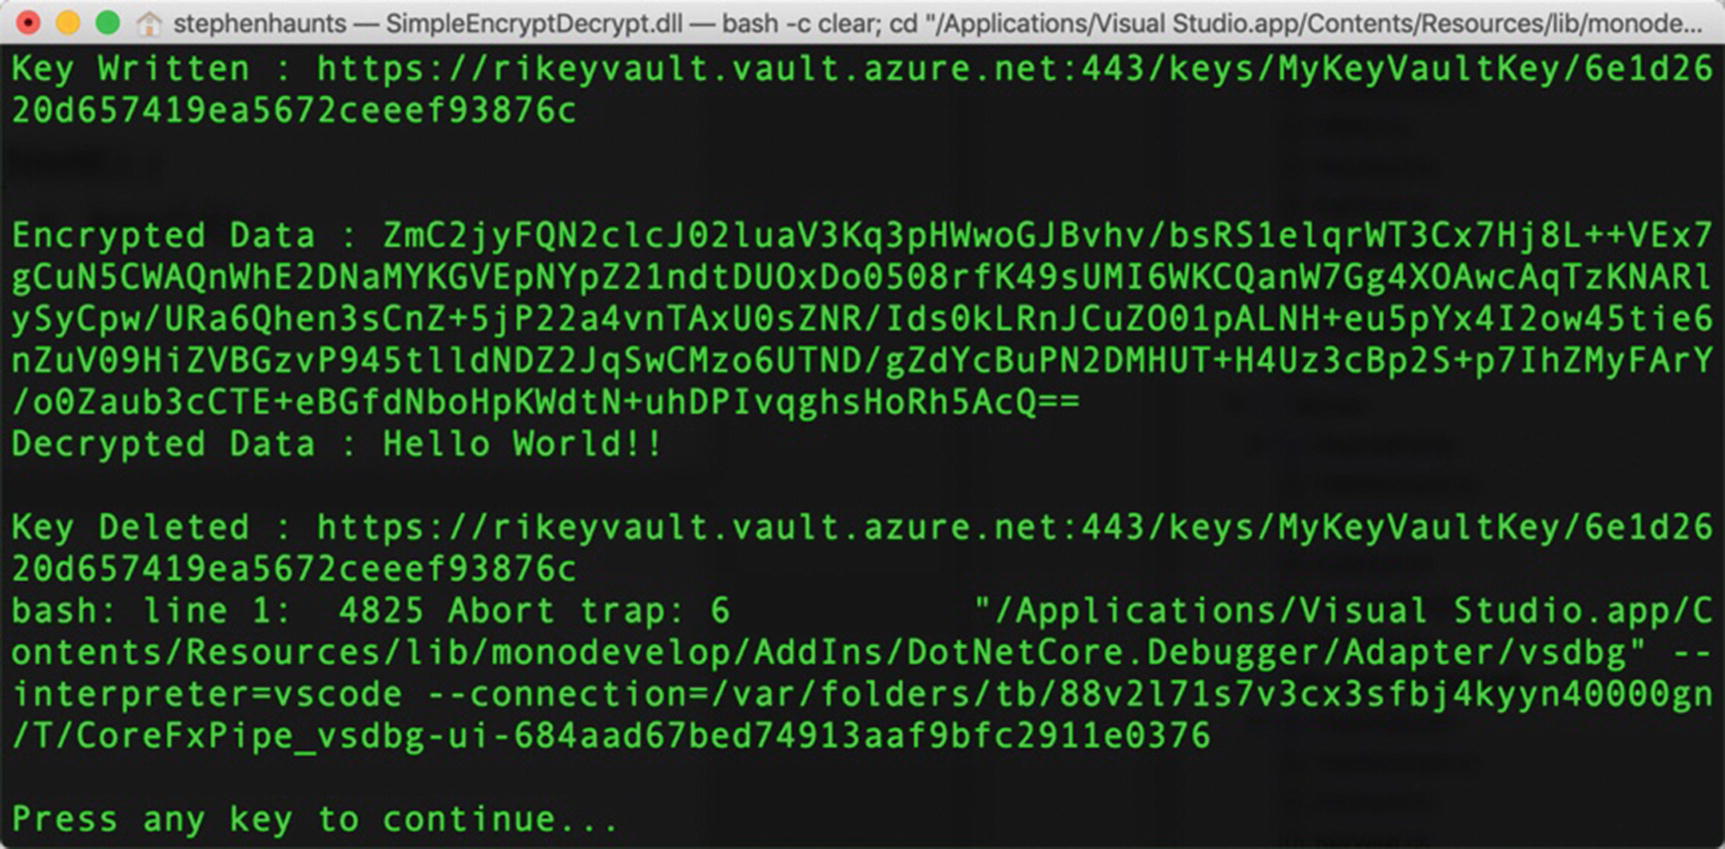
Output from Key Vault–based encryption and decryption example
The example we walked through represents a simple encryption and decryption operation using Azure Key Vault. We explore some more coding and operational patterns of using Key Vault in the next chapter.
Summary
In this chapter, we looked at Microsoft Azure Key Vault cloud computing platform. Key Vault is a software abstraction on top of traditional HSM hardware. Until services like Azure Key Vault existed, HSMs were too expensive for most, except large institutions like banks and insurance companies. With a service like Azure Key Vault, the cost of using robust key management hardware has been dramatically slashed and moved within the reach of anyone who wants to use it. The ramifications of this are massive as it means any company has the option to use HSMs to store their keys. In the next chapter, we look at some more code and usage patterns for Microsoft Azure Key Vault.