In this chapter, we look at COM+'s administrative layer. Many of the COM+ object attributes we manipulate are introduced in this chapter but not described in detail; subsequent chapters provide the specifics.
In this chapter, I demonstrate how to turn on, turn off, and otherwise configure COM+-specific services. For the most part, we are looking at the "how" and "why" of installing COM+ components and applications, but we also demonstrate how to modify settings (configure) for applications, components, interfaces, and methods using both the COM+ Component Services snap-in and the COM+ Administration Objects.
In the beginning, there were INI files. Conceptually simple but somewhat limited, an application could store string-based information in its own INI file. In these quiet, simpler times, books on the shelves with titles like Secrets of Windows Gurus: Undocumented INI Entries!, and NOTEPAD.EXE gave you real power (after all, INI files were just text files) to determine how an application (or Windows itself) would run.
Back then, the headlines of the industry trades proclaimed, "Forget about INI Files: Store Your Application's Configuration Data in the new Windows Registry!" Many applications, such as 16-bit Windows, took their first tentative steps with this new medium and began to store their settings in the Registry. Although there still were (and are) a good number of INI files in use, it was hoped the Registry might someday replace them altogether.
COM (then called Object Linking and Embedding [OLE]) was one of the driving forces that propelled the Registry into stardom. As Windows moved toward a component-based architecture, a central database containing detailed information about all the registered COM components became a necessity. At a minimum, the Registry needed to keep track of where a component could be found on the hard disk, its GUID, and its friendly string name (ProgID). As time went on, other settings were added having to do with threading, implemented functionality, and other details.
As the complexity of components grew, the amount of information held in the Registry grew. Eventually, things grew and evolved to a point where the Registry no longer seemed like the best medium to keep track of it all. For one thing, the Registry was a highly desegregated hierarchy where COM component information intermingled with non-COM-based operating system and application information. In the same manner as NOTEPAD.EXE could be used to edit INI files, the Registry could by modified by anyone who could double-click REGEDIT.EXE or REGEDT32.EXE. Given Windows' increased reliance on components and their blossoming sophistication, maybe this wasn't such a good idea anymore. The Registry was also ill-equipped to address how related COM components might be grouped together so they could share common properties and functionality. In short, COM had grown up, and it was time to have its own room.
Hence Windows 2000 introduces the COM+ Catalog. Much of the information about how a component runs in COM+ and what COM+ services a component takes advantage of is stored here. There are two ways you can modify declarative information about a COM+ component:
Administratively using the COM+ Administrative UI
Programmatically using the COM+ Administrative objects
But we are, perhaps, ahead of ourselves. Before a COM component can be manipulated at all in the COM+ Catalog, the developer or administrator must perform the explicit step of importing the component. This importation of a component marks its change from unconfigured to configured. Configured components can take advantage of COM+ services;Unconfigured components cannot.
In-process components that you might have already written in your pre-COM+ days can still function in COM+ without modification. And although these unconfigured components might need some slight modification to take advantage of the full range of COM+ services (for example, voting on the outcome of a transaction), they can be given the opportunity to participate in most of what COM+ offers. They need only be configured by a system administrator or developer. This brings us to the declarative nature of COM+—that is, the capability to administratively dictate how the object will operate.
The administrative settings made available by COM+ encompass everything from declaring that a certain method will be queueable (the caller will not block on the call or expect any form of return value; this is covered in Chapter 10, "Queued Components" ) to indicating that a certain object requires synchronization. As you see in Chapter 7, "Contexts," these administratively configured attributes combine to create an object's context.
Although it is true that Windows still keeps some component information in the standard Registry, the vast majority of administrative settings lie within the COM+ Catalog. The COM+ Catalog, like all administrative interfaces in Windows 2000, is configured through a Microsoft Management Console (MMC) snap-in.
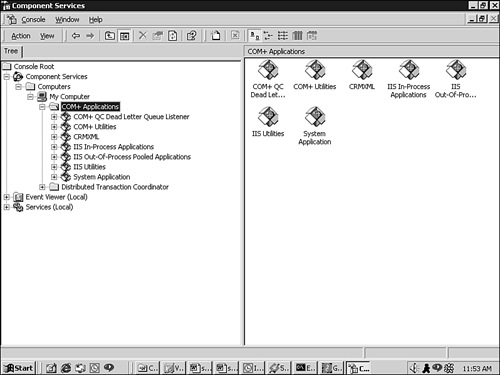
To take a look at the Component Services snap-in, go to the Start menu, Programs, click Administrative Tools, and then Component Services. This runs the Component Services Console, and much like the Windows Explorer, the entire COM+ administrative hierarchy is displayed as a set of folders. Navigate your way to COM+ Applications as shown in Figure 6.1, and you can see all the COM+ applications installed on your system.
Although the term application is already overused, in the COM+ paradigm, an application is a group of configured components that are somehow related. If you are familiar with Microsoft Transaction Server (MTS), you can think of the COM+ application as an MTS package. The terminology is different, but the underlying meaning is the same. Similarly, the Component Services snap-in replaces the MTSExplorer (also a snap-in) used in previous versions of Windows.
MMC
Prior to Windows 2000, different system-oriented programs, such as Disk Manager, User Manager for Domains, and so on, had slightly varied and sometimes wildly different User Interfaces (UIs). Similarly, there was no standard for the UIs that configured NT services—every vendor was free to create its own UI, embracing a custom, though perhaps less-intuitive, paradigm.
To provide a uniform look and feel for all services and system tools, Microsoft began pushing MMC as a standard architecture. Basically, MMC.EXE is a COM container that is hard-wired to work with MMC snap-ins. Snap-ins are COM components that implement certain MMC interfaces. The author of the service ships a snap-in with his service that, when loaded by MMC, produces a hierarchical list of all properties that can be configured, viewed, or otherwise interacted with. The COM+ Component Services UI is just the MMC.EXE channeling the Component Services snap-in.
When you first install Windows 2000, you might notice that there are a number of applications already installed. As you see, many of these pre-installed applications are used internally by COM+ to provide various component services (queuing, transaction capability, and so on). An explanation of these pre-installed applications and their associated components can be found at the of this chapter. For the time being, let's examine the rules that govern generic applications, components, interfaces, and methods.
In COM+, each and every object you instantiate will run inside a COM+ application. You can think of a COM+ application as a logical grouping of components; but from an OS perspective, a COM+ application is really just a "potential instance" of a process calledDLLHOST.EXE. By "potential instance," I mean that a COM+ application has the potential to become a new instance of DLLHOST.EXE, which will house one or more running components. This potential becomes a reality when a client application first requests an instance of a component. COM+ determines the application that the component is associated with, and a new instance of DLLHOST.EXE is run. Thus, when you instantiate an object, the object's application (DLLHOST.EXE) must be run (unless it is already running, in which case the already running instance will be used). The component you instantiate is then loaded into this process. Any number of components may be associated with a COM+ application, and this means that any number of components can be made to run inside the same instance of DLLHOST.EXE.
Because COM+ applications take the physical form of a new DLLHOST.EXE process, the number of components you associate with COM+ applications has a direct effect on performance. If you have many components overall but divide them amongst many different applications, you may up with a system that is less efficient than it could be; related components should be grouped together in the same application to avoid an excessive number of COM+ applications/DLLHOST.EXEs from running.
There is no absolute rule or guideline to follow when deciding how your components should be grouped. Common sense is often the best guide: don't put every component you write into a single application for the same reason that you don't put every method in one large C++ or Visual Basic class—you up with an inflexible, monolithic environment. By the same token, avoid creating so many applications in which related components have to talk to one another across process boundaries. Fragmentation results in a system that is inefficient and hard to administrate.
One factor that may dictate how your components are grouped has to do with how the application is configured. That is, how the properties of a COM+ application are set.Properties of an application include security settings, asynchronous delivery (queueing), inactivity time-out periods, and other details. A discussion of most these properties is the providence of later chapters of this book ( Chapter 10 and Chapter 12). However, to get a sense of how properties may be manipulated for COM+ applications, I show you one set of properties that doesn't require much background. They are the properties that can be found by right-clicking on any COM+ application in Component Services, selecting Properties, and then choosing the Advanced tab. You will see that shown in Figure 6.2.
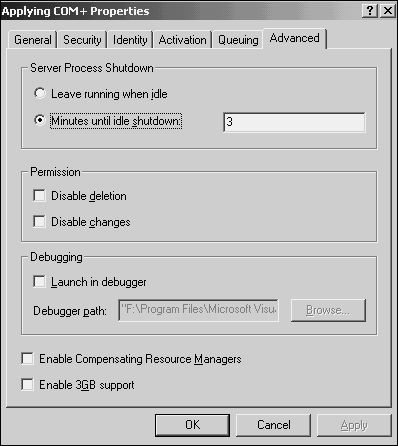
These settings affect how the COM+ application behaves. Consider the first two radio buttons: "Leave running when idle," and "Minutes until idle shutdown." These are pretty simple to intuit if you remember that from an OS perspective, a COM+ application is nothing more than a potential instance of DLLHOST.EXE. With that in mind, these settings influence how the new instance of DLLHOST.EXE behaves. Specifically, if you select "Leave running when idle," you are asking that once run, the DLLHOST.EXE for this application should remain running indefinitely even if all clients release their connections to all components, leaving the application empty and idle. By selecting "Minutes until idle shutdown," however, you demand that an application should be terminated after n number of minutes of idle time ("idle" being defined as the time the application is not hosting any components for any client applications).
If you anticipate that the components of your application will be used frequently, you may want to "Leave running when idle" to avoid the overhead of starting a new DLLHOST.EXE process. If you are debugging components, however, you will probably want to select "Minutes until idle shutdown" to be something low. When developing a component, it is impossible to recompile while its host application is still running; the component is loaded and in use, so a low minute termination value is a good idea while debugging. Note that any application may be terminated manually at any time by right-clicking the application in Component Services, and selecting the Shut down menu option. Or you can perform the same trick programmatically with the following code:
'Must reference comadmin.dll to use COMAdminCatalog

Const APP_TO_SHUTDOWN = "SomeApplication"
Dim Catalog As COMAdminCatalog

Private Sub Command1_Click()

    Set Catalog = New COMAdminCatalog

    On Error GoTo Problem
    Catalog.ShutdownApplication APP_TO_SHUTDOWN

    Exit Sub

Problem:
    MsgBox Hex$(Err.Number) & ": " & Err.Description

End Sub
We see that changes to an application's settings affect the components of the application, and this makes sense; they will ultimately be hosted by the application's process, DLLHOST.EXE. So, there is a chain of command involved in COM+ configuration—all components registered under a particular application are affected by the changes you make to that application's properties. Similarly, components themselves have properties you can access (by right-clicking the component and choosing Properties). The Properties dialog box for a component is shown in Figure 6.3.

Where the properties of the application have to do with the system (that is, the DLLHOST.EXE process, timeout intervals and so on), the properties of a component have more to do with the logical functioning of your application. It is here, with these properties, that you specify many operational and application-specific details, for example:
Will database modifications that your component makes be able to participate in distributed transactions? More on this in Chapter 8, "Transactions."
Can your object be "pooled" that is, reused between unrelated, successive clients; and if so, under what terms and conditions? This is discussed in Appendix C, "Object Pooling."
Does your object need to be protected from concurrent access by any outside influence while enlisted in an activity? See Appendix B, "COM+ Synchronization Through Activities," for more details.
What types of access restrictions do you want to enforce? Security is discussed in Chapter 12, "Security."
Just as the properties of an application affect the functioning of its components, so too do the properties of components affect the interfaces of these components (and, in turn, the methods of those interfaces). For example, if you change the security setting of a component such that certain users are allowed access, you are implicitly allowing these users access to all the interfaces and methods of the component. As we see in Chapter 12, although interfaces and methods have security-related properties just as the component does, there is no COM+ declarative way of refusing access to an interface by any user that the component grants access to.
The most important configuration options are those relating to applications and components. Let's explore them in the context of adding and configuring an entirely new COM+ application and component. We will call the application Trading System, and it will contain one component, Currency.
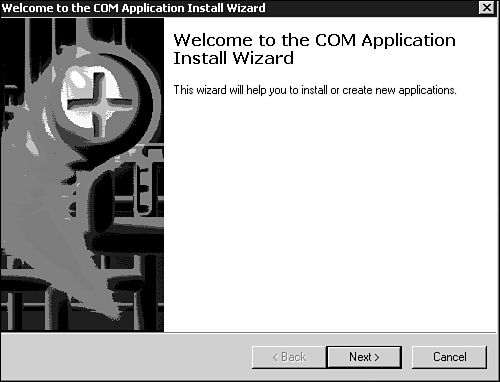
To create a new COM+ application, click the COM+ Applications folder to highlight it, right-click it, and select New, Application. This brings up thewizard shown in Figure 6.4.
Click the Next button to see the dialog box shown in Figure 6.5.
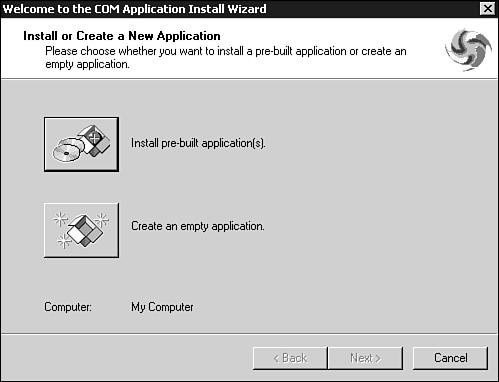
The first button, Install Pre-Built Application(s), is useful if someone gives you a PAK (short for Package) or MSI (Microsoft Installer) file. APAK comes from the days of MTS and is included for legacy's sake. An MSI file, like a PAK file, is a complete, informational export of all the components and their settings for a specific application.MSI files are created when a COM+ developer chooses to export his application by right-clicking it and choosing the Export menu item. In essence, it is how COM+ applications are distributed.
Of the two choices, select Create an Empty Application. This brings you to the screen shown in Figure 6.6.
Give your application the name Trading System. By accepting the default setting of Server Application, you are saying that all components of this application will run together in one dedicated COM surrogate called DLLHOST.EXE. Although there can be many clients on different machines accessing components of a server application, there will most likely be only one instance of DLLHOST.EXE running that all clients share.
If you select Library Application, however, all components in this application run in the client's address space. Note that the client is intended to be another server application running on the same machine. Library applications often contain utility components that, although not necessarily used on their own, are useful to a running application. In this case, library application components are brought into the application's DLLHOST.EXE. Similarly, client executables running on the same machine as the library application can also bring the application's components in-process. A client executable on a remote machine, however, can not directly use components in a library application because the library application can not cross network boundaries to be brought into the client's process.
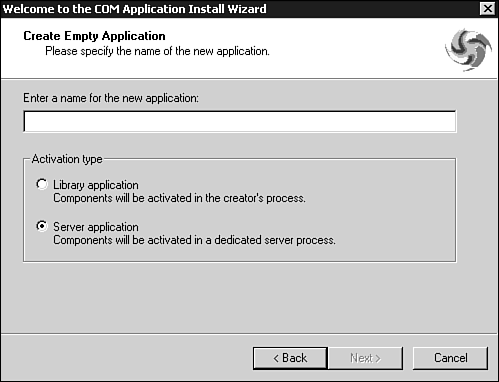
In short, library applications consist of components whose purpose in life is to service the needs of other components and, as such, do not need their own dedicated server process.
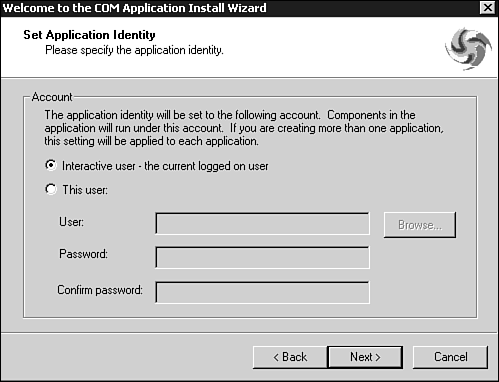
Clicking the Next button brings you to a screen like that shown in Figure 6.7.
The default in this case isInteractive User. As the description says, the component will run in the NT security context of the user that is currently logged on. COM+ security is explored in detail in Chapter 12; but pushing the finer points of NT security aside for the moment, it is obvious that problems arise when no user is logged on—the server won't run. This setting does have its good points, however, particularly when it comes to debugging. Objects sprung from applications so configured can pop up dialog boxes and other UI elements that can be seen by the currently logged-in user of the server machine. Although server components should never attempt to interact with a user directly via a UI, it can be useful when troubleshooting a component.
On the whole, it is somewhat unbecoming for an enterprise application to be subject to the whims of whoever might be logged in to the server—whatever their privileges happen to be. It is better to create dedicated software accounts for your applications—that is, valid NT user accounts configured to provide the specific privileges required by your components. We will examine the details of this option when we revisit security in the "Application Identity" section of Chapter 12.
In this case, do the easy thing—go ahead and accept Interactive User and click Next. This brings you to the final page of the wizard. Just click Finish, and if all goes well, COM+ creates a new application called Trading System. You can now add components to this new application. To demonstrate, let's add a new component called Currency.
Imagine that the IDL for Currency contains the interfaces shown in Listing 6.1.
Example 6.1. The IDL for the Interfaces of the Currency Object
[
        object,
        uuid(3730B8BC-13A3-4F97-8A7E-01F9456793A8),
        dual,
        helpstring("IConvert Interface"),
        pointer_default(unique)
]
interface IConvert : IDispatch
{
        HRESULT CurrencyConvert([in] int SourceCode, [in] int DestCode,
                 [in] float InAmount, [out,retval] float* OutAmount);

};

[
        object,
        uuid(4446F2D0-FE18-4902-B91B-95792F4B049D),
        dual,
        helpstring("ITransfer Interface"),
        pointer_default(unique)
]
interface ITransfer : IDispatch
{
        HRESULT TransferMoney([in] int SourceAccount, [in] int DestAccount,
         [in] float Amount);
 } ;
Assume that this IDL has been compiled into a Type Library (.TLB file). Further assume we have created a Visual Basic ActiveX DLL that includes this type library via the Project, References dialog. Now we can create an ActiveX class that implements these interfaces, and not surprisingly, we call this VB ActiveX class Currency. It's code is shown in Listing 6.2.
Example 6.2. VB Implementation Code for the Currency Object that Provides Implementation for IConvert and ITransfer.
'The following code is in the ActiveX class, Currency
Implements IConvert
Implements ITransfer

Private Function IConvert_CurrencyConvert(ByVal SourceCode As Long, ByVal DestCode As Long, ByVal InAmount As Single) As Single

'code to perform conversion, not included for brevity

Private Sub ITransfer_TransferMoney(ByVal SourceAccount As Long, ByVal DestAccount As Long, ByVal Amount As Single)

'code to perform transfer, not included for brevity

End Sub
To add Currency as a component under the Trading System application, right-click the Component folder underneath the Trading System folder and select New, Component, which brings up theComponent Install Wizard. The wizard presents you with the options shown in Figure 6.8.
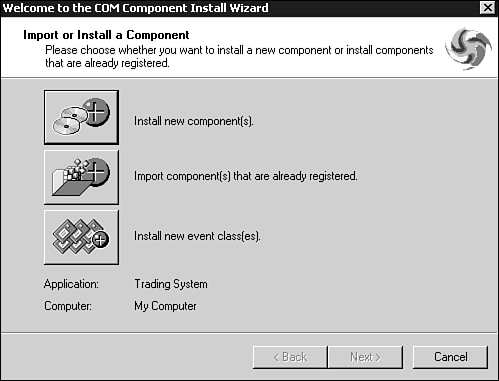
Import versus Install
There is one other side effect of choosing Import versus Install. If you choose Install, removing the component sometime later from its parent COM+ application results in the component being de-registered entirely. All Registry entries are removed and any applications using this component now find the component unavailable. What's more, COM+ might modify the existing settings (such as its apartment model) when installing the component.
Using Import and then deleting a component from COM+ results in the component becoming unconfigured but still available in a traditional COM capacity—that is, its Registry entries remain, but it can no longer take advantage of COM+ services.
Basically, COM+ regards installed components as belonging entirely to it, but looks at imported components as borrowed and so does not take wide latitudes with their Registry settings.
Install New Component(s) and Import Component(s) That Are Already Registered both allow you to bring a COM DLL into COM+ and make it a configured component. You might imagine that you will use the second option in any case where the component is already registered on the system. However, I suggest that you always use the first option, even if the component is already registered. This is because Install New Component(s) reads the type library of the component and makes information about the interfaces and methods visible in the administrative application. This is important if you want to be able to set security (and other properties) on a particular method or interface. If you use Import Component(s) That Are Already Registered, the interfaces and methods of an object are not listed. True, installing new reregisters the component, but this does not cause any harm.
We discuss the final option, Install New EventClass(es), in Chapter 11, "Events." But just to give you a sense, you can designate a certain interface as being eventful. You can then declaratively arrange it so that calls to methods of this interface on the implementing class will result the methods propagation to all (there can be one or many) registered subscribers who support this interface.
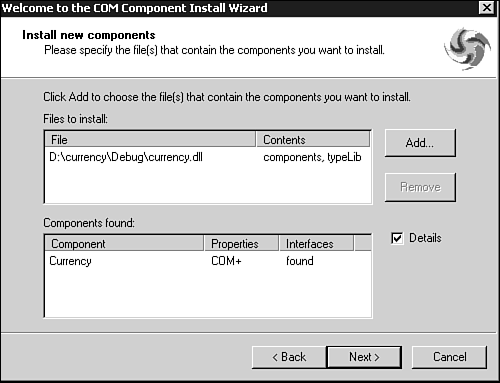
For now, choose Install New Component(s). This brings up the Open File dialog box. Choose the COM DLL you want to bring into COM+, which brings up the screen shown in Figure 6.9.
Here, the coclasses in the component are listed. Click the Next button and then Finish. You can now see your component listed as a member of the application.
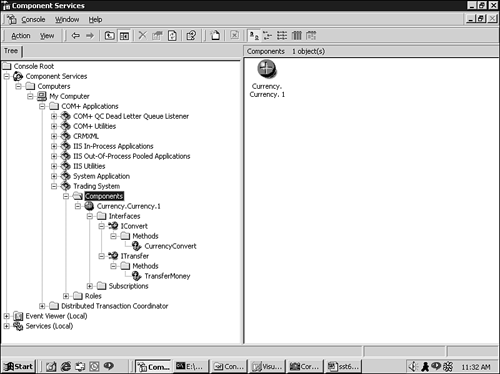
After the wizard is complete, if you click on the newly installed component and go deeper in the tree, you will see its interfaces and methods, shown in Figure 6.10.
A Slight Omission: VB's Extra Interface
Note that for the sake of simplicity I made one small omission. As Currency is presently written in VB (see Listing 6.2), there should actually be a third interface in front of IConvert and ITransfer namedCurrency. VB always creates a default interface with the same name as the ActiveX class except it is prepended with an underscore. This interface is not included in Figure 6.10, because I installed a C++ version of Currency for the purpose of this screen capture so as to paint the simplest possible picture.
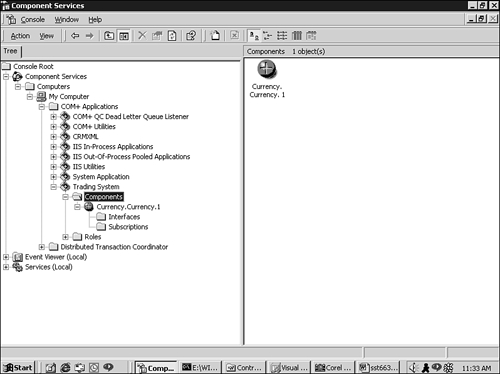
Once again, if you had chosen Import Component(s) That Are Already Registered, interfaces and methods would not be listed (see Figure 6.11).
By bringing your component into a COM+ application, it has become a configured component.
Almost every entity that appears in the tree view—Application, coclass, Interface, Method—can be configured. The procedure is always the same: Simply right-click on any one, select Properties, and you can explore all the various settings.
The Component Services snap-in is nothing more than an attractive MMC front-snap-in. The real work of manipulating various settings for configured components and applications is done by interacting with the Catsrv.CatalogServer.1 component directly (described in the section, "A Quick Tour: Pre-Installed COM+ Applications" at the of this chapter). However, at the time of this writing, the interfaces of this object are undocumented—a strong indication that they are not to be used by developers, but exist to service other components authored by Microsoft. Fortunately, the "other" components that use CatalogServer are documented and can be used to programmatically change properties of COM+ entities. They are called the COM+ administration objects. These objects implement a series of interfaces that allow an application to modify the declarative settings for COM+ components.
As we have discussed, there are a number of configuration settings that a component can set to take advantage of different COM+ services. It is not my habit to provide laundry lists of properties or methods with brief descriptions (that is why we have MSDN). I do make an exception here, however, just to give you a broad sense of some of the configuration settings and services your object has access to.
Table 6.1 lists the configuration options for a COM+ application and component. (There exist additional security-related settings for interfaces and methods entities, but we will discuss these in Chapter 12.) Many of these options can be found in the property dialog boxes you saw earlier. You access each property programmatically through something called a ValueProperty, which is explained momentarily. Note that only brief explanations for properties are provided in Table 6.1, but the underlying concepts will be explored in subsequent chapters.
Table 6.1. Application Properties
Value Property | Description |
|---|---|
Determines whether access checks are performed at the process level or at the component level. This setting has implications for role-based security. | |
Determines whether components within the application will be run in the creator's process (library application) or in a dedicated surrogate (server application). | |
Determines whether access checks are performed by components of the application. This setting is related to role-based security. | |
Determines whether the application is an application proxy. An application proxy can be accessed remotely from other machines, provided the client computer has a subset of the application locally. | |
The name other machines use when accessing this application remotely. The application must be configured as an | |
Determines the level of security COM+ employs when dispatching RPC calls. Because this setting applies only RPC calls, it is available only to server applications. More on this when we discuss security in Chapter 12. | |
| Determines the impersonation level when RPC calls are dispatched. Again, this applies only to server applications. |
Determines whether changes to the application's settings are allowed either programmatically or through the MMC. | |
A command-line string that is passed to the application when it is launched. This is used mostly for debugging purposes. | |
A string indicating the creator of the application. | |
Determines if the compensating resource manager is enabled for this application. More on this in Chapter 9, "Compensating Resource Managers." | |
The location of the log for the Compensating Resource Manager. More on this in Chapter 9. | |
Determines whether this application can be removed from the system either programmatically or through the MMC. | |
A string describing the application. | |
Determines whether events are enabled for the application. | |
A GUID that represents the application. This can only be written to once—when the application is added to the catalog. If omitted, COM+ generate one for you. | |
Applies only to server applications. It allows an application to use the security credentials of an NT account.This property must be set to a valid user account or interactive user, whereby the application assumes the identity of the user who is currently logged in. | |
Determines the level of authority this application grants to other applications it uses when they act on its behalf. | |
Returns whether the application is a system component. This property is read only. | |
A string that represents the name of the application. | |
Used in conjunction with the | |
This property only takes effect if the | |
Determines whether components within this application can receive method calls asynchronously via MSMQ. | |
Determines if the application stays awake while it is idle. This option is only available to server applications. If this is set to false, the application shuts down after it becomes idle as determined by the ShutdownAfter property. | |
Determines the interval between when an application becomes idle and when it shuts down. This property is only relevant for server applications. (For development environments, you want to set this value to a low number, so your components don't hang around in memory while you're developing.) | |
Determines whether the application will have 3GB of addressable memory in its process (the default is 2GB). |
Similarly, the properties for a component are listed in Table 6.2.
Table 6.2. Component Properties
Enables in-process subscribers if the component is an event class. | |
Returns the GUID of the application in which this component resides. Changing this property to another application GUID (if it exists) moves the component under that application. | |
The GUID for this component. In plain COM terminology, this is the coclass GUID. This property is read-only. | |
| Determines if role-based access checks are performed on the component. |
Undocumented, but it is likely that this property specifies whether a component's context inherits COMTI information. COMTI is used to allow COM+ objects to participate in transactions with mainframe systems. | |
Determines whether a constructor string (see the | |
| If the |
If the object supports pooling, this property determines the amount of time the pool has to provide an instance of the component, after which an error is returned. See Appendix C, for more information on object pooling. | |
A string describing the component | |
Determines whether events are tracked. This is expanded upon in Chapter 11. | |
If this component is a queued component, specifies the CLSID of an alternative component to be activated when this component repeatedly fails. | |
Enables events to be fired in parallel, if the component is an event class. Events are discussed in Chapter 11. | |
Allows the component's context to inherit Internet Information Server properties, such as session and application objects. | |
Returns whether the component is an event class. This property is read-only. | |
Determines whether the component supports Just-in-Time (JIT) Activation. | |
Load balancing was removed from Windows 2000 as of Beta 3. Effectively orphaned unless you use Microsoft's new AppCenter Server when it becomes available. | |
If the component supports object pooling (see | |
If the component supports object pooling, determines the minimum number of instances that are kept in the pool. | |
Sets the CLSID for a publisher filter. | |
If set to true, the component must be activated in the caller's context. | |
Determines whether the object supports pooling. | |
Returns the | |
Identifier for the event publisher, if the component is an event class. | |
Determines if calls to the component are synchronized via Activities. Activities are discussed in Appendix B. | |
Determines the type of thread in which the component will run (STA, MTA or TNA). See Chapter 4, "Threading and Apartment Models," for details. | |
Determines if the component will participate in transactions, and if so, how it will participate in them. This is covered in Chapter 8. | |
The major build version of the component. | |
The major version of the component. | |
The minor version of the component. | |
The minor build version of the component. |
Now that you've seen what properties are available to you, let's take a look at how to configure a component programmatically using the COM+ administrative objects.
COM+ exposes three components you will use to configure a component. They are the following:
COMAdminCatalog. Represents the COM+ Catalog database.COMAdminCatalogis the highest level object, and you must go through it to get the collection of COM+ applications. You can also use this object to install components, administer and configure catalogs on other computers, and start and stop services.COMAdminCatalogCollection. Used when you have obtained a collection from theCOMAdminCatalogobject (for example, the Application collection represents all the COM+ applications currently installed on the system). This component allows you to access numerousCOMAdminCatalogObjectsobjects (see the next bullet) in the collection, which you can then manipulate.COMAdminCatalogObject. Represents an object in a collection.COMAdminCatalogObjectscan be used to represent an application, component, or any other COM+ entity that can be returned in aCOMAdminCatalogCollection. BecauseCOMAdminCatalogObjectsare designed to be generic and to hold any kind of object with any number of properties, they do not have very descriptive (or very many) properties. Aside from a couple of utility methods, these objects have only one property,Value.
For the most part, the preceding objects return collections of objects representing either components or applications. You then use one or more of the ValueProperties listed in Tables 6.1 and 6.2 to change their settings. Using the ValueProperty is a little unusual, because unlike the typical properties you are used to, you must use the ValueProperty to get to the underlying real properties of the object that the COMAdminCatalogObject is referring to. This is easiest to demonstrate in code. If, for example, you have a COMAdminCatalogObject that is representing an application object and you want to make sure that its 3GigSupportEnabled property is true, you would not say the following:
'Don't do this
ApplicationObject.3GigSupportEnabled = True; 'WRONG!!
Instead, you would say the following:
'do the following
ApplicationObject.Value("3GigSupportEnabled") = True;
Note: The string constant 3GigSupportEnabled is only one possible ValueProperty. You can use any of the string constants defined in Table 6.1. Of course, you also need to make certain that the value on the right side of the assignment is the appropriate data type for the property you are setting.
Earlier, I made the statement that everything that can be done through the Component Services UI can be done programmatically. To prove this and gain some exposure to the administrative objects, Listing 6.3 demonstrates how to add a new application to COM+ programmatically in Visual Basic.
Example 6.3. Adding an Application Programmatically to the Catalog
'This example adds a 'Trading System' application and a Currency component
'residing under it to the COM Catalog.

'Note that this code does NOT check to see if an existing application of
'the SAME name already exists.  The Catalog will not automatically reject
'duplicates, so this is important. See the source code accompanying the
'book for a more complete example.

'Application and Component Information:
Const APPLICATION_NAME = "Trading System"

Const COMPONENT_PROGID = "Current.Currency"
Const COMPONENT_LOCATION = " somedir Currency.DLL"

Dim Catalog  As New COMAdminCatalog 'reference to the Catalog DataBase
Dim Application  As COMAdminCatalogObject  'represents a single application
Dim Component As COMAdminCatalogObject   'represents a single component
Dim colApp  As COMAdminCatalogCollection 'Collection of Applications
Dim colComp As COMAdminCatalogCollection 'Collection of components

'obtain the Application collection from the Catalog
Set colApp = Catalog.GetCollection("Applications")

'Add our Application to the Application Collection:
Set Application = colApp.Add

'The Application variable now points to the newly added application.
'We can let COM+ choose default properties for us, or set some
'ourselves:

Application.Value("Name") = APPLICATION_NAME
Application.Value("Activation") = COMAdminActivationInproc 'Library Activation
Application.Value("ShutdownAfter") = 0 'Shut down immediatley
Application.Value("3GigSupportEnabled") = True 'Enable 3 gig support

'Write changes to the database:
colApp.SaveChanges
If you now want to add the Currency component to Trading Systems, you execute the code in Listing 6.4 (this code continues from the prior section).
Example 6.4. Adding a Component Programmatically to the Catalog
'Install the Currency component using the catalog object.

'The code below installs a COM component in the Catalog under the
'specified application.  COM+ will read the type library of the DLL
'to determine the necessary registry entries.

'Note that the final two arguments for the line of code below, are for
'the type library and the proxy DLL.  Pass nothing as the third
'argument if the type library is embedded in the DLL (normal) and nothing
'in the fourth argument unless the component needs a special proxy DLL
'(highly unlikely, and impossible if the component is written in VB).

'Note that this code does not check for a pre-existing component of the
'same name.  Attempting to install an already configured component
'results in an internal error (COMADMIN_E_OBJECTERRORS).  See the source
'code accompanying the book for a more complete example.

Catalog.InstallComponent Application.Key, COMPONENT_LOCATION, "", ""

'Obtain the component from the component collection so we can
'modify its settings:

Set colComp = colApp.GetCollection("Components",
                                    Application.Key)
colComp.Populate

For Each Component In colComp
     if Component.Value("ProgID") = COMPONENT_PROGID Then Exit For
Next

'Did we find our component?
If Component Is Nothing Then
    'component was not found, report the error
     MsgBox "Error: Component was not found."
Else
    'component was found, modify some of its settings:
    Component.Value("JustInTimeActivation") = False 'Just in time activation off
    Component.Value("MustRunInClientContext") = False 'Run outside client's context
    colComp.SaveChanges
End If
Some of the code might seem a little indirect, but it is simple enough. After you become familiar with the basic collection-to-object flow, any task involving the administrative objects becomes routine. You can, of course, programmatically configure properties of the newly installed application or components as well. By way of example, the code in Listing 6.5 programmatically shuts down a COM+ application, changes the account identity it runs under (see Chapter 12 for details regarding server identity), and restarts the application. Error checking is omitted for brevity.
Example 6.5. Shutting Down a COM+ Application, Changing Its Identity, and Restarting It Programmatically
'This code stops the specified application, configures it
'such that it runs under the specified account, and then
'restarts it.

'This code does not perform error checking.  For example, if
'the account password specified is incorrect a
'COMADMIN_E_USERPASSWDNOTVALID error will be raised. See the
'source code accompanying the book for a more complete example.

Const APPLICATION_NAME = "Trading System"
Const APPLICATION_ACCOUNT = "SomeAccount"
Const ACCOUNT_PASSWORD = "AccountPassword"

Dim Catalog As New COMAdminCatalog
Dim Application As COMAdminCatalogObject
Dim colApp As COMAdminCatalogCollection


'Shut down the application if it is running:
Catalog.ShutdownApplication APPLICATION_NAME

'obtain the Application collection from the Catalog:
Set colApp = Catalog.GetCollection("Applications")

'Search for the specified application:
colApp.Populate
For Each Application In colApp
     If Application.Value("Name") = APPLICATION_NAME Then Exit For
Next

'Did we find our Application?
If Application Is Nothing Then
     MsgBox "The application is not in the Catalog. "
     End
End If

'Change the identity application runs under:
Application.Value("Identity") = APPLICATION_ACCOUNT
Application.Value("Password") = ACCOUNT_PASSWORD
colApp.SaveChanges

'Restart the application
Catalog.StartApplication APPLICATION_NAMEWhen you first run Component Services on Windows 2000, you find a number of pre-installed COM+ applications. These applications contain one or many components, some of which seem mysteriously named and do not appear to be documented. Although these components may be thought of as "plumbing," understanding the purpose of these components can be helpful in constructing a "big picture" understanding of how COM+ provides its services.
If your present interest in applied COM+ drastically outweighs your interest in its plumbing, the remainder of this chapter may be skipped (perhaps you might return to it later), and you can begin reading about COM+ contexts in Chapter 7.
This application group consists of one COM+ system component, QC.DLQListener. As you'll see in Chapter 10, when queued components are in use, it is understood that the client who sends an asynchronous message does not run at the same time as the server who ultimately receives it. Therefore, there are circumstances when a message might never be received. DLQListener is involved in the tracking of such dead messages—that is, those that fail to arrive at a destination. DLQListener is an internal system object, and it does not support any interfaces that would make it useful to your clients.
COM+ utilities consists of system components that are involved in queuing, events, and transactions. Specifically, this application group contains the following:
QC.ListenerHelper.1. Used on the server side to create and feed messages to a queueable server object. It works hand-in-hand with a coclass calledQC.Player, but we talk more about these in Chapter 10. You do not explicitly create objects of this type.QC.Recorder.1. Used on the client side to record method calls of a client object to a queueable object. These calls are later replayed for a newly instantiated server object with the help of theListenerHelper. You do not explicitly create objects of this type.RemoteHelper.RemoteHelper. Completely undocumented at the time of this writing. Some sleuthing, however, indicates that it is most likely used by the system to facilitate the COM+ security; see the book's companion source code for more information ( http://www.newriders.com/complus ). You do not explicitly create objects of this type.TxCTx.TransactionContext. An object of this type is created by a client EXE when it instantiates transactional objects and wants to vote on the outcome of a transaction. As you see in Chapter 8, an EXE itself does not, on its own, have the capability to vote with objects it creates to determine the outcome of a transaction they all share. Chapter 8 demonstrates how objects of this type can be created and used in your applications.X
TxCTx.TransactionContextEx: A more comprehensive version of the previous object. Basically, it supports a more C++-friendly interface—nothing to write home about.
COM+ is frequently described as a merging of COM andMTS. Actually, Microsoft's Web server product Internet Information Server (IIS) and MTS entered into a symbiosis much earlier in IIS 4.0. You could not install IIS 4.0 without getting MTS in the bargain.
With IIS 3.0, Microsoft introducedActive Server Pages (ASP). These were HTML pages laced with VBScript so that when the client browser requested a page, IIS ran the ASP page. This meant that all the VBScript on the page was run, and through the use of an IIS-provided COM object called response, the VBScript dynamically injected HTML into its host page. See Listing 6.6 for a simple example.
Example 6.6. A Simple ASP Example
<html>
<body>
<p>  This is simple ASP Page</p>

<%
'NOTE: the '<%' tag denotes script that will be processed
'by IIS.  Response.write can be used to produce
'ordinary html that will be injected in to the resulting
'HTML page that is handed back to the client browser

   response.write(" The date is " & _
            CStr(Date) & ""
%>

</body>
</html>
IIS merged with MTS in version 4.0. The merger made sense—the only way the VBScript in an ASP page could reach out to the outside world was through COM objects. And MTS was, basically, a value-added COM surrogate that could provide for better performance and allow different objects to cooperate in distributed transactions.
IIS also had its own suite of components that could benefit from running inside MTS. One component specifically was, and still is, called theWeb Applications Manager (WAM). The purpose of WAM was to protect IIS's process (INETINFO.EXE) from in-process entities (called ISAPI DLLs) that could, if they failed, bring the entire Web server down.
The WAM itself is a COM component, and as such, it ran in MTS. Now, it runs in COM+, and you find two different incarnations of it in the following two COM+ applications:
Incidentally, if you look at the application settings for W3SVC, you might notice that the application is configured to be a library application. This means that all components in that application (mainly IISWAM.W3SVC) run in the process space of its caller. OutofProcessPool, however, is configured as a server application, which means it always runs in a process separate from the caller.
To see that this is true, right-click on Out-Of-Process Pooled Applications and select Properties. Then click the Activation tab (see Figure 6.12).
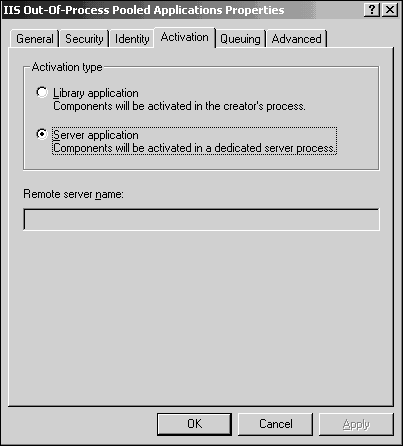
If you look at the application properties for IIS In-Process Applications, you might notice that the radio button reads Library Application. These settings make sense if you remember that, as described previously, W3SVC handles IIS in-process scenarios (IIS being the client), and OutofProcessPool handles the out-of-process ones.
With the introduction of IIS 4.0, differentASP pages that modified data could now share in the same transaction. Simply put, different ASP pages that used Active X Data Objects (ADO) (or some other ODBC-supporting data access technology) to modify one or many databases could cooperate in a single distributed transaction. Practically, this meant that if any ASP page reported an error, data modifications would be rolled back for all ASP pages. To do this, an ASP page creates one of four IIS objects depending on how it wants to participate in a transaction. It is early yet to discuss this in detail; we cover the specifics in Chapter 8. For completeness, the objects are as follows:
ASP.ObjectContextTxNotSupportedASP.ObjectContextTxRequiredASP.ObjectContextTxRequiresNewASP.ObjectContextTxSupported
You do not create these objects explicitly. They are created implicitly when you put a @Transaction= tag in the beginning of your ASP page. You learn more about this in Chapter 8.
The following components are used by COM+ to facilitate certain services and the management of the COM+ Catalog:
Catsrv.CatalogServer.1. This is the component that makes changes to the COM+ Catalog. Any higher-level administrative tool—for example, the COM+ Component Services snap-in or the COM+ Administrative Objects—ultimately must go through this component to make changes to the catalog.COMSSVCS.TrackerServer. This component is completely undocumented at the time of this writing; however, some investigating into its Registry settings reveals a self-description of COM+ Instance Tracking Component. What's more, lack of documentation aside, an object of this type can be instantiated and used to iterate through running instances of applications, and a variety of performance- oriented statistical data can be obtained. See the following sidebar, "Using TrackerServer," for a code example of this component in use.
Using TrackerServer
The following code demonstrates how the IGetAppData interface of TrackerServer can be used to iterate through and obtain information about running COM+ applications.
// Demonstration of IGetAppData, contained in the TrackerServer coclass.
// Note that these interfaces are undocumented by Microsoft and
// subject to change.

#include <windows.h>
#include <iostream.h>`
#include <Rpcdce.h>

// We have to #import comsvcs.dll because comcvcs.h does not
// contain the interface declerations for IGetAppData.

// To look at the methods of these functions, you have
// to use a utility like OLEView to examine the type library
// embedded inside comsvcs.dll:

#import "comsvcs.dll" no_namespace named_guids


int main() {

HRESULT         hr;
IGetAppData*    pGetAppData;
ULONG           nApps;
ULONG           nCLSIDs;

// The following structs are defined in the embedded type
// library, and are used with IGetAppData's methods:

appData*        pAppData;
CLSIDDATA*      nCLSDATA;


// Initialize the COM Library:
CoInitialize(NULL);

// Get an interface pointer for IGetAppData:
hr = CoCreateInstance(
        CLSID_TrackerServer,
        NULL,
        CLSCTX_ALL,
        IID_IGetAppData,
        (void**)&pGetAppData);


if (hr!=S_OK)
{
    // There was a problem getting IGetAppData:
    cout << "Problem obtaining IGetAppData processing"
            "component." << endl;
    return 1;
}

// If you look at the IDL generated by the type library, you
// will see that IGetAppData has 4 methods.  There is no
// documentation, so the purpose of these methods must be determined
// empirically.  Looking at the data structures these methods
// return is a good place to start. The interface decleration
// has been extraced from the type-library and is provided below:

/*

interface IGetAppData : IUnknown {

    HRESULT _stdcall SetPushRate([in] unsigned long dwPushRate);

    // Enumerates all the currently running
    // COM+ applications on the system:

    HRESULT _stdcall GetApps(
                    [out] unsigned long* nApps,
                    [out] appData** aAppData);

    // Returns Information on all the components
    // of a COM+ application. Some of this information
    // can be be found using the COM Admin objects (whether
    // a component is queued or not), others, can only be
    // obtained through this interface (# of live references
    // to the object, calls completed etc):

    HRESULT _stdcall GetAppData(
                    [in] unsigned long idApp,
                    [out] unsigned long* nCLSIDs,
                    [out] CLSIDDATA** aAppData);


    // Same as GetAppData, except it doesn't return ALL
    // the components in a COM+ application, just the
    // one specified by the GUID given:

    HRESULT _stdcall GetCLSIDData(
                    [in] unsigned long idApp,
                    [in] GUID clsid,
                    [out] CLSIDDATA** ppAppData);

       HRESULT _stdcall Shutdown();
} ;

*/


// Get all the running COM+ applications:
pGetAppData->GetApps(&napps,
                     &pAppData);

cout << "Number of COM+ Applications currently running: "
     << nApps << endl << endl;

// Iterate through each running application, print some information,
// and also get information about running components:

for (int k=0; k < nApps; k++)
{

    cout << "Application #: " << k+1 << endl << endl;
    cout << "    Process ID: " << pAppData[k].m_dwAppProcessId << endl;
    cout << "    AppGUID: ";

    // Print out the Application GUID:
    for (int n=0; n<39;n++)
        cout << (char)pAppData[k].m_szAppGuid[n];
        cout << endl;

    cout << "    Total times Called: "
         <<pAppData[k].m_AppStatistics.m_cTotalCalls
         << endl;
    cout << "    Total Classes:      "
         <<pAppData[k].m_AppStatistics.m_cTotalClasses
         << endl;
    cout << "    Total Instances:    "
         <<pAppData[k].m_AppStatistics.m_cTotalInstances << endl;

    cout << "    Calls per second:   "
         << pAppData[k].m_AppStatistics.m_cCallsPerSecond << endl << endl;
    // Get information on running components within the application:
    pGetAppData->GetAppData(pAppData[k].m_idApp,
                            &nCLSIDs,
                            &nCLSDATA);

    cout << "Number of Components in the Application running: "
         << nCLSIDs << endl << endl;

    // Print out information on each of the running components:
    for (unsigned int i=0; i < nCLSIDs; i++)
    {

        // We use the bstr class to make printing of
        // the progID simpler:

        _bstr_t sComponentName;
        OLECHAR *pProgID;
        ProgIDFromCLSID(nCLSDATA[i].m_clsid,&pProgID);
        sComponentName= pProgID;

        cout << "Component #" << i << ": " << sComponentName
             << ": CallsCompleted: " << nCLSDATA[i].m_cCallsCompleted
             << ", CallsFailed: " << nCLSDATA[i].m_cCallsFailed << endl;

        ::CoTaskMemFree(pProgID);

    }
    cout << endl << endl;
}

}
The output is similar to what is seen below:
Number of COM+ Applications currently running: 2

Application #: 1

    Process ID: 2400
    AppGUID: { 02D4B3F1-FD88-11D1-960D-00805FC79235}
    Total times Called: 0
    Total Classes:      1
    Total Instances:    5
    Calls per second:   0

Number of Components in the Application running: 1
Component #0: COMSVCS.TrackerServer: CallsCompleted: 6, CallsFailed: 0


Application #: 2

    Process ID: 2448
    AppGUID: { E0A989B7-277F-4461-8067-17782524607F}
    Total times Called: 0
    Total Classes:      0
    Total Instances:    0
    Calls per second:   0

Number of Components in the Application running: 0EventPublisher.EventPublisher.1. This is the COM+ Event Notification Server and is used in conjunction with the COM+ Event Service to broadcast events to interested subscribers.Mts.Mtsgrp.1. As its name implies, this heralds the days of MTS. It was used to enumerate through running MTS packages. In COM+ terminology, packages are now known as applications. An object of this type enumerates through running applications. Information can be gathered about each application, although not as much as can be gleaned from an instance ofTrackerServer(described in a previous bullet). See the following sidebar, "Using Mtsgrp," for an example of how this component may be used.
Using Mtsgrp
The following code demonstrates how the Mtsgrp may be used to obtain information about currently running applications (specifically, this application will list all applications currently running):
#include "iostream.h"
#include "comdef.h"
#include "comsvcs.h"

int main(int argc, char* argv[])
{

IMtsGrp *pIMtsGrp;
IMtsEvents *pIMtsEvents;
IUnknown *pIUnknown;

LONG nApps;
HRESULT hr;
CLSID CLSID_MtsGrp;
_bstr_t bstrMtsGrpProgID("Mts.MtsGrp.1");

// Initalize the COM Library:
CoInitialize(0);

// Obtain the MtsGrp CLSID:
CLSIDFromProgID( bstrMtsGrpProgID, &CLSID_MtsGrp);

// Obtain an IMtsGrp interface pointer. Error
// checking has been omitted for brevity. Consult
// the book's source code for a complete example.

CoCreateInstance(CLSID_MtsGrp,
                 0,
                 CLSCTX_ALL,
                 IID_IMtsGrp,
                 (void**)&pIMtsGrp);

// Determine the number of applications running,
// and cycle through them, printing out their names:

pIMtsGrp->get_Count(&napps);
cout << "Number of applications running is: " << nApps <<endl;

for(int i=0; i < nApps; i++)
{

    pIMtsGrp->Item(i,&pIUnknown);

    hr=pIUnknown->QueryInterface(IID_IMtsEvents,
                                (void**)&pIMtsEvents);
    if(hr!=S_OK)
    {
        cout<< "Did not support IMtsEvents."<<endl;
    }
    else
    {
        // Determine the Application name:
        BSTR bstrAppName;
        pIMtsEvents->get_PackageName( &bstrAppName);
        _bstr_t bstrHelper(bstrAppName, FALSE);

        cout<< "Application: " << i+1 << " is named "
            << bstrHelper << endl;
        pIMtsEvents->Release();
    }
    pIUnknown->Release();
}

pIMtsGrp->Release();
CoUninitialize();

return 0;
}Application Performance Explorer(APE) was written originally for MTS. It is written entirely in Visual Basic and ships with Visual Studio 6.0. It may or may not be installed on your machine, depending on the options you chose during the setup routine. It is a template application that simulates a real application by moving money around to different accounts in one or many databases. Its behavior can be changed by UI tools to play what-if scenarios and test the impact of different architectures. It is not a core part of COM+ and need never be used; it is an external application, useful perhaps, but in no way necessary or required. You can find out more about the APE in MSDN.
An unimportant, though perhaps revealing, question remains—where exactly does COM+ keep its catalog information? Although it is not documented anywhere (and it relies on some roundabout techniques to prove it), the evidence suggests that COM+ keeps its catalog information in the %winroot% Registration directory.
There are two ways to prove this, but first let's briefly go over what exactly a Cyclical Redundancy Check (CRC) is—it will inevitably benefit you at some point in your development career. CRC is a common technique for detecting data transmission errors. It examines a file and based on a certain algorithm, provides you with a 16- or 32-bit signature of that file. If you send a file to a friend over email, he can perform a CRC check on the file to determine if he received it correctly. If the CRC he computes matches yours, he can say with reasonable certainty that his file is the same as yours. (Two different files can have the same CRC, but this is a remote possibility—especially for 32-bit CRCs.) In fact, several compression utilities do this implicitly to ensure that what was compressed is what is uncompressed.
Now, back to our investigation of the COM+ Catalog. If you look in the %winroot% Registration directory, you should see something like the following:
R000000000155.clb      24,100
R000000000156.clb     24,100
{ 02D4B3F1-FD88-11D1-960D-00805FC79235} .crmlog    1,048,576
To prove that this is where COM+ Catalog information is stored, perform a CRC on these files (several CRC/CRC32 utilities can be downloaded from various freeware and shareware sites). If you perform the check several times in succession, you should note that the CRC values stay constant (the file contents are not changing). Now use the snap-in and do something (such as, add a component, change a property). Return to this directory and perform the CRC check again. You should observe that the CRCs of some files are different (their contents have changed). From this little exercise, can you conclude that this is where COM+ Catalog information is stored? You be the judge.
Try one more thing. If you have a copy of Visual Basic, run the following code (add the COM+ administrative components as reference):
Dim catalog As New COMAdminCatalog 'reference to the Catalog Database

catalog.BackupREGDB "test.dat"
According to the MSDN, the BackupRegDB method, "Backs up the COM+ class registration database (RegDB) to a specified file." If you now run a CRC on test.dat and compare it to one of the clb files in the systemroot Registration directory, you should observe their CRCs are the same (they are the same file!). Once again, draw your own conclusions as to what this might mean.
Employing a more sophisticated tracking mechanism (such as using some type of file monitoring utility) explicitly shows that COM+ does in fact keep its catalog information here.
Ordinary COM components that pre-date COM+ can be used by COM+ objects and ordinary executables. To take advantage of COM+ services, however, a component must be configured. This involves either installing or importing the component using the COM Application Install Wizard; installing is the preferred option.
A configured object must exist in a COM+ application that you create. Both applications and components have various properties that can be set using the Component Services snap-in. Alternatively, the COM+ administration objects can be used by your applications to accomplish the same result programmatically.
Property settings for applications, components, interfaces, and methods are hierarchical in nature—configuration changes made to an application affect components in that application, changes to components affect interfaces, and so on.