My firm works predominantly with Wall Street investment banks, so security is never far from our minds. Billions of dollars move through our trading systems, often at the simple strike of the Enter key. It is critical to make sure that only thattrader for that desk has the authority to trade thatparticular security for thatamount. That is a lot of conditions. Although most of these institutions have not migrated to Windows 2000 and COM+ at the time of this writing, when they do, they will benefit greatly from COM+'s role-based security architecture. It will give them the ability to group users into domains of privilege (roles) and declaratively apply them to components, interfaces, and even methods.
COM+ security is declarative in the sense that users can be associated with one or more roles. A role groups one or more users together such that if permission is granted to a role, any user in that role has permission. For example, many of the trading desks I've worked with have two distinct roles for their users—traders and operations. Traders have the authority to execute trades, but operations people do not. Operations people have authority to change the details of a trade after it is submitted (in case pricing errors were made), which traders cannot do. If we were using COM+ security, we would give the Operations role permissions to call methods on interfaces that modify trading data after it is submitted, but deny this access to the traders. We would, however, give the Traders role the permission to call methods on interfaces that facilitate trade entry, but deny access to trade-entry interfaces for operations people.
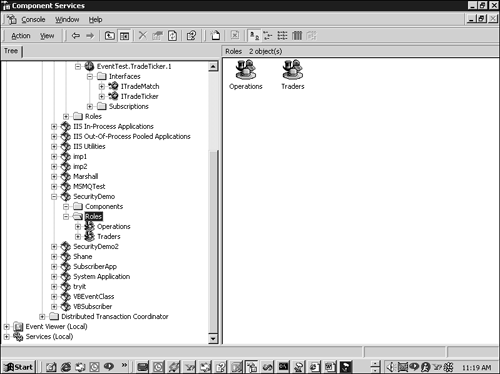
In Component Services, you notice that every application has aRoles folder. By default, it is empty. You can create new roles by right-clicking the Roles folder and selecting New, Role. A dialog box bearing a simple text box pops up asking you for the name of the new role. If you summon this dialog box twice, once for Operations and again for Traders, under the Roles folder, you will see what is shown in Figure 12.1.
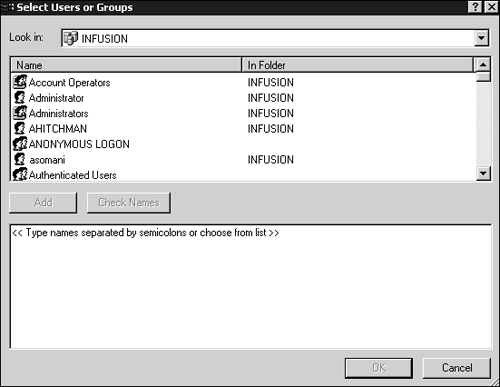
You now have two roles, Operations and Traders, but they are empty. You need to place authenticated NT users in these roles. By double-clicking on either the Operations or Traders folders, you see a Users folder. Right-click on this folder, select New, and User, and the dialog box shown in Figure 12.2 pops up.
Simply double-click on all the registered users you want to be placed in a particular role and click OK. Component Services now lists those users as members of the role.
Roles can be associated with components themselves and to the interfaces and methods of any configured component. To demonstrate how this works, assume that you have a component described by the IDL in Listing 12.1.
Example 12.1. Partial IDL for the TradeEntry Component
//Note: Definition tags are not shown for the purpose of brevity

    interface ITradeEntry : IDispatch
    {
        HRESULT EnterTrade(BSTR cusip, int qty, double price);
        HRESULT ModifyTrade(BSTR cusip, int qty, double price);
    } ;

    coclass TradeEntry
    {
        [default] interface ITradeEntry;
    } ;
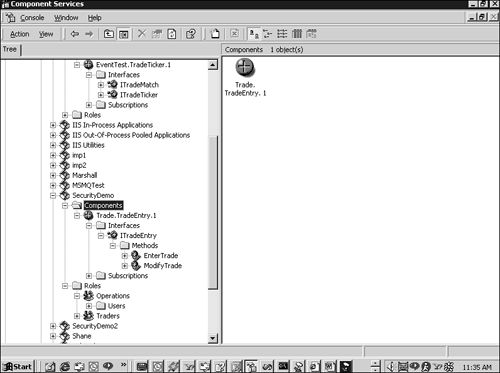
The TradeEntry component shown in Listing 12.1 appears in Component Services as shown in Figure 12.3.
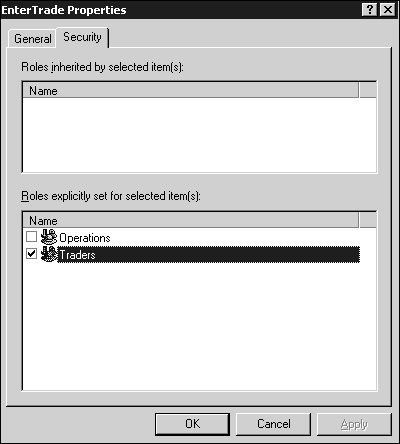
The TradeEntry component, the ITradeEntry interface, and the EnterTrade and ModifyTrade methods can all have roles assigned to them. For example, I said that the Traders role should be able to enter trades. Thus, you can simply right-click on the EnterTrade method, then select Properties, and then select the Security tab of the resulting dialog box. Next, click the Traders role as shown in Figure 12.4.
By selecting the Traders role and not selecting the Operations role, you are saying that any user in the Traders role has permission to execute this method, but Operations people do not.
Role-based permissions can be set on the ITradeEntry interface in the exact same manner as you set role permissions on the EnterTrade method. Permissions are inheritable,so if you give the Traders role access to the ITradeEntry interface, traders can invoke both the EnterTrade and ModifyTrade no matter what the security settings are for these two methods.
The same holds true for components. If Traders are given access to the TradeEntry component, Traders must necessarily be able to access all interfaces of the component and call all methods on all interfaces of the component. Thus, the following statements are always true regarding COM+ security:
If you give a role permission on a component, you are giving that role permission to access all interfaces and methods of that component.
If you give a role permissions on an interface, you are giving that role permission to invoke all methods of that interface.
It can be helpful to think of COM+ security as optimistic and always looking for a yes. You never deny access to a role declaratively, you only grant access. Thus, even though a "parent" component and interface might not explicitly grant access to a certain role, if the role is assigned access to the "child" method, the call succeeds.
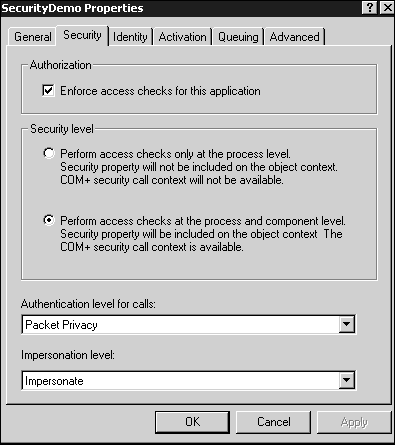
To enable a COM+ application to take advantage of role-based security, it must first be turned on. When you bring up the properties for an application in Component Services and select the Security tab, you will see what is shown in Figure 12.5.
Note that thedialog box of Figure 12.5 is specific to server applications in that it contains options only appropriate for these types of applications. There is a similar but slightly different dialog box for COM+ library applications. We are going to discuss security in server applications for most of this chapter, but a discussion of the special security considerations involved in library applications can be found in the sidebar, "Library Application Considerations."
Let's take a look at Figure 12.5. I cover the bottom section of the dialog box (specifically, the bottom two drop-down list boxes) in the section "Authentication." For now, let's begin at the top.
Toenable declarative security for a COM+ application, theEnforce Access Checks for This Application must be checked. If it isn't checked, no access checks are performed, and the methods of all components in the application are accessible to any and all callers. (However, a component might still be able to investigate the caller's role programmatically and reject it. More on that in the next section, "Programming Security.")
Following the Enforce Access Checks for This Application check box, in the Security Level section of the dialog box are the following two radio buttons:
Perform Access Checks Only at the Process Level. Selecting this optionturns off component-level role-based security. COM+ objects in an application so configured will not have any security information in their context, and you will not be able to associate roles with interfaces, methods, or components of the application (security dialog boxes will be grayed out). There is still security, but it is very broad–stroke: COM+ simply reads all the roles associated with the application (those listed under the Roles folder) and adds all users in every role to the process's Access Control List (ACL). Thus, COM+ will only check to make sure that a caller is in one of the roles associated with the application as a whole and denies the caller if he is not. Other than that, however, no other access checks are performed, and no security context is available to components. Thus, programmatic security will not operate for components of parent applications configured in this way.
Perform Access Checks at the Process and Component Level. This optionturns role-based security on. Security contexts will be available to components, and you can declaratively give roles access to components, interfaces, and methods. Validation still occurs at the process level in that the caller needs to be in some role associated with the application, but finer-grain control is permitted. Roles can be granted permission to certain components, interfaces, and methods in the application, but not others. Normally, you will select this option.
It might seem surprising, but both these options are still relevant even ifEnforce Access Checks for This Application is not checked. The operative word on this check box is Enforce, and by not selecting this option, you are asking COM+ to stand down and let everyone through. Security information might, however, still be available. For example, if you do not enforce access checks for the application, but you do select the second radio button, PerformAccess Checks at the Process and Component Level, components can still programmatically determine what role their caller is in and accept or reject the call. If Enforce Access Checks for This Application is off, acceptance or rejection needs to be implemented manually by the developer because COM+ does not automatically enforce security in this mode.
If you do not select the Enforce Access Checks for This Application option and select the first radio button,Perform Access Checks Only at the Process Level, you are effectively saying that you want no security enforced, and you want to prevent all components of the application from receiving any security information. Thus, programmatic security no longer works. This no enforce, process only pair is the setting to choose if you want to emphatically state that an application and all its components are absolutely public and available to anyone.
Library Application Considerations
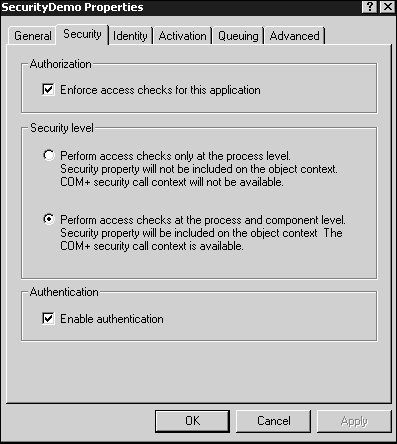
As we've discussed, a COM+ library application does not have a process of its own, but lives in the process of another COM+ application (or in the process space of an ordinary client application executable, but that is a rare circumstance and we will not discuss it here). Thus, its security considerations are different from that of a COM+ server application. The first difference you will notice is a library application's Security dialog box (Figure 12.6) has slightly different settings available than does the server application'sSecurity dialog box shown earlier in Figure 12.5.
Notice that the dialog box shown in Figure 12.6 does not include theImpersonation andAuthentication drop-down boxes. This is because a library application always lives in the process of its client application (by client application, I am referring to the COM+ application that contains the component that called on the library application), and it is the client that determines the impersonation and authentication settings. Library applications do, however, have anEnable Authentication check box. If this is checked, the library application is saying that, in addition to its own declarative security, it wants to be accessed according to the security requirements of its host application/process. Specifically, an interface to a library component with Enable Authentication checked cannot be passed as an argument to any component that does not have access to that library's host application. Put another way, the application that will be receiving an interface to a component in the library application must have an identity that exists in some role of the library's host.
At first glance, you might imagine that not checking this check box allows clients to invoke methods of a library component without going through the security of the parent application. This is true in a sense, but for a library application to be run in the first place, a running COM+ server application must first request a component in the library application on behalf of a client. For this to happen, the client must go through the host application and invoke some method that results in the creation of the library application. It follows then that the client must already have access to the host application for it to gain access to the library application. This setting, therefore, is not designed to allow the creating client uncontested access to the library component (it already has it), but to impose additional access restrictions to components that will receive an interface from a component in the library application as an argument.
Declarative security is useful for granting access to a component, interface, or method. It is simple (using Component Services) to declare that the Traders role can call the EnterTrade() method but the Operations role cannot. COM+ automatically enforces these permissions for you, and the developer does not need to implement any security-related code in his component. However, if you require finer-grain security control—for example, allowing the EnterTrade() method to be invoked by Traders but only if the trade amount is less than one million dollars—declarative security cannot help you. To make access decisions based on method arguments or other fine point considerations, you need to use the security context of your object.
The primary interface used by components that implement programmatic security is ISecurityCallContext. In VB, you can obtain this interface with the following:
Dim SecCallCtx as SecurityCallContext
Set SecCallCtx = GetSecurityCallContext()
And in C++
ISecurityCallContext *pSecCtx;
HRESULT hr;
hr=CoGetCallContext(IID_ISecurityCallContext,(void**)&pSecCtx);
The methods of ISecurityCallContext are listed in Table 12.1 (source: MSDN) with some additional explanation:
Note that these methods are also available via the IObjectContext interface. However, as IObjectContext is largely a legacy Microsoft Transaction Server (MTS) interface, ISecurityCallContext should be used instead.
Now that your component can obtain its security context, you can provide finer-grain access control. Listing 12.2 demonstrates how to allow or disallow a caller from invoking a method depending on the callers role and the arguments to the method.
Example 12.2. The Use of Programmatic Security Combined with Method Arguments to Determine Access
Sub EnterTrade(cusip As String, qty As Integer, price As Double)

Dim SecCallCtx As SecurityCallContext
Set SecCallCtx = GetSecurityCallContext()

If SecCallCtx.IsCallerInRole("Traders") And price < 1000000 Then
    'do the trade
ElseIf SecCallCtx.IsCallerInRole("HeadTraders") And price < 5000000 Then
    'HeadTraders role is allowed a higher limit
Else
    'this raises permissions denied as COM+ does,
    'but you can raise whatever error condition you like.
    Err.Raise 70
End If

End SubIf you have a client executable calling into a single COM+ application, security is pretty straightforward. COM+ determines the calling client's identity, sees what roles that identity is associated with, and determines if the caller's associated role(s) has the appropriate privileges. Things get more complex when a call to a component in one application results in a call to a component in another application.
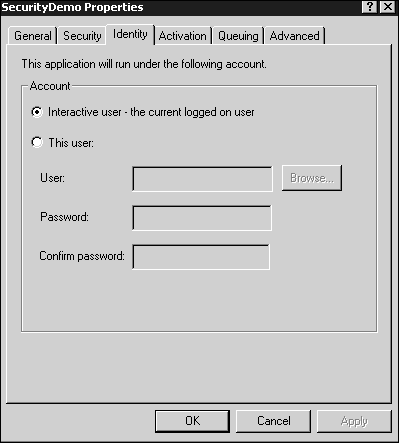
A COM+ application does not automatically assume the identity of its callers. On the contrary, the application's process (DLLHOST.EXE) always runs as one specific user. Selecting the Identity properties tab for an application results in the dialog box shown in Figure 12.7.
TheIdentity tab lets you specify who the application will be when it runs—that is, what privileges it will assume. By selectingInteractive User, you are saying that the application will run with the privileges of the currently logged-in user—that is, the user currently logged into the machine on which the COM+ application will be run. There is often some confusion about this setting. Many developers believe that an application so configured assumes the identity of the client application that is calling or interacting with the application. That process is termed impersonation, and that is not what is happening. By selecting Interactive User, the COM+ application has only those privileges that the currently logged-in user has.
If no user is logged in, the application will not run and calls to its components fail. Even if someone is logged in, it is simply a bad idea to write a piece of enterprise architecture that relies on the serendipitous fact that the appropriate user will happen to be logged into the server. Thus, this setting should probably not be used except when writing and debugging components. One convenient feature of this setting is that components in an application configured as Interactive User can pop up dialog or message boxes. Note that you should never do this in production, but for debugging it is helpful. A message box only appears because the application is running in the context of the logged-in user, and by being logged into that machine at that moment, the user is sitting in front of a living Windows desktop that can present him with message boxes. If you do not select the interactive user option, message boxes still pop up, but do so in the depths of a non-graphical NT virtual desktop, unseen by anyone, possibly hanging your application by waiting forever for someone to click OK.
TheThis User radio button allows you to specify the account you want the application to run under. Never use a real person's account for this. People leave to join other companies, get promoted, demoted, and so on. The last thing you need is to have your application suddenly fail because a system administrator in another building changed the password for an account you were using. It is much better to create dedicated software accounts—that is, accounts created by the system administrator specifically intended to service COM+ applications. By setting the application to run as a specific software account, the components of that application have the privileges of that account.
Every COM+ application can be thought of living in its own security boundary. Roles, after all, are specific to a particular application. Furthermore, you know that every application runs under one specific account—the one specified in the application'sIdentity tab. When a component in one application calls a component in another application, security boundaries are said to becrossed.
For the purposes of example, imagine you have an Application A that contains one component, Component A. Further imagine an Application B that contains one component, Component B. If I, user gbrill, run a client executable that invokes a method on Component A, the declarative security for Application A comes into effect. COM+ makes sure the calling account, gbrill, exists in a role that has access to the method I am trying to invoke. If the method I invoke in Component A calls the methods of another component in the same application, no additional security checks are performed. (If you are familiar with relational databases, you might notice a similarity between this and stored procedures security; if you give a database user permission to execute a stored procedure, the procedure can access tables that the user might not have permissions to access directly.)
If, however, Component A calls Component B, which resides in another COM+ application (Application B), a second authentication takes place. Unfortunately, roles do not cross the security boundaries of applications, only the ID of the caller does. If user gbrill invokes a method on Component A in Application A, which then invokes a method on Component B in Application B, you might expect that application B's caller is gbrill; it isn't. Application B's caller is the account that Application A is set to run under in itsIdentity tab (see Figure 12.7). If the identity of Application A is set to Administrator, the call to component B only succeeds if the Administrator is in the proper role(s) for that component. Although gbrill might be the original caller, that does not come into play for declarative security when security boundaries are spanned. Component B can, however, determine programmatically that gbrill was the original caller by requesting a call list. Examine the code in Listing 12.3.
Example 12.3. Retrieving the Chain of Callers
Sub WhoCalledMe()

    Dim SecCallCtx As SecurityCallContext
    Dim Caller As SecurityIdentity
    Dim Callers As SecurityCallers
    Dim iCaller As Integer

    Set SecCallCtx = GetSecurityCallContext()
    Set Callers = SecCallCtx.Item("Callers")

    Debug.Print "Number of Callers in Chain: " & Callers.Count & _
                 vbNewLine

   'Note: For...Each will not work with this interface

    For iCaller = 0 To Callers.Count - 1
        Set Caller = Callers.Item(iCaller)
        Debug.Print "Caller " & Caller.Item("AccountName") & vbNewLine
    Next

End Sub
Listing 12.3 introduces two new VB objects—SecurityIdentity (VB's wrapper for ISecurityIdentity) and SecurityCallers (wrapper for ISecurityCallersColl). For more information about their use, see the following sidebar, "Determining the Call Chain with ISecurityCallersColl and ISecurityCallersColl.
"
Determining the Call Chain with ISecurityIdentityColl and ISecurityCallersColl
The ISecurityCallContext interface can be used to determine if a caller or user is in a specific role and if security is presently enabled. It is also a VB style collection and, as such, supports a method, Item(), that returns a single Variant. This returned Variant holds either a numerical value or an IUnknown pointer that can be QI'd for an ISecurityIdentityColl (gives information about a specific caller) interface or an ISecurityCallersColl interface (a collection of ISecurityCallersColl interfaces). The string value passed into the Item() method of ISecurityCallContext determines what the returned Variant will have in it. For example, examine the last line of the following VB code snippet from Listing 12.3:
Dim securityinfo As SecurityCallContext
Dim callers As SecurityCallers

Set securityinfo = GetSecurityCallContext()
Set callers = securityinfo.Item("Callers")
By passing in the string "Callers", you are asking the SecurityCallContext object to return a collection of callers. Other string values could have been used, however that would have returned a single ISecurityCallersColl interface or numerical value. The table of property values is shown in Table 12.2 (source: MSDN) with some additional explanation.
Table 12.2. The Properties of ISecurityCallContext
When a collection of "Callers" is requested from ISecurityCallContext, a collection of SecurityIdentityColl interfaces is returned. Like ISecurityCallersColl, the ISecurityIdentityColl is another collection of properties. It also has an Item() method that returns a Variant and takes a string value to determine what the returned Variant will hold. Its property table is shown in Table 12.3 (source: MSDN) with some additional explanation.
Table 12.3. The Properties of ISecurityCallersCall
The ISecurityIdentityColl and ISecurityCallersCol interfaces are not, in my opinion, well designed. Although they are relatively straightforward to use in VB, their typeless, Variant-oriented design makes them unwieldy in C++. Furthermore, only IUnknown and IDispatch interfaces can be returned in a Variant, so the object requesting a collection of callers, for example, gets a collection of IUnknown pointers stored in Variants. Thus, the object must extract each interface from the Variant and then explicitly QI for ISecurityIdentityColl. This might not seem like much, but needless round trips in a heavily used object add up quickly to degrade performance.
Reviewing this scenario, you have a user, gbrill, who runs a client that invokes a method on Component A in Application A. Application A has its identity declaratively set to run as Administrator. Thus, if Component A then invokes a method on Component B re- siding in Application B, the caller (from Application B's perspective) is Administrator, not gbrill. If the code in Listing 12.3 is run in Component B, the resulting output would confirm this:
Number of Callers in Chain:
2 Caller INFUSION gbrill
Caller INFUSION Administrator
Although Application B can determine the original caller, gbrill, declarative security is enforced based on the last or current caller (Application A), which is running as Administrator. You might imagine that there must be some way to allow the original caller to persist in cross-application calls, and there is—impersonation and delegation. We discuss the former first.
You know that, by default, a component runs with the security credentials of its host COM+ application and not with the credentials of its caller. The easiest way to prove this is to use a simple NTFS file.Permissions on an NTFS file—that is, a file on an NTFS hard drive partition—can be set to allow certain users to read, write, execute, and so on. Imagine that you have such a file, but access is restricted to user gbrill. Further imagine that you have a COM+ application whose identity is set to softwareaccount1. If I, gbrill, execute a client executable that invokes a method on some component in this application, any attempts by that component to modify the file will fail. Why? Because only gbrill has access to the file, and although the original caller might be gbrill, the component is running with the privileges of its application. In this case, the application's identity is softwareaccount1; thus, the file modification does not succeed even though the original caller, gbrill, has the appropriate access.
There is, however, a way for the component to impersonate the caller. Specifically, a component only needs to call the Win32 method, CoImpersonateClient(). This method encapsulates the following:
CoGetCallContext(IID_IServerSecurity, (void**)&pServerSec);
    pServerSec->ImpersonateClient();
The CoGetCallContext() Win32 function can be used to retrieve either ISecurityCallContext (covered in the previous section) or the other interface you see here—IServerSecurity.
IServerSecurity has four methods, one of which is ImpersonateClient() (shown in the preceding code). If your file modification component calls this ImpersonateClient(), the component assumes the credentials of the caller. Thus, the file modification component does have the credentials of gbrill and, therefore, does have the appropriate permissions to manipulate the file. When the component no longer wants to assume the caller's identity, it can call the IServerSecurity method, RevertToSelf()
(or the CoRevertToSelf API).
Let's see an example of CoImpersonateClient() at work. Imagine you have NTFS file scenario described earlier: User gbrill runs a client application that instantiates a file modification component in a COM+ application. Because this application's identity is set to softwareaccount1, the component is unable to open a file owned by gbrill—even though gbrill is the originating caller. The file-modification component shown in Listing 12.4 first tries to do exactly this but will be rebuffed with an ACCESS
DENIED error. The component then calls CoImpersonateClient() to borrow the credentials of the original caller, gbrill, and succeeds in opening the file. Examine Listing 12.4 for the file-modification component's source.
VB and CoImpersonateClient
The only security method COM+ Services type library makes available to VB is GetSecurityCallContext(). This global method always returns a SecurityCallContext object (ISecurityCallContext, in reality). IServerSecurity cannot be obtained or used in VB because one of its methods, QueryBlanket(), uses non-automation data types. However, you can make an external Win32 function call to CoImpersonateClient() and achieve the same result. To call CoImpersonateClient() from VB, you need only add the following Win32 declaration to your project:
Public Declare Function CoImpersonateClient Lib "ole32.dll" () As Long
Example 12.4. A Component that Borrows the Credentials of Its Caller in Order to Modify a File Owned by the Caller
'This example demonstrates a VB component that utilizes
'CoImpersoanteClient. The component tries to open file
'as specified by the protectedfilename parameter, under:

'1.) The identity of the component itself.

'2.) The identity of its caller. Note that the caller does
'not have to be a configured component - it doesn't have
'to have a context.  This is because all CoImpersonateClient
'is doing, is copying the ACL into the thread of the
'component so it runs with its caller's credentials.

'Win32 COM Security functions.  We CANNOT use the underlying interface
'(IServerSecurity) of these APIs in VB, because it uses
'non-ole datatypes

Public Declare Function CoImpersonateClient Lib "ole32.dll" () As Long
Public Declare Function CoRevertToSelf Lib "ole32.dll" () As Long
'Above declarations should be in a VB module

Sub Impersonate(protectedfilename As String, logfile As String)

    Open logfile For Output As #1
    Print #1, "Trying to open file under component identity: "

    If FileOpen(protectedfilename) Then
        Print #1, "Opened: " & protectedfilename
    Else
        Print #1, "Could not open: " & protectedfilename
    End If

    'Impersonate the client:
    Print #1, "Impersonating client"
    CoImpersonateClient
    Print #1, "Trying to open file under inhertied identity: "

    If FileOpen(protectedfilename) Then
        Print #1, "Opened: " & protectedfilename
    Else

        Print #1, "Could not open: " & protectedfilename
    End If
    Close #1

    'Revert to self:
    CoRevertToSelf

End Sub
Assuming the filename specified by ProtectedFilename (say c: protect.txt) is restricted by NTFS such that only the user gbrill can open it, the following log file results as detailed in Listing 12.5:
Example 12.5. Output of the VB Component
Trying to open file under component identity:
Could not open: c: protect.txt
Impersonating client
Trying to open file under inherited identity:
Opened: c: protect.txt
Thus, the log file confirms that the component has successfully borrowed the credentials of the original caller.
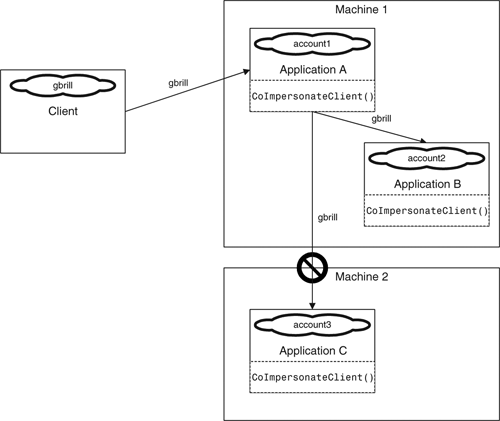
Impersonation allows the recipient of a method call to borrow the credentials of the caller, but contrary to intuition, does not assume the caller's identity. An impersonating server is like a thief with your credit card—the thief might be able to purchase things as you, but if anyone checks his real ID, that person can see that the thief is not you. The intent of impersonation is to allow the server to borrow the credentials of its caller so as to manipulate resources it does not ordinarily have security privileges to access. Even here, it is limited—impersonation only works for one network hop.
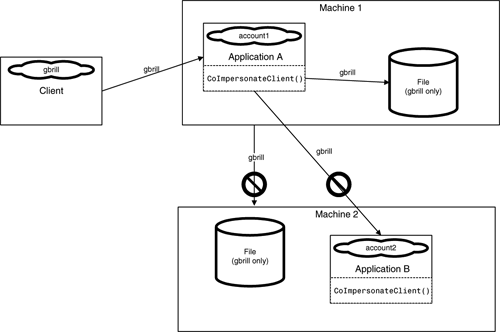
For example, if a client executable on one machine uses Component A on another Machine, A can impersonate the client. Similarly, if Component A calls another Component, B, in a different application but on the same Machine,B also can impersonate the client. If, however, the impersonating Component A calls a Component C on another Machine,C cannot impersonate the client. This is shown in Figure 12.8.
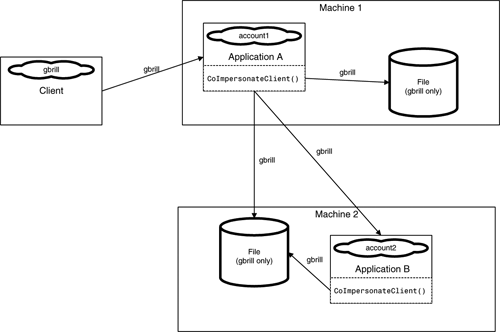
This behavior is by design. At one time, it was thought dangerous to allow an impersonating server to have all the privileges of the client it was impersonating. Concerns arose about malicious servers that would use this capability and, unbeknownst to the client, manipulate resources elsewhere on the network without limitation. Thus, the privileges of impersonating servers were curtailed somewhat. An impersonating server can have all the privileges of its caller but only on the machine on which the server is running. This is shown in Figure 12.9.
The one network hop limitation for impersonation caused particular havoc with DCOM servers using connection points (connection points are covered in Chapter 11, "Events," in the section "The Doubtful Future of Connection Points"). An impersonating DCOM server running on a machine separate from the client would find itself unable to call back on the client's event sink because as far as NT is concerned, that is a second network hop and is forbidden. An impersonating server is even forbidden to manipulate a file on the network.
To overcome this limitation, Windows 2000 introduced the concept of delegation.(Although you might find references to delegation in some of the security dialog boxes of NT 4.0, it was never supported before Windows 2000). Where an impersonating server can borrow the credentials of the caller (but only on the machine where it is running), a delegating server has unrestrictive use of borrowed credentials. Specifically, a delegating server can reach out beyond the machine on which it is running. It can connect to databases, manipulate files on the network, and perform other actions forbidden to impersonating servers. And through the use of a feature called Windows 2000cloaking that is on by default (I discuss cloaking in the next section), delegating COM+ applications can allow the original caller to propagate across any number of application/network hops. Delegation with cloaking is depicted in Figure 12.10.
If delegation and cloaking are enabled and every component involved in a chain of calls invokes CoImpersonateClient() before calling another component, the original caller (the user who ran the client application) can propagate to each component. In this scenario, if gbrill calls Component A, which calls B, which calls C, which calls D, D runs with the credentials of gbrill. The combination of delegation, cloaking, and calls to CoImpersonateClient() enable the propagation of the original user.
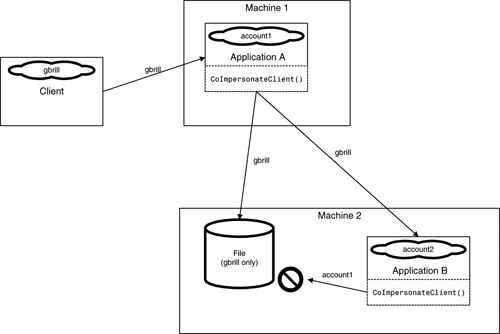
Impersonation allows a server to use the security credentials of a client for one network hop. Delegation is a form of impersonation that does the same thing, but for an unlimited number of hops. In either case, the server is simply borrowing the credentials of its caller. Normally, if an impersonating or delegating server Application A creates another server Application B, Application B will see Application A in terms of its real identity, not the one it is borrowing from the caller (see Figure 12.11).
Figure 12.11 depicts a delegating server that creates another server, Application B, that calls CoImpersonateClient(). Note, however, that Application B ends up impersonating the real identity of Application A, account1, as opposed to the original caller, gbrill. This is precisely what you do not want to happen. Application B cannot obtain the original caller's credentials in any way and ends up impersonating its creating application's identity, account1, which cannot help Application B open gbrill's file.
The solution to this problem comes in the form of cloaking.Cloaking can be defined as the capability of an impersonating or delegating server to pass on the capability to impersonate its present caller. With cloaking, Application B can impersonate gbrill even though its immediate caller, Application A, is really running under account1. But because Application A is impersonating gbrill and cloaking is enabled, Application B will see Application A as gbrill and not account1. (A cloaking example, Listing 12.7, can be found toward the of this chapter).
Cloaking is on by default. This means that impersonating servers automatically pass on impersonation privileges to servers on one machine, and delegating servers can do this across network boundaries on many machines. By and large, this is the behavior you want, although this is a different paradigm than older DCOM servers might have been written to expect. If you like, you can turn cloaking on or off. In fact, all declarative security settings can be explicitly set by and for any thread or process. The section "Lower Level Security" discusses how security can be explicitly set via COM security API calls. For additional details about cloaking, see the following sidebar, "Static and Dynamic Cloaking."
Static and Dynamic Cloaking
There are two types of cloaking—static and dynamic. If there are a number of delegating or impersonating servers along a call chain, the last server in the chain borrows the credentials of the original caller. This is the behavior you expect and want. However, if a client changes its identity or passes its interface to some other client running under a different identity, dynamic cloaking forces all servers in the call chain to re-identify the caller with each new method call and assume the identity of the new caller. By default, dynamic cloaking is enabled.
Static cloaking, on the other hand, does not permit dynamic reidentification and impersonation. Even if the caller changes its identity the downstream servers retain their original impersonation. Thus, though more efficient, static cloaking is not as accommodating.
There remains one other security setting we have not discussed—authentication. Like the impersonation level, authentication can be set on per machine or per application level. Its levels are shown in Figure 12.12.
These settings determine to what extent NT should go to protect the integrity of data sent on the network from client to server. These settings range from the least safe but most efficient, to the most safe but least efficient. Note that every setting implicitly includes all settings above it. For example, if Call is selected, Connect is performed as well. Also note that the authentication does not affect role-based security. Role-based security still operates even if the authentication level is set to None.
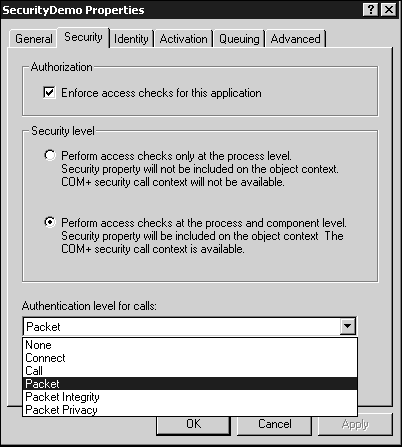
Figure 12.12. Authentication levels can be selected in the middle drop-down box determining what level of network security is to be used for the RPC connection.
Impersonation and Delegation and Queued Components
Impersonation and delegation does not work with queued components. Although a message does retain security information about its sender, such that role-based security will operate, it does not contain the access token or impersonation token of the caller. Impersonation and delegation require this information to reconstruct the caller's security privileges; thus, any attempt to call CoImpersonateClient() on a queued component results in an error. When I test this empirically, I get RPC_E_CALL_COMPLETE. If you are a C++ programmer, this error is described in winerror.h as "call context cannot be accessed after call completed."
Authentication is designed to protect against replayed method calls, network sniffers, packet hacking, and other security attacks that occur at the network level. Thesettings are as follows:
None. No authentication is used. Note that impersonation does not operate if this setting is used.
Connect. Authentication is performed when the client first connects to the server. Thereafter, authentication is not performed. A slight and negligible performance hit is incurred during the initial connection.
Call. Authentication is performed on every method call. A performance hit is incurred on every method call, but this is negligible because the authentication occurs very quickly.
Packet. Authentication is performed on every packet of every method call. For connectionless protocols (such as TCP/UDP), the Call and Connect settings are treated as the Packet setting. This also has a negligible effect on performance.
Packet Integrity. In addition to authentication of every packet of every method call, packet integrity is ensured. COM+ does this by computing a checksum of the packet when the call is made and then re-computing the checksum and comparing for equality at the server end. This has a negative effect on performance, because a checksum must be computed twice on every method call—at both the client and server.
Packet Privacy. Packet Privacy is the highest level of authentication that COM+ provides. In addition to performing the operations in the Packet Integrity option (checking for packet integrity by computing a checksum), each packet is encrypted. This setting incurs a relatively large performance hit.
Situations can arise where a server or client might require different authentication levels. In these scenarios, the highest security setting is used. For example, if a client seeks Packet but a server demands Packet Integrity, Packet Integrity is used.
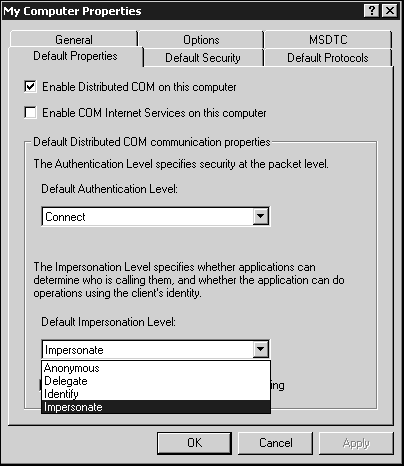
Impersonation and delegation are powerful but somewhat dangerous capabilities for a component to have. If a component delegates as you, it is you as far as NT is concerned. It can open your Outlook account and send nasty emails to everyone in your contact list, all of which have your full name in the FROM field. Thus, clients can explicitly disallow components from delegating or impersonating them. There are two ways to do this. The first is programmatically with a call to a Win32/COM method CoInitializeSecurity(). This method is somewhat complex and can only be done from C++. It is somewhat contrary to the declarative nature of COM+. Unfortunately, you might up calling this API anyway because the alternative method while very simple, is, perhaps, too all-encompassing: you can specify what impersonation settings allclient applications allow on a machine-wide basis. To specify access rights for all components on a machine, select the properties for the My Computer folder at the root of Component Services' tree and then click on the Default Properties tab; you see that shown in Figure 12.13.
Sadly, someone at Microsoft forgot to set the Sort property of the drop-down to false. Thus, these settings are sorted alphabetically instead of by privilege level, so the order in which they appear in the dialog box is not meaningful. I, however, will order them according to their restrictiveness, with the most restrictive first:
Anonymous. This is the least permissive setting. Anonymous means that the client does not want the server to know who it is. The server cannot impersonate the client and does not receive any security credentials. Note that this setting prevents role-based security from operating because COM+ cannot determine the identity of the caller.
Identify. The client allows the server to determine the client's identity—that is, the server knows what account the client is using. The server cannot, however, impersonate or otherwise assume any of the credentials of the caller.
Impersonate. The client allows the server to impersonate it by assuming its credentials. The server has all the privileges of the account under which the client is run, but only on the computer on which the server is running.
Delegate. This is the most permissive setting. The client allows its server to impersonate it completely, and the server can manipulate resources beyond the computer on which it is running.
These same settings can be set on theSecurity tab, shown earlier in Figure 12.5, for every COM+ application. This setting indicates the level of privilege the application grants to other applications it might call—that is, to what extent the recipient application can impersonate the calling application. In other words, an application that is set to Delegate is saying, "If a component of mine should ever call another application, that application can impersonate me with my credentials on its machine and/or anywhere on the network." If the application never calls outside of itself to another application, this setting is not referenced.
COM+ declarative security eliminates the need for components and processes to explicitly call Win32/COM security APIs. Declarative security is, however, just a higher level abstraction. Security APIs are called by COM+ implicitly on your application's behalf. A detailed description of these functions and their methods would bring us into the internals of security descriptors, Access Control Entries (ACEs), ACLs, and many other facets of NT security used to allow or exclude access to resources. That kind of discussion demands a book of its own. However, for completeness and so that you can understand security-related COM articles you might come across, I'm going to introduce a couple of security functions that every COM+ developer should have a nodding acquaintance with.
This method determines process-wide security settings. Old style, out-of-process (EXE) DCOM servers often call this function explicitly to determine who has access to them, their authentication level, and so on. If this function is not called for an out-of-process server, COM calls it when an interface is first marshaled to or from the server using values from the Registry. In NT 4.0., the utility DCOMCNFG.EXE was typically used to assign access rights to the DCOM server such that COM could determine the arguments for this implicit call to CoInitializeSecurity().
With COM+, you no longer write out-of-process servers, and more often than not, your clients are Visual Basic. Thus, leave it to COM+ to interpret your security-related declarations and make this call for you. Although a C++ client executable can call this function, it is typically unnecessary—machine-wide default settings are automatically used. Furthermore, the client can always change the security settings of the proxy it holds to a component by calling CoSetProxyBlanket(), which is discussed next.
Typically, when a client holds an interface, it does not have a pointer to the actual object. The client is really holding a proxy
, and in reality, the proxies a client holds are aggregated inside an object called the
proxy manager. It is possible, then, for the client to interact with the proxy manager itself. Specifically, when a client QIs an interface proxy for IClientSecurity, the real object does not support it, but the QI, according to the rules of aggregation, is passed on the outer object. The proxy manager remains quiet and invisible most the time, but it picks up on this request and gives the requesting client an IClientSecurity interface. A client can use this interface to dynamically change the security settings for a particular interface proxy. The CoSetProxyBlanket() method simply encapsulates the process of obtaining the IClientSecurity interface and calls its SetBlanket() method.
For the most part, you do not want to dynamically change security settings for a proxy. There are, however, a couple rare circumstances where this might be necessary. If you want to turn off cloaking because you have very real security concerns, this is the preferable way to do it.
A client can call this method's counterpart, CoQueryProxyBlanket(), to determine what the present security settings are for a proxy.
We've certainly covered a lot of ground in this chapter, so it is appropriate to with an example that brings all these concepts together in a meaningful way. Let's return to the example we've used so far (that of the file belonging to gbrill) and add some additional dimensions to it.
Assume we have two components, Impersonate1 and Impersonate2, both of which reside in different COM+ applications. The application that Impersonate1 resides in runs under the account account1, and the application that Impersonate2 resides in runs under the account account2.
The component Impersonate1 is written to create an instance of Impersonate2 and call a method on Impersonate2 that will attempt to open gbrill's file. Assuming that both Impersonate1's and Impersonate2's applications have Roles that contain the account gbrill, what do you think happens when a client EXE run by user gbrill kicks off the process by calling Impersonate1?
Well, the first thing that happens is that the client gets a Permission Denied error. If you are not sure why, you might want to take a second look the section, "Security Boundaries" in this chapter. Remember, Impersonate1 runs in an application operating under the identity of account1. Thus, when Impersonate1 calls Impersonate2, it is doing so from the account account1—not from the original caller, gbrill. Therefore, the call is rejected by Impersonate2's application, which has a role for gbrill but not for account1.
While we can always add account1 to a Role of Impersonate2's application, the ideal solution is to have Impersonate1 call CoImpersonateClient()
beforeit creates and calls Impersonate2. If it does this, Impersonate2's application will see the caller as gbrill and let it through providedcloaking is enabled (don't worry, it is enabled by default).
Because cloaking is on, Impersonate2 should call CoImpersonateClient() just as Impersonate1 did. Now Impersonate2 inherits gbrill's credentials from Impersonate1, which in turn impersonated them from the original caller. If Impersonate2's call to CoImpersonateClient() succeeds, it is now able to open gbrill's file.
The source example of Listing 12.6 details the relevant functions of Impersonate1 and Impersonate2. Note that Impersonate1 has the ability to turn on and off cloaking via a call to CoSetProxyBlanket() and Listing 12.6 demonstrates what the effect will be.
Example 12.6.
Impersonate1::CallImpersonate, Which Impersonates Its Caller and Instantiates Impersonate2
HRESULT Impersonate1::CallImpersonate2(
        BSTR Protectedfile,
        BSTR Logfile,
        int Cloaking) {

// CallImpersonate2 Impersonates its caller. It then
// creates an instance of Impersonate2, which in turn
// attempts to impersonate its caller.  The identity
// Impersonate2 obtains depends on whether or not
// CLOAKING is turned on, as determined by the cloaking
// variable of this method, where:

// cloaking = 0         turns CLOAKING OFF
// cloaking = 1         sets  STATIC CLOAKING
// cloaking = other  sets  DYNAMIC CLOAKING


IImpersonate2 *pImpersonate2;

DWORD AuthnSvc, AuthzSvc, AuthnLevel;
DWORD ImpLevel, Capabilities, Cloaking_Type;
HRESULT hr;
OLECHAR* ServerPrincName;
RPC_AUTH_IDENTITY_HANDLE pAuthInfo;

// Impersonate our caller:
hr=CoImpersonateClient();

if (hr!=S_OK) {
    // CoImpersonateClient failed.
    return hr;
}

// Initialize the COM Library and create an instance
// of Impersonate2:
CoInitialize(NULL);

hr = CoCreateInstance(
        CLSID_Impersonate2,
        NULL,
        CLSCTX_ALL,
        IID_IImpersonate2,
        (void**)&pImpersonate2);

if (hr!=S_OK) {
    // Couldn't get an instance of Impersonate2.
    return hr;
}


// Depending on the cloaking variable, set the
// type of cloaking to be used:

if (Cloaking == 0)
    Cloaking_Type = EOAC_NONE; // No cloaking
else if (Cloaking == 1)
    Cloaking_Type = EOAC_STATIC_CLOAKING; // Static cloaking
else
    Cloaking_Type = EOAC_DYNAMIC_CLOAKING;// Dynamic cloaking

// Before we set the type of Cloaking used,
// Query the Impersonate2 proxy we have
// obtained, to ascertain information we will
// use when we set the proxy:

hr=CoQueryProxyBlanket(
    pImpersonate2,
    &AuthnSvc,
    &AuthzSvc,
    &ServerPrincName,
    &AuthnLevel,
    &ImpLevel,
    &pAuthInfo,
    &Capabilities);


if (hr!=S_OK) {
    // Problem Querying proxy:
    return hr;
}


// Now set the proxy according to the information
// obtained when we Queried the proxy AND
// the type of Cloaking we desire:

hr=CoSetProxyBlanket(
    pImpersonate2,
    AuthnSvc,
    AuthzSvc,
    ServerPrincName,
    AuthnLevel,
    ImpLevel,
    pAuthInfo,
    Cloaking_Type);        // Set cloaking Type

if (hr!=S_OK) {
    // problem setting proxy:
    return hr;
}


// Call impersonate2:
hr=pImpersonate2->ImpersonateClient(
    Protectedfile,
    Logfile);

pImpersonate2->Release();

return S_OK;

}
The source code for Impersonate2 follows in Listing 12.7.
Example 12.7.
Impersonate2, Which Impersonates Its Caller and Attempts to Open a File
// ImpersonateClient first tries to open the protected file using its own
// credentials.  It then impersonates its caller, and does two
// things with its newly inherited identity:

// It prints out the security credentials it has inherited (this
// magic is performed by GetTokenUser) and then it tries to
// open the protected file using these credentials.


HRESULT Impersonate2::ImpersonateClient(
            BSTR protectedfile,
            BSTR logfile) {


HRESULT hr;
HANDLE fHandle;
const int BUFFER=200;
char achInfo[BUFFER];
char achCallersName[BUFFER];
char achProtectedFile[BUFFER];
char achLogFile[BUFFER];
int size=BUFFER;

// Convert the incoming BSTR to char *'s required
// by the C APIs we will be using:

if (WideCharToMultiByte(CP_ACP, 0,
                    logfile,
                    WC_SEPCHARS, // -1
                    achLogFile,
                    size,
                    NULL, NULL) == 0)
{
    // Could not convert:
    return E_FAIL;
}

if (WideCharToMultiByte(CP_ACP, 0,
                    protectedfile,
                    WC_SEPCHARS, // -1
                    achProtectedFile,
                    size,
                    NULL, NULL) == 0)
{
    // Could not convert:
    return E_FAIL;
}


// Open the log file:
fHandle = CreateFile(achLogFile,
                GENERIC_WRITE,
                FILE_SHARE_WRITE,
                NULL,
                CREATE_ALWAYS,
                FILE_ATTRIBUTE_NORMAL,
                NULL);


if (fHandle==INVALID_HANDLE_VALUE)
{
    // Couldn't open the logfile:
    return E_FAIL;
}


// Try to open to protected file with this
// component's identity:

if (GetTokenUser(achCallersName)) {
    sprintf(achInfo,"Impersonate2: Account credentials BEFORE Impersonation: %s n",achCallersName);
    WriteToFile(fHandle, achInfo, strlen(achInfo));
}
else {
    sprintf(achInfo,"Impersonate2: could not get access token n");
    WriteToFile(fHandle, achInfo, strlen(achInfo));
    CloseHandle(fHandle);
    return E_FAIL;
}

sprintf(achInfo,"Impersonate2: Trying to open %s n",achProtectedFile);
WriteToFile(fHandle, achInfo, strlen(achInfo));

if (TryToOpenFile(achProtectedFile)) {
    sprintf(achInfo,"Impersonate2: Successfully opened %s n",
            achProtectedFile);
    WriteToFile(fHandle, achInfo, strlen(achInfo));
}
else {
    sprintf(achInfo,"Impersonate2: Could not open %s n",
            achProtectedFile);
    WriteToFile(fHandle, achInfo, strlen(achInfo));
}

// Impersonate the caller:
hr=CoImpersonateClient();


if (hr!=S_OK) {
    sprintf(achInfo," nImpersonate2: CoImpersoanteClient failed.: %x n",hr);
    WriteToFile(fHandle, achInfo, strlen(achInfo));
    CloseHandle(fHandle);
    return hr;
}
else {
    sprintf(achInfo," n nImpersonate2: Successfully"
            Impersonated Caller. n n");
    WriteToFile(fHandle, achInfo, strlen(achInfo));
}

// Determine the account this component is running under after
// it impersonates its caller.  Note that if the this component's
// caller is itself a component that has impersonated its caller,
// the identity assumed here will depend on whether CLOAKING
// is ON or OFF.


if (GetTokenUser(achCallersName)) {
    sprintf(achInfo,"Impersonate2: Account credentials AFTER"
            " impersonation: %s n",achCallersName);
    WriteToFile(fHandle, achInfo, strlen(achInfo));
}
else {
    sprintf(achInfo,"Impersonate2: could not get access token n");
    WriteToFile(fHandle, achInfo, strlen(achInfo));
    CloseHandle(fHandle);
    return E_FAIL;
}

// Try to open the protected file with the new credentials:

sprintf(achInfo,"Impersonate2: Trying to open %s n",achProtectedFile);
WriteToFile(fHandle, achInfo, strlen(achInfo));

if (TryToOpenFile(achProtectedFile)) {
    sprintf(achInfo,"Impersonate2: Successfully opened %s n",
            achProtectedFile);
    WriteToFile(fHandle, achInfo, strlen(achInfo));
}
else {
    sprintf(achInfo,"Impersonate2: Could not open %s n",
            achProtectedFile);
    WriteToFile(fHandle, achInfo, strlen(achInfo));
}


CloseHandle(fHandle);
return S_OK;

}


// GetTokenUser determines the security credentials the component is using
// when it attempts open resources etc.  This is not as simple as a call
// to the API GetUserName:

// From the MSDN:

/* "Impersonation is really the ability of a thread to execute in a security
    context different from that of the process owning the thread. The server
    thread uses an access token representing the client's credentials, and
    with this it can access resources that the client can access. */

// Thus to determine the security credentials the component has inherited
// we must:
//
//  1.) Obtain the new Access Token of the current thread
//  2.) Obtain the security identifier (SID) within the Access Token
//  3.) Resolve the SID to an account name.


int GetTokenUser(char *User) {

HANDLE hToken;
const int BUFFER=200;
char achAccountName[BUFFER];
char achDomainName[BUFFER];
DWORD DomainBuffer=BUFFER;
DWORD AccountBuffer=BUFFER;

SID_NAME_USE sidUse;
TOKEN_USER tokenInfo;
DWORD BufferSize;

// Obtain the Access token of the current thread. If the component
// has not attempted to Impersonate its client, the thread may
// not have an access token:

if (!OpenThreadToken(GetCurrentThread(),
                     TOKEN_QUERY,
                     FALSE,
                     &hToken))
{
    // Problem getting Thread Access Token.
    // This could be because there is no Thread
    // token available, which means that the
    // thread is not impersonating anyone.  In this
    // case, get the process Access Token (so we can

    // determine the identity the component itself is
    // running under)

    if (GetLastError()==ERROR_NO_TOKEN)
    {

        if (!OpenProcessToken(GetCurrentProcess(),
                             TOKEN_QUERY,
                             &hToken))
        {

                // There was a problem getting the
                // process token.  This is a problem,
                // so abort the procedure:
                return 0;
        }

    }
    else
    {

        // The Thread token existed, but we couldn't
        // get it for some reason, so abort the
        // procedure:
            return 0;
    }

}
// Now obtain information on the Token's
// user account.  This gives us a structure
// with the user account's SID:

if (!GetTokenInformation(hToken,
            TokenUser,
            &tokenInfo,
            (DWORD)BUFFER,
            (PDWORD)&BufferSize))
{

    // Problem getting user account information:
    return 0;
}

// Resolve the SID obtained above, into
// an NT account name.  This gives us

// both the Domain and Account of the user:
if (!LookupAccountSid(NULL,
         tokenInfo.User.Sid,
        achAccountName,
        &AccountBuffer,
        achDomainName,
        &domainBuffer,
        &sidUse))
{
        return 0;
}


// We have the Domain and Account Name the thread's
// token is running under, give this information
// to the user.  We use the _bstr_t class to make
// our string manipulation a little easier:
_bstr_t FullName=achDomainName;
FullName+="  ";
FullName+=achAccountName;
strcpy(User,FullName);

return 1;

}


// TryToOpenFile...tries to open the specified file.
// It Returns 1 if it exists, and 0 otherwise:

int TryToOpenFile(char * Filename) {


HANDLE Hand;
Hand= CreateFile(Filename,
                GENERIC_READ,
                FILE_SHARE_READ,
                NULL,
                OPEN_EXISTING,
                FILE_ATTRIBUTE_NORMAL,
                NULL);


if (Hand==INVALID_HANDLE_VALUE)
{
    return 0;
}

else
{
    CloseHandle(Hand);
    return 1;
}

}

void WriteToFile(HANDLE hFile, char* Contents, int size) {

DWORD nWritten;

int result = WriteFile(hFile,
                   Contents,
                   size,
                   &nWritten,
                   NULL);
}
Dim impImp1 As Impersonate1 Set impImp1 = New Impersonate1 impImp1.CallImpersonate2 "c: protect.txt", "c: log.txt", 0 'Cloaking OFF
Assuming that role-based security is turned off for the applications of Impersonate1 and Impersonate2, we need to turn Security off (or add account1 to a Role); because if cloaking is disabled then Impersonate2's application does not see the caller as gbrill, rather it sees the caller as account1 and rejects the call. An examination of the log file created by Impersonate2 further proves the point
Impersonate2: Account credentials BEFORE Impersonation: INFUSION account2
Impersonate2: Trying to open c: protect.txt
Impersonate2: Could not open c: protect.txt

Impersonate2: Successfully Impersonated Caller.
Impersonate2: Account credentials AFTER impersonation: INFUSION account1
Impersonate2: Trying to open c: protect.txt
Impersonate2: Could not open c: protect.txt
Because cloaking is OFF, Impersonate2 gets Impersonate1's security credentials ( account1) as opposed to the credentials of the original caller. Thus the attempt to open the file fails because the file belongs to gbrill and not account1. It is true that Impersonate1 called CoImpersonateClient() before creating Impersonate2, and this would allow Impersonate1 to open gbrill's file if it wishes. However, with cloaking disabled, a downstream server sees its caller for who it really is, as opposed to who it is impersonating.
If we modify the VB client to enable cloaking
Dim impImp1 As Impersonate1
Set impImp1 = New Impersonate1
impImp1.CallImpersonate2 "c: protect.txt", "c: log.txt", 2 'Cloaking ON
the following log file results:
Impersonate2: Account credentials BEFORE Impersonation: INFUSION account2
Impersonate2: Trying to open c: protect.txt
Impersonate2: Could not open c: protect.txt

Impersonate2: Successfully Impersonated Caller.
Impersonate2: Account credentials AFTER impersonation: INFUSION gbrill
Impersonate2: Trying to open c: protect.txt
Impersonate2: Successfully opened c: protect.txt
Because cloaking is enabled Impersonate2 is able to obtain gbrill's credentials, and the attempt to open the file succeeds.
COM+ security is declarative in nature and can enforce access checks without requiring components to call security-related functions. A COM+ application can define one or many roles into which one or many individual NT accounts can be placed. An administrator declaratively grants roles access to components, interfaces, and/or methods using Component Services. If an application and/or the components of the application are configured to enforce access checks, COM+ prevents callers from accessing any components, methods, or interfaces that do not grant access to a role that the caller is associated with.
Programmatic security can augment declarative security by allowing the component programmer to manually determine whether the caller is in a specific role. Furthermore, method arguments can be factored in to decide whether a caller should be accepted or rejected. Programmatic security can also be used to determine the chain of callers, the authentication level in use, and many other security details. ISecurityCallContext is the main security interface and provides methods to determine if a caller or user is in a specific role and if security is presently enabled. It is also a VB-style collection and, as such, can be used to obtain the ISecurityIdentityColl and ISecurityCallersColl interfaces, which can be used to obtain more detailed information about the caller(s).
A COM+ application is assigned a specific NT account to run under. It can either be the interactive user (the user presently logged into the system) or assigned specific NT account. Although interactive user is useful when debugging a component, specific accounts should be used most of the time. If an application wants to borrow the security credentials of its caller so as to manipulate resources as the caller, it can do so on the machine in which it is running by using impersonation. A client specifies whether to allow a server to do this based on how its impersonation level is set, but for the most part, clients allow impersonation. Delegation is a type of impersonation that can allow the server to manipulate resources as the caller, even if those resources are located on another machine. A component that wants to impersonate (or delegate) its caller can call the CoImpersonateClient() function.
A new feature of Windows 2000, cloaking, is enabled by default and allows the original caller to propagate across a series of impersonating or delegating servers, such that the last component in a call chain can still borrow the security credentials of the original caller.
