
By definition, a COM+ application expects to have clients on other machines. The following question then arises: What do you distribute to your clients? In traditional COM, you have several options when distributing components to remote users:
Distribute nothing. Client applications can only communicate with your components using late binding.
Distribute type library. Client applications can communicate with your components using early and late binding.
Distribute type library and proxy/stub DLL. If you are using non- automation types as arguments to your interface methods, you need to ship a proxy DLL to your client.
To instantiate your component remotely, assuming NT 4.0 and VB 6.0, the client must do either of the following:
Use the DCOMCNFG.EXE utility and specify that your component should always be run on a specific remote machine even if requested locally. In this way, any local creation requests made via
CoCreateInstance()or VB'sCreateObjectorNewresults in the component being instantiated on the remote machine.Instead of
CoCreateInstance(), useCoCreateInstanceEx()to specify a remote machine name when creating a component. In VB, two arguments must be passed toCreateObject(), the first being the ProgID of the component and the second being the machine name.
COM+ automates the distribution and installation process. Specifically, it can export applications for automatic installation on other machines. During the export process, COM+ packages all facets of the application (contained components, the component and application settings) into one, easily distributable file. This file can then be imported into another machine just as easily as it was exported.
There are two options whenexporting a COM+ application. One option is to completely export the application for installation on another server machine. You do this when you are finished developing the application and its components and are ready to deploy it on the production server. The other option is of interest to client machines, and it allows you to export the COM+ application as an application proxy. Application proxies can be installed on a client machine such that all the components on that machine point to components on the server machine. When the component is run on any machine where the application proxy was imported, it executes on the machine where the proxy was exported.
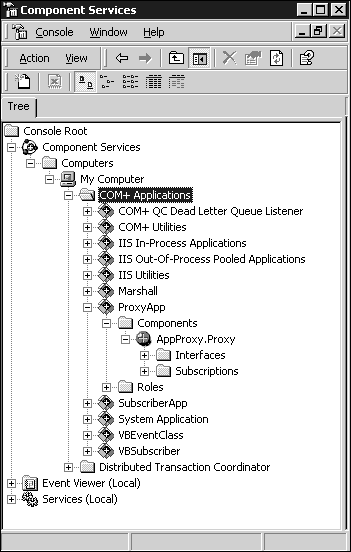
Consider a simple COM component written in Visual Basic called AppProxy. On machine A, you create an application named ProxyApp and install your component under it (see Figure F.1).
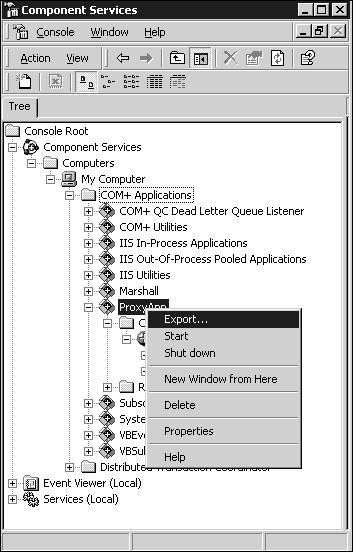
Now, let's export this application by right-clicking the application and selecting Export (see Figure F.2).
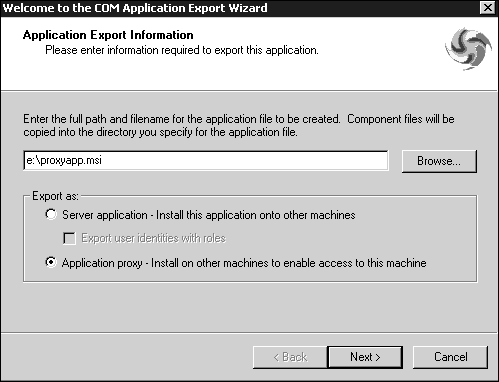
Doing this brings up the COM Application Export Wizard, shown in Figure F.3.
Give the exported application a filename (this is the file you will use to reconstruct the application on machine B) and select the Application Proxy option. If you do not select the Application Proxy option, when the application is reconstructed on other machines, all the components are locally installed and run on that machine.
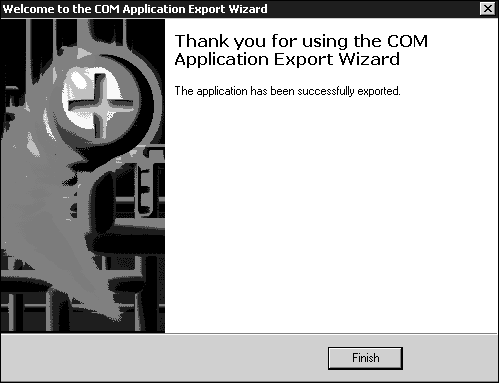
Click Next; if all goes well, COM+ exports the application for you (see Figure F.4).
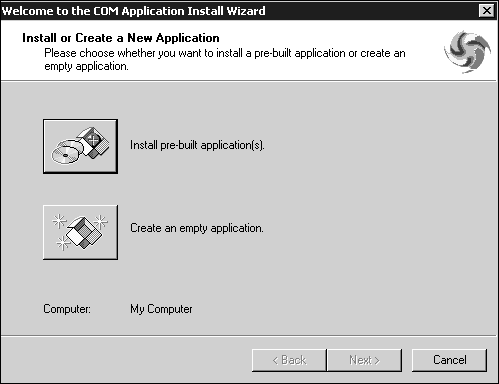
Take the MSI file that COM+ produces and copy it to machine B. Install the application on the machine as an application proxy by starting the COM Application Installation Wizard and selectingInstall pre-built application(s) (see Figure F.5).
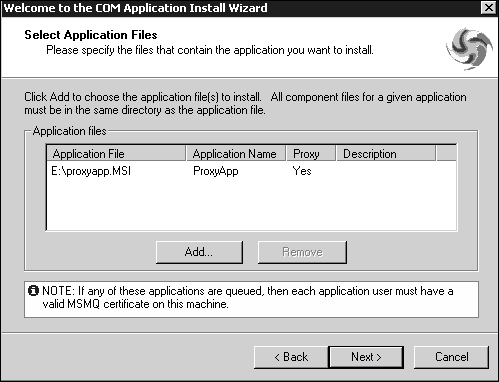
Selecting the first option allows you to select the filename of the application you want to install. Here, select the proxyapp.MSI file that you created on machine A. Doing so brings up the screen shown in Figure F.6.
Note that COM+ has detected this is as a proxy application. Clicking Next allows you to choose where you want the application installed locally (see Figure F.7).
Accept the default and click Next. If all goes well, COM+ installs the application proxy on your machine, as shown in Figure F.8.

During the installation process, COM+ installs the information it needs to access the application remotely. This includes the following information:
Application identity information (AppIDs, CLSIDs, and ProgIDs).
The name of the remote machine.
Marshaling information for all components (type libraries and proxy/stubs).
MSMQ queue names and identifiers (if the Queued Components service is enabled for the application).
Application, component, and method attributes.
COM+ actually stores a copy of DLL(s) (and any associated proxy/stub DLLS) on the local computer in the following directory: Program Files COMPlus Applications { Application-GUID} .
Behind the scenes, components executed on the local machine are instantiated and execute on the remote machine and communicate through DCOM. As such, the only requirement for the local machine is that it be DCOM capable (and have the Windows Installer to process the exported MSI file).
Thus, although a configured component can only execute on a Windows 2000 machine, it can be exported and called by any operating system supporting DCOM. Because this scenario is likely to be commonplace during Windows 2000 migration efforts where NT 4 clients are likely, I will demonstrate it here.
To install application proxies (MSI files) on non-Windows 2000 platforms, you must have theWindows Installer (instmsi.exe), a free utility and SDK available from Microsoft (
http://msdn.microsoft.com/downloads/sdks/platform/wininst.asp
) installed on the destination machine. As an example, we will install the previously exported application (proxyapp.msi) on an NT 4 machine. Follow these steps:
On the Windows NT machine, go to the Control Panel and run Add/Remove Programs, which brings up the dialog box shown in Figure F.9.
Click Install and select the proxyapp.MSI file (see Figure F.10).
Click Finish.
At this point, the Window Installer takes over and installs the application and its associated components on the NT 4 machine, such that they point to the Windows 2000 machine. Because the components execute on the Windows 2000 machine, they can participate in all COM+ services, even though the calling machine is not COM+ capable.


Note that there is one significant restriction with the application proxy technique involving the use ofQueued Components. Recall that Queued Components are instantiated using the queue moniker, a feature exclusive to Windows 2000. It is not possible, therefore, to instantiate and use Queued Components directly from non-Windows 2000 machines. During the installation process, the Windows Installer does the following:
You now can use the component as you do any other standard component. The difference is that it executes on the remote machine.