Choosing the Right Development Option
I contacted Benny to share his story because it is both inspirational and relevant to this book. Also, I wanted to prove the power of both developing and outsourcing quality apps. He found a good target market, created an app that market would enjoy, managed his users, and, consequently, achieved great success. To see for yourself what a professional-quality outsourced app looks like, be sure to download Photo 365.
When it comes to app development, you have two basic options: developing the app yourself or outsourcing the development. There are pros and cons to both options. If you are a tech-savvy programmer with some experience, then learning the language and SDK is a great idea and probably will not give you much trouble. You will certainly have lower overhead costs and thus a greater profit margin if you can develop the app yourself. However, the downside is that learning the SDK takes time, sometimes more than you can spare.
For example, just learning the basics of the SDK took me approximately five months, even with a good background in programming. The SDK is always expanding; I have been doing this for four years, and I still learn new things every day. While you are learning the SDK, someone could be developing your idea! I am not saying that developing your own idea is always a race against competitors, but it is possible that while you are preparing, another developer may cross the finish line with a similar concept. Therefore, I suggest that if you have an idea for the next big app, or an idea that is very time sensitive, then by all means, have a studio or developer create the app.
Having a developer create the app comes with its share of responsibilities and potential issues as well. FMost important, have anyone you are discussing an idea with sign a nondisclosure agreement (NDA ). This document will protect your idea and your intellectual property. Recently, a client came to the studio with an idea for an app that I thought was very original. He came to us because we offer a unique service whereby we develop a client’s app free of charge if the idea is something we really like; in turn, the client receives a cut of the profits. This is a good way for people with great ideas and a low budget to have apps developed. In this particular case, we were a bit busy and were not going to be able to start on the app for at least another month. The client decided he couldn’t wait and went to another studio. A few months later, I noticed that his app was in the App Store. I e-mailed him my congratulations. He didn’t e-mail me back but rather called me immediately. The situation he described was that he still had not developed his app idea; furthermore, the new studio had not signed an NDA. Regrettably, someone was selling his app idea, and he had no way of proving it was his. Unfortunately, this is just one of many times in which the inexperienced have been taken advantage of through unethical business practices.
Moreover, choosing the right developer or development studio is crucial. This is by far the most complicated part of outsourcing the development process. Because I own a development studio the Idea 2 App Store (www.idea2appstore.com ), I am familiar with the information most potential clients will require. The first question you should ask is whether the development studio or developer is local. Basically, developers are divided into two categories: local (which I will define as your country of residence) and overseas (which I will define as Indian, Chinese, or Russian). Both types have positive and negative aspects. Generally, local development will require more financially; however, you will likely get a much better product. A local developer will afford you much greater control over the development process. Most studios with local clientele have a more intimate connection with clients. Frequent face-to-face meetings are ideal for development because you will be able to communicate openly with the developer as you become more comfortable, allowing you to share your vision more completely. Generally, the greater personal handling of the local studios costs more than the services of a freelance developer, but the results are well worth the expense. In fact, the intimacy of a local studio will allow you to see a demonstration of your app before production, meaning that you will be able to correct any errors and greatly reduce the number of revisions needed in the end, a benefit that will likely save you precious time and money. Most local development studios will charge between $75 and $125 an hour for development; this usually includes all the necessary graphics.
Another option is remote development. Overseas developers typically work inexpensively but may deliver subpar apps. This is usually due to the language barrier and the education and experience of the developers. I have outsourced a few apps when I have been too busy. Of the five I have outsourced, only one came back usable. Needless to say, I don’t have entire apps outsourced. Although there are exceptions, historically, local developers/studios create superior apps.
At times, overseas outsourcing can be used without causing the final product to suffer. When my studio becomes overwhelmed with client requests, I choose to outsource some of the development. My method of outsourcing allows me to meet client expectations while still delivering a quality product. If I am forced to outsource development, I make sure that it is only the backbone and basic features of the app. Because doing these is fairly straightforward, it would be difficult for any developer to get it wrong. After the basic features are completed, my team will then develop the more advanced feature set. Experience has taught me that this strategy—outsourcing the easy jobs while keeping the major features local—saves the client money and ensures production of a high-quality app in a timely fashion.
Outsourcing the beginning design and easy features is generally the most mundane part of the development process and can be handled by a relative amateur. There really isn’t a need to spend top dollar when having the base features implemented. For the select few with unlimited means, you could certainly keep all the app development local, but for those who need to economize, the hybrid development plan works well. Once you have a good base app built from outsourcing, find a quality local studio or developer. This is when having someone that is experienced matters. That person will be in charge of handling the more difficult features and overall user interface (UI), or, basically, what the user sees: buttons, images, animations, icons. By handling the development process in this manner, you will save time, money and headaches.
After you have found your developer, what should you do next? First, get a sound contract written. Fortunately, you do not necessarily need an expensive lawyer to make this happen. Search the Internet; there are hundreds of template contracts you can use. Make sure the contract grants you the rights to the source code of the app. If a developer will not grant you the rights to the source code, do not work with that person! Web sites such as Elance (www.elance.com ) are useful for finding developers but are plagued with the issues discussed previously.
Before taking your idea to the developer, design the concept on paper. When a client comes to my studio with an app idea but no paper or Photoshop model, I almost instantly turn the client down. If you take the time to design the app, you will save yourself expense and frustration. Remember, you know in your head what the app needs to look like and do; nevertheless, developers cannot read minds! The more prepared you are, the better chance you have of your app’s being a success.
It is no longer 2009; the App Store is a very crowded and competitive marketplace. If you are looking simply to create the next goofy fart app and retire, you should probably think again. Since the launch of the App Store redesign in iOS 6, it has become even harder for apps to get noticed, and things aren’t going to change with iOS 7. You are going to need a great title, awesome keywords, a killer description, a superb app with beautiful graphics, and a near genius marketing plan. I am not trying to intimidate you; I am just letting you know the facts. Lucky for you, you have this handy-dandy book.
Picking the Right Title
When app lovers are searching for new apps to download, they first see look at the app’s title. The App Store loads the title of the app first and then loads the images asynchronously (in the background). Therefore, in order to sell, your title must be catchy and enticing. A user needs to be able to read the title and instantly think, “I have to buy this” or “Hmm, this is interesting, better open it and check out the details.”
There are two types of titles: plain and description. A plain title is just that: the title of the app. This is common with popular games,such as Angry Birds, Cut the Rope, and Tiny Wings. There are both advantages and disadvantages to this type of descriptor:
- Pros: These short names build great brand recognition and are easy to remember.
- Cons: Without a description following the title, these apps will not get as many hits for keywords (keep in mind that words in the title count as keywords). For instance, if your app were called Photo Caption —Create Pictures with Captions, each word in the title—“photo,” “caption,” “create,” and so on—would get a keyword hit, whereas if the title were simply Photo Caption, only “photo” and “caption” would get hits.
Description titles, conversely, are popular with appreneurs wanting to get a few extra hits for their keywords. Searchable keywords are divided into three categories:
- Publisher name: The publisher for the app’s display name, such as Rovio for Angry Birds . If you search for “Rovio,” you will see Angry Birds right at the top.
- App title: The title of your app; this can be either the plain title or the description title.
- Keywords: Keywords are hidden from the public and are submitted with the app to the App Store.
Publisher name is the strongest keyword and will yield the highest ranking, followed by app title and then keywords. Also built into the search algorithm are the number of total downloads, downloads per day, and ratings and reviews. No one knows for sure the exact formula for the search algorithm, but there are a few educated guesses among seasoned developers. I assign each category a point value to get an idea as to how my app will rank for a searched term. The more points, the higher the keyword ranking. For example:
- Publisher name: Five points
- App title: Three points
- Downloads per day: Two points
- Total downloads: One point
- Keywords: One point
- Reviews: One point
To demonstrate, let’s say our App Store publishing company (or individual name) is Great App Publisher; our app’s name is Great App—Awesome Fun App ; and our keywords are “great,” “app,” “multiplayer,” and “game.”
If you were to search for “great app,” chances are we would come up at the top because “great app” is in the publisher name, title, and set of keywords. There is some speculation that if a word is in your title, then it doesn’t matter if it is one of the keywords. This was true until only recently. Now, if you searched for a term, for example, “great multiplayer” (for our game), and “great” and “multiplayer” weren’t in our set of keywords, then our app wouldn’t have shown up. For this reason, I like to include my app’s title in my set of keywords. For the search “great app,” we would have gotten ten points for the searched terms, regardless of downloads or reviews. That is a very good result, and it would be easy to keep a high search result for that ranking. Understand that this hypothetical scenario is an ideal case. Usually, publisher name is not something you can get a hit on; sadly, that’s just the nature of the beast.
Although you cannot control all aspects of the keyword process, there are still ways to show up very high in the search algorithm. Initially, rank is easy to escalate with new apps, but it is much harder to achieve a high position by climbing the ladder over time. Follow these three steps to ensure you are ranked high when your app is released:
- Make sure your app has a few good keywords in the title and be certain they are used as description to avoid rejection by Apple. Technically, Apple does forbid having keywords in the title, but if they are used as a description of your app, Apple does not care. Take, for example, the app name Gun Range —Fun Exciting Super Awesome Gun Range. Apple will reject this instantly because you are using keywords blatantly in the title. Now, let’s say we change the app name to Gun Range—Virtual Shooting Range 45+ Guns. Apple would likely allow this because it is a description of what the app does. This is a fantastic way to get a few extra keyword hits.
- Check that you have a good set of keywords, including your app’s title name. Recently, Apple changed the search algorithm, such that you cannot search for a word in the title plus a keyword and see a result. Therefore, always include your app’s title as a keyword. There are rumors that Apple will be reverting to the old search algorithm, but be forewarned that minor things such as this are changed quite often.
- Look to see that you are getting a lot of downloads in the first 72 hours of your app’s going live. This is the crucial time for determining where you show up in the search term’s ranking. The first three days can make or break your app. Don’t worry; there is a ton of information later in the book about how to get the downloads you’ll need.
Once your app is in development, there is still work to be done. This is the time to do research on the most important part of the app: keywords. Keywords, as mentioned earlier, are words or phrases that users will search for to find your app. No matter how great your app is, if users cannot find it, then it will not sell. Regrettably, a defined set of keywords that will guarantee your app is found and downloaded does not exist. However, the web site AppCodes (www.appcod.es ) is a hidden gem, a resource for keyword help. This site is incredibly useful for optimizing search terms. Its value lies in allowing you to see your competitor’s keywords. This is huge! Most people do not understand the power of keywords and how they are used to increase your app’s visibility in the App Store. Quality keywords will put your app in front of the most users, and because of the vast number of apps available to consumers, you will need all the exposure possible. There are no set keywords that produce perfect results. Each app is different and, as such, requires specialized keywords.
Many developers will attempt to benefit from successful apps by including app names in their set of keywords. The purpose of this ploy is to gain traffic generated from popular apps. Although on the surface this may seem like a logical plan, it is not a good idea for one reason: in general, people don’t search for apps by name. Users will usually enter a search term such as “fun game” or “free shooting game.”
So, once you have done your research and have your keywords ready, what can you do next to ensure success?
Besides the title, an app’s icon is probably the most important factor in determining whether the app is downloaded. Consumer research attests that people like visually appealing icons. Case in point, we had an app that was really entertaining in terms of content but that had a really ugly icon. Sales were disappointing, to say the least. In an effort to improve sales, I decided to have the icon redone from the ground up. The icon looked substantially better; the makeover gave it that visually appealing “wow” factor. Overnight, sales quadrupled and continued to rise. The app went from being ranked 157 to 24 in games in one day. Remember when I said that users love updates? When updates address the issues and concerns users have, they are ecstatic to see the changes; happy users often tell other people about the apps they enjoy.
Because visual appeal is subjective, there is no set standard for designing an icon. Often, the graphic design process is the greatest struggle for appreneurs, but there are some guidelines that can make the process less painful. First, look at what kinds of icons your competitors have. What do you like about them? What do you dislike? Have the users said anything about the icon in the reviews? Once you have an idea for an icon, jot it down, and find a quality graphic designer. Do not pinch pennies when it comes to the graphic designer. Graphic designers abound, but quality graphic designers are much more rare. Finding a designer is much like finding a developer. You need to look into the person’s past work and check the quality. Remember, the icon can make or break the app. I have seen apps that had the potential to go viral, but because the icon was so unappealing, users simply didn’t download the app. To consumers, their phone is a prized possession; no one wants ugly icons on their home screen.
When you have what you think is a good icon designed, share it with your friends. Ask for their honest opinion. Listen very closely to any constructive criticism they may have. I would also post the icon on any forums that may be specific to your app and ask for opinions there. Two forums, iPhoneDevSDK (www.iphonedevsdk.com ) and MacRumours (www.macrumors.com ), are both generally good for this type of thing. Feedback is always important, and it is imperative to your app’s success that you learn to receive it. Just because you like an icon doesn’t mean everyone else will. Do not get so invested in your personal opinions and tastes that you discount valuable information. Ultimately, your goal is to make an appealing app for a user, not yourself.
Writing an Engaging App Description
At this point, you have developed your app, chosen keywords, and designed a beautiful icon. You should be finished, right? Almost. At last, you are in the final stages of the development process. To complete the process, you need to write a great description of your app’s purpose and function. Think of the app’s description as a summary of what the app will do. Grab your favorite book or DVD, and flip it over to the back for inspiration. Imagine you are the app consumer. What could you read that would compel you to download the app? If the consumer is reading your description, that person is already intrigued; either your icon or your app title has piqued the consumer’s interest. Now, it is time to close the deal! As an attention grabber, I like to start off my descriptions with any awards or great reviews my app has received. If a popular app review web site reviews one of my apps favorably, I will copy and paste the short review into my description and cite it. Users like to see this; it shows them they are downloading an excellent app. Even if you don’t have a popular web review, you can also benefit from posting a specific user’s review from the app’s “Reviews” section. Although anonymous reviews are not as prestigious, they are still worthwhile, especially if your app is new. After positive reviews, I then like to put a few of the app’s highest-achieved rankings in the app’s description.
When users open my app, the first things they see about the app are positive. They see it has a good ranking and that it has earned favorable reviews. Oftentimes, this alone can be enough to get you that download. Yet, although you want to present your app in the best possible terms, it not advisable to invent good reviews or rankings if your app has not yet earned them. Give it some time; if, after a few months, you don’t have a good review or high ranking, it is time to make some changes to your app, because something is not right.
Once you have a good description written down, take it to an editor, or a friend who is grammatically gifted, and have him or her proofread it. Chances are by this point you’re very excited about your app, and this can cause you to overlook a typo or other error. Trust me, I know from personal experience how embarrassing proofing errors can be. Granted, this metadata can be changed even after an app is live, but it still makes you look bad. You want your description to be engaging, informative, and accurate. Despite the description’s importance in terms of appeal to app users, do not be misled by appreneurs who tell you that you can get search hits for words in your description. This is not true. Your description has one main purpose: to tell the user what your app will do.
Last, but certainly not least, is the app’s display screenshots. In iOS 7, apps are displayed via tiles. These tiles show one app at a time, but they offer much more information about the app than previous displays. The biggest addition is that your screenshots show up on searches. Screenshots are now make-or-break for your app. Take a look at Ironhide Game Studio’s Kingdom Rush Frontiers:
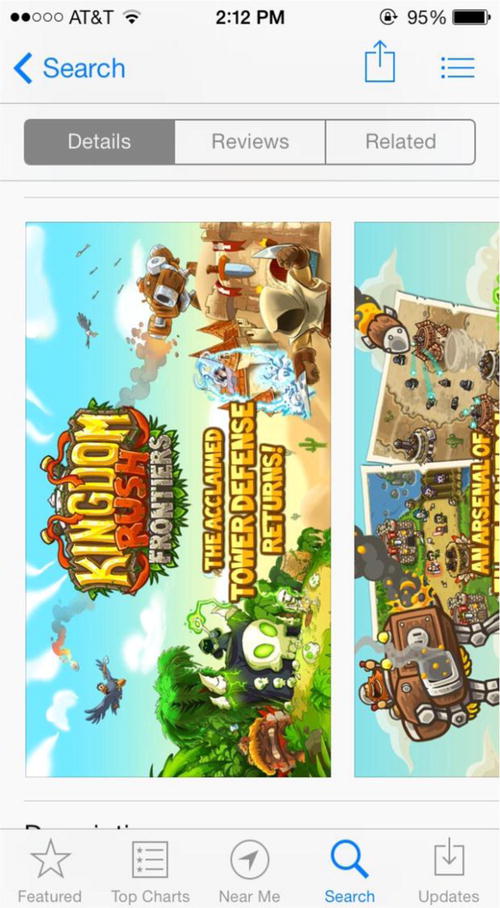
Screenshots are usually the first and last image users see before buying the app, so you need to impress them. Weary buyers are often convinced to buy an app because the screenshot sealed the deal. Screenshots are generally of two varieties in the App Store: plain (essentially, an exact replica of the app’s screens) and designed. Designed screenshots can either enhance or degrade an app, depending on the quality. Most use an iPhone template and add cool colors and text over the plain screenshot that really make the image come to life. For ideas on how to do these well, take a look at the top 25 apps. These are usually done by companies with large budgets and have amazing graphics. But, bear in mind that whereas you cannot go wrong with a simple screenshot, a poorly designed screenshot can have devastating results. Recently, I tested my theory. We had a funny picture-captioning app that was ranked number 12 in its category. The app had plain screenshots, so I decided to make some rather poorly designed screenshots and see what happened. (Testing a theory on a top app is not generally a good idea, but I was willing to risk it in the interest of gathering the most accurate data for this book.) Almost overnight, the app’s ranking fell by nearly a hundred spots. To test the positive effects of superb work, I had my designer create some professional screenshots. My theory was proven to be accurate. With the new, graphically pleasing screenshots, the app surged in the rankings to number 7, even higher than its earlier position!
An effective strategy I like to use when making designed screenshots is to try to tell a story. If you can do this successfully, potential buyers will be attracted. Make the screenshots colorful and fun. Users are buying apps to have a good time; make them entertaining! Here are the example screenshots from our photo-captioning app Meme Creator Pro. They are very simple, but much more entertaining than plain screenshots.
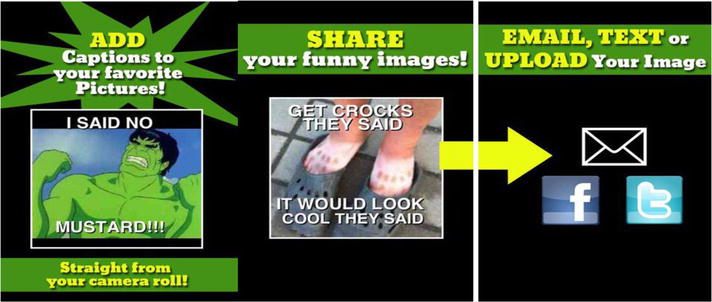
Do you see how these screenshots tell the story of the app—what it is and does? Well-designed screenshots such as these are also more amusing and visually appealing than ordinary, straight-from-the-phone screenshots. If you have been researching apps, you probably noticed that most of the top-selling apps include well-designed screenshots. Why do you think that is? Simply put, good-looking screenshots drive downloads. The possibilities for screenshot design are endless and vary with each unique app. If you find a good designer for your screenshots, stay with that person. As discussed previously, finding a reliable, capable designer is not an easy task, and you may have to work with a few different people before finding one that meets your needs.
Finally, you have your first app ready to be uploaded to Apple for review. Keep this in mind: Apple has become much stricter on the content it will and won’t allow in the App Store. To avoid rejection, be sure to review the Apple IOS Human Interface Guidelines before submitting an app. If your app requires any type of login or registration, provide Apple a test, or demo account, in the “Review Notes” section of the metadata. If you have any concerns as to whether your app may get rejected, I recommend signing up for any developer forum and posing your questions there first. My personal favorite is iPhoneDevSDK (www.iphonedevsdk.com ). Quality developers and appreneurs have formed a professional learning community via this site, in which developers will help solve your most troubling content issues. It is likely you’ll see me posting on there as well. If your app gets rejected, don’t panic and start to wave the white flag. I have had more apps rejected than I can count. My first reaction was usually worry over the months I had spent working in vain. Usually, you will get a message from the reviewer explaining why your app was rejected. Simply make any requested changes and reupload. If you reupload a rejected app, the same reviewer will review it the second time. If it gets rejected the second time, the odds are that particular reviewer will never accept it.
To circumvent the same reviewer, change the app’s title, using, for example, a string of random letters, so that you can use the app’s title again when you reupload the app. Then, start the upload process again from scratch, reuploading the app. This time, you will get a new reviewer, and maybe your luck will be different. At this point, you will need to create all new metadata, keywords, and screenshots. My rule of thumb is that if I get rejected from three different reviewers, then I throw in the towel. I draw the conclusion that my app contains content that Apple will not allow. If you can find an app in the App Store that is similar to yours, but you are getting rejected, just hang in there, and keep uploading. It may take some time, but if the other app was approved, so, too, can yours be. Once your app is live and in the App Store, you can finally relax, right? Wrong. Relaxation of concern is the most crucial mistake amateur appreneurs make.
How to create considerable profits and long-term revenue are considered next, in Chapter 3.