So hopefully you have your Particle Core connected to your Wi-Fi network and have succeeded in flashing new code to the board over the air. Wireless programming has many benefits but there is more to the Particle Core, which makes it very interesting for wearable applications. What's the point of being connected to the Internet if we can't use it to send data? The people behind the Particle Core have already thought of this and have implemented some really nice features for data transfers and remote communication with the board.
First off, there is the Particle Dashboard, which you can find at the following link: https://dashboard.particle.io.
This will open up a website, which should look something like Figure 8.5. If you are logged in to the web IDE, the dashboard should automatically open. If not, you need to enter your account information, which is the same as for the app and web IDE:

Figure 8.5: The Particle Dashboard
This dashboard is able to visualize data sent from the Particle Core board. In software architecture, there is a messaging pattern often used called publish-subscribe, or pub/sub for short. The basic idea behind this form of messaging is that a sender of messages, called a publisher, can send messages without a specific receiver in mind. On the other side, you have subscribers who can collect data without the need to connect to the publisher. This works by naming the data and storing the data on a server where it will remain until changed or removed and the subscribers can collect the data from this server. The whole idea is similar to a radio where a publisher acts as a radio station and anyone with a radio receiver can tune in to a channel and listen to whatever is broadcasted on this channel.
In practice, this means that you can connect your Particle Core and broadcast whatever sensor data you want and anyone or any application can listen in to your channel and use this data for something else. In order to try this out for yourself, we first need to have a look at some code:
    void setup() {
  //No need to do anything
}

void loop() {
       //Publish the data
        Spark.publish("MyMessage","Hello",60,PUBLIC);
       //Wait for a bit
        delay(1000);
       //Publish the data
        Spark.publish("MyMessage","Goodby",60, PUBLIC);
       // Wait for a bit
        delay(1000);

}
In the code example just given, we are using the publishing command to send information to the dashboard. This first parameter of this function is the event name, or channel name if you like. If the event name does not exist, it will be created.
The next parameter is the actual data you want to send. In the case of the previous code, these are the messages Hello and Goodbye.
The third parameter is the TTL value, which is short for time-to-live, which limits the lifetime of data in a computer or network. TTL prevents data from circulating indefinitely. In the case of the Particle Core, the default TTL is 60 milliseconds and if you don't have a good reason to change it, I would just stick with this value.
The last parameter is used to indicate whether you want your data to be private or public, for example, if you want other people to be able to access your data or not. You do not need to add the last two parameters if you don't want to. If you don't, the default values will be used, which are TTL 60 and the data will be published as public.
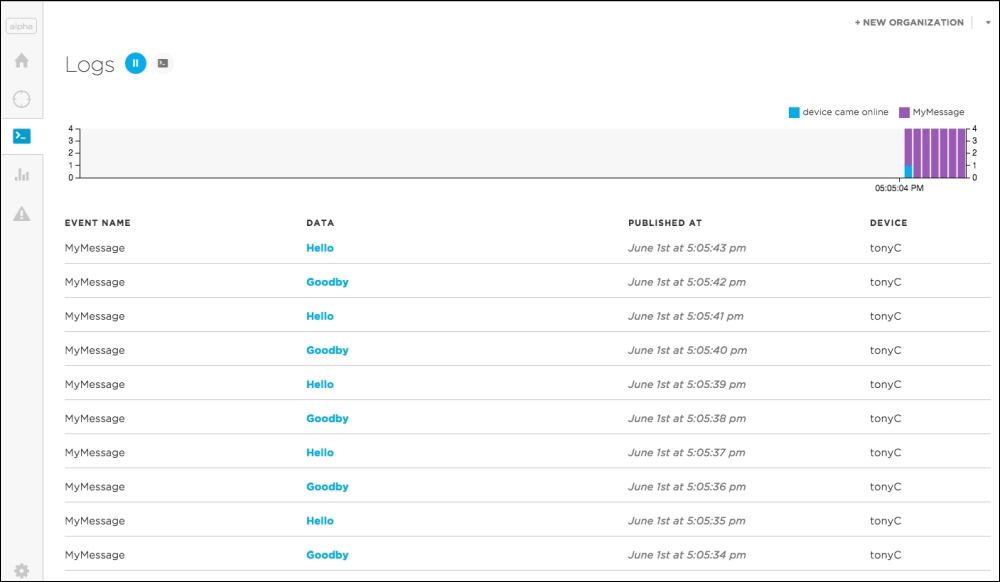
So to sum up, what this sketch does is basically send a message every second, where it alternates between Hello and Goodbye. Flash the code from the web IDE and once done, open up your dashboard. It should start to look something like Figure 8.6:

Figure 8.6 Receiving data in the dashboard
As you can see, we have multiple messages displayed; every second, the data is updated since this is the delay we use in the code. We can also see when the data was published and from which device. In my case, I have changed the name of the Particle Core to tonyC. The interface also includes a visualization of a timeline when the data was received.
Now let's say we have the opposite scenario, where you want to read data from someone else's data stream. In order for the next code to work, you need an additional Particle Core set up with the first code example below and the second Particle Core with the second example code. I don't expect you to buy two Particle Cores, but you might have a friend that owns one who could help you to try out this next part. Or you could head over to the Particle community forum and ask someone to help you, or check whether someone has an open data stream you could try subscribing to: https://community.particle.io/.
Once you have found another Particle Core buddy, ask them to flash the following onto their board:
void setup() {
//Do nothing
}

void loop() {

Spark.publish("tonyC_data_stream","ON");
delay(2000);
Spark.publish("tonyC_data_stream","OFF");
delay(2000);

}
Make sure you change the event name to something that corresponds to your application. If everyone that reads this book uses the same event name, we might end up in trouble! So just make sure that the name is unique. The reason for this is that the name works as a filter. In the next code, we will search for this event name in the subscribe command. But this command is very smart so it uses the event name as a prefix filter. This means that if we were to add the event name hello, the command would subscribe to data streams that starts with hello, for example, streams named helloworld, hello_all, or hello_to_me. But if you make the event name unique enough, you will avoid unwanted data subscriptions.
Once you have one Particle Core set up with the previous code, flash the second one with the following code:
int led = D7;

void setup() {
pinMode(led,OUTPUT);
Particle.subscribe("tonyC_data_stream", doFunction);
}

void loop() {
//Do nothing

}

void doFunction(const char *event, const char *data)
{

    //Compares the incoming data to the string "ON"
  if (strcmp(data,"ON")==0) {
digitalWrite(led,LOW);
  }
    //Compares the incoming data to the string "OFF"
  else if (strcmp(data,"OFF")==0) {
digitalWrite(led,HIGH);
  }

}
In the second code example, we are subscribing to the same channel that the first Particle Core board is publishing to. If the data string ON is sent, the second board will turn on the LED next to the USB port and if OFF is sent, the LED will turn off.
If you can't find anyone with a second Particle Core and you don't want to spend the extra money, don't worry, the Internet can be your friend. Next, I will show you how to connect and control your Particle Core from the Web.
