
There are many ways you can desolder components and it is truly an art in itself. If you are new to desoldering electronics, I would recommend starting with cheaper components. An old broken radio is a perfect training ground as it includes many types of components in different sizes and shapes. There are special materials available for desoldering components, such as solder wicker and suction pens, but personally, I found that the best way to do it is to use a soldering iron and a pair of tweezers to grab and pull the components. How to desolder electronics is hard to illustrate in a book so I recommend having a look at these videos to get a sense of what we are dealing with:
https://www.youtube.com/watch?v=77JgIqraX_I
https://www.youtube.com/watch?v=Z38WsZFmq8E
There is no single way that is the best way, so I would watch as many videos you can in order to get a good grasp on the concept. Then, start training on your own on any kind of electronic junk you might have lying around. However, two ways you could do this is:
- To heat the solder, hold a component in place and then drop it hard on to a table. When the component hits the table with force, if the solder is hot, the solder will usually fall off on to the table. Be very careful using this technique as you do not want to splash hot solder onto your finger or any flammable materials of surface. Never use a table that is not meant for working on, since the hot solder can leave a mark.
- The alternative approach is to heat the solder pads and pull the component using tweezers or a pair of needle nose pliers. Again, you heat the solder holding the components in place, and then you pull the components using the tweezers and your other hand. Make sure that you never heat a component for too long since this can damage the components. Only heat it for a few seconds and then try pulling the component. If it does not come off, let it cool down for a few seconds before you try again. Beware of heating the tweezers as they can get hot fast.
Once you feel confident in desoldering, you can get going with removing the JST connector from the battery charger assuming you are using a similar charger and the male pin headers from the Particle Core board. If everything goes to plan, you should end up with something that looks like Figure 9.7.
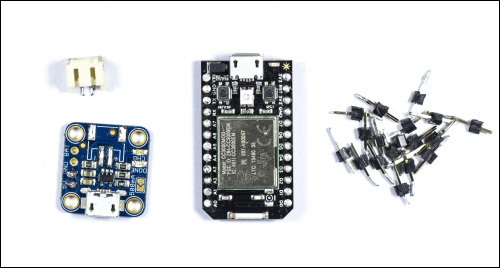
Figure 9.7: The JST connector and male pins desoldered
In order to remove all the male pin headers from the Core board, the trick is to cut the plastic that holds all the pins together using a pair of mini side cutters, or similar, and then you can desolder the pins one by one instead. In order to remove the JST connector from the USB charger, I recommend starting the ground pads on the side. Start with one side heating the solder and pull it up as much as you can, and then do the same for the other side. Do this a couple of times and eventually the connector clears from the pcb board. Then, heat the positive and negative connectors at the same time and simply remove the JST connector.
After you have finished desoldering, have a look at your pcbs and check that you haven't soldered connections together by accident. Take your time desoldering the components in order to not damage any of the other components. For future investigations into desoldering, I would recommend looking up solder suckers or the desoldering braid shown in the video link mentioned earlier. Personally, I don't prefer these tools, but this should not stop you from trying them out. As I said before, when it comes to soldering and desoldering, there are a lot of different techniques and tools, and you should investigate different approaches and try to find a work method that fits your needs.