
Now it's time to move on to the design of the watch; as mentioned before, you can incorporate any kind of sensors you like into the design of your watch, but take into account the size of any component you add. In order to turn your components into a watch, we will base the design on the template shown in Figure 9.3. Ideally use this template to cut the shape out of a 1 mm thick plastic material. This can be any material as long as it's sturdy enough but has some flexibility to it. The plastic material I used, also shown in Figure 9.4, is a fairly common 1 mm plastic material found in arts and crafts stores.

Figure 9.4: The template design for the watch strap
The inspiration for the design comes from traditional wristwatch leather crafts where they often use plastic inlays to make the straps more ridgid. The leather inspiration does not stop there, since we will be using leather as our other casing for the watch, giving the design a nice mix between high and low tech.
As you can see in Figure 9.4, the edges are covered with small holes. The idea is to use these holes later on as guidance once we sew our watch together. You can cut the template by hand since 1 mm plastic is fairly easy to cut with a pair of normal scissors. But, once again, if you do have access to a laser cutter, it would be the preferred choice since the spacing between the holes can be hard to achieve by hand. There are specialized watch-making tools for making holes like this, but if this is the only watch you plan to make, a nail and a hammer will do just fine.
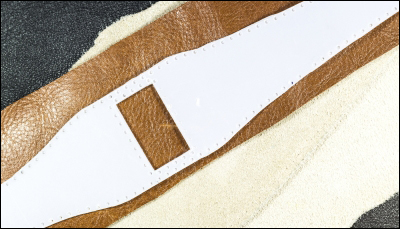
Figure 9.5: The cut template and a selection of leather types
In Figure 9.5, you will find the cut template and a selection of different leather types. Any type of leather you prefer should work for this project, but my recommendation is to choose one that is not too thick. I would stay below 3 mm or else it might be hard to sew when it's time to stitch things together. There are also synthetic leathers available if you are not to keen on the idea of using real leather, or you could use fabric as well. Don't forget that this might not make the watch as weather-resistant as with leather. In any case, this watch will never be waterproof so don't go swimming with it.
Before we start soldering the components together, it is a good idea to place them onto the template in order to figure out the best location. In Figure 9.6, you will find the layout I was aiming for, which gives you a good general direction. In my case, I have very thin wrists so it is a good idea to put the components in place using sticky tape in order to wrap the template with the components around your wrist to see whether the placements works for your wrists. The important parts are that the screen needs to line up with the hole in the template and the micro USB connector on the battery charger. The USB connector needs to be placed close to the edge so that we can access it later on once everything is stitched together.

Figure 9.6: The placement of components on the watch template
Once you feel your components are located in the right place, you can mark their position onto the template using a pen. Before we attach and solder them together, we need to make some modifications to the Core board and the USB battery charger. As you might have noticed, the JST connecter and the pins of the Core board are not optimal for a flat design like in this project, and we can fix this by desoldering the pins and JST connector since there is no need for them.