
1
Assemble Your Supplies for Creativity
You cannot govern the creative impulse; all you can do is eliminate obstacles and smooth the way for it.
~ Kimon Nicolaides

Streamline your supplies to free your artistic impulse. Simplicity is often the catalyst for creativity. I keep all my materials in three trim tool kits—one for drawing, one for collage and one for watercolor. I keep my sketchbook and watercolor palette in a light and slender portfolio. It’s a breeze for me to grab my three essential tool kits and my portfolio and bring them along with me wherever I go. This practice truly extends my studio out into the world at large.
You’ll never have time for art unless you claim the time. One way to make time is to have your art supplies organized and ready to go. In this chapter, I show you how to make a portfolio case, uniquely designed to fit your own sketchbook. I also show you how to make your own tool kit supply cases, customized to match your personal choice of materials. The materials you need for the projects in this book are included in the portfolio and three tool kits. The promise of art day-by-day is sewn into your portfolios and three roll-up cases.
The idea for these tool kits came to me while packing for a trip. After years of travel, I have learned to keep my toiletries case pre-packed. I don’t worry about remembering my toothbrush because everything is already there. Having a compact and complete set of art supplies ready to go propels creativity by eliminating packing obstacles. Make a quick transition from the responsibilities of life into a creative moment in your artistic journal simply by having all your materials portable and ready for action. Although I have a studio, it is not the only place I create art. At our cabin on the Metolius River in Oregon, I paint and draw at the kitchen table, outdoors by the river or even on a mountain hike. I am often on the road, overseas in foreign countries, teaching workshops or visiting friends and family out of town. Like you, I must attend meetings, and cool my heels in waiting rooms and airport lobbies. But, wherever I am, I am confident I have everything I need for everyday Art Escapes in my artistic journal.
Sketchbook Portfolio
Keep your sketchbook in an easy-to-make portfolio. I designed this portfolio to hold my favorite sketchbook, the Aquabee 9" × 12" (23cm × 30cm) spiral-bound sketchbook. I have filled more than twenty of these books so far, and plan to keep on going. I am drawn to this size because it gives me enough room for my drawings, paintings and collages, yet is still very portable. You can easily alter the dimensions of the pattern if your current sketchbook is a different size. One of the most important features of a great sketchbook is spiral binding, so the pages lie flat when open. Good, durable paper that takes a lot of abuse is also an essential. The Aquabee sketchbook accepts water media, as well as pen and pencil, surprisingly well.

Make a Portfolio for Creative Portability
This folded portfolio is a compact way to carry and protect your sketchbook, as well as other essentials for painting and collage. And it is fun to make. I slide my sketchbook into one side, and everything else fits neatly into the other side.

Demonstration: Make a Sketchbook Portfolio
MATERIALS
Felt One 14" × 22" (36cm × 56cm) piece Two 14" × 105" (36cm × 27cm) pieces
Grosgrain ribbon Four pieces, ⅝-inch (12mm) wide, 8 inches (20cm) long
Needle and thread or fabric glue
Pencil
Pinking shears
Pins
Spiral bound sketchbook 9" × 12" (23cm × 30cm)
Straightedge or ruler
![]() At the fabric store, you will find bolts of polyester craft felt in a spectrum of colors. For a 9" × 12" (23cm × 30cm) sketchbook, you will need one piece of felt measuring 14" × 22" (36cm × 56cm). You will also need two pieces of felt, each measuring 14" × 10H" (36cm × 27cm). Make adjustments to the dimensions if your current sketchbook is not 9" × 12" (23cm × 30cm) in size.
At the fabric store, you will find bolts of polyester craft felt in a spectrum of colors. For a 9" × 12" (23cm × 30cm) sketchbook, you will need one piece of felt measuring 14" × 22" (36cm × 56cm). You will also need two pieces of felt, each measuring 14" × 10H" (36cm × 27cm). Make adjustments to the dimensions if your current sketchbook is not 9" × 12" (23cm × 30cm) in size.
It is not necessary to use pinking shears, as felt will not unravel even if cut with regular scissors. However, I like the finished look of the zigzag edge. If you prefer, you can use fabric glue rather than sewing.

1 Cut Three Pieces of Craft Felt
Use pinking shears to cut one piece of felt measuring 14" × 22" (36cm × 56cm) and two pieces of felt, each measuring 14" × 105" (36cm × 27cm). Be sure to make adjustments to the dimensions if your current sketchbook is not 9" × 12" (23cm × 30cm).

2 Place the Two Smaller Pieces on Top of the Larger Piece
Place the two smaller pieces of felt on top of the larger piece, leaving a 1-inch (25mm) gap between them in the middle of the large piece of felt. This gap allows for the width of the sketchbook and palette when the portfolio is folded in half. Cut four 8-inch (20cm) pieces of ⅝-inch (12mm) grosgrain ribbon. Tuck the ribbon pieces between the top and bottom layers of the fabric, on each side, as shown. Pin all the materials in place.

3 Sew or Glue the Edges
Sew (or glue) around all the sides ¼-inch (64mm) from the outside edge, as shown, leaving the inner edges of the small pieces of felt unsewn so that they form pockets.
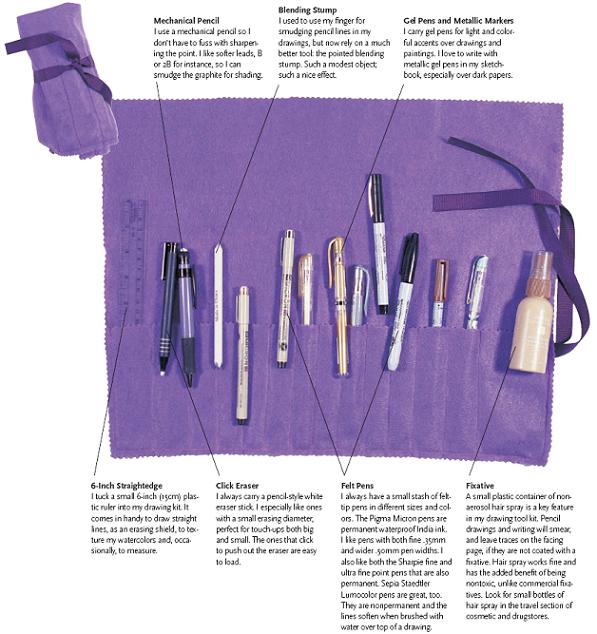
Drawing Tool Kit
All I need for drawing is rolled up into this colorful little bundle. I’ve refined my selection of tools over time to identify just the supplies I need—no more and no less. I always plan with portability in mind and these tools are my drawing essentials. I know that my purple pouch has all my drawing supplies—collected, organized and ready for action. It’s an invitation to dive into my artistic journal!
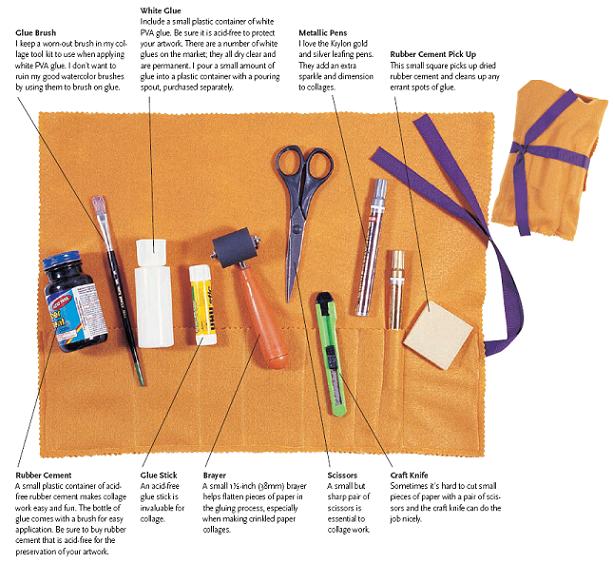
Collage Tool Kit
Everything you need for creating collages is included in this tool kit. A few wellchosen supplies consistently do more for your creativity than a room full of supplies you don’t use. This yellow bundle, wrapped with a purple ribbon, entices me to open it, and have fun making collages in my sketchbook. Choose lively colors of felt and ribbon—why not put color into your art supply cases? You’ll see how to use these supplies to create an exciting array of assemblages and collages in chapter five.
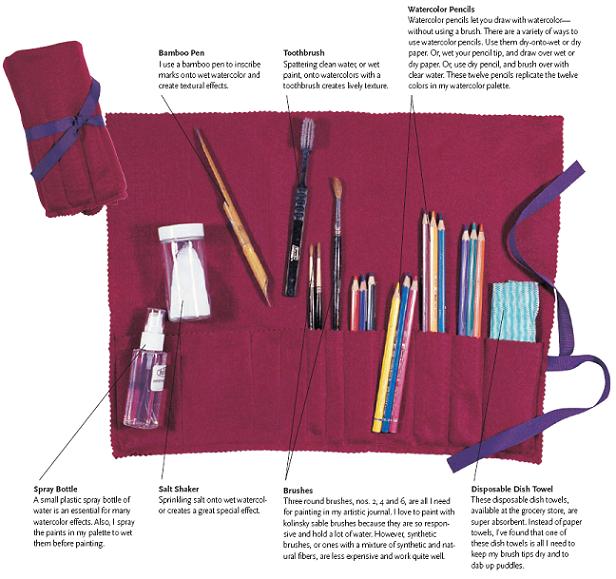
Watercolor Tool Kit
This selection of supplies is a comprehensive collection of what I consider the essentials for watercolor. I recommend felt for my supply case design because it is a highly absorbent material and perfect for soaking up dampness from brushes or other watercolor tools. This red roll-up case invites me to paint. I know it has all I need to get started, and keep going. All I need to do is take my journal and watercolor palette out of my portfolio, unroll my watercolor tool kit, and start playing in full color.
Demonstration: Make Your Own Tool Kits
MATERIALS
Felt One 14" × 18" (36cm × 46cm) piece One 5" × 18" (13cm × 46cm) piece
Grosgrain ribbon two pieces, ⅝-inch (12mm) wide, 12 inches (30cm) long
Needle and thread, or sewing glue
Pencil and straightedge
Pinking shears
Pins

![]() Make a supply case that fits your supplies, instead of the other way around. I have a bunch of zippered cases, brush holders, portfolios, carriers and totes in all sizes and shapes that almost work for me. But the only way for me to get exactly what I need is to make it myself. I designed this easy-to-make roll-up supply case for my three essential tool kits—one for drawing, one for collage and one for watercolor. Choose different colors for each of them for quick identification. All I do to make art is grab and go. My friends love when I make a colorful supply case for them as a gift.
Make a supply case that fits your supplies, instead of the other way around. I have a bunch of zippered cases, brush holders, portfolios, carriers and totes in all sizes and shapes that almost work for me. But the only way for me to get exactly what I need is to make it myself. I designed this easy-to-make roll-up supply case for my three essential tool kits—one for drawing, one for collage and one for watercolor. Choose different colors for each of them for quick identification. All I do to make art is grab and go. My friends love when I make a colorful supply case for them as a gift.
1Cut Two Rectangles of Craft Felt
Cut one piece of craft felt into a 14" × 18" (36cm × 46cm) rectangle using pinking shears. Cut a second piece of craft felt into a 5" × 18" (13cm × 46cm) rectangle with the pinking shears. Next, cut two pieces of 5.8-inch (12mm) grosgrain ribbon 12-inches (30cm) long.

2Sew the Sides and Bottom Edges
Place the smaller rectangle of felt on top of the larger rectangle as shown and pin together. Tuck the ends of the ribbons between the larger and smaller rectangles, on the right edge, close to the top of the small piece of felt and pin together. Sew (or glue) along the two vertical sides and bottom, 4-inch (64mm) from the edges, as shown.

3Make Pockets for Each Tool
Place your tools on top of the supply case and mark where you want to create a pocket. Use a ruler to make a straight line. Sew (or use fabric glue) along the vertical lines to create slit pockets to accommodate your tools. A good rule of thumb is to allow a 1-inch (25mm) width for the average pen or pencil, adjusting as needed for the size of your tools.
