5
Art Assemblage, Collage & Other Inspiring Ideas
I am my sketchbook.
~ Pablo Picasso
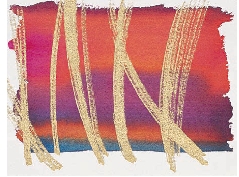
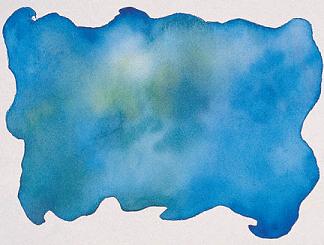
WASH DAY, VERNAZZA
Watercolor on crinkled Masa paper collage, mounted on Arches 140-lb. (300gsm) cold-pressed paper 26" × 20" (66cm × 51cm) Collection of Randall Vemer
Making collages is exciting. I love the spontaneity of cutting and pasting. The best part is that I don’t need a plan to begin. Collage is a dynamic tool for spontaneous design. Transform the ephemera of daily life—candy wrappers, ticket stubs, bottle labels, postcards and stamps—into enduring images. My spirit of invention soars when I construct abstract assemblages, and paint on unique collaged surfaces.
This chapter is a resource manual of my favorite collage techniques, time-tested and shared with many friends, students and colleagues. All you need is your collage tool kit to get going on new, energizing page-a-day creations. You will learn how to make watercolor mosaics, painted paper cutouts, paper weavings, crinkled paper collages, and found-object collages.
Each project is an open door to a fresh approach in your artistic journal. There are many page-a-day ideas and creative prompts to trigger your imagination. I hope you enjoy the experimentation of art assemblage, and the invitation to celebrate the day in new invigorating ways.
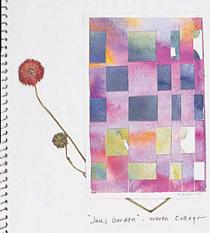
Watercolor Mosaics
I think of watercolor mosaics as inventions of the soul. Make a mosaic-ofthe-moment in your journal and see what springs forth from your brush, your hands and your spirit.
There is infinite diversity to this simple format. Expand your visual vocabulary with abstract collage art. Some artists have become positively addicted to this art habit.

Cut Pieces in Random Sizes
I had fun assembling this design to commemorate a day spent with friends. I tried to recreate the blues and greens of the river and sky on my painted paper. I cut the rectangles and strips in random sizes for variety, some large, some small and some medium. The composition came together quickly after I cut the pieces. I included both the sailboat and boathouse in the finished design. It all started with rectangles and strips.
Express Yourself in Colorful Abstractions
I created this watercolor mosaic in response to the tragic events of September 11, 2001. I used color and design, rather than a direct depiction, to reveal my emotions. I painted a piece of paper with the colors of intense fire and smoke, then cut it into strips before gluing the collage into my journal.
9.11 NYC
Watercolor and collage on Arches 140-lb. (300gsm) cold-pressed paper 5" × 6" (13cm × 15cm)
![]() PAGE-A-DAY IDEA
PAGE-A-DAY IDEA
Free Your Spirit With Mosaic Art
A few years ago, my family had just begun a very special yearlong sojourn in Europe. I was so excited to begin our adventure, and so full of ideas and dreams of the artwork I would produce. There was one problem; I was paralyzed with the limitless potential. The French countryside where we started our sabbatical was so heartbreakingly beautiful. How was I going to paint it? How could I do it justice? I broke through my painter’s block by creating watercolor mosaics. I started painting paper, simply replicating the colors of the French hills, vineyards, farmhouses and flowers. Then I cut my French-inspired watercolor papers into rectangles and strips. I designed them into abstract collages and glued them into my brand new journal. I broke through the barrier of “what to do?” with a liberating artistic invention.
Use Black or Colored Backgrounds
![]() PAGE-A-DAY IDEA
PAGE-A-DAY IDEA
Let the Subject Emerge
Take a piece of watercolor paper and simply enjoy painting on the paper, without giving any thought to your subject matter. The subject, at this moment, is you. Remember, the muse comes to the moving brush. You may want to paint more than one piece of paper, as you loosen up. If you like, play some music while you paint.
Pick one of your painted papers and cut it into rectangles and strips. Create a watercolor mosaic, allowing the subject to surface unbidden. Give your mosaic a title only after you finish composing your design. Perhaps you will discover something about yourself in the process. Sometimes I don’t know what the inspiration for an artwork is until it is done. This is part of the magic of art.
Take a look at the watercolor mosaic, Friday Night Chopsticks. You can see it in its original form on top, and recreated against a background of black cardstock below. It’s surprising to see the brilliant mosaic pieces as they appear against different backgrounds. Experiment by varying background colors for your mosaics—it all adds to the spirit of innovation. You can create your own version of Friday Night Chopsticks using the step-by-step demonstration.

FRIDAY NIGHT CHOPSTICKS
Watercolor, gold leaf and collage on Arches 140-lb. (300gsm) cold-pressed watercolor paper 5" × 6" (13cm × 15cm)

Add Texture Using Special Effects
One of the wonderful attributes of watercolor is the ability to add fascinating texture to the painted surface. Here are four of my favorite techniques. Have fun and experiment with all four as you create painted papers for your watercolor mosaics. Use one or combine two or more of these techniques for added surface richness.

Scratch
Scratch a pointed object into wet paint and you will produce a dark line on your paper. The paint puddles into the valleys created by the impressions made with the pointed tool. On the right, I inscribed lines with the tip of a bamboo pen; the dark marks in the middle were made from the point of my scissors. Scratching into dry paint creates white marks as you reveal the paper. The white marks on the left were made by scratching with a craft knife.

Sprinkle Salt
Scatter salt from a shaker over your painting while the paint is still shiny wet. As the wet paint dries, the salt absorbs the pigment, leaving white, starlike shapes. Experiment with different kinds of salts—kosher, margarita, table—for different versions of the same natural phenomena.

Spatter Paint
I spattered yellow paint on top of wet red paint. When the red background was dry, I filled a toothbrush with blue paint and ran my finger across the bristles to produce a fine blue paint spray. The best way to spatter with a paintbrush is to knock your loaded brush against your other hand, which is resting securely on the table for support—not up in the air. Spraying clean water onto wet paint with a sprayer will produce light spatter marks.
Add Metallics
I include Krylon leafing pens in my drawing tool kit. They come in gold, silver or copper. I love the shimmering metallic accents stroked over dry watercolor paintings. The Krylon pens are great because of the richness of their metallic coverage.
Demonstration: Dry Mount Glue Technique
MATERIALS LIST
Acid-free rubber cement
Arches 140-lb. (300gsm) cold-pressed paper, cut to fit inside sketchbook
Full-spectrum triad pigments Permanent Rose, Winsor Blue (Red Shade), Winsor Lemon
Krylon leafing pen: gold, silver or copper
No. 6 round
Pen tips and pointed tools for texturing Rubber cement pick-up tool, or gummed eraser
Salt
Scissors
Scratch paper for gluing
![]() The best way to adhere all your mosaic pieces to a paper surface is with the dry mount glue technique. The great advantage of this method is that you don’t have to glue each mosaic piece individually.
The best way to adhere all your mosaic pieces to a paper surface is with the dry mount glue technique. The great advantage of this method is that you don’t have to glue each mosaic piece individually.
Here is how it works: Cover the back of your uncut, painted watercolor paper with rubber cement. Let it dry. Cover the paper where you want to mount your mosaic with rubber cement and let it dry. Now, cut your collage pieces out of the painted paper. Simply press each collage piece onto the paper substrate, and the two dry glued surfaces will bond together. Follow the step-by-step instructions below. You will save lots of time and make gluing a breeze with the dry mount gluing technique. Be sure to buy acid-free rubber cement (Elmer’s makes one) to preserve your artwork.

1 Create Color and Texture on Watercolor Paper
Use the full-spectrum triad to paint rich colors onto Arches 140-lb. (300gsm) cold-pressed paper. Inscribe into the wet surface with the bamboo pen. Sprinkle salt and spray clean water onto the semiwet paint. When dry, add some calligraphic marks with the Krylon 18 Kt gold leaf pen. At this point in the process the subject is still unknown. Simply enjoy playing with the paint and have fun layering textures and colors. The subject will reveal itself as you continue.

2 Apply Glue to Your Painting
Lay your dry painting face down on a piece of scratch paper. Spread an ample amount of acid-free rubber cement over the back and past the edges of your painting. Let it dry until it is no longer sticky to the touch.
3 Apply Glue to Your Journal Page
Spread acid-free rubber cement over the page in your journal where you want to adhere the mosaic. Be sure to apply rubber cement over a larger area than you imagine your finished design will be so that you have freedom when placing the pieces. Let the glue dry until it is no longer sticky to the touch.

4 Cut Rectangles and Thin Strips
When the rubber cement on your painting is thoroughly dry and no longer sticky, cut your painting into strips about 1-inch (25mm) wide. Now cut most of the strips into squares. Cut freely—don’t bother measuring the strips and squares with a ruler. It is not important to produce rigidly uniform shapes. Cut some of the wide strips into thinner strips for accent pieces. Create a large pile of painted mosaic rectangles.
5 Design Your Mosaic
Lay all your cutouts on a separate piece of paper and pick the ones that attract you. Play with the pieces until you find a pattern that appeals to you. You won’t use all the pieces. If you want to cut the pieces again, go ahead and trim. Turn your composition upside down and sideways to see if it is balanced. You’ll see your mosaic with new eyes simply by viewing it from a different angle. You might even like it better upside down.
6 Transfer Your Design Onto the Glued Surface
Replicate the pattern you created by picking up each mosaic piece and setting it onto the glued paper surface. Each piece will bond to the glued paper because of the contact of dry rubber cement on both surfaces. After you have placed all the pieces, use a rubber cement pick-up tool or a gummed eraser to rub away the excess rubber cement. The subject of your mosaic will emerge as you create your design. Finish your mosaic with a title and your signature.
Painted Paper Cutouts
Henri Matisse created vibrant collages by “drawing with scissors.” Inspired by the freedom of his method, I create my own version of painted paper cutouts in my artistic journals. Design without drawing—let your scissors describe the shapes for you. Don’t like the shape? Just cut again!
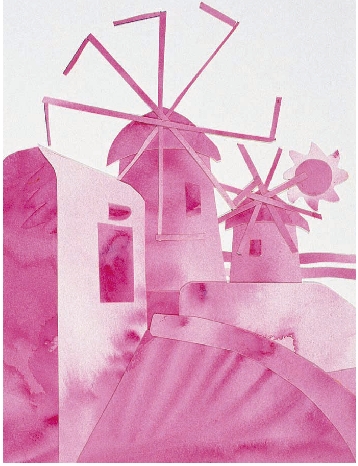
Contrast Brilliant Colors Against a White Background
Monica Wheeler interpreted her love of the island of Mykonos in this bold magenta watercolor cutout. You can almost feel the warm sunset glow over the windmills so typical of this Greek island. Against the white paper of her journal page, the monochromatic color is brilliant in its simplicity.
WHY MYKONOS?
Monica Wheeler Watercolor on Arches 140-lb. (300gsm) cold-pressed watercolor paper 10" × 8" (25cm × 20cm)
![]() PAGE-A-DAY IDEA
PAGE-A-DAY IDEA
Cutout Collaborations
Ask a friend or family member to collaborate on a portrait. Ask them to loosely paint a piece of watercolor paper, covering it from edge to edge. Have them select colors they are particularly drawn to. The colors should represent something about that person. If your friend or family member gets stuck with that concept, ask them to think about the colors they love to wear. This usually represents a person’s favorite colors.
Use the painted paper to make a cutout portrait of your subject. Try the torn paper technique for a very personal and uncomplicated image. Give the original collage to your friend or family member as a gift, and make a color copy to insert into your journal.
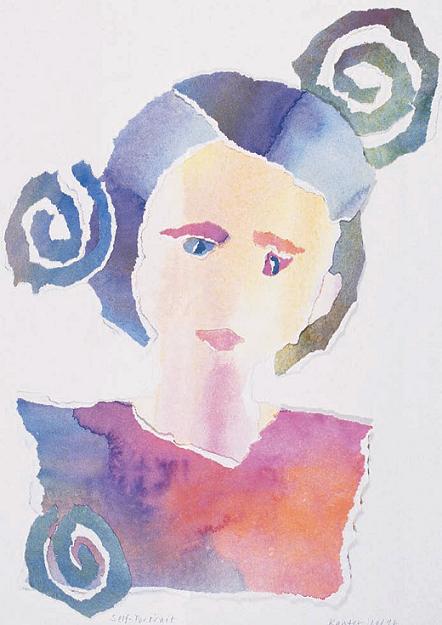
Tearing Painted Paper
Tearing paper for collages is a freeing way to create shapes. It’s hard to get too fussy when you are tearing paper. I love the raw white deckled edge of torn painted paper. The white outline allows you to draw attention to shapes in your composition. The torn spiral patterns added to this self-portrait are ancient Greek symbols for chaos and energy. On some busy days, that motif seems like the right symbol for my life! It was restorative to take some time for myself out of a day full of activity to create this sketchbook self-portrait.
SELF-PORTRAIT
Watercolor on Arches 140-lb. (300gsm) cold-pressed watercolor paper 8" × 11" (20cm × 28cm)
Demonstration: Create a Colorful Background Blanket
MATERIALS
Acid-free glue stick
Arches 140-lb. (300gsm) cold-pressed paper, 10" x 14" (25cm x 36cm) piece and one cut to fit inside your sketchbook
Full-spectrum triad pigments Permanent Rose, Winsor Blue (Red Shade), Winsor Lemon
No. 6 round
Scissors
Scratch paper for gluing
![]() This painted paper assemblage recalls the fish, sailboats and sea of the island of Corsica. The background blanket is painted in turquoises and blues—brilliant Mediterranean colors. My full-spectrum triad eased the blending of these exuberant hues. I made this painted paper collage while on a ferry ride from Corsica to Nice. Out came my scissors, glue stick and a lot of memories of a week in Corsica. What a wonderful way to while away an hour or two.
This painted paper assemblage recalls the fish, sailboats and sea of the island of Corsica. The background blanket is painted in turquoises and blues—brilliant Mediterranean colors. My full-spectrum triad eased the blending of these exuberant hues. I made this painted paper collage while on a ferry ride from Corsica to Nice. Out came my scissors, glue stick and a lot of memories of a week in Corsica. What a wonderful way to while away an hour or two.
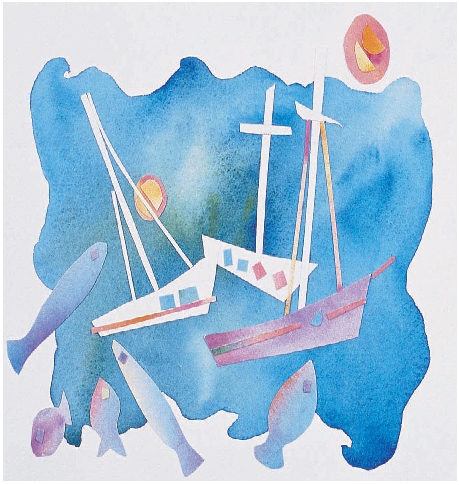
CORSICAN MEMORIES
Painted paper on Arches 140-lb. (300gsm) cold-pressed watercolor paper 8" × 10" (20cm × 25cm)
1 Paint a Colorful Wash
Paint an entire piece of cold-pressed watercolor paper with loose splashes of colors derived from your subject. You don’t need to describe the subject as you paint—just record the colors of the landscape, objects or figures in your theme. Have fun and paint freely to cover the paper with unself-conscious broad color washes.
2 Create a Background Shape
On another piece of cold-pressed watercolor paper, paint a colorful background shape—a large rectangle, ellipse, circle or other shape. Think of the painted background shape as a blanket to hold your cutout shapes. Vary the blanket shape to indicate the atmosphere of your theme. This painting suggests the waves and colors of the sea. Some other possibilities are a starry dark blanket for a night scene or a field of green grass for a pastoral subject.

3 Glue Your Shapes on Top of the Background
Take your painted paper from step 1, and cut shapes that will float on top of your painted background blanket. Cut out fish, boats and sun shapes with your scissors. Move the pieces around to decide where to glue them. Use an acid-free glue stick. It’s surprising how pleasurable painting, cutting and gluing can be.
Paper Weaving
![]() PAGE-A-DAY IDEA
PAGE-A-DAY IDEA
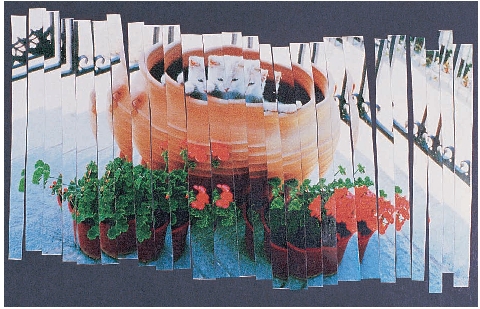
Weave a Garden View
This page is from a journal I made a few years back. Its a very uncomplicated paper weaving— that only took a few minutes. I used two blank watercolor postcards to make the paintings. On one, I quickly painted the greens of the foliage in my garden on a June day. On the other, I painted the colors of the late spring flowers, budding and blossoming in my little garden patch. I casually cut the paintings into strips and wove them together. You can see that I didn’t bother cutting the strips evenly or in perfectly straight lines. I like this informal look—especially in my journal. I picked one of the flowers and tucked it underneath the paper weaving. It’s pleasing to look through my sketchbook and be reminded of a garden that grew several years ago.
Create unique paper weavings in your artistic journal. Merge two paintings or photographs together into a construction that combines both in a fascinating way. The end result is greater than the sum of its parts. It’s exciting to see how your woven image turns out. There is always a happy surprise when you are done.
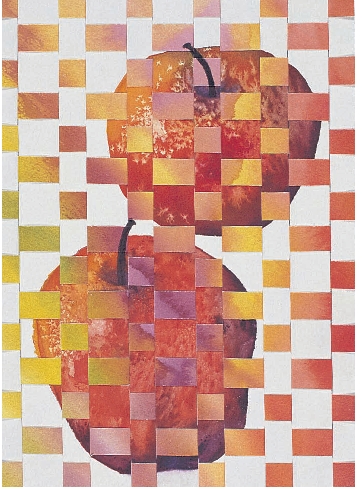
The White Background Makes the Subject Stand Out
One way to create a dramatic paper weaving is to leave the background white. I painted two apples onto a piece of Arches 140-lb. (300gsm) cold-pressed paper, leaving the background unpainted.The second painting is a wash of red and green apple colors. I like the way the apples stand out strongly after weaving the two images together.
BELLE MELE PER FRANCO Watercolor on Arches 140-lb. (300gsm) cold-pressed paper 7" × 10" (18cm × 25cm)
Weave a Wavy Memory
My daughter, Laura, made a collage for her college dormitory room out of two identical photocopies of a favorite photograph of our cat, Hercules. She cut each one into vertical strips, without a ruler—just cutting with scissors freehand. Using the dry mount glue technique, she adhered each strip to her page with rubber cement. She made an original, spirited image from two matching photocopies, just by cutting and pasting twin strips next to each other.
Your finished collage will be twice the width of your original photo because of doubling the identical strips. Crop both photos on the sides to focus attention on your subject. In this way you can temper the width of your finished artwork.
Double the Impact
The dry mount gluing system is perfect for this project. Follow the same procedure described. Before you cut the two identical photos, photocopies or postcards, spread rubber cement over the back of each one and a page in your artistic journal.
When the rubber cement is no longer tacky, cut each image into vertical strips, about ¼-inch (6mm) wide. Be sure to keep all the pieces in order. Lay the strips down onto the dried rubber cement on your journal page. In this case, Laura used a piece of black mat board as her background, rather than her journal. Place each twin strip next to its mate. You can offset the strips a bit to create an animated uneven edge.
HERCULES
Laura Kanter Paper weaving from photocopies, glued onto black mat board 5" × 8" (13cm × 20cm)
Demonstration: Weave Two Themes Into One Subject
MATERIALS LIST
Arches 140-lb. (300gsm) cold-pressed paper, 4" x 6" (10cm x 15cm) cut to fit inside sketchbook (two pieces) or two 4" x 6" (10cm x 15cm) postcards
Cutting board
Full-spectrum triad pigments Permanent Rose, Winsor Blue (Red Shade), Winsor Lemon
Masking or drafting tape
No. 2 round
Scissors or craft knife
Straightedge or ruler
![]() Weave two paintings together to combine two observations of one theme, in an extraordinary way. One painting depicts the sky, clouds and watery waves of the seashore. The other describes the beach grasses and flowers growing near the dunes.
Weave two paintings together to combine two observations of one theme, in an extraordinary way. One painting depicts the sky, clouds and watery waves of the seashore. The other describes the beach grasses and flowers growing near the dunes.

1 Paint Two Different Ways
Identify two aspects of the subject and paint each of them on a 4" × 6" (10cm × 15cm) piece of watercolor paper or a postcard. Paint one image depicting the sky, clouds and sea. Paint the second one showing the colors and textures of the beach grasses and flowers.
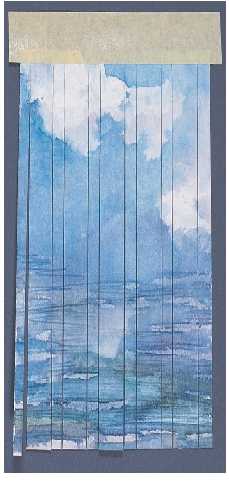
2 Cut Vertical Strips
Set the sky/clouds/sea painting on a cutting board, stretch drafting tape across the top 4-inch (6mm) edge of the painting and secure it. Use a craft knife and ruler to cut the painting into vertical strips, cutting them alternately 5-inch (12mm) and 4-inch (6mm) wide. Cut the strips only up to the lower edge of the tape, leaving the painting uncut underneath the tape.

3 Cut Horizontal Strips
Use a craft knife and cutting board to cut the beach grass/flower painting into horizontal strips, again alternating between 5-inch (12mm) and 4-inch (6mm) widths. This time cut all the way across, keeping the strips in order.
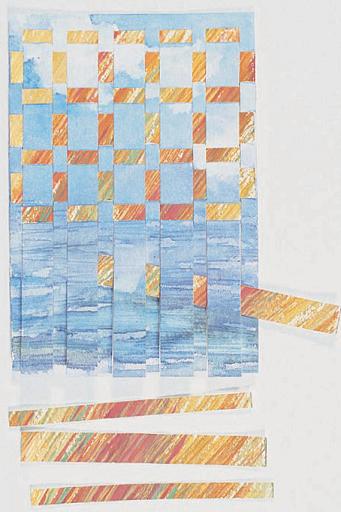
4 Weave the Strips Together
Take each horizontal strip and weave it into the vertically cut sea painting. Alternate rows beginning over and under, then under and over. Alternate between the 4-inch (6mm) and 5-inch (12mm) strips to create an attractive pattern. When you finish weaving, tape the back of the collage along the edges to keep the strips from unraveling.

SEA WEAVE
Watercolor on Arches 140-lb. (300gsm) cold-pressed watercolor paper 4" × 6" (10cm × 15cm)
Crinkled Paper Collage
Mingle the traditional and the innovative by painting on crinkled paper collage. Crunch up a piece of paper and unfold it—you have just created a strikingly textured surface for watercolor. Paint directly on the crinkled paper or glue it onto a piece of watercolor paper before painting. In both cases, a fantastic veined surface will appear as you apply watercolor. This wholly unique effect is a wonderful tool to add to your artistic repertoire.

Paint Directly on Crinkled Paper
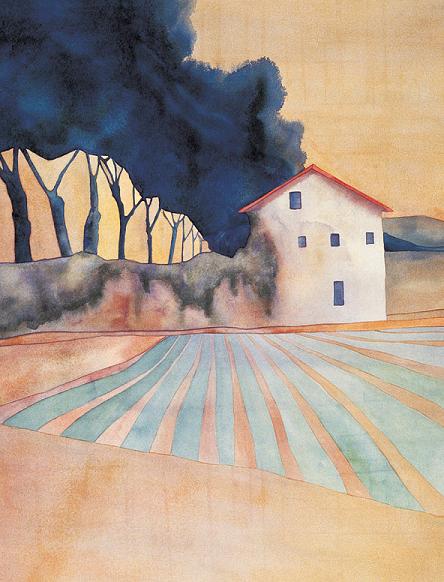
Japanese Masa paper is similar in appearance to white butcher paper, but it is much stronger when wet. I crunched up a piece of unwaxed Masa paper. Then I unfolded the paper and started painting with watercolor. When finished, I lightly tacked this watercolor sketch onto my journal page with a dab of glue at each of the four corners. I love the instant texture that developed on the painted mountains. As the wet watercolor soaks into the grooves of the crinkles, batik-like lines and veins appear on the surface. This quick sketch was in preparation for Yellow Mountains, China on page 10. I often use my artistic journal for experimentation before beginning larger works.
Paint on Crinkled Masa Paper With Ink
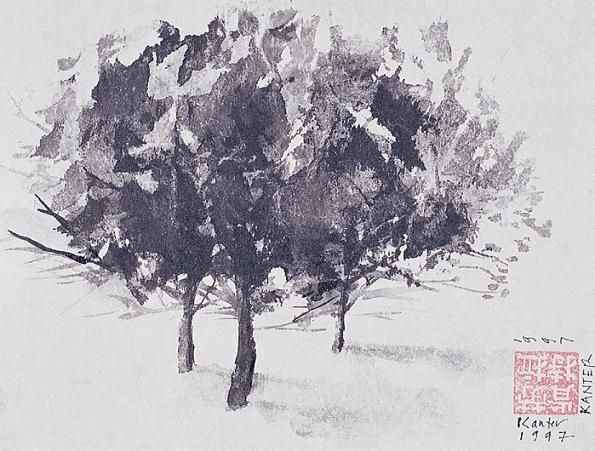
This is another example of painting directly onto crinkled Masa paper. I let the creases and bumps in the paper help make the tree shapes. I loaded a no. 6 round with black sumi ink. Holding the brush on its side, I stroked it over the bumps and folds of the crinkled paper, which I did not stretch out completely flat. The brush hit the raised paper folds and missed the areas inside the creases. When the large tree mass was established, I added a few lower branches and leaves to the edges using a no. 2 brush held upright in the customary fashion. Next I painted the trunks of the trees. When done painting, I completely unfolded the paper and glued it onto the stiff surface of my sketchbook cover using white PVA glue. When glued flat, I used a carved stone chop to stamp my name in Chinese characters. Ink paintings on crinkled paper convey a distinctively Eastern simplicity and elegance.
Make Botanical Studies With Crinkled Papers
Lines and veins appear quite naturally in crinkled paper collages painted with watercolor. This distinctive textural effect makes a beautiful surface for botanical subjects. You can create amazingly lifelike leaves and petals. This painting was made with crinkled Masa paper, glued onto 140-lb. (300gsm) watercolor paper. I stained the whole sheet of crinkled paper with light tones of blues and violets after it was glued onto the watercolor paper.

FEBRUARY BULBS
Watercolor on crinkled Masa paper mounted on Arches 140-lb. (300gsm) cold-pressed paper 13" × 20" (33cm × 51cm)
Demonstration: Rich Color and Texture
MATERIALS
Arches 140-lb. (300gsm) cold-pressed paper
Brayer
Clothes iron, set on the lowest temperature
Elmer’s white glue or acid-free PVA glue
Glue brush
Nos. 2, 4 and 6 rounds
Sun triad pigments: Holbein Marine Blue, New Gamboge, Permanent Magenta
Spray bottle filled with water
Plastic wrap
Unwaxed Masa paper or white butcher paper (not as strong when wet)
2B pencil
![]() Create a naturalistic texture for your floral paintings with this special collage technique. The creases of the crinkled paper collage make lifelike veins and tonal variations in the painted flower petals and leaves. Follow the step-by-step instructions to make a crinkled paper floral painting.
Create a naturalistic texture for your floral paintings with this special collage technique. The creases of the crinkled paper collage make lifelike veins and tonal variations in the painted flower petals and leaves. Follow the step-by-step instructions to make a crinkled paper floral painting.

1 Draw the Image
One side of the Masa paper is smooth and shiny, the other side is rough. With a 2B pencil, draw a floral design on the shiny side of the paper. After drawing, crush the Masa paper into a tight ball. Don’t be afraid of crumpling the paper too much, the creases create the textural effect. Unfold and gently press the paper flat with your fingers.

2 Add Color
Spray the Masa paper with clean water. With a no. 6 round, loosely paint on top of your drawing. Veins will appear where the paper is creased. Use pure New Gamboge and Permanent Magenta, and a purple mixed from Permanent Magenta and Marine Blue for the flowers. Mix a bright green using New Gamboge and Marine Blue for the leaves, and light Marine Blue for the vase.
When dry, flatten by lightly ironing on the back side of the painted Masa paper. Glue the painting onto a slightly larger piece of 140-lb. (300gsm) cold-pressed watercolor paper with white or acid-free PVA glue. Cover with plastic wrap to protect the Masa paper, and roll with a brayer to press flat. Remove the plastic wrap, and let dry.

3 Define the Image
Make the subject appear by painting the negative shapes behind it. Use a no. 2 round to paint darker values of the same color mixtures as in step two, to darken the shapes behind the flowers, leaves and vase. Leave the subject untouched to preserve the freshness of the underpainting. The creases in the Masa paper emerge as you apply wet paint to the surface. The more you paint, the more the creases appear. Finish by adding red centers to each of the flowers with a no. 2 round using a mixture of New Gamboge and Permanent Magenta.
Found Object Collage
![]() PAGE-A-DAY IDEA
PAGE-A-DAY IDEA
The Weekend Collage
This week, keep a resealable bag with you to collect all the labels, ticket stubs, menus, newspaper clippings and attractive papers you find. Then, over the weekend, cut, tear and arrange the papers into a collaged composition. Look for variety in color and shape, layering translucent papers on top of others for a subtle effect. Center the eye on a dominant area or focal point that is supported by all the other design elements. Lightly paste the collage pieces in place temporarily so you can make changes if you wish. When you have settled on your composition, apply glue from a glue stick over the back of each piece. Press down so that all the shapes lay flat when dry. Don’t forget to take a moment to admire the new pages in your artistic journal.
Thomas Edison said, “To invent, you need a good imagination and a pile of junk.” What some call junk, I call treasure. Recycling is an art form. What normally is lost, instead, can be turned into found object collages. Gather a collection of attractive scraps—newspaper clippings, tickets, bits of wrapping papers, handwritten letters and notes, leaves, flowers, printed E-mail messages—all these bits and pieces have personal meaning and memories. Transform these everyday artifacts into page-a-day artistic journal creations.
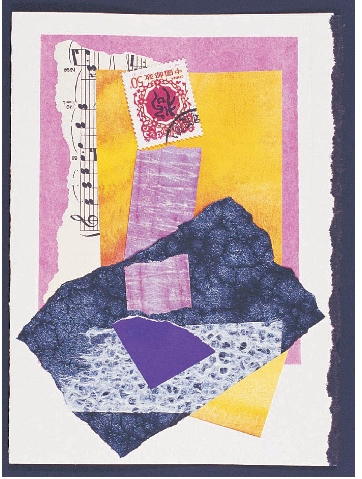
Reclaim Old Sheet Music and Candy Wrappers
Recently I found some tattered sheet music, yellowed with age, at a secondhand store. I love incorporating bits of sheet music into my collages. I also included a stamp I peeled off of a postcard from China. The transparency of the white rice paper on top of the black torn rectangle creates a subtle layered effect. It was fun combing through my scrap paper collection and combining bits and pieces into this collage.

Labels Inspire Art
A label from a bottle of mineral water found its way onto a page in my journal. The bright sunset image caught my eye. It became the inspiration for my journal watercolor painting. I’m glad I tore the label off the bottle and saved it. Sometimes inspiration for artwork comes from the most unexpected places. The first step is collecting fabulous scraps, and gluing them into your sketchbook— the best place to experiment with new ideas, images and approaches.