
The basic idea of a green screen, or chroma key compositing, is commonly used in the film industry. The director shoots a video with a single-colored backdrop (always green or blue), and then replaces the single colors with another video or still image. This produces some exciting effects such as the actor running out of an explosion field or the weather broadcaster standing in front of a large virtual map/earth. In this chapter, we will try to implement the same effect with the Kinect device.
The Kinect device is designed to be able to resolve depth data from the sensor to human body results. It can recognize both the entire body and different parts of human limbs and tries placing the joints to build up a skeleton, which is perhaps the most impressive feature of Kinect. In fact, we had never seen a for-civil-use production before that can perform similar work.
To learn more about the skeleton recognition of Kinect, you can refer to http://research.microsoft.com/en-us/projects/vrkinect/default.aspx.
But in this example, it is enough to only know where the human body is in the depth image. For the depth pixels within a specific human body, Kinect will save the player index (a non-zero number). So the only task for us is to read the player indices in the depth image and clear the pixels in the color image if their corresponding depth value doesn't have a player index.
The simplest idea to combine depth and color images is to display them at the same position but allow color pixels to be shown only when the depth value at the same row and column is valid. We will implement our example in this way and see if it works:
- The depth stream we used before only recorded values read from the depth sensor. The Kinect SDK also provides a packed depth stream with both depth and player index recorded in every pixel. This is very useful for our case.
- First, we modify the
initializeKinect()function to listen to the packed depth stream instead of the original one. The only change here is to replaceNUI_INITIALIZE_FLAG_USES_DEPTHwithNUI_INITIALIZE_FLAG_USES_DEPTH_AND_PLAYER_INDEX:DWORD nuiFlags = NUI_INITIALIZE_FLAG_USES_SKELETON | NUI_INITIALIZE_FLAG_USES_COLOR | NUI_INITIALIZE_FLAG_USES_DEPTH_AND_PLAYER_INDEX; hr = context->NuiInitialize( nuiFlags ); hr = context->NuiImageStreamOpen( NUI_IMAGE_TYPE_DEPTH_AND_PLAYER_INDEX, NUI_IMAGE_RESOLUTION_640x480, 0, 2, NULL, &depthStreamHandle ); - The second step seems straightforward. Because we know which pixel contains a valid player index and which does not, we can just set the corresponding texture's pixel to
0where no player index is found. ThedepthTexturethen works like a mask image, replacing the same locations in the color texture with empty values:unsigned char* ptr = depthTexture->bits + (i * 640 + j); if ( NuiDepthPixelToPlayerIndex(bufferWord[j])>0 ) *ptr = 255; else *ptr = 0; - OpenGL can implement masking with the
GL_BLENDfeature, as shown in the following code snippet:// Define vertices and texture coordinates for a simple // quad // The quad will cover whole screen to show the final image GLfloat vertices[][3] = { { 0.0f, 0.0f, 0.0f }, { 1.0f, 0.0f, 0.0f }, { 1.0f, 1.0f, 0.0f }, { 0.0f, 1.0f, 0.0f } }; GLfloat texcoords[][2] = { {0.0f, 1.0f}, {1.0f, 1.0f}, {1.0f, 0.0f}, {0.0f, 0.0f} }; VertexData meshData = { &(vertices[0][0]), NULL, NULL, &(texcoords[0][0]) }; // Draw the quad with color texture attached glBindTexture( GL_TEXTURE_2D, colorTexture->id ); drawSimpleMesh( WITH_POSITION|WITH_TEXCOORD, 4, meshData, GL_QUADS ); // Enable blending with the depth texture color as factors glEnable( GL_BLEND ); glBlendFunc( GL_ONE_MINUS_SRC_COLOR, GL_SRC_COLOR ); // Draw the quad again before the previous one and blend // them // Result will be the product of color and depth textures glTranslatef( 0.0f, 0.0f, 0.1f ); glBindTexture( GL_TEXTURE_2D, depthTexture->id ); drawSimpleMesh ( WITH_POSITION|WITH_TEXCOORD, 4, meshData, GL_QUADS ); // Disable blending at last glDisable( GL_BLEND ); - So the result should be nice, shouldn't it? Let's compile and stand before the Kinect device to see if background subtraction has been successfully implemented:
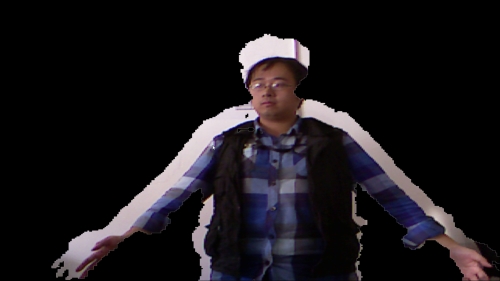
The result of our background subtraction, which is not good at all
- Maybe you will be disappointed now. The depth data is clipped correctly, but it is not aligned with the color image at all! The player is obviously slanted and thus makes the entire application unusable.
The NUI_IMAGE_TYPE_DEPTH_AND_PLAYER_INDEX data type is a slightly different stream from the depth sensor. It doesn't contain pure depth value, but one that is combined with a 3-bit index value belonging to specific players determined by the skeleton tracking system. This packed depth pixel will thus have 11 bits and must be stored using a USHORT data type. The Kinect SDK provides two convenient functions to read the real depth value and player index from every pixel read: NuiDepthPixelToDepth() and NuiDepthPixelToPlayerIndex().
In this example, we decide the value of our depth texture using the player index so that we can get an image with only white (with the player index) and black (without the player index) pixels. In OpenGL, we blend this monochrome picture with the color texture. White pixels are transparent so the colors become visible, and black pixels are still black so background colors appear blank, thus generating the final image. Unfortunately, this is incorrect.
The reason is simple. Kinect's depth and color images in fact come from different sensors. They may have different fields of view (FOV) and not face the same direction. So a pixel at a specified location in a depth image is not always at the same location in a color image. Without considering these factors, we can hardly line up the depth and image pixels and produce a correct green screen effect.
However, thanks to the Kinect SDK, we still have some methods to fix this problem, such as mapping a pixel at a certain location in depth space to the corresponding coordinates in color space. We could even directly use some functions to achieve this.