
Now we can develop a simple game to satisfy ourselves, which will also be used as part of our Fruit Ninja game. The idea can be described as a magic photographer who automatically puts the photo of the player in front of the Kinect device onto any scenery images, pretending that he had taken this photo some time ago.
The example we just finished is used to show a player with a single colored background, so the only work left is to load a still image from the disk and blend it with the player image to produce a final composite photo.
Let's continue working on the previous example code we created, which already contains the kernel functionality for our use:
- We need a background image to be shown under the player's image. The alpha channel of the player texture will be used to decide if the background should show or not. FreeImage is used to load the image from a disk file and bind it to an OpenGL texture. The global ID for the texture is declared here:
const unsigned int backgroundTexID = 1;
- In the main entry, we will read a file named
background.bmpfrom the disk. Please copy any of your image files to the executable directory and convert it to BMP format for use. Note that FreeImage always loads images in BGR format; that is, in blue-green-red order:if ( TextureManager::Inst()->LoadTexture("background.bmp", backgroundTexID, GL_BGR_EXT) ) { glTexParameteri( GL_TEXTURE_2D, GL_TEXTURE_MIN_FILTER, GL_LINEAR ); glTexParameteri( GL_TEXTURE_2D, GL_TEXTURE_MAG_FILTER, GL_LINEAR ); } - Render simple OpenGL quads with Kinect color and depth images:
// Define vertices and texture coordinates for a simple // quad // The quad will cover whole screen to show the final image GLfloat vertices[][3] = { { 0.0f, 0.0f, 0.0f }, { 1.0f, 0.0f, 0.0f }, { 1.0f, 1.0f, 0.0f }, { 0.0f, 1.0f, 0.0f } }; GLfloat texcoords[][2] = { {0.0f, 1.0f}, {1.0f, 1.0f}, {1.0f, 0.0f}, {0.0f, 0.0f} }; VertexData meshData = { &(vertices[0][0]), NULL, NULL, &(texcoords[0][0]) }; // Draw the background image quad TextureManager::Inst()->BindTexture( backgroundTexID ); drawSimpleMesh( WITH_POSITION|WITH_TEXCOORD, 4, meshData, GL_QUADS ); // Enable blending with player texture alpha as factors glEnable( GL_BLEND ); glBlendFunc( GL_SRC_ALPHA, GL_ONE_MINUS_SRC_ALPHA ); // Draw the quad again before the previous one and blend // them glTranslatef( 0.0f, 0.0f, 0.1f ); glBindTexture( GL_TEXTURE_2D, playerColorTexture->id ); drawSimpleMesh( WITH_POSITION|WITH_TEXCOORD, 4, meshData, GL_QUADS ); - Start the program and you will see your chosen scenery image shown on the screen, which could be your favorite place:

A sand landscape chosen by the author
- Stand in front of the Kinect device and you will be added to the scene now. Find a good position for yourself and take a photo now:
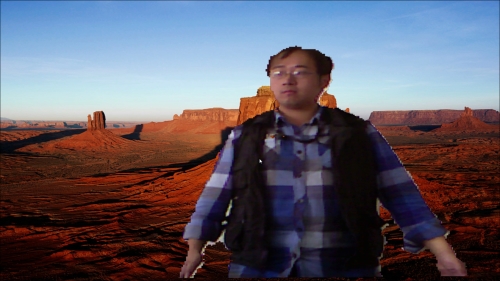
Add the player into the scene
The only difference between this recipe and the previous one is that a background image is added and blended with the player. The alpha values we set in the previous recipe play an important role because they are used as the OpenGL blending factor as follows:
glBlendFunc( GL_SRC_ALPHA, GL_ONE_MINUS_SRC_ALPHA );
This means the source pixels S, which form the player image to be drawn, and the target pixels T, which are the background colors, will be blended using the following equation:
S * alpha + T * (1 – alpha)
So, the player pixels will only be rendered on screen when alpha is 1, and the background pixels are kept where alpha is 0.
The composite image is still not that good because of aliasing and flickering at the player edges. One possible improvement is to blur the depth image before using it. We could also do some postprocessing work on the generated image to perfectly match it with the background. It is now up to you to consider implementing these features using, for instance, GrabCut (http://research.microsoft.com/en-us/um/cambridge/projects/visionimagevideoediting/segmentation/grabcut.htm).