
Chapter 3
Calculating and Working with Values
Many of the standard AutoCAD® commands perform a lot of calculations as they are used from the user interface, but much of this work is shifted to you as a programmer when you work with AutoLISP®. AutoLISP supports a variety of functions that allow you to perform basic and complex math calculations, manipulate numeric or string values, and work with the elements contained in a list. I cover working with lists in Chapter 4, “Working with Lists.”
Although many of the math and data-manipulation functions in AutoLISP provide a solid foundation for working with values, you might need to combine many of these functions to create custom functions that return a value. In Chapter 2, “Understanding AutoLISP,” you learned how to create custom functions, but I didn't explain how to return a value like standard AutoLISP functions do. Later in this chapter, we'll explore how to define a custom function that returns a value using the defun function.
Calculating Values with Math Functions
When working with AutoCAD, you must consider the accuracy with which objects are placed and the precision with which objects are created in a drawing. The same is true with AutoLISP; you must consider both accuracy and precision when creating and modifying objects. The AutoLISP math functions allow you to perform a variety of basic and complex calculations. You can add or multiply numbers together, or even calculate the sine or arctangent of an angle.
Performing Basic Math Calculations
When manipulating geometric properties of an object in a drawing, you often need to perform a math operation on the current value of an object and then assign that value back to the object—or even apply it to another object. Using math operations, you can manipulate an object's location, decrease a text object's height, increase an object's length or radius, and much more. The basic math functions that AutoLISP supports allow you to
- Add, subtract, multiply, or divide numbers
- Get the remainder after dividing two numbers
- Calculate bitwise values
- Get the minimum or maximum value in a range of values
- Determine if a value is 0 or negative
This exercise demonstrates how to add and subtract values in AutoLISP:
- At the AutoCAD Command prompt, type
(setq sum (+ 2 3 0.5 4))and press Enter.All the values are added together for a final value of 9.5.
- Type
(setq val (+ 2 (1- sum)))and press Enter.1 is subtracted from the value assigned to the
sumuser-defined variable, for a value of 8.5. Then, 2 is added to the value of 8.5 for a final value of 10.5, which is assigned to thevaluser-defined variable. - Type
(command "._circle" PAUSE val)and press Enter.The AutoLISP
commandfunction starts thecirclecommand and then prompts for a center point. After you provide a center point, the current value of thevaluser-defined variable is used for the radius of the circle. - At the
Specify radius of circle or [Diameter]:prompt, pick a point in the drawing area.The new circle is drawn.
Adding and Subtracting Numeric Values
Adding and subtracting numbers in AutoLISP works just like you might have learned in elementary school, with one slight difference: Instead of placing a + or − operator symbol between each number as you normally would, the AutoLISP + or - function must be the first atom in a list. An atom is an element or item within a list. The + and - functions can add or subtract any number of integer or real numeric values, and they return an integer or real numeric value. An integer is returned when all the values passed to the function are integers; otherwise, a real value is returned.
The following shows the syntax of the + and - functions:
(+ [numberN ...])
(- [numberN ...])
The numberN argument represents the numeric values you want to add together or subtract from each other. The numberN argument is optional and can be more than one value. If no value is passed to the + or - functions, 0 is returned.
Here are some examples of adding and subtracting numbers with the + and - functions, along with the values that are returned:
(+ 5 2 3)
10
(+ 5.0 2 3)
10.0
(+ 5.0 2.25 0.25)
7.5
(- 2 3)
-1
(+ (- 1.625 0.125) 1)
2.5
In addition to the + and - functions, you can use the 1+ function to increment (or 1- to decrement) a value by 1. If you need to increment or decrement a value by more than 1, you will need to use the + and - functions. The 1+ and 1- functions are a great way to create a counter in a looping expression. I explain how to use looping expressions in Chapter 5, “Requesting Input and Using Conditional and Looping Expressions.”
The following shows the syntax of the 1+ and 1- functions:
(1+ number)
(1- number)
The number argument represents the numeric value that should be incremented or decremented by 1.
Here are examples of incrementing or decrementing a number with the 1+ and 1- functions, along with the values that are returned:
(setq cnt 0)
0
(1+ cnt)
1
(1- cnt)
-1
Multiplying and Dividing Numeric Values
Multiplying and dividing numeric values is an effective way to calculate a new scale factor to increase or decrease the scale factor of an object, or even to figure out how many objects of a specific size might fit into an area or along a linear path. Use the * function to multiply any number of integer or real numeric values and return the resulting product. Using the / function returns the quotient after dividing any number of numeric values. The * and / functions return an integer or real numeric value. An integer is returned by the functions when all the values passed to the function are integers; otherwise, a real numeric value is returned.
The following shows the syntax of the * and / functions:
(* [numberN ...])
(/ [numberN ...])
The numberN argument represents the numeric values you want to multiply or divide by each other. The numberN argument is optional and can be more than one value. If no value is passed to the * or / function, 0 is returned.
Here are examples of multiplying and dividing numbers with the * and / functions, along with the values that are returned:
(* 5 3)
15
(* 5.0 2 3)
30.0
(/ 5 2)
2
(/ 5.0 2)
2.5When dividing numbers, you can use the AutoLISP rem function to return the remainder of the first number after it has been divided by all the other numbers supplied to the function. The rem function can take any number of numeric values; the function returns 0 when no values are passed to it. The following demonstrates the rem function:
(/ 10.0 3)
3.33333
(rem 10.0 3.0)
1.0
AutoLISP includes a function named gcd that can be used to return the greatest common denominator of two integer values. The gcd function requires two integer values, and it returns an integer that represents the greatest common denominator of the provided values. Here are two examples:
(gcd 5 2)
1
(gcd 54 81)
27
Using Other Basic Math Functions
Most of your math function needs should be met with the basic math functions that I previously covered, but you should be aware of some other basic math functions. These other functions allow you to get the minimum or maximum number in a range of values or determine if a numeric value is equal to 0 or is negative.
The following explains some of the other basic math functions that are available as part of AutoLISP:
minandmaxThe
minandmaxfunctions accept any integer or real numeric values. Theminfunction returns the smallest numeric value from those that are passed to it, whereas themaxfunction returns the largest numeric value. A real value is returned by the function, except when the function is passed only integer values—in that case, an integer value is returned. If no numeric value is passed to either function, 0 is returned.The following are examples of the
minandmaxfunctions:(min 9 1 1976 0.25 100 -25)-25.0(max 9 1 1976 0.25 100 -25)1976.0(max 9 1 1976 100 -25)1976minuspandzeropThe
minuspandzeropfunctions accept an integer or real numeric value. Theminuspfunction returnsTif the value that it was passed is negative, or it returnsnilif the value was positive. Thezeropfunction also returnsTornil;Tis returned if the value passed is equal to 0. Thezeropfunction can help you avoid dividing a number by 0 or seeing if a system variable is set to 0.The following are examples of the
minuspandzeropfunctions:(minusp 25)nil(minusp -25)T(zerop 25)nil(zerop 0)TFor more information on the
minuspandzeropfunctions, see the AutoCAD Help system.
Performing Advanced Math Calculations
In addition to basic math functions, AutoLISP offers a range of advanced math functions that aren't used as frequently. These advanced functions allow you to work with angular, exponential, natural logarithm, or square root numeric values. AutoLISP supports the advanced math functions listed in Table 3.1.
Table 3.1 AutoLISP advanced math functions
| Function | Description |
sin |
Returns the sine of an angular value expressed in radians. |
atan |
Calculates the arctangent of an angular value expressed in radians. |
cos |
Returns the cosine of an angular value expressed in radians. |
exp |
Returns a numeric value that has been raised to its natural antilogarithm. |
expt |
Returns a numeric value after it has been raised by a specified power. |
log |
Calculates the natural logarithm of a numeric value. |
sqrt |
Gets the square root of a numeric value. |
For more information on these functions, see the AutoCAD Help system.
Working with Bitwise Operations
Integer values can be used to represent what is known as a bit pattern or bit-coded value. A bit-coded value is the sum of one or more bits. A bit is a binary value; when one or more bits are combined they create a unique sum. AutoCAD uses bit-coded values for many different object properties (DXF group codes) and system variables.
For example, the layer status property (DXF group code 70) of a layer is a bit-coded value that contains various flags used to specify whether the layer is frozen (1 bit), locked (4 bit), or dependent on an xref (16 bit). The osmode system variable is another example of a bit-coded value in AutoCAD. In the osmode system variable, the value indicates which running object snaps are currently enabled. Refer to the AutoCAD Help system to determine whether an object property or system variable is an integer or bit-coded value.
Because a bit-coded value is represented by the integer data type, you can use the + and − functions to add or remove a bit value for the overall sum of a bit-coded value. AutoLISP also provides several useful functions that you can use when working with bit-coded values. The logior and logand functions help combine several bit-coded values and determine whether a bit is part of a bit-coded value. Let's take a closer look at the logior and logand functions.
logior
The logior function allows you to combine several bits into a single bit-coded value and ensures that a bit is added only once to the resulting bit-coded value. Although you can use the + function to add several bits together, that function simply adds several values together and returns the resulting value, which might return a bit-coded value with a different meaning. For example, the bits 1 and 4 are equal to the bit-coded value of 5:
; Final result is a bit-coded value of the bits 1 and 4
(logior 1 4)
5
; Final result is an integer of 5
(+ 1 4)
5
Adding the bits 1, 2, and 5 with the logior function results in the bit-coded value of 7.
; Final result is a bit-coded value of the bits 1, 2, and 4
(logior 1 2 5)
7
Were you expecting a value of 8 maybe? The 1 bit is added only once because the logior function recognizes that the 1 bit is provided individually and as part of the bit-coded value of 5 in the previous example. If you were to add the same numbers (1, 2, and 5) together with the + function, the result would be 8 and would mean something different. A value of 8 is a bit in and of itself.
; Final result is an integer of 8 and not a bit-coded value of the bits 1, 2, and 4
(+ 1 2 5)
8
Here is the syntax of the logior function:
(logior [bitN ...])The bitN argument represents the bits you want to combine. If no bit is passed to the function, 0 is returned.
The following examples add the provided bits together into a bit-coded value of 35 with the logior function. The bits 1, 2, and 32 represent the ENDpoint, MIDpoint, and INTersection running object snap settings. The second expression returns a value of 35 as well, and because 3 is a bit-coded value that represents both bits 1 and 2, the logior function will add a bit only once to the bit-coded value it returns. If you used the + function instead, it would be easy to add a bit more than once to a bit-coded value.
; Returns the sum of the bits 1, 2, and 32
(setq new_osmode (logior 1 2 32))
35
; Returns the sum of the bits 1, 2, 3, and 32
; Bit 3 is a bit-coded value containing 1 and 2
(logior 1 2 3 32)
35
logand
The logand function is used to determine whether a specific bit or bit-coded value is part of another bit-coded value. This type of comparison in a program can be helpful when you need to handle specific conditions in the AutoCAD environment, such as making sure that the current layer is not frozen or locked when you're creating or selecting objects, or making sure a specific running object snap is set.
Here is the syntax of the logand function:
(logand [bitN ...])The bitN argument represents the bits you want to test for comparison. If no value is passed to the function, 0 is returned.
The following examples use the logand function to determine if a bit is common with the provided bits or bit-coded values. Bit 2 represents the MIDpoint running object snap; a bit-coded value of 12 represents the CENter and QUAdrant running object snaps; and the bit-coded value of 34 represents the running object snaps MIDpoint and INTersection. The first example returns 0 because the bit 2 value is not part of the bit-coded value 12 (bit codes 4 and 8), whereas 2 is returned for the second example because bit 2 is part of the bit-coded value of 34 (bit codes 1, 2, and 32).
; Returns 0 because no bit codes are in
; common with the two numbers
(logand 2 12)
0
; Returns 2 because it is the common bit code
; in common with both numbers
(logand 2 34)
2s
If you want to add or remove a bit to or from a bit-coded value, you can use logand to verify whether a bit is already part of the bit-coded value. If 0 is returned by logand, the bit code is not part of the bit-coded value, so the bit could safely be added with the + function. If the bit is returned instead of 0, the bit is part of the bit-coded value and can be safely removed using the - function.
Other Bitwise Functions
In addition to the AutoLISP logior and logand functions, you can use these functions when working with bit-coded values:
∼(Bitwise NOT)The
∼ (bitwise NOT)function accepts a bit (integer) value and converts it into a binary number before performing a bitwise negation. The negation changes any 1 in the binary value to a 0, and any 0 to a 1. For example, an integer value of 32 expressed as a binary value is as follows:0000 0000 0000 0000 0000 0000 0000 0000 0000 0000 0000 0000 0000 0000 0010 0000The binary value is read from lower right to upper left.
When the
∼(bitwise NOT) function is applied to a bit value of 32, it becomes a bit value of −33 and is expressed as the binary value1111 1111 1111 1111 1111 1111 1111 1111 1111 1111 1111 1111 1111 1111 1101 1111The following is an example of the
∼(bitwise NOT) function:(∼ 32)-33booleThe AutoLISP
boolefunction is used to perform a Boolean operation on two bit-coded (integer) values. The Boolean operations that can be performed are AND (1), XOR (6), OR (7), and NOR (8). For example, the AND Boolean operation can be used to see which bits are common between two bit-coded values. If an AND Boolean operation is performed on the bit-coded values 55 and 4135, a bit-coded value of 39 is returned.The following is an example of the
boolefunction:(boole 1 55 4135) 39LshThe AutoLISP
lshfunction accepts a bit (integer) value and converts it into a binary number before performing a bitwise shift by a specified number of bits. For example, you can shift the bit value of 1 by 3 bits to return the 8 bit value. A bit value of 1 is expressed as the binary value 1000 0000 (read left to right); the bitwise shift moves the 1 three bits to the right and it becomes a binary value of 0001 0000, or a bit value of 8.The following is an example of the
lshfunction:(lsh 1 3)8
For more information on the ∼ (bitwise NOT), boole, and lsh functions, see the AutoCAD Help system.
Working with Bit-Coded Values
The following exercise demonstrates how to work with bit-coded values. You'll create a custom function that allows you to toggle the state of the INTersection object snap. The current running object snap modes are stored in the osmode system variable, which contains a bit-coded value. The INTersection object snap is represented by the bit code 32.
- At the AutoCAD Command prompt, type
(setq cur_osmode (getvar "osmode"))and press Enter.The current value of the
osmodesystem variable is assigned to thecur_osmodeuser-defined variable. - Type
(logand 32 cur_osmode)and press Enter.The value 32 or 0 is returned. If 32 is returned, then the INTersection object snap mode is enabled.
- Type
osnapand press Enter. - When the Drafting Settings dialog box opens, verify the current state of the Intersection check box based on the results you got in step 2. Click Cancel.
If 32 is returned by the
logandfunction in step 2, the Intersection check box should be checked; otherwise it will be unchecked. - Type the following and press Enter:
(defun c:ToggleINT ( / cur_osmode) (setq cur_osmode (getvar "osmode")) (if (= (logand 32 cur_osmode) 0) (setvar "osmode" (logior 32 cur_osmode)) (setvar "osmode" (- cur_osmode 32)) ) (princ) ) - Type
toggleintand press Enter.The custom function checks the bit-coded value of the
osmodesystem variable to see if bit code 32 is part of the value. If bit code 32 is not part of the bit-coded value, 32 is added to the current value of theosmodesystem variable with thelogiorfunction. Otherwise, 32 is subtracted from theosmodesystem variable. - Open the Drafting Settings dialog box and verify that the state of the Intersection check box has been changed. Click Cancel.
- Type
toggleintand press Enter.The previous state of the INTersection object snap mode is restored.
Manipulating Strings
Strings are used for a variety of purposes in AutoLISP, from displaying command prompts and messages to creating annotations in a drawing. The string values in an AutoLISP program can have a static or fixed value that never changes during execution, or a value that is more dynamic and is changed by the use of string-manipulation functions. You can manipulate a string by
- Concatenating two or more strings together
- Getting the number of characters or their position in a string
- Replacing characters in a string
- Removing characters from or truncating a string
- Trimming empty spaces or other characters from the ends of a string
- Changing the case of and evaluating the values of a string
This exercise demonstrates how to concatenate and manipulate strings in AutoLISP:
- At the AutoCAD Command prompt, type
(setq str1 "String:")and press Enter.The string “String:” is assigned to the
str1user-defined variable. - Type
(setq str2 ""Sample"")and press Enter.The string “″Sample″” is assigned to the
str2user-defined variable. - Type
(setq mtline1 (strcat str1 " " str2))and press Enter.A new string value of “String: ″Sample″” is returned and assigned to the
mtline1user-defined variable. - Type
(setq mtline2 (strcat "Length: " (itoa (strlen str2))))and press Enter.A new string value of “Length: 8” is returned and assigned to the
mtline2user-defined variable. - Type
(command "mtext" PAUSE PAUSE (strcat mtline1 "\P" mtline2) "")and press Enter.The
mtextcommand is started and you are prompted for the two corners of the multiline text boundary. - At the
Specify first corner:prompt, pick a point in the drawing. - At the
Specify opposite corner or [Height/Justify/Line spacing/Rotation/Style/Width/Columns]:prompt, pick a point in the drawing.The new multiline text object is created and should look like Figure 3.1.

Figure 3.1 Multiline text object created from multiple string values
I discuss the strcat and strlen functions in the following sections, along with many other functions related to working with strings. The section “Converting Data Types” later in this chapter explores the itoa function used to convert an integer to a string.
Concatenating Strings
Two or more strings can be concatenated (combined) into a string value that can then be presented to the user or used by another function. There are many different reasons why you might combine two or more strings. Some of the most common reasons follow:
- To define an absolute file location based on a path and filename
- To write a string value out to a file
- To create a prompt based on a fixed string value and a recently entered string or numeric value that was converted to a string
- To build a field or multiline text value using special characters that can then be displayed using an
MTextobject
The AutoLISP strcat (short for string concatenation) function is used to concatenate multiple strings together. The following shows the syntax of the strcat function:
(strcat [stringN ...])The stringN argument represents the strings that should be concatenated together to form the resulting string. The stringN argument is optional. If no argument is provided, an empty string represented by a pair of quotation marks (“”) is returned.
The following demonstrates the strcat function and the values that are returned:
(setq str1 "Hello" str2 "AutoLISP!")
(strcat str1 str2)
"HelloAutoLISP!"
(strcat str1 " from " str2)
"Hello from AutoLISP!"
(setq kwd1 "Plate" kwd2 "Bolt" *prev_kwd* "Plate")
(strcat "
Enter object to place [" kwd1 "/" kwd2 "] <" *prev_kwd* ">: ")
"
Enter object to place [Plate/Bolt] <Plate>: "
Getting the Length of and Searching for Strings
When working with strings, you may want to know the number of characters in a string or the position in which a text pattern begins. You can use the length of a string to make sure a string doesn't exceed a specific number of characters, to remove characters from the end of a string, or to insert a string at a known location.
Returning the Length of a String
The AutoLISP strlen (short for string length) function returns the number of characters in a string. The following shows the syntax of the strlen function:
(strlen [string])The string argument represents the string for which you want to know the length; the length is returned as an integer. Spaces in a string are counted as one character. The string argument is optional, and a length of 0 is returned if no argument is provided.
The following are examples of the strlen function and the values that are returned:
(strlen "Hello")
5
(strlen "  Hello  ")
9
(strlen "Product: %product%")
18
Searching for a Text Pattern in a String
In addition to wanting to know the number of characters in a string, you might want to know if a specific text pattern is contained in a string. This can be helpful if you want to create a custom find and replace program for text contained in an annotation object. The AutoLISP vl-string-search function takes a text pattern and compares that pattern to a string. The position at which the text pattern begins in the string is returned as an integer. If the text pattern is not found, nil is returned. The first character in a string is located in the 0 position. A string can contain multiple instances of the text pattern, but the vl-string-search function only returns the start position of the first instance of the text pattern.
The following shows the syntax of the vl-string-search function:
(vl-string-search pattern string [start])The arguments are as follows:
patternThepatternargument represents the text pattern that you want to search for in the string argument. The text pattern is case sensitive.StringThestringargument represents the string that you want to search.StartThestartargument represents the starting position in the string argument where you want to begin searching for the text pattern specified by the pattern argument. The start argument is optional. If no argument is provided, searching for the text pattern starts at the 0 position.
The following are examples of the vl-string-search function and the values that are returned:
(vl-string-search "product" "Product: %product%")
10
(vl-string-search "Product" "Product: %product%")
0
(vl-string-search "program" "Product: %product%")
nil
Although the vl-string-search function can be used to search a string for a text pattern, the function is limited to searching only for that text pattern and in the case specified. If you have a need to search a string for multiple text patterns, the vl-string-search function is not very efficient by itself. You can use the wcmatch (short for wildcard match) function to help search a string for more complex text patterns with the use of wildcard pattern matching.
However, unlike the vl-string-search function, the wcmatch function returns T only if the wildcard pattern matches part or all of the string; otherwise, nil is returned if no match is found. If a match is found, it is up to you to try to find the text in the string that was matched. You can use the AutoLISP substr function along with a looping expression to get down to the substring that is a match. You'll learn more about the substr function in the “Replacing and Trimming Strings” section later in this chapter, and more about looping expressions in Chapter 5.
The following shows the syntax of the wcmatch function:
(wcmatch string pattern)The arguments are as follows:
stringThestringargument represents the string that you want to search.PatternThepatternargument represents the wildcard text pattern that you want to search for in thestringargument. For information on the wildcard characters that are supported, see the “wcmatch” topic in the AutoCAD Help system.
Here are examples of the wcmatch function and the values that are returned:
(wcmatch "W6X12" "W#X12")
T
(wcmatch "W*6" "W#X12")
nil
The AutoLISP strlen, vl-string-search, and wcmatch functions are all helpful in learning more about the length or characters in a string. Here are two additional functions that can be useful in finding out what characters are in a string:
vl-string-positionReturns the position of a character in a string
vl-string-mismatchReturns the length of the characters that are at the beginning of and in common between two strings
For more information on these functions, see the AutoCAD Help system.
Replacing and Trimming Strings
In the previous section, I mentioned how the vl-string-search and wcmatch functions can be used to determine whether a text pattern exists in a string. After you know that the text pattern is in a string, you can use that information to split a string into two strings based on the text pattern's location, replace a matching text pattern with a new string, or remove the string that matches a text pattern. Along with working with a string based on the results of a matched text pattern, you can trim spaces or specific characters off the ends of a string.
Replacing a Text Pattern in a String
A text pattern or set of characters in a string can be replaced with a new string or set of characters, making it easy to update an out-of-date part number or even a basic implementation of inline variable expansion. For additional information on inline variable expansion, see the “What Is Inline Variable Expansion?” sidebar.
The AutoLISP vl-string-subst (short for string substitution) function is commonly used to replace a text pattern in a string. Only the first instance of the matching text pattern is replaced, so you might need to run the vl-string-subst function several times on a string.
The following shows the syntax of the vl-string-subst function:
(vl-string-subst new_string pattern string [start])The arguments are as follows:
new_stringThenew_stringargument represents the string that you want to use as the replacement value if the text pattern specified by thepatternargument is found in thestringargument.PatternThepatternargument represents the text pattern that you want to search for in the string argument.StringThestringargument represents the string that you want to search.StartThestartargument represents the starting position in thestringargument that you want to begin searching for the text pattern specified by thepatternargument. Thestartargument is optional. If no argument is provided, searching for the text pattern starts at the first position.
The following are examples of the vl-string-subst function and the values that are returned:
(vl-string-subst "career" "hobby" "Programming is my hobby.")
"Programming is my career."
(vl-string-subst "_" " " "Project 123 - ABC")
"Project_123 - ABC"
Listing 3.1 is a custom function that mimics the use of inline variable expansion. When the function is executed, it attempts to match the text between % (percent) signs with a user-defined variable. If the variable is found, the inline variable is replaced by its current value.
Along with the vl-string-subst function, you can use the vl-string-translate function to replace all instances of a character anywhere in a string with another character. Since the vl-string-translate function works with single characters, it provides much less control over using a text pattern that contains multiple characters.
The following example demonstrates how the vl-string-translate function can be used to replace all of the spaces in a string with underscores:
(vl-string-translate " " "_" "Project 123 - ABC")
"Project_123_-_ABC"
For more information on the vl-string-translate function, see the AutoCAD Help system.
Trimming a String
A string can be trimmed to a specific length by specifying a starting position and the number of characters to keep, resulting in what is known as a substring. The AutoLISP substr (short for substring) function allows you to keep a set of characters from a given string.
The following shows the syntax of the substr function:
(substr string start [length])The arguments are as follows:
stringThestringargument represents the string that contains the substring you want to return.StartThestartargument represents the starting position in thestringargument that the substring begins. A string starts at the first position.LengthThelengthargument represents the number of characters the substring should contain. Thelengthargument is optional. If no argument is provided, the substring contains all of the characters from the starting position specified by thestartargument to the end of the string.
The following are examples of the substr function and the values that are returned:
(substr "Programming is my hobby." 12)
" is my hobby."
(substr "Programming is my hobby." 1 11)
"Programming"
(substr "Programming is my hobby." 19 5)
"hobby"
Although the substr function is very helpful in pulling a string apart, it is not the most efficient function to use if you need to remove or trim specific characters from the left or right ends of a string. The AutoLISP vl-string-trim, vl-string-left-trim, and vl-string-right-trim functions are better suited to trimming specific characters, such as extra spaces or zeroes, from the ends of a string. The vl-string-trim function trims both ends of a string, whereas the vl-string-left-trim and vl-string-right-trim functions trim only the left and right ends of a string, respectively. Characters that are part of the character_set argument are trimmed from the respective ends of the string until a character that isn't a part of the character_set argument is encountered.
The following shows the syntax of the vl-string-trim, vl-string-left-trim, and vl-string-right-trim functions:
(vl-string-trim character_set string)
(vl-string-left-trim character_set string)
(vl-string-right-trim character_set string)
The arguments are as follows:
character_setThecharacter_setargument represents the characters on the end or ends of the string specified by thestringargument that should be trimmed off.StringThestringargument represents the string that should be trimmed based on the characters specified by thecharacter_setargument.
The following are examples of the vl-string-trim, vl-string-right-trim and vl-string-left-trim, functions and the values that are returned:
(vl-string-trim " " "  Extra spaces  ")
"Extra spaces"
(vl-string-right-trim " .0" "Trailing Zeroes and Spaces 0.10000   ")
"Trailing Zeroes and Spaces 0.1"
(vl-string-right-trim " .0" "Trailing Zeroes and Spaces 1.0000   ")
"Trailing Zeroes and Spaces 1"
(vl-string-left-trim " 0" "  001005 Leading Zeroes and Spaces")
"1005 Leading Zeroes and Spaces"
Changing the Case of a String
The text in most annotation objects of a drawing file is in all uppercase letters. However, the text that a user might enter at a Command prompt might be in uppercase, lowercase, or even mixed-case letters. The AutoLISP strcase (short for string case) function can be used to convert all of the letters in a string to either uppercase or lowercase.
The following shows the syntax of the strcase function:
(strcase string [lowercase])The arguments are as follows:
stringThestringargument represents the string that you want to convert to all uppercase or lowercase letters.lowercaseThelowercaseargument, when provided, indicates that all the letters should be converted to lowercase.Tis typically provided as the value for this argument. Using a value ofTindicates that thestringargument should be converted to all lowercase letters.
The following are examples of the strcase function and the values that are returned:
(setq str_convert "StRiNg")
(strcase str_convert)
"STRING"
(strcase str_convert T)
"string"
The strcase function can't be used to convert specific letters of a string to sentence or title case. However, if you need that type of functionality, you can use the subst and strcase functions to do get the desired results. For example, in the case of wanting to convert a string to sentence case, you can use the substr function to get the first character of a string and then get the remaining characters of a string. After you get the two parts of the string you can then change their case with the strcase function and concatenate the two strings back together with the strcat function.
Listing 3.2 is an example of a custom AutoLISP function that could be used to convert a text string to sentence case.
Evaluating Values to Strings
When working with strings, you may also want to concatenate a numeric value as part of a prompt string or response to the user. Before you can concatenate a nonstring value to a string, you must convert the nonstring value to a string. The quickest way to do so is to use the AutoLISP vl-princ-to-string and vl-prin1-to-string functions.
The difference between the two functions is how quotation marks, backslashes, and other control characters are represented in the string that is returned. The vl-prin1-to-string function expands all control characters, whereas the vl-princ-to-string function doesn't. For more information on control characters that can be used in strings, search on the keywords “control characters” in the AutoCAD Help system.
The following shows the syntax of the vl-princ-to-string and vl-prin1-to-string functions:
(vl-princ-to-string atom)
(vl-prin1-to-string atom)
The atom argument represents the expression, variable, or value that should be converted to and returned as a string.
The following are examples of the vl-princ-to-string and vl-prin1-to-string functions, and the values that are returned:
(vl-princ-to-string 1.25)
"1.25"
(vl-princ-to-string (findfile (strcat (getvar "PROGRAM") ".exe")))
"C:\Program Files\Autodesk\AutoCAD 2014\acad.exe"
(vl-prin1-to-string 1.25)
"1.25"
(vl-prin1-to-string (findfile (strcat (getvar "PROGRAM") ".exe")))
""C:\\Program Files\\Autodesk\\AutoCAD 2014\\acad.exe""
I discuss other AutoLISP functions that can be used to convert nonstring values to strings and strings to nonstring values next.
Converting Data Types
Variables in AutoLISP aren't defined to hold a specific data type, which allows the variable to be flexible and hold any valid type of data. However, data types are used by AutoLISP as a way to enforce data integrity and communicate the types of values an argument expects or a function might return. As your programs become more complex and you start requesting input from the user, there will be times when a function returns a value of one data type and you want to use that value with a function that expects a different data type.
I explained the use of the vl-princ-to-string and vl-prin1-to-string functions earlier, but those functions simply convert most values to a string. AutoLISP also contains many other conversion functions that allow you to convert the following:
- Numeric values to strings
- Strings to numeric values
- Numeric values to other number types
- Lists to strings and strings to lists
You'll learn how to convert lists to strings and strings to lists in Chapter 4.
Converting Numeric Values to Strings
Numbers are the most commonly used data type in AutoLISP because you are often working with the size of any object, positioning an object in a drawing, or counting objects to generate a bill of materials. The reason you might want to convert a numeric value to a string is to add a value to a prompt string, create a text string for an annotation object, or write a value out to an external file.
Table 3.2 lists the available functions for converting a numeric value to a string.
Table 3.2 AutoLISP functions for converting numeric values to strings
| Function | Description |
angtos |
The angtos function accepts a numeric value, integer or real number, which represents an angle in radians. Optionally, you can specify the unit that the angle should be converted into along with a precision. The function returns a string based on the angular value, unit, and precision arguments specified. You can use the AutoLISP angtof function to reverse the conversion. |
rtos |
The rtos function accepts a numeric value, integer or real number, which represents a distance. Optionally, you can specify the linear unit that the distance should be converted into along with a precision. The function returns a string based on the linear value, unit, and precision arguments specified. You can use the AutoLISP atof function to reverse the conversion. |
itoa |
The itoa function accepts an integer and returns a string value of the converted integer value. If a real number is passed to the function, the ; error: bad argument type: fixnump: error message is displayed. You can use the AutoLISP atoi function to reverse the conversion. |
chr |
The chr function accepts an ASCII code, which is an integer value, and returns the character equivalent of the ASCII code value. If a real number is passed to the function, the ; error: bad argument type: fixnump: error message is displayed. You can use the AutoLISP ascii function to reverse the conversion. |
The following are examples of the angtos, rtos, itoa, and chr functions, and the values they return:
(angtos (/ PI 2))
"90"
(angtos (/ PI 6) 0 5)
"30.00000"
(rtos 1.375)
"1.3750"
(rtos 1.375 4)
"1 3/8""
(rtos 1.375 3 4)
"1.3750""
(itoa -25)
"-25"
(itoa 5)
"5"
(chr 32)
" "
(chr 65)
"A"
For more information on these functions, see the AutoCAD Help system.
Converting Strings to Numeric Values
You can use string values for prompts and messages to the user, as you saw earlier. You can store string values with annotation objects, and you can also read a part number from an external data file and assign that value to an attribute in a block. Even though a string value is between quotation marks, it can still represent a numeric value. Before you use a string that contains a number with a function that expects a numeric value, you must convert that string to a numeric value.
Table 3.3 lists the AutoLISP functions that can be used to convert a string to a numeric value.
Table 3.3 AutoLISP functions for converting strings to numeric values
| Function | Description |
angtof |
Accepts a string that represents an angular value. Optionally, you can specify the unit that defines the formatting of the number in the string. The function returns a real number based on the value in the string and the unit argument that is specified. You can use the AutoLISP angtos function to reverse the conversion. |
atof |
Accepts a string that represents a numeric value and returns a real number based on the value in the string. You can use the AutoLISP rtos function to reverse the conversion. |
distof |
Accepts a string that represents a distance value. Optionally, you can specify the unit that defines the formatting of the number in the string. The function returns a real number based on the value in the string and the unit argument that is specified. You can use the AutoLISP rtos function to reverse the conversion. |
atoi |
Accepts a string that represents a numeric value and returns an integer based on the value in the string. You can use the AutoLISP itoa function to reverse the conversion. |
ascii |
Accepts a string and returns an integer that represents the ASCII code value of the first character in the string. Although the string can be more than one character, only the first character is converted. You can use the AutoLISP chr function to reverse the conversion. |
vl-string-elt |
Accepts a string and returns an integer that represents the ASCII code value of the character at the specified position in the string. You can use the AutoLISP chr function to reverse the conversion. |
The following are examples of the angtof, atof, distof, atoi, ascii, and vl-string-elt functions, and the values they return:
(angtof "90")
1.5708
(angtof "30.00000" 0)
0.523599
(atof "1.3750")
1.375
(distof "1 3/8"" 4)
1.375
(distof "1.3750"" 3)
1.375
(atoi "-25")
-25
(atoi "5")
5
(atoi "5th Place")
5
(ascii " ")
32
(ascii "A")
65
(vl-string-elt "Programming" 4)
114
For more information on these functions, see the AutoCAD Help system.
Converting Numeric Values to Other Number Types
There are times when you have to work with an integer or a real number, even if a function returns a different numeric data type. In addition to converting integers to reals or reals to integers, you can also convert a negative number to a positive number.
Table 3.4 explains the functions that can be used to convert one numeric value to another.
Table 3.4 AutoLISP functions for converting numeric values
| Function | Description |
fix |
Accepts a numeric value, integer or real number, and returns the nearest integer after discarding the value after the decimal place. |
float |
Accepts a numeric value, integer or real number, and returns a real number. |
abs |
Accepts a numeric value, integer or real number, and returns the absolute value of the numeric value. The absolute value is a positive value, never negative. You can also multiply a numeric value by −1 to convert a positive to a negative numeric value or a negative to a positive numeric value. The AutoLISP minusp function can be used to determine whether a numeric value is negative. |
The following are examples of the fix, float, and abs functions, and the values they return:
(fix -25)
-25
(fix 25.5)
25
(float -25)
-25.0
(float 25.5)
25.5
(abs -25)
25
(abs 25.5)
25.5
For more information on these functions, see the AutoCAD Help system.
Returning a Value from a Custom Function
Almost all AutoLISP functions return some sort of value—a number, string, or even nil. In Chapter 2 you learned how to create custom functions, but I didn't explain how you can specify a return value for a custom function. The value a custom AutoLISP function returns is always based on the last expression that is evaluated, which doesn't need to be an AutoLISP expression in the traditional sense; it doesn't need to contain a function and be surrounded by parentheses.
Listing 3.3 contains a custom AutoLISP function that divides two numbers and will return either nil or a numeric value. nil is returned instead of the resulting quotient when a zero is passed as an argument value. The reason for the nil is because there is no Else statement to the if function and the if function is the last function to be evaluated.
Without the if function to verify that it is safe to divide the two numbers, there would be no point in creating the custom function, as it would be the same as the regular / (divide) function. However, it is valid to add a variable as the last expression in a function. The variable is then evaluated and its value is returned. Listing 3.4 contains a custom AutoLISP function similar to the one shown in Listing 3.3, but the resulting quotient is returned instead.
Listing 3.5 demonstrates how adding an Else statement to the /s custom function would have also solved the problem of nil being returned when a zero is passed as an argument to the function.
Exercise: Drawing a Rectangle (Revisited)
In this section, I take another look at the drawplate function from Chapter 2, and apply some of the concepts that have been introduced in this chapter. The key concepts that are covered in this exercise are as follows:
- Using Math Functions Numeric values can be changed using basic math functions.
- Converting Values AutoLISP functions return different values, and those values can be converted to be used with functions that accept other types of data.
- Manipulating Strings String values can be manipulated to create a new string value.
- Storing AutoLISP Expressions You can store AutoLISP expressions in an LSP file so they can be used in more than one drawing or shared with others.
- Identifying the Locations of Your LSP Files AutoCAD needs to know where your LSP files are so it can locate them and know which locations are trusted.
- Loading LSP Files LSP files can be loaded into AutoCAD for use by the user or an AutoLISP program.
You can learn more about working with LSP files in Chapter 10, “Authoring, Managing, and Loading AutoLISP Programs.”
Creating the drawplate.lsp File
In Chapter 2, you entered the drawplate function at the AutoCAD Command prompt and executed the function from the current drawing. However, once you created a new drawing or closed the drawing that the function was typed in, it was lost unless you entered the function again.
The following steps explain how to create a file named drawplate.lsp that can be used to store the drawplate function:
- Do one of the following:
- On Windows XP or Windows 7, click the Start button
 [All] Programs Accessories Notepad.
 - On Windows 8, on the Start Screen, type note and then click Notepad on the Search bar.
- On Windows XP or Windows 7, click the Start button
- In Notepad, click File Save As.
- In the Save As dialog box, browse to the
MyCustomFilesfolder that you created under theDocuments(orMy Documents) folder, or the location in which you want to store the LSP file. - In the File Name text box, type
drawplate.lsp. - Click the Save As Type drop-down list and select All Files (*.*).
- Click the Encoding drop-down list and select ANSI. Click Save.
- In Notepad, click File Save As.
Don't close Notepad.
If you are running AutoCAD on Mac OS, use the following steps to create the drawplate.lsp file:
- In the Mac OS Finder, click Go Applications. In the Finder window, double-click TextEdit.
- In TextEdit, click TextEdit Preferences. In the Preferences dialog box, on the New Document tab, click Plain Text and deselect Smart Quotes. Close the dialog box.
- Click File New to create a plain ASCII text file.
- Click File Save and type
DrawPlate.lspin the Save As text box. From the sidebar on the left, click Documents MyCustomFiles, or select the location in which you want to store the LSP file. Click Save. - If prompted to use the
.lspextension, click Use .lsp. - Don't close the TextEdit window for the
drawplate.lspfile.
Revising the drawplate Function
In Chapter 2, you defined the drawplate function as a single function with the following expressions:
(defun c:drawplate ( / old_osmode pt1 pt2 pt3 pt4)
  (setq old_osmode (getvar "osmode"))
  (setvar "osmode" 0)
  (command "._-layer" "_m" "Plate" "_c" 5 "" "")
  (setq pt1 '(0 0 0))
  (setq pt2 '(5 0 0))
  (setq pt3 '(5 2.75 0))
  (setq pt4 '(0 2.75 0))
  (command "._line" pt1 pt2 pt3 pt4 "_c")
  (setvar "osmode" old_osmode)
)
If you look at the drawplate function, it contains expressions that are used to create a layer and draw objects that form a rectangle. Creating or setting a layer is a common task that you will want to perform each time you add objects to a drawing; the same could be true about drawing rectangles, depending on the type of drawings you create. The following two functions are the result of modularizing the expressions of the drawplate function that were used to create a layer and draw a rectangle:
(defun createlayer (name color / )
  (command "._-layer" "_m" name "_c" color "" "")
)
(defun createrectangle (pt1 pt2 pt3 pt4 / old_osmode)
  (setq old_osmode (getvar "osmode"))
  (setvar "osmode" 0)
  (command "._line" pt1 pt2 pt3 pt4 "_c")
  (setvar "osmode" old_osmode)
)
If you look at the createlayer and createrectangle functions, you'll see that they both accept values in the form of arguments that are used by the expressions that make up the function. Arguments allow a function to be more flexible and perform the same task in different situations. For example, createlayer could be used to create a Door layer, which is green, or the Plate layer, which is blue. I discussed how to create functions that accept arguments in Chapter 2.
A revised version of the drawplate function using the separate functions that create a layer and draw a rectangle might look like this:
(defun c:drawplate_rev ( / pt1 pt2 pt3 pt4)
  (createLayer "Plate" 5)  (setq width 5
        height (/ width 2))
  (setq pt1 '(0 0 0)
        pt2 (list width 0 0)
        pt3 (list width height 0)
        pt4 (list 0 height 0))
  (createRectangle pt1 pt2 pt3 pt4)
)
Along with breaking code down into smaller functions, thereby making the code modular, you can take the same approach to how the functions are stored. Using this approach, let's you store the three functions in two files: drawplate.lsp and utility.lsp.
drawplate.lspwill contain the functions that will be exposed to the user: the original and revised versions of thedrawplatefunction.utility.lspwill contain thecreatelayerandcreaterectanglefunctions, making it easier to reuse the functions with other programs if needed.
Adding the Revised drawplate Function to drawplate.lsp
Now that you have seen how the drawplate function can be broken down into smaller functions, it is time to add the revised function to the drawplate.lsp file and use it in AutoCAD. The following steps explain how to update the drawplate.lsp file:
- In NotePad or TextEdit, open the file
drawplate.lsp. - In the text editor area, position the cursor in front of the first expression of the original
drawplatefunction. Hold down the Shift key and click after the last expression of the function. - With the expressions of the function highlighted, type the following:
; Draws a rectangular plate that is 5x2.75 (defun c:drawplate ( / pt1 pt2 pt3 pt4 width height insPt textValue) ; Create the layer named Plate or set it current (createlayer "Plate" 5) ; Define the width and height for the plate (setq width 5 height 2.75) ; Set the coordinates to draw the rectangle (setq pt1 '(0 0 0) ;| lower-left corner |; pt2 (list width 0 0) ;| lower-right corner |; pt3 (list width height 0) ;| upper-right corner |; pt4 (list 0 height 0)) ;| upper-left corner |; ; Draw the rectangle (createrectangle pt1 pt2 pt3 pt4) ; Set the insertion point for the text label (setq insPt (list (/ width 2.0) (+ height 1.0) 0)) ; Define the label to add (setq textValue (strcat "Plate Size: " (vl-string-right-trim " .0" (rtos width 2 2)) "x" (vl-string-right-trim " .0" (rtos height 2 2)) ) ) ; Create label (createlayer "Label" 7) (createtext insPt "_c" 0.5 0.0 textValue) ) - Click File Save.
Creating the utility.lsp File
Now that you have the revised version of the drawplate function in the drawplate.lsp file, you need to create the utility.lsp file that will store the functions createlayer and createrectangle. You will also define a function named createtext. That function will be used to place a single-line text object below the plate that is drawn with the createrectangle function.
Follow these steps to create the utility.lsp file, and add the createlayer, createrectangle, and createtext functions:
- Open Notepad or TextEdit, and create a file named
utility.lsp. Use the steps from the “Creating thedrawplate.lspFile” section if you need additional information. - In NotePad or TextEdit, in the text editor area, type the following:
; CreateLayer function creates/modifies a layer and ; expects to argument values. (defun createlayer (name color / ) (command "._-layer" "_m" name "_c" color "" "") ) ; Createrectangle function draws a four-sided closed object. (defun createrectangle (pt1 pt2 pt3 pt4 / old_osmode) ; Store and change the value of the OSMODE system variable (setq old_osmode (getvar "osmode")) (setvar "osmode" 0) ; Draw a closed object with the LINE command (command "._line" pt1 pt2 pt3 pt4 "_c") ; Restore the value of the OSMODE system variable (setvar "osmode" old_osmode) ) ; Createtext function creates a single-line text object. (defun createtext (insertionPoint alignment height rotation textString / old_osmode) ; Store and change the value of the OSMODE system variable (setq old_osmode (getvar "osmode")) (setvar "osmode" 0) ; Creates a single-line text object with the -TEXT command (command "._-text" "_j" alignment insertionPoint height rotation textString) ; Restore the value of the OSMODE system variable (setvar "osmode" old_osmode) ) - Click File Save.
Loading the LSP Files into AutoCAD
Before the AutoLISP expressions in the drawplate.lsp and utility.lsp files can be used, the files must be loaded into AutoCAD. The Load/Unload Applications dialog box (appload command) can be used for this purpose.
The following steps explain how to load the LSP files into AutoCAD:
 Make AutoCAD the active program and do one of the following:
- On the ribbon, click the Manage tab Customization panel Load Application (Windows).
- On the menu bar, click Tools Load Application (Mac OS).
- At the Command prompt, type
apploadand press Enter (Windows and Mac OS).
- On the ribbon, click the Manage tab
- When the Load/Unload Applications dialog box (see Figure 3.2) opens, browse to the
MyCustomFilesfolder and select thedrawplate.lspfile. Click Load.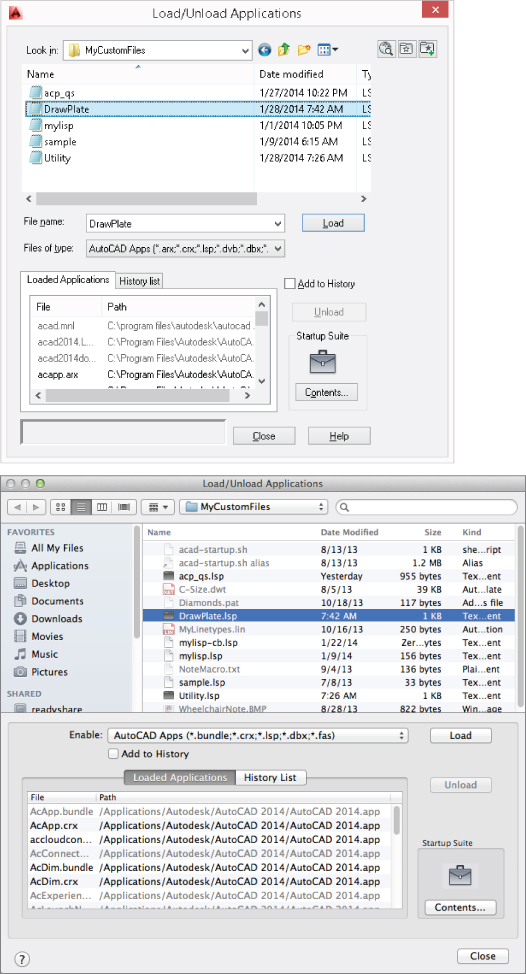
Figure 3.2 Loading the LSP fi les
- If the File Loading - Security Concerns message box is displayed, click Load.
- Repeat steps 2 and 3, but select the
utility.lspfile to load this time. - Click Close to return to the drawing area.
- At the Command prompt, type
drawplatepress Enter. - Type
zoomand press Enter, and then typeeto use the Extents option and press Enter.
The rectangle that represents the plate is drawn with a single-line text object drawn above it, as shown in Figure 3.3.
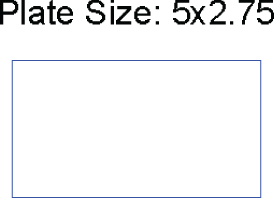
Figure 3.3 Results of the custom d rawplate function