
5
HTTP
To retrieve data from the Web, we have to enable our software to communicate with servers and web services. The lingua franca of communication on the Web is HTTP, the Hypertext Transfer Protocol. HTTP dates back to the late 1980s when it was invented by Tim Berners-Lee, Roy Fielding and others at the CERN near Geneva, Switzerland (Berners-Lee 2000; Berners-Lee et al. 1996). It is the most common protocol for communication between web clients (e.g., browsers) and servers, that is, computers that respond to requests from the network. Virtually every HTML page we open, every image we view in a browser, every video we watch is delivered by HTTP. When we type a URL into the address bar, we usually do not even start with http:// anymore, but with the hostname directly (e.g., r-datacollection.com) as a request via HTTP is taken for granted and automatically processed by the browser. HTTP's current official version 1.1 dates back to 1999 (Fielding et al. 1999), a fact that nicely illustrates its reliability over the years—in the same time period, other web standards such as HTML have changed a lot more often.
We hardly ever come into direct contact with HTTP. Constructing and sending HTTP requests and processing servers’ HTTP responses are tasks that are automatically processed by our browsers and email clients. Imagine how exhausting it would be if we had to formulate requests like “Hand me a document called index.html from the host www.nytimes.com/ in the directory pages/science/ using the HTTP protocol” every time we wanted to search for articles. But have you ever tried to use R for that purpose? To maintain our heroic claim that R is a convenient tool for gathering data from the Web, we need to prove that it is in fact suited to mimic browser-to-web communication. As we will see, for many of the basic web scraping tasks we still do not have to care much about the HTTP particulars in the background, as R handles this for us by default. In some instances, however, we have to dig deeper into protocol file transfers and formulate precise requests in order to get the information we want. This chapter serves as an introduction to those parts of HTTP that are most important to us to become successful web scrapers.
The chapter starts with an introduction to client–server conversation (Section 5.1.1). Before we turn to the technical details of HTTP, we briefly digress to talk about URLs, standardized names of resources on the Internet (Section 5.1.2). Our presentation of HTTP is then subdivided into a fundamental look at the logic of HTTP messages (Section 5.1.3), request methods (Section 5.14), status codes (Section 5.15), and headers (Section 5.1.6). In the second part, we inspect more advanced features of HTTP for identification and authentication purposes (Sections 5.2.1 and 5.2.2) and talk about the use of proxies (Section 5.2.3). Although HTTP is by far the most widespread protocol on the Web, we also take a look at HTTPS and FTP (Section 5.3). We conclude with the practical implementation of HTTP-based communication using R (Section 5.4). All in all, we have tried to keep this introduction to HTTP as nontechnical as possible, while still enabling you to use R as a web client in situations that are not explicitly covered in this book.
5.1 HTTP fundamentals
5.1.1 A short conversation with a web server
To access content on the Web, we are used to typing URLs into our browser or to simply clicking on links to get from one place to another, to check our mails, to read news, or to download files. Behind this program layer that is designed for user interaction there are several more layers—techniques, standards, and protocols—that make the whole thing work. Together they are called the Internet Protocol Suite (IPS). Two of the most prominent players of this Protocol Suite are TCP (Transmission Control Protocol) and IP (Internet Protocol). They represent the Internet layer (IP) and the transportation layer (TCP). The inner workings of these techniques are beyond the scope of this book, but fortunately there is no need to manually manipulate contents of either of these protocols to conduct successful web scraping. What is worth mentioning, however, is that TCP and IP take care of reliable data transfer between computers in the network.1
On top of these transportation standards there are specialized message exchange protocols like HTTP (Hyper Text Transfer Protocol), FTP (File Transfer Protocol), Post Office Protocol (POP) for email retrieval, SMTP (Simple Mail Transfer Protocol) or IMAP (Internet Message Access Protocol) for email storage and retrieval. All of these protocols define standard vocabulary and procedures for clients and servers to talk about specific tasks—retrieving or storing documents, files, messages, and so forth. They are subsumed under the label application layer.
Other than the name suggests, HTTP is not only a standard for hypertext document retrieval. Although HTTP is quite simple, it is flexible enough to ask for nearly any kind of resource from a server and can also be used to send data to the server instead of retrieving it.
Figure 5.1 presents a stylized version of ordinary user–client interactions. Simply put, when we access a website like www.r-datacollection.com/index.html, our browser serves as the HTTP client. The client first asks a DNS server (Domain Name System) which IP address is associated with the domain part of the URL we typed in.2 In our example, the domain part is www.r-datacollection.com.3 After the browser has received the IP address as response from the DNS server, it establishes a connection to the requested HTTP server via TCP/IP. Once the connection is established, client and server can exchange information—in our case by exchanging HTTP messages. The most basic HTTP conversation consists of one client request and one server response. For example, our browser asks for a specific HTML document, an image, or some other file, and the server responds by delivering the document or giving back an error code if something went wrong. In our example, the browser would ask for index.html and start parsing the content of the response to provide the representation of the website. If the received document contains further linked resources like images, the browser continues sending HTTP requests to the server until all necessary resources are transmitted. In the early days of the Internet, one could literally observe how the browser loaded webpages piece by piece. By now, it almost seems like webpages are received all at once due to the availability of higher bandwidths, keeping HTTP connections alive or posing numerous requests in parallel.
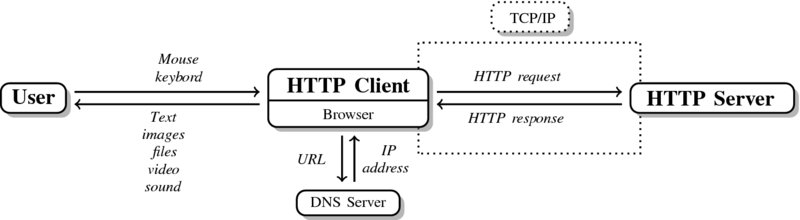
Figure 5.1 User–server communication via HTTP
There are two important facts about HTTP that should be kept in mind. First, HTTP is not only a protocol to transport hypertext documents but is used for all kinds of resources. Second, HTTP is a stateless protocol. This means that without further effort each pair of request and response between client and server is handled by default as though the two were talking to each other for the first time no matter how often they previously exchanged information.
Let us take a look at one of these standardized messages. For the sake of the example we establish a connection to www.r-datacollection.com and ask the server to send us index.html. The HTTP client first translates the host URL into an IP address and then establishes a connection to the server on the default HTTP port (port 80). The port can be imagined as a door at the server's house where the HTTP client knocks. Consider the following summary of the client-side of the conversation:4

After having established the connection the server expects a request and our client sends the following HTTP request to the server:

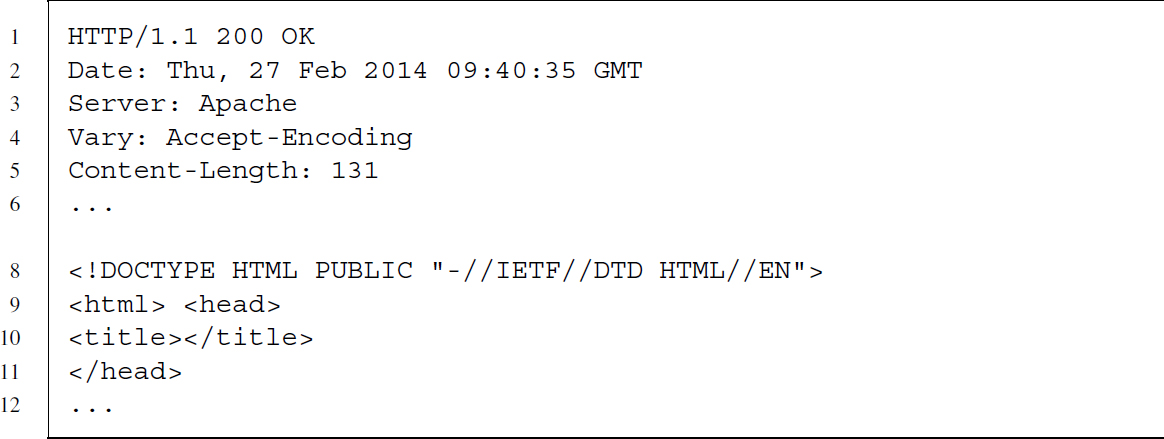
Now it is the client's turn to expect a response from the server. The server responds with some general information followed by the content of our requested document.5 The HTTP response reads as follows:
After having received all the data, the connection is closed again by the client …

… and the transaction is completed.
5.1.2 URL syntax
The location of websites and other web content are identified by Uniform Resource Locators (URLs). They are not part of HTTP but make communication via HTTP and other protocols straightforward for users.6 The general URL format can be expressed as follows:
scheme://hostname:port/path?querystring#fragment
A corresponding real-life example would be
http://www.w3.org:80/People/Berners-Lee/#Bio
Each URL starts with a scheme that defines the protocol that is used to communicate between client/application and server. In the example, the scheme is http, separated by a colon. There are other schemes like ftp (File Transfer Protocol) or mailto, which corresponds to email addresses that rely on the SMTP (Simple Mail Transfer Protocol) standard. Most enable communication in networks, but you will also find the file scheme familiar, which addresses files on local or network drives.
The hostname provides the name of the server where the resource of interest is stored. It is a unique identifier of a server. The hostname along with the port component tell the client at which door it has to knock in order to get access to the requested resource. The information is provided in the example as www.w3.org:80. Port 80 is the default port in the Transmission Control Protocol (TCP). If the client is fine with using the default port, this part of the URL can be dropped. Hostnames are usually human readable, but every hostname also has a machine-readable IP address. In the example, www.w3.org belongs to the IP address 128.30.52.37, making the following an equivalent URL:7
http://128.30.52.37/People/Berners-Lee/#Bio
As we usually provide the human-friendly versions of URLs, the Domain Name System (DNS) translates hostnames into numerical IP addresses. Therefore, the DNS is frequently compared to a worldwide phone book that redirects users who provide hostnames to services or devices.
The path determines the location of the requested resource on the server. It works like paths on any conventional file system where files are nested in folders that may again be nested in folders and so on. Path segments are separated by slashes (/).
In some cases, URLs provide supplementary information in the path that helps the server to process the request correctly. The additional information is delivered in query strings that hold one or more name=value pairs. The query string is separated from the rest of the URL by a question mark. It encodes data using a ‘field = value’ format and uses the ampersand symbol (&) to separate multiple name–value pairs.
https://www.google.com/search?q=RCurl+filetype%3Apdf
A comparable URL is constructed when we search for “RCurl” documents on Google that are of type PDF. The name–value pair q=RCurl+filetype%3Apdf is the transformed actual request written in the search form as “RCurl filetype:pdf,” a compact syntax to search for PDF files that include the term “RCurl.” One could easily extend the request with further search parameters such as tbs=qdr:y. This would limit the results to hits that are younger than one year.8
Finally, fragments help point to a specific part of a document. This works well if the requested resource is HTML and the fragment identifier refers to a section, image, or similar. In the example above, the fragment #Bio requests a direct jump to the biography section of the document. Note that fragments are handled by the browser, that is, on the client side. After the server has returned the whole document, the fragment is used to display the specified part.
There are some encoding rules for URLs. URLs are transmitted using the ASCII character set, which is limited to a set of 128 characters. All characters not included in this set and most special characters need to be escaped, that is, they are replaced by a standardized representation. Consider once again the example. The expression “RCurl filetype:pdf” is converted to q=RCurl+filetype%3Apdf. Both white space and the colon character seem to be “unsafe” and have been replaced with a + sign and the URL encoding%3A, respectively. URL encodings are also called percent-encoding because the percent character % initializes each of these encodings. Note that the plus character is a special case of a URL escape sequence that is only valid in the query part. In other parts, the valid URL encoding of space is %20. A complete list of URL encodings can be found at http://www.w3schools.com/tags/ref_urlencode.asp.
We can encode or decode characters in URLs with the base functions URLencode() and URLdecode() in R. The reserved argument in the former function ensures that non-alphanumeric characters are encoded with their percent-encoding representation:
R> t <-"I'm Eddie! How are you & you? 1 + 1 = 2"
R> (url <- URLencode(t, reserve = TRUE))
[1]"I'm%20Eddie!%20How%20are%20you%20%26%20you%3f%201%20+%201%20%3d%202"

R> URLdecode(url)
[1]"I'm Eddie! How are you & you? 1 + 1 = 2"
These functions can be useful when we want to construct URLs manually, for example, to specify a GET form (see below), without having to insert the percent-encodings by hand.
5.1.3 HTTP messages
HTTP messages, whether client requests or server response messages, consist of three parts: start line, headers, and body—see Figures 5.2 and 5.3. While start lines differ for request and response, the messages’ header and body sections are structured identically.
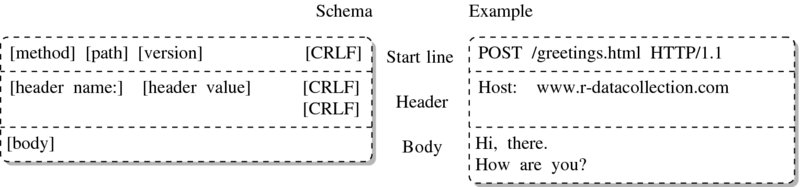
Figure 5.2 HTTP request schema
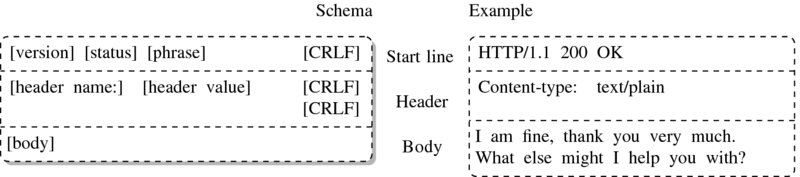
Figure 5.3 HTTP response schema
To separate start line from headers and headers from body, carriage return and line feed characters (CRLF) are used.9 Note that start line and headers are separated by one sequence of CRLF while the last header before the body is followed by two CRLF. In R, these characters are represented as escaped characters for carriage return and for new line feed.
The start line is the first and indispensable line of each HTTP message. In requests, the start line defines the method used for the request, followed by the path to the resource requested, followed by the highest HTTP version the client can handle. In our example we use the POST method requesting greetings.html and indicate that our client understands HTTP up to version 1.1.
The server response start line begins with a statement on the highest HTTP version the server can handle, followed by a status code, followed by a human-readable explanation of the status. Here, www.r-datacollection.com tells us that it understands HTTP up to version 1.1, that everything went fine by returning 200 as status code, and that this status code means something like OK.
The header section below the start line provides client and server with meta information about the other sides’ preferences or the content sent along with the message. Headers contain a set of header fields in the form of name–value pairs. Ordinarily, each header field is placed on a new line and header field name and value are separated by colon. If a header line becomes very long, it can be divided into several lines by beginning the additional line with an empty space character to indicate that they belong to the previous header line.
The body of an HTTP message contains the data. This might be plain text or binary data. Which type of data the body is composed of is specified in the content-type header, following the MIME type specification (Multipurpose Internet Mail Extensions). MIME types tell the client or server which type of data it should expect. They follow a scheme of main-type/sub-type. Main types are, for example, application, audio, image, text, and video with subtypes like application/pdf, audio/mpg, audio/ogg, image/gif, image/jpeg, image/png, text/plain, text/html, text/xml, video/mp4, video/quicktime, and many more.10
5.1.4 Request methods
When initiating HTTP client requests, we can choose among several request methods—see Table 5.1 for an overview. The two most important HTTP methods are GET and POST. Both methods request a resource from the server, but differ in the usage of the body. Whereas GET does not send anything in the body of the request, POST uses the body to send data. In practice, simple requests for HTML documents and other files are usually executed with the GET method. Conversely, POST is used to send data to the server, like a file or inputs from an HTML form.
Table 5.1 Common HTTP request methods
| Method | Description |
| GET | Retrieves resource from server |
| POST | Retrieves resource from server using the message body to send data or files to the server |
| HEAD | Works like GET, but server responds only with start line and header, no body |
| PUT | Stores the body of the request message on the server |
| DELETE | Deletes a resource from the server |
| TRACE | Traces the route of the message along its way to the server |
| OPTIONS | Returns list of supported HTTP methods |
| CONNECT | Establishes a network connection |
Source: Fielding et al. (1999).
If we are not interested in content from the server we can use the HEAD method. HEAD tells the server to only send the start line and the headers but not transfer the requested resource, which might be convenient to test if our requests are accepted. Two more handy methods for testing are OPTIONS, which asks the server to send back the methods it supports and TRACE, which requests the list of proxy servers (see Section 5.2.3) the request message has passed on its way to the server.
Last but not least there are two methods for uploading files to and deleting files from a server—PUT and DELETE—as well as CONNECT, a method for establishing an HTTP connection that might be used, for example, for SSL tunneling (see Section 5.3.1).
We will elaborate the methods GET and POST, the two most important methods for web scraping, when we discuss HTTP in action (see Section 5.4).
5.1.5 Status codes
When a server responds to a request, it will always send back a status code in the start line of the response. The most famous response that nearly everybody knows from browsing the Web is 404, stating that the server could not find the requested document. Status codes can range from 100 up to 599 and follow a specific scheme: the leading digit signifies the status category—1xx for informations, 2xx for success, 3xx for redirection, 4xx for client errors and 5xx for server errors—see Table 5.2 for a list of common status codes.
Table 5.2 Common HTTP status codes
| Code | Phrase | Description |
| 200 | OK | Everything is fine |
| 202 | Accepted | The request was understood and accepted but no further actions have yet taken place |
| 204 | No Content | The request was understood and accepted but no further data needs to be returned except for potentially updated header information |
| 300 | Multiple Choices | The request was understood and accepted but the request applies to more than one resource |
| 301 | Moved Permanently | The requested resource has moved, the new location is included in the response header Location |
| 302 | Found | Similar to Moved Permanently but temporarily |
| 303 | See Other | Redirection to the location of the requested resource |
| 304 | Not Modified | Response to a conditional request stating that the requested resource has not been changed |
| 305 | Use Proxy | To access the requested resource a specific proxy server found in the Location header should be used |
| 400 | Bad Request | The request has syntax errors |
| 401 | Unauthorized | The client should authenticate itself before progressing |
| 403 | Forbidden | The server refuses to provide the requested resource and does not give any further reasons |
| 404 | Not Found | The server could not find the resource |
| 405 | Method Not Allowed | The method in the request is not allowed for the specific resource |
| 406 | Not Acceptable | The server has found no resource that conforms to the resources accepted by the client |
| 500 | Internal Server Error | The server has encountered some internal error and cannot provide the requested resource |
| 501 | Not Implemented | The server does not support the request method |
| 502 | Bad Gateway | The server acting as intermediate proxy or gateway got a negative response forwarding the request |
| 503 | Service Unavailable | The server can temporarily not fulfill the request |
| 504 | Gateway Timeout | The server acting as intermediate proxy or gateway got no response to its forwarded request |
| 505 | HTTP Version Not Supported | The server cannot or refuses to support the HTTP version used in the request |
Source: Fielding et al. (1999).
5.1.6 Header fields
Headers define the actions to take upon reception of a request or response. Headers can be general or belong to one specialized group: header fields for requests, header fields for responses, and header fields regarding the body of the message. For example, request header fields can inform the server about the type of resources the client accepts as response, like restricting the responses to plain HTML documents or give details on the technical specification of the client, like the software that was used to request the document. They can also describe the content of the message, which might be plain text or binary, an image or audio file and might also have gone through encoding steps like compression. Header fields always follow the same, simple syntax. The name comes first and is separated with a colon from the value. Some header fields contain multiple values that are separated by comma.
Let us go through a sample of common and important header fields to see what they can do and how they are used. The paragraphs in the following overview provide the name of the header in bold and the field type in parentheses, that is, whether the header is used for request, response, or body.
Accept (request)

Accept is a request header field that tells the server about the type of resources the client is willing to accept as response. If no resource fits the restrictions made in Accept, the server should send a 406 status code. The specification of accepted content follows the MIME type scheme. Types are separated by commas; semicolons are used to specify so-called accept parameters type/subtype;acceptparameter=value,type/.... The asterisk (*) can be used to specify ranges of type and subtypes. The rules of content-type preferences are as follows: (1) more specific types are preferred over less specific ones and (2) types are preferred in decreasing order of the q parameter while (3) all type specifications have a default preference of q = 1 if not specified otherwise.
The above example can be read as follows: The client accepts HTML and GIF but if neither is available will accept any other image type. If no other image type is available, the client will also accept any other type of content.
Accept-Encoding (request)

Accept-Encoding tells the server which encodings or compression methods are accepted by the client. If the server cannot send the content in the specified encoding, it should return a 406 status code.
The example reads as follows: The client accepts gzip and deflate for encoding. If neither are available it also accepts sdch and otherwise content that was not encoded at all. It will not accept any other encodings as the value of the acceptance parameter is 0, which equals nonacceptance.
Allow (response; body)

Allow informs the client about the HTTP methods that are allowed for a particular resource and will be part of responses with a status code of 405.
Authorization (request)

Authorization is a simple way of passing username and password to the server. Username and password are first merged to username:password and encoded according to the Base64 scheme. The result of this encoding can be seen in the header field line above. Note that the encoding procedure does not provide encryption, but simply ensures that all characters are contained in the ASCII character set. We discuss HTTP authorization methods in more detail in Section 5.2.2.
The Authorization header field in the example indicates that the authorization method is Basic and the Base64-encoded username–password combination is cm9va2...
Content-Encoding (response; body)

Content-Encoding specifies the transformations, for example, compression methods, that have been applied to the content—see Accept-Encoding for further details.
Content-Length (response; body)

Content-Length provides the receiver of the message with information on the size of the content in decimal number of OCTETs (bytes).
Content-Type (response; body)

Content-Type provides information on the type of content in the body. Content types are described as MIME types—see Accept for further details.
Cookie (request)

Cookies are information sent from server to client with the Set-Cookie header field. They allow identifying clients—without cookies servers would not know that they have had contact with a client before. The Cookie header field returns the previously received information. The syntax of the header field is simple: Cookies consist of name=value pairs that are separated from each other by semicolon. Names like expires, domain, path, and secure are reserved parameters that define how the cookie should be handled by the client. expires defines a date after which the cookie is no longer valid. If no expiration date is given the cookie is only valid for one session. domain and path specify for which resource requests the cookie is needed. secure is used to indicate that the cookie should only be sent over secured connections (SSL; see Section 5.3.1). We introduce cookies in greater detail in Section 5.2.1.
The example reads as follows: The cookie sessionid=2783321 is valid until 31st of December 2035 for the domain www.r-datacollection.com and all its subdirectories (declared with /).
From (response)

From provides programmers of web crawlers or scraping programs with the option to send their email address. This helps webmasters to contact those who are in control of automated robots and web crawlers if they observe unauthorized behavior. This header field is useful for web scraping purposes, and we discuss it in Section 5.2.1.
Host (request)

Host is a header field required in HTTP/1.1 requests and helps servers to decide upon ambiguous URLs when more than one host name redirects to the same IP address.
If-Modified-Since (request)

If-Modified-Since can be used to make requests conditional on the time stamp associated with the requested resource. If the server finds that the resource has not been modified since the date provided in the header field, it should return a 304 (Not Modified) status code. We can make use of this header to write more efficient and friendly web scrapers (see Section 9.3.3).
Connection (request, response)

Connection is an ambiguous header field in the sense that it has two completely different purposes in HTTP/1.0 and HTTP/1.1. In HTTP/1.1, connections are persistent by default. This means that client and server keep their connection alive after the request–response procedure has finished. In contrast, it is standard in HTTP/1.0 to close connections after the client has got its response. Since establishing connections for each request, the value Keep-Alive can be specified in HTTP/1.0, while this is the default procedure in HTTP/1.1 and thus does not have to be explicitly stated. Instead, the server or client can force the connection to be shut down after the request–response exchange with the Close value.
Last-Modified (response; body)

Last-Modified provides the date and time stamp of the last modification of the resource.
Location (response; body)

Location serves to redirect the receiver of a message to the location where the requested resource can be found. This header is used in combination with status code 3xx when content has moved to another place or in combination with status code 201 when content was created as result of the request.
Proxy-Authorization (request)

The same as Authorization, only for proxy servers. For more information on proxies, see Section 5.2.3.
Proxy-Connection (request)

The same as Connection, only for proxy servers. For more information on proxies, see Section 5.2.3.
Referer (request)

Referer is a header field that informs the server what referred to the requested resource. In the example, www.r-datacollection.com/index.html might provide a link to a picture (e.g., /pictures/eddie.jpg). In a request for this picture the referer header field can be added to signal that the user has already been on the site and does not want to access the image from elsewhere, like another website.
Server (response)

Server provides information about the server addressed in the request. The first server above is based on Apache software using a Unix platform (httpd.apache.org/), while the second one is based on Microsoft's Internet Information Service (www.microsoft.com/).
Set-Cookie (response)

Set-Cookie asks the client to store the information contained in the Set-Cookie header field and send them along in subsequent requests as part of the Cookie header. See Cookie and Section 5.2.1 for further explanation.
User-Agent (request)

The User-Agent header field indicates the type of client that makes a request to the server. These more or less cryptic descriptions can indicate the use of a certain browser on a certain operating system. This information can be helpful for the server to adapt the content of the response to the system of the client. Nevertheless, the User-Agent can contain arbitrary user-defined information, such as User-Agent: My fabulous web crawler or User-Agent: All your base are belong to us. Web scrapers can and should use User-Agents responsibly. We discuss how this is done in Sections 5.2.1 and 9.3.3.
Vary (response)

The server response sometimes depends on certain parameters, for example, on the browser or device of the client (e.g., a desktop PC or a mobile phone), on whether the user has previously visited a site and has received a cookie, and on the encoding format the client accepts. Servers can indicate that content changes according to these parameters with the Vary header field.
The first example above indicates that the content might vary with changes in User-Agent, Cookie, or Accept-Encoding. The second example is rather unspecific. It states that changes on an unspecified set of parameters lead to changes in the response. This header field is important for the behavior of browser caches that try to load only new content and retrieve old and unchanged content from a local source.
Via (request, response)

Via is like Server but for proxy servers and gateways that HTTP messages pass on their way to the server or client. Each proxy or gateway can add its ID to this header, which is usually a protocol version and a platform type or a name.
WWW-Authenticate (response)

WWW-Authenticate asks the client to identify itself and is sent along a 401 Unauthorized status code. It is the counterpart to the Authorization request header field. The WWW-Authenticate header field describes the method of identification as well the “realm” this identification is valid for, as well as further parameters needed for authorization. The first example requests basic authentication while the second asks for digest authentication, which ensures that passwords cannot be read out by proxies. We explain both types of authentication in Section 5.2.2.
5.2 Advanced features of HTTP
What we have learned so far are just the basics of HTTP-based communication. There are more complex tasks that go beyond the default configuration of standard HTTP methods. Both web users and server maintainers may ask questions like the following:
- How can servers identify revisiting users?
- How can users avoid being identified?
- How can communication between servers and clients be more than “stateless,” that is, how can they memorize and rely on previous conversations?
- How can users transfer and access confidential content securely?
- How can users check if content on the server has changed—without requesting the full body of content?
Many of these tasks can be handled with means that are directly implemented in HTTP. We will now highlight three areas that extend the basic functionality of HTTP. The first comprises issues of identification, which are useful to personalize web experiences. The second area deals with different forms of authentication that serve to make server–client exchanges more secure. The third area covers a certain type of web intermediaries, that is, middlemen between clients and servers, namely proxy servers. These are implemented for a variety of reasons like safety or efficiency. As the availability of content may depend on the use of such advanced features, basic knowledge about them is often useful for web data collection tasks.
To showcase some advanced HTTP requests, we use the server at http://httpbin.org. This server, set up by Kenneth Reitz, offers a testing environment for HTTP requests and returns JSON-encoded content. It is a useful service to test HTTP calls before actually implementing them in real-life scenarios. We use it to formulate calls to the server via RCurl commands and evaluate the returned message within R.
Further, we will gently introduce the RCurl package to demonstrate some advanced HTTP features by example. RCurl provides means to use R as a web client software. The package is introduced in greater detail in Section 5.4.
5.2.1 Identification
The communication between client and server via the HTTP protocol is an amnesic matter. Connections are established and closed for each session; the server does not keep track of earlier requests from the same user by default. It is sometimes desirable that server responses are built upon results from previous conversations. For example, users might prefer that sites are automatically displayed in their language or adapted to fit a specific device or operating system. Moreover, customers of an online shop want to place items into a virtual shopping cart and continue browsing other products, while the website keeps track of these operations. Apart from scenarios like these that enhance user experience, some basic knowledge about clients is interesting for web administrators who want to know, for example, from which other sites their pages are visited most frequently.
HTTP offers a set of procedures that are used for such purposes. We discuss the most popular and relevant ones in the context of web scraping—basic identification header fields and cookies.
5.2.1.1 HTTP header fields for client identification
By default, modern web browsers deliver basic client identification in the HTTP header when sending a request to a server. This information is usually not sufficient to uniquely identify users but may improve surfing experience. As we will see, it can also make sense to pass these fields to servers when the request does not come from a browser but, for example, from a program like R that processes a scraping script.
The User-Agent header field contains information about the software that is used on the client side. Ordinary browsers deliver User-Agent header fields like the following:

What is hidden behind this cryptic string is that the request was performed by a Chrome browser, version 31.0.1650.57. The browser is ‘Mozilla-compatible’ (this is of no further interest), operates on a Windows system, and draws upon the web kit.11 This information does not suffice to uniquely identify the user. But they still serve an important purpose: They allow web designers to deliver content that is adapted to the clients’ software.
While an adequate layout is hardly relevant for web scraping purposes, we can deliver information on the software we use for scraping in the User-Agent field to keep our work as transparent as possible. Technically, we could put any string in this header. A both useful and convenient approach is to provide the current R version number along with the platform that R is run on. This way, the webmaster at the other end of the interaction is told what kind of program puts a series of requests to the server. The following command returns the current R version number and the corresponding platform:

We can use this string to configure a GET request that we conduct with the getURL() function of the RCurl package:

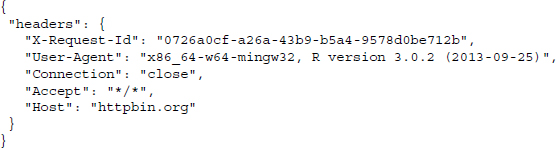
cat() is used to concatenate and print the results over several lines. The useragent argument allows specifying a User-Agent header field string. RCurl takes care of writing this string into a header field and passes it to the server. http://httpbin.org/headers returns the sent header information in JSON format.12 Beside the set of header fields that are used by default, we find that a User-Agent header field has been added.13
We will later learn that the basis of the RCurl package is the C library libcurl. Many of the options that libcurl offers can also be used in RCurl’s high-level functions (for more details, see Section 5.4.1). We will return to the use of User-Agents in practical web scraping in Section 9.3.3.
The second header field that is informative about the client is the Referer. It stores the URL of the page that referred the user to the current page. Referrers can be used for traffic evaluation to asses where visitors of a site come from. Another purpose is to be able to limit access to specific server content like image files. A webmaster could modify the settings of the server such that access to images is only possible from another resource on the server in order to prevent other people from using images on their own webpage by referring to the location on the original server. This causes unwanted traffic and is therefore unwelcome behavior. The default browser setting is that the Referer header is delivered automatically. This may look as follows:

We can provide the Referer header field with R using getURL()’s referer argument. We test the request to http://httpbin.org/headers with:14
R> getURL("http://httpbin.org/headers", referer ="http://www.r-datacollection.com/")
Note that adding information on the Referer from within R is misleading when R has not actually been referred from the site provided. We suggest that if it is necessary to provide a valid referrer in order to get access to certain resources, stay identifiable, for example, by properly specifying the From header field as described below, and contact the webmaster if in doubt. Providing wrong information in the Referer header field in order to disguise the source of the access request is called referrer spoofing. This may have its legitimacy for data privacy purposes but is not encouraged by scraping etiquette (see Section 9.3.3).
The From header field for client identification is not delivered by browsers but a convenient header for well-behaved web spiders and robots. It carries the user's email address to make her identifiable for web administrators. In web scraping, it is good practice to specify the From header field with a valid email address, as in

Providing contact details signals good intentions and enables webmasters who note unusual traffic patterns on their sites to get in touch. We thus reformulate our request:
R> getURL("http://httpbin.org/headers", httpheader = c(From ="[email protected]"))
Note that we have to use the httpheader option here to add the From header field, as from is not a valid option—in contrast to “referer,” for example. httpheader allows us to specify additional other header fields.
5.2.1.2 Cookies
Cookies help to keep users identifiable for a server. They are a tool to turn stateless HTTP communication into a stateful conversation where future responses depend on past conversations. Cookies work as follows: Web servers store a unique session ID in a cookie that is placed on the client's local drive, usually in a text file. The next time a browser sends an HTTP request to the same web server, it looks for stored cookies that belong to the server and—if successful—adds the cookie information to the request. The server then processes this “we already met” information and adapts its response. Usually, further information on the user has been stored on the server over the course of several conversations and can be “reactivated” using cookies. In other words, cookies enable browsers and servers to continue conversations from the past.
Cookies are shared via the HTTP header fields “Set-Cookie” (in the response header) and “Cookie” (in the request header). A typical conversation via HTTP that results in a cookie exchange looks as follows. First, the client makes a request to a web server:

If the request is successful, the server responds and passes the cookie with the Set-Cookie response header field. The field provides a set of name–value pairs:

The id attribute allows the server to identify the user in a subsequent request and the domain attribute indicates which domain the cookie is associated with. The client stores the cookie and attaches it in future requests to the same domain, using the Cookie request header field:

There are several types of cookies that differ in terms of persistence and range. Session cookies are kept in memory only as long as the user visits a website and are deleted as soon as the browser is closed. Persistent cookies, or tracking cookies, last longer—their lifetime is defined by the value of the max-age attribute or the expires attribute (not shown in the examples above). The browser delivers the cookie with every request during a cookie's lifetime, which makes the user traceable for the server across several sessions. Third-party cookies are used to personalize content across different sites. They do not belong to the domain the client visits but to another domain. If you have ever wondered how personalized ads are placed on pages you visit—this is most likely done with third-party cookies that are placed by advertising companies on domains you visit and which can be used by advertisers to tailor ads to your interests. The use of cookies for such purposes surely has contributed to the fact that cookies have a bad reputation regarding privacy. In general, however, cookies are only sent to the server that created them. Further, the user can decide how to handle locally stored cookies. And in the end, cookies are useful as they often enhance the web experience considerably.
If cookies influence the content a server returns in response to a request, they can be relevant for web scraping purposes as well. Imagine we care to scrape data from our crammed shopping cart in an online store. During our visit we have added several products to the cart. In order to track our spending spree, the server has stored a session ID in a cookie that keeps us identifiable. If we want to request the webpage that lists the shopped items, we have to deliver the cookie with our request.
In order to deliver existing cookies with R, we can draw upon the cookie argument:
R> getURL("http://httpbin.org/headers", cookie ="id=12345;domain=httpbin.org")
It is usually not desirable to manage cookies manually, that is, retrieve them, store them, and send them. This is why browsers automatically take care of such operations by default. In order to achieve similar convenience in R, we can rely on libcurl’s cookiefile and cookiejar options that, if specified correctly, manage cookies for us. We show in detail how this can be done in Section 9.1.8.
5.2.2 Authentication
While techniques for client identification are useful to personalize web content and enable stateful communication, they are not suited to protect content that only the user should see. A set of authentication techniques exist that allow qualified access to confidential content. Some of these techniques are part of the HTTP protocol. Others, like OpenID or OAuth (see Section 9.1.11), have been developed more recently to extend authentication functionality on the Web.
The simplest form of authentication via the HTTP protocol is basic authentication (Franks et al. 1999). If a client requests a resource that is protected by basic authentication, the server sends back a response that includes the WWW-Authenticate header. The client has to repeat its request with a username and password in order to be granted access to the requested resource. Both are stored in the response's Authorization header. If the server can verify that the username/password combination is correct, it returns the requested resource in a HTTP 200 message. Technically, basic authentication looks as follows.
- The client requests a protected resource:

- The server asks the client for a user name and password:

- The client/user provides the requested username and password in Base64 encoding:

- The server returns the requested resource:

Note that in the third step, the username/password combination has been automatically “encrypted” into the string sequence “dXNlcm5hbWU6cGFzc3dvcmQ=.” This transformation is done via Base64 encoding. Base64 encoding is not actually an encrypting technique but follows a rather trivial and static scheme (see Gourley and Totty 2002, Appendix E). We can perform Base64 encoding and decoding with R; the necessary functions are implemented in the RCurl package:
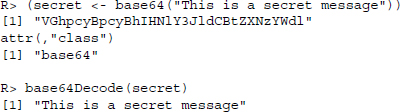
The example reveals the insecurity of basic HTTP authentication: As long as it is done via standard HTTP, the sensitive information is sent practically unencrypted across the network. Therefore, basic authentication should only be used in combination with HTTPS (see Section 5.3.1).
A more sophisticated authentication technique is digest authentication (Franks et al. 1999). The idea behind digest authentication is that passwords are never sent across the Web in order to verify a user, but only a “digest” of it. The server attaches a little random string sequence to its response, called nonce. The browser transforms username, password, and the nonce into a hash code, following one of several algorithms that are known to both server and browser. This hash code is then sent back, compared to the hash calculations of the server, and if both match the server grants access to the client. The crucial point is that the hash alone does not suffice to learn anything about the password; it is just a “digest” of it. This makes digest authentication an improvement relative to basic authentication, as the encrypted client message is incomprehensible for an eavesdropper.
Steps 2 and 3 in the authentication procedure sketched above are slightly different. The server returns something like the following:15
- 2a. The server asks the client for a username and password and delivers a nonce, reports a “quality of protection” value (qop) and describes the realm as Protected area:

- 3a. The client provides the encrypted username and password in the response attribute, as well as the unencrypted username, the qop and nonce parameters and a client nonce (cnonce):

In Section 9.1.6 we give a short demonstration of HTTP authentication in practice with RCurl.
5.2.3 Proxies
Web proxy servers, or simply proxies, are servers that act as intermediaries between clients and other servers. HTTP requests from clients are first sent to a proxy, which evaluates the request and passes it to the desired server. The server response takes the way back via the proxy. In that sense, the proxy serves as a server to clients and as a client to other servers (see Figure 5.4).

Figure 5.4 The principle of web proxies
Proxies are useful for several purposes. They are deployed for performance, economic, and security reasons. For users, proxies can help to
- speed up network use;
- stay anonymous on the Web;
- get access to sites that restrict access to IPs from certain locations;
- get access to sites that are normally blocked in the country from where the request is put; or
- keep on querying resources from a server that blocks requests from IPs we have used before.
Especially when proxies are used for any of the last three reasons, web scrapers might get into troubles with the law. Recent verdicts point in the direction that it is illegal to use proxy servers in order to get access to public websites that one has been disallowed to visit (see Kerr 2013). We therefore do not recommend the use of proxies for any of these purposes.
In order to establish connections via a proxy server, we have to know the proxy's IP address and port. Some proxies require authentication as well, that is, a username and a password. There are many services on the Web that provide large databases of open and free proxies, including their location and specification. Open proxies can be used by anyone who knows their IP address and port. Note that proxies vary in the degree to which they provide anonymity to the user. Transparent proxies specify a Via header field in their request to the server, filling it with their IP. Further, they offer an X-Forwarded-For header field with your IP. Simple anonymous proxies replace both the Via and the X-Forwarded-For header field with their IP. As both fields are delivered only when a proxy is used, the server knows that the requests comes from a server, but does not easily see the client's IP address behind it. Distorting proxies are similar but replace the value of the X-Forwarded-For header field with a random IP address. Finally, High anonymity proxies or elite proxies behave like normal clients, that is, they neither provide the Via nor the X-Forwarded-For header field but only their IP and are not immediately identifiable as proxy servers.
To send a request to a server detouring via a proxy with R, we can add the proxy argument to the request command. In the following, we choose a fictional proxy from Poland that has the IP address 109.205.54.112 and is on call on port 8080:
![]()
IP address and port of the proxy are specified in the proxy option. Further, we set the followlocation argument to TRUE to ensure that we are redirected to the desired resource.
5.3 Protocols beyond HTTP
HTTP is far from the only protocol for data transfer over the Internet. To get an overview of the protocols that are currently supported by the RCurl package, we call

Not all of them are relevant for web scraping purposes. In the following, we will highlight two protocols that we often encounter when browsing and scraping the Web: HTTPS and FTP.
5.3.1 HTTP Secure
Strictly speaking, the Hypertext Transfer Protocol Secure (HTTPS) is not a protocol of its own, but the result of a combination of HTTP with the SSL/TLS (Secure Sockets Layer/Transport Security Layer) protocol. HTTPS is indispensable when it comes to the transfer of sensitive data, as is the case in banking or online shopping. To transfer money or credit card information we need to ensure that the information is inaccessible to third parties. HTTPS encrypts all the client–server communication (see Figure 5.5). HTTPS URLs have the scheme https and use the port 443 by default.16

Figure 5.5 The principle of HTTPS
HTTPS serves two purposes: First, it helps the client to ensure that the server it talks to is trustworthy (server authentication). Second, it provides encryption of client–server communication so that users can be reasonably sure that nobody else reads what is exchanged during communication.
The SSL/TLS security layer runs as a sublayer of the application layer where HTTP operates. This means that HTTP messages are encrypted before they get transmitted. The SSL protocol was first defined in 1994 by Netscape (see Freier et al. 2011) and was updated as TLS 1.0 in 1999 (see Dierks and Allen 1999). When using the term “SSL” in the following, we refer to both SSL and TLS as their differences are of no importance to us.
A crucial feature of SSL that allows secure communication in an insecure network is public key, or asymmetric, cryptography. As the name already indicates, encryption keys are in fact not kept secret but publicly available to everyone. In order to encrypt a message for a specific receiver, the receiver's public key is used. In order to decrypt the message, both the public and a private key is needed, and the private key is only known to the receiver. The basic idea is that if a client wants to send a secret message to a server, it knows how to encrypt it because the server's public key is known. After encryption, however, nobody—not even the sender—is able to decipher the message except for the receiver, who possesses both the public and the private key.
We do not have to delve deeply into the details of public key encryption, how the secret codes (ciphers) work, and why it is so hard to crack them in order to understand HTTPS's purpose. For the details of cryptography behind SSL, we refer to the excellent introductions by Gourley and Totty (2002) and Garfinkel (2002). If you want to get a more profound understanding of digital cryptography, the books by Ferguson et al. (2010) and Paar and Pelzl (2011) are a good choice. What is worth knowing though is how secure channels between client and server are actually established and how we can achieve this from within R. A very simplified scheme of the “SSL handshake,” that is, the negotiation between client and server about the establishment of an HTTPS connection before actually exchanging encrypted HTTP messages, works as follows (see Gourley and Totty 2002, pp. 322–328).
- The client establishes a TCP connection to the server via port 443 and sends information about the SSL version and cipher settings.
- The server sends back information about the SSL and cipher settings. The server also proves his identity by sending a certificate. This certificate includes information about the authority that issued the certificate, for whom it was issued and its period of validity. As anybody can create his or her own certificates without much effort, the signature of a trusted certificate authority (CA) is of great importance. There are many commercial CAs, but some providers also issue certificates for free.
- The client checks if it trusts the certificate. Browsers and operating systems are shipped with lists of certificate authorities that are automatically trusted. If one of these authorities has signed the server's certificate, the client trusts the server. If this is not the case, the browser asks the user whether she finds the server trustworthy and wants to continue, or if communication should be stopped.
- By using the public key of the HTTPS server, the client generates a session key that only the server can read, and sends it to the server.
- The server decrypts the session key.
- Both client and server now possess a session key. Thus, knowledge about the key is not asymmetric anymore but symmetric. This reduces computational costs that are needed for encryption. Future data transfers from server to client and vice versa are encrypted and decrypted through this symmetric SSL tunnel.
It is important to note that what is protected is the content of communication. This includes HTTP headers, cookies, and the message body. What is not protected, however, are IP addresses, that is, websites a client communicates with.
We will address how connections via HTTPS are established in R and how much of the technical details are hidden deeply in the respective functions in Section 9.1.7—using HTTPS with R is not difficult at all.
5.3.2 FTP
The File Transfer Protocol (FTP) was developed to transfer files from client to server (upload), from server to client (download), and to manage directories. FTP was first specified in 1971 by Abhay Bhushan (1971); its current specification (see Postel and Reynolds 1985) is almost 30 years old. In principle, HTTP has several advantages over FTP. It allows persistent, keep-alive connections, that is, connections between client and server that are maintained for several transfers. This is not possible with FTP, where the connection has to be reestablished after each transfer. Further, FTP does not natively support proxies and pipelining, that is, several simultaneous requests before receiving an answer. On the upside, FTP may be faster under certain circumstances, as it does not come with a bunch of header fields like HTTP—just the binary or ASCII files are transferred.
FTP uses two ports on each side, one for data exchange (“data port,” the default is port 20) and one for command exchange (“control port,” the default is port 21). Just like HTTP, FTP comes with a set of commands that specify which files to transfer, what directories to create, and many other operations.17 FTP connections can be established in two different modes: the active mode and the passive mode. In active FTP, the client connects with the server's command port and then requests a data transfer to another port. The problem with this mode is that the actual data connection is established by the server. As the client's firewall has not been told that the client expects data to come in on a certain port, it usually blocks the server's attempt to deliver the data. This issue is tackled with the passive mode in which the client initiates both the command and the data connection. We are going to demonstrate accessing FTP servers with R in Section 9.1.2.
5.4 HTTP in action
We now learn to use R as an HTTP client. We will have a closer look at two available packages: the powerful RCurl package (Temple Lang 2013a), and the more lightweight but sometimes also more convenient httr package (Wickham 2012) that rests on the voluminous RCurl package.
Base R already comes with basic functionality for downloading web resources. The download.file() function handles many download procedures where we do not need complex modifications of the HTTP request. Further, there is a set of basic functions to set up and manipulate connections. For an overview, type ?connections in R. However, using these functions is anything but convenient. Regarding download.file(), there are two major drawbacks for sophisticated web scraping. First, it is not very flexible. We cannot use it to connect with a server via HTTPS, for example, or to specify additional headers. Second, it is difficult to adhere to our standards of friendly web scraping with download.file(), as it lacks basic identification facilities. However, if we just want to download single files, download.file() works perfectly fine. For more complex tasks, we can apply the functionality of the RCurl and the httr package.
5.4.1 The libcurl library
Much of what we need to do with R on the web is dramatically facilitated by libcurl (Stenberg 2013). libcurl is an external library programmed in C. Development began in 1996 by Daniel Stenberg and the cURL project and has since been under continuous development. The purpose of libcurl is to provide an easy interface to various Internet protocols for programs on many platforms. Over time, the list of features has grown and now comprises a multitude of possible actions and options to configure, among others, HTTP communication. We can think of it as a tool that knows how to
- specify HTTP headers;
- interpret URL encoding;
- process incoming streams of data from web servers;
- establish SSL connections;
- connect with proxies;
- handle authentication;
and much more. In contrast, R’s url() and download.file() are precious little help when it comes to complex tasks like filling forms, authentication, or establishing a stateful conversation. Therefore, libcurl has been tapped to enable users to work with the libcurl library in their ordinary programming environment. In his manifest of RCurl and libcurl’s philosophy, Temple Lang points out the benefits of libcurl: Being the most widely used file transfer library, libcurl is extraordinarily well tested and flexible (Temple Lang 2012a). Further, being programmed in C makes it fast. To get a first impression about the flexibility of libcurl, you might want to start by taking a look at the available options of libcurl’s interface at http://curl.haxx.se/libcurl/c/curl_easy_setopt.html. Alternatively, you can type the following into R to get the comprehensive list of libcurl’s “easy” interface options that can be specified with RCurl:
R> names(getCurlOptionsConstants())
Currently, there are 174 available options. Among them are some that we have already relied on above, like useragent or proxy. We sometimes speak of curl options instead of libcurl options for reasons of convenience. curl is a command line tool also developed by the cURL software project. With R we draw on the libcurl library.18
5.4.2 Basic request methods
5.4.2.1 The GET method
In order to perform a basic GET request to retrieve a resource from a web server, the RCurl package provides some high-level functions—getURL(), getBinaryURL(), and getURLContent(). The basic function is getURL(); getBinaryURL() is convenient when the expected content is binary, and getURLContent() tries to identify the type of content in advance by inspecting the Content-Type field in the response header and proceeding adequately. While this seems preferable, the configuration of getURLContent() is sometimes more sophisticated, so we continue to use getURL() by default except when we expect binary content.
The function automatically identifies the host, port, and requested resource. If the call succeeds, that is, if the server gives a 2XX response along with the body, the function returns the content of the response. Note that if everything works fine, all of the negotiation between R/libcurl and the server is hidden from us. We just have to pass the desired URL to the high-level function. For example, if we try to fetch helloworld.html from www.r-datacollection.com/materials/http, we type
R> getURL("http://www.r-datacollection.com/materials/http/helloworld.html")
[1]"<html>
<head><title>Hello World</title></head>
<body><h3>Hello World</h3>
</body>
</html>"
The body is returned as character data. For binary content, we use getBinaryURL() and get back raw content. For example, if we request the PNG image file sky.png from www.r-datacollection.com/materials/http, we write
R> pngfile <- getBinaryURL("http://www.r-datacollection.com/materials/http/sky.png")
It depends on the format how we can actually process it; in our case we use the writeBin() function to locally store the file:
R> writeBin(pngfile,"sky.png")
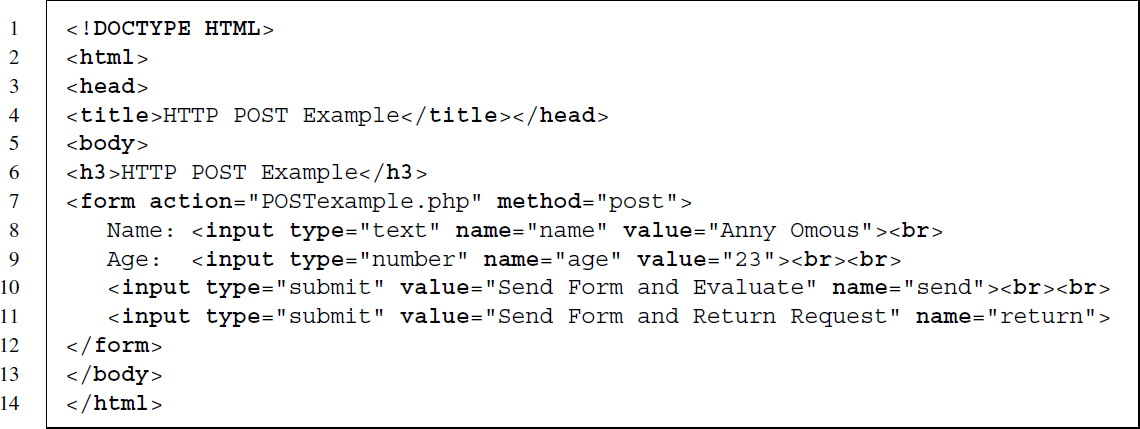
Sometimes content is not embedded in a static HTML page but returned after we submit an HTML form. The little example at http://www.r-datacollection.com/materials/http/GETexample.html lets you specify a name and age as input fields. The HTML source code looks as follows:

The <form> element indicates that data put into the form is sent to a file called GETexample.php.19 After having received the data from the GET request, the PHP script evaluates the input and returns “Hello <name>! You are <age> years old.” In the browser, we see an URL of form http://www.rdatacollection.com/materials/ http/GETexample.php?name=<name>&age=<age>, which indicates that a PHP script has generated the output.
How can we process this and similar requests from within R? There are several ways to specify the arguments of an HTML form. The first is to construct the URL manually using paste() and to pass it to the getURL() function:
R> url <-"http://www.r-datacollection.com/materials/http/GETexample.php"
R> namepar <-"Eddie"
R> agepar <-"32"
R> url_get <- str_c(url,"?","name=", namepar,"&","age=", agepar)

R> cat(getURL(url_get))
Hello Eddie!
You are 32 years old.
An easier way than using getURL() and constructing the GET form request manually is to use getForm(), which allows specifying the parameters as separate values in the function. This is our preferred procedure as it simplifies modifying the call and does not require manual URL encoding (see Section 5.1.2). In order to get the same result as above, we write
R> url <-"http://www.r-datacollection.com/materials/http/GETexample.php"
R> cat(getForm(url, name ="Eddie", age = 32))
Hello Eddie!
You are 32 years old.
5.4.2.2 The POST method
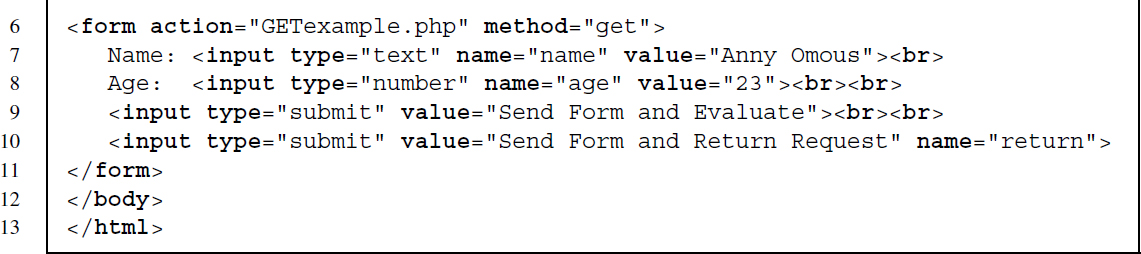
When using HTML forms we often have to use the POST method instead of GET. In general, POST allows more sophisticated requests, as the request parameters do not have do be inserted into the URL, which may be limited in length. The POST method implies that parameters and their values are sent in the request body, not in the URL itself. We replicate the example from above, except that now a POST request is required. The form is located at http://www.r-datacollection.com/materials/http/POSTexample.html. The HTML source code reads as follows:
We find that the <form> element has remained almost identical, except for the required method, which is now POST. When we submit the POST form in the browser we see that the URL changes to ../POSTexample.php and no query parameters have been added as in the GET query. In order to replicate the POST query with R, we do not have to construct the request manually but can use the postForm() function:
R> url <-"http://www.r-datacollection.com/materials/http/POSTexample.php"
R> cat(postForm(url, name ="Eddie", age = 32, style ="post"))
Hello Eddie!
You are 32 years old.
postForm() automatically constructs the body and fills it with the pre-specified parameter pairs. Unfortunately, there are several ways to format these pairs, and we sometimes have to explicitly specify the one that is accepted in advance using the style argument (see Nolan and Temple Lang 2014, p. 270–272 and http://www.w3.org/TR/html401/interact/forms.html for details on the form content types). For the application/x-www-form-urlencoded form content type, we have to specify style ="post" and for the multipart/form-data form content type, style ="httppost". This formats the parameter pairs in the body correctly and adds the request header "Content-Type" ="application/x-www-form-urlencoded" or "Content-Type" ="multipart/form-data". To find the adequate POST format, we can look for an attribute named enctype in the <form> element. If it is specified as enctype=’application/x-www-form-urlencoded’, we use style ="post". If it is missing (as above), leaving out the style parameter should also work.
5.4.2.3 Other methods
RCurl offers functions to deal with other HTTP methods as well. We can change methods in calls to getURL(), getBinaryURL(), getURLContent() by making use of the customrequest option, for example,
R> url <-"r-datacollection.com/materials/http/helloworld.html"
R> res <- getURL(url = url, customrequest ="HEAD", header = TRUE)
R> cat(str_split(res,"
")[[1]])
HTTP/1.1 200 OK
Date: Wed, 26 Mar 2014 00:20:07 GMT
Server: Apache
Vary: Accept-Encoding
Content-Type: text/html
As we hardly encounter situations where we need these methods, we refrain from going into more detail.
5.4.3 A low-level function of RCurl
RCurl builds on the powerful libcurl library, making it a mighty weapon in the hands of the initiated and an unmanageable beast in the hands of others. The low-level function curlPerform() is the workhorse of the package. The function gathers options specified in R on how to perform web requests—which protocol or methods to use, which headers to set—and patches them through to libcurl to execute the request. Everything in this function has to be specified explicitly so later on we will come back to more high-level functions. Nevertheless, it is useful to demonstrate how the high-level functions work under the hood.
We start with a call to curlPerform() to request an HTML document:
R> url <-"www.r-datacollection.com/materials/http/helloworld.html"
R> (pres <- curlPerform(url = url))
OK
0
Instead of getting the content of the URL we only get the information that everything seems to have worked as expected by the function. This is because we have to specify everything explicitly when using curlPerform(). The function did retrieve the document but did not know what to do with the content. We need to define a handler for the content. Let us create one ourselves. First, we create an object pres to store the document and a function that takes the content as argument and writes it into pres. As the list of options can get extensive we save them in a separate object performOptions and pass it to curlPerform():
R> pres <- NULL
R> performOptions <- curlOptions(url = url,
writefunc = function(con) pres <<- con )
R> curlPerform(.opts = performOptions)
OK
 0
R> pres
[1]"<html>
<head><title>Hello World</title></head>
<body><h3>Hello World</h3>
</body>
</html>"
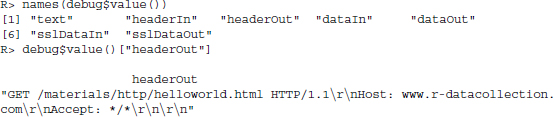
That looks more like what we would have expected. In addition to the content handler, there are other handlers that can be supplied to curlPerform(): a debug handler via debugfunc, and a HTTP header handler via headerfunc. There are sophisticated functions in RCurl for each of these types that spare us the need to specify our own handler functions. For content and headers, basicTextGatherer() turns an object into a list of functions that handles updates, resets, and value retrieval. In the following example we make use of all three. Note that in order for debugfunc to work we need to set the verbose option to TRUE:
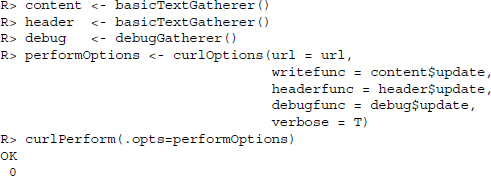
Using the value() function of content we can extract the content that was sent from the server.
R> str_sub(content$value(), 1, 100)
[1]"<html>
<head><title>Hello World</title></head>
<body><h3>Hello World</h3>
</body>
</html>"
header$value() contains the headers sent back from the server:
R> header$value()
[1]"HTTP/1.1 200 OK
Date: Wed, 26 Mar 2014 00:20:10 GMT
Server: Apache
Vary: Accept-Encoding
Content-Length: 89
Content-Type: text/html

"
debug$value() stores various pieces of information on the HTTP request. See Section 5.4.6 for more information on this topic:
5.4.4 Maintaining connections across multiple requests
It is a common scenario to make multiple requests to a server, especially if we are interested in accessing a set of resources like multiple HTML pages. The default setting in HTTP/1.0 is to establish a new connection with each request, which is slow and inefficient. Connections in HTTP/1.1 are persistent by default, meaning that we can use the same connection for multiple requests. RCurl provides the functionality to reuse established connections, which we can exploit to create faster scrapers.
Reusing connections works with the so-called “curl handles.” They serve as containers for the connection itself and additional features/options. We establish a handle as follows:
R> handle <- getCurlHandle()
The handle in the handle object is of class CURLHandle and currently an empty container. We can add useful curl options from the list listCurlOptions(), for example:

In the example, we specify a User-Agent header field that contains the current R version and a From header field containing an email address, set the followlocation argument to TRUE, and activate cookie management (see Section 5.4.5). The curl handle can now be used for multiple requests using the curl argument. For instance, if we have a vector of URLs in the object url, we can retrieve them with getURL() fed with the settings in the curl handle from above.
R> lapply(urls, getURL, curl = handle)
Note that the curl handle container is not fixed across multiple requests, but can be modified. As soon as we specify new options in a request, these are added—or old ones overridden—in the curl handle, for example, with getURL(urls, curl = handle, httpheader = c(from ="[email protected]")). To retain the status of the handle but use a modified handle for another request, we can duplicate it and use the “cloned” version with dupCurlHandle():
![]()
Cloning handles can be especially useful if we want to reuse the settings specified in a handle in requests to different servers. Not all settings may be useful for every request (e.g., protocol settings or referrer information), and some of the information should probably be communicated only to one specific server, like authentication details.
When should we use curl handles? First, they are generally convenient for specifying and using curl options across an entire session with RCurl, simplifying our code and making it more reliable. Second, fetching a bunch of resources from the same server is faster when we reuse the same connection.
5.4.5 Options
We have seen that we can use curl handles to specify options in RCurl function calls. However, there are also other means. Generally, RCurl options can be divided into those that define the behavior of the underlying libcurl library and those that define how information is handled in R. The list of possible options is vast, so we selected the ones we frequently use and listed them in Table 5.3. Some of these options were already introduced above, the others will be explained below. Let us begin by showing the various ways to declare options.
Table 5.3 List of useful libcurl options that can be specified in RCurl functions
| Option | Description | Example |
| HTTP | ||
| connecttimeout | Set maximum number of seconds waiting to connect to server | connecttimeout = 10 |
| customrequest | Define HTTP method to use in RCurl’s high-level functions | customrequest ="HEAD" |
| .encoding | Specifies the encoding scheme we expect | .encoding ="UTF-8" |
| followlocation | Follow the redirection to another URL if suggested by the server | followlocation = TRUE |
| header | Retrieve response header information as well | header = TRUE |
| httpheader | Specifies additional HTTP request headers | httpheader = c(’Accept-Charset’ ="utf-8") |
| maxredirs | Limit the number of redirections to avoid infinite loop error with followlocation = TRUE | maxredirs = 5L |
| range | Retrieve a certain byte range from a file, that is, only parts of a document (does not work with every server; see p. 264) | range ="1-250" |
| referer | Convenience option to specify a Referer header field | referer ="www.example.com" |
| timeout | Set maximum number of seconds waiting for curl request to execute | timeout = 20 |
| useragent | Convenience option to specify a User-agent header field | useragent ="RCurl" |
| FTP (see Sections 5.3.2 and 9.1.2) | ||
| dirlistonly | Set if only the file names and no further information should be downloaded from FTP servers | dirlistonly = TRUE |
| ftp.use.epsv | Set extended or regular passive mode when accessing FTP servers | ftp.use.epsv = FALSE |
| Cookies (see Sections 5.2.1.1 and 9.1.8) | ||
| cookiefile | Specifies a file that contains cookies to read from it or, if argument remains empty, activates cookie management | cookiefile ="" |
| cookiejar | Writes cookies that have been gathered over several requests to a file | cookiejar ="/files/cookies" |
| SSL (see Sections 5.3.1 and 9.1.7) | ||
| cainfo | Specify file with digital signatures for SSL certificate verification | cainfo = system.file("CurlSSL","cacert.pem", package ="RCurl") |
| ssl.verifyhost | Set validation of the certificate-host match true or false | ssl.verifyhost = FALSE |
| ssl.verifypeer | Set validation of server certificate true or false—useful if a server lacks a certificate but is still trustworthy | ssl.verifypeer = FALSE |
We can declare options for single calls to the high-level functions (e.g., getURL, getURLContent, and getBinaryURL). In this case the options will only affect that single function call. In the following example we add header = TRUE in order to not only retrieve the content but also the response header:20
R> url <-"www.r-datacollection.com/materials/http/helloworld.html"
R> res <- getURL(url = url, header = TRUE)
R> cat(str_split(res,"
")[[1]])
HTTP/1.1 200 OK
Date: Wed, 26 Mar 2014 00:20:11 GMT
Server: Apache
Vary: Accept-Encoding
Content-Length: 89
Content-Type: text/html

<html>
<head><title>Hello World</title></head>
<body><h3>Hello World</h3>
</body>
</html>
Another, more persistent way of specifying options is to bind them to a curl handle as described in the previous section. Every function using this handle via the curl option will use the same options. If a function uses the handle and redefines some options or adds others, these changes will stick to the handle. In the following example we create a new handle and specify that the HTTP method HEAD should be used for the request:
R> handle <- getCurlHandle(customrequest ="HEAD")
R> res <- getURL(url = url, curl = handle)
R> cat(str_split(res,"
")[[1]])
The first function call using the handle results in an empty vector because HEAD provides no response body and the header option was not specified. In the second call we add the header argument to retrieve header information:
R> res <- getURL(url = url, curl = handle, header = TRUE)
R> cat(str_split(res,"
")[[1]])
HTTP/1.1 200 OK
Date: Wed, 26 Mar 2014 00:20:14 GMT
Server: Apache
Vary: Accept-Encoding
Content-Type: text/html
The added header specification has become part of the handle. When we reuse it, we do not need to specify header = TRUE anymore:
R> res <- getURL(url = url, curl = handle)
R> cat(str_split(res,"
")[[1]])
HTTP/1.1 200 OK
Date: Wed, 26 Mar 2014 00:20:16 GMT
Server: Apache
Vary: Accept-Encoding
Content-Type: text/html
With dupCurlHandle() we can also copy the options set in one handle to another handle:
R> handle2 <- dupCurlHandle(handle)
R> res <- getURL(url = url, curl = handle2)
Two more global approaches exist. First, we can define a list of options, save it in an object, and pass it to .opts when initializing a handle or calling a function. The curlOptions() function helps to expand and match option names:
R> curl_options <- curlOptions(header = TRUE, customrequest ="HEAD")
R> res <- getURL(url = url, .opts = curl_options)
To specify further curl options when using getForm() and postForm(), we have to use the .opts argument. Otherwise the function cannot distinguish between form parameters and curl options. Further, instead of specifying the parameters of POST directly after the URL, they can also be processed in a list passed to the .params option:
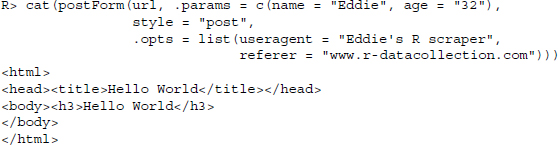
Second, we can even use R’s global option system to specify standard values that will be part of each curl handle or function call unless specified otherwise:
R> options(RCurlOptions = list(header = TRUE, customrequest ="HEAD"))
R> res <- getURL(url = url)
R> options(RCurlOptions = list())
Now that we know how to set options, we should inspect two options a little closer because they can control HTTP methods and HTTP headers: customrequest and httpheader. The customrequest option was already used throughout the examples above and tells libcurl to use whatever method specified—for example, POST, HEAD, or PUT instead of the default GET. For instance, we can transform getURL() into a function that posts form information:

Individual HTTP headers can be added using the httpheaders option. We add them as a list where names of the list items identify the header name and their values correspond to header values. Let us specify some helpful standard headers and pass them to a call to getURL(). To check which headers are sent along the HTTP request, we send our request to a page that simply returns the HTTP request that was received. First we send a request without any further specifications:
R> url <-"r-datacollection.com/materials/http/ReturnHTTP.php"
R> res <- getURL(url = url)
R> cat(str_split(res,"
")[[1]])
GET /materials/http/ReturnHTTP.php HTTP/1.1
Authorization:
Host: r-datacollection.com
Accept: */*
Connection: close
The results from above show that only few headers are sent along our HTTP request. Now we want to add a from and user-agent header specification to the list:21
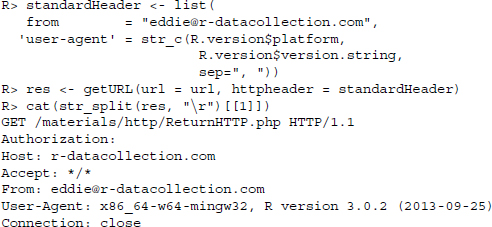
To conclude this section we provide an example of a list of default options. We recommend setting these options via options() directly at the start of a session after loading RCurl. This way it is transparent which options are set as default values for all functions and handles with the convenience of having to type the options only once. First, we include the from and user-agent options from above to always identify ourselves. Next we set followlocation to TRUE to tell libcurl to automatically follow redirections—maxredirs restricts these redirections to avoid infinite loops. Next, we specify a default connection timeout as well as a completion timeout (connecttimeout and timeout). The former tells libcurl to stop trying to connect to a server after 10 seconds while the latter timeout is for the maximum time we give libcurl to complete a request altogether. The standard libcurl connection timeout is 300 seconds. Setting the cookiefile option enables libcurl to receive, save, and send back cookies. The last option specifies the location for files that contain digital signatures for SSL certificate verification:
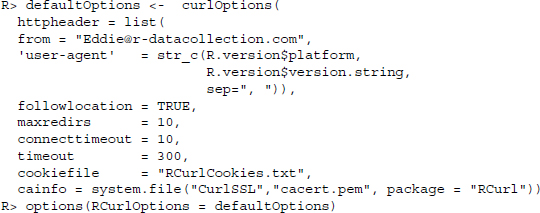
The list of default options can be emptied using
R> options(RCurlOptions = list())
5.4.6 Debugging
What happens in case of an error in an HTTP call? We have documented in Section 5.1.5 that many things can go wrong and the server communicates the presumed type of error. In the simplest of cases, we might have gotten the URL wrong:
R> getURL("http://www.stata-datacollection.com")
Error: Could not resolve host: www.stata-datacollection.com; Host not found
Some errors might be less obvious but still prevent us from receiving content from a server. In this section we will show some tools that help identify reasons why things do not work as expected. We know already that we can ask RCurl functions to capture the response headers in addition to the content by setting the header option to TRUE. Often, however, we want to have more information, for example the information that arrives at the server after we put a request to it.
A generally useful tool for HTTP debugging is the service at http://httpbin.org, which provides a set of endpoints for specific HTTP requests. To check whether a GET request is specified correctly and what information arrives at the server, we write
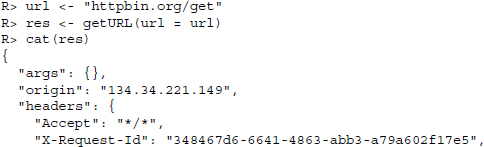
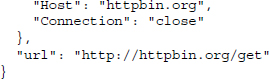
Moreover, RCurl provides its own way of checking HTTP calls by specifying a debug gatherer within the function call. The procedure is powerful and does not rely on external resources. It works as follows. First, we create an object that contains three functions (update(), value(), reset()) by calling the debugGatherer():
R> debugInfo <- debugGatherer()
R> names(debugInfo)
[1]"update""value""reset"
R> class(debugInfo[[1]])
[1]"function"
In a second step, we request a document using the ordinary getURL() function and use the debugfunction option. With this option we specify a function that gathers debug information as is supplied by libcurl—the update() function we stored in debugInfo. To make the necessary debugging information available, we have to set the verbose option to TRUE:
R> url <-"r-datacollection.com/materials/http/helloworld.html"
R> res <- getURL(url = url, debugfunction = debugInfo$update, verbose = T)
In a third and last step, we access the debugging information gathered during the execution of getURL() by calling the value() function stored in the debugInfo object. The value function provides seven items:
![]()
The first item of the resulting vector—text—captures information libcurl provides about the procedure:
R> cat(debugInfo$value()["text"])
About to connect() to r-datacollection.com port 80 (#0)
  Trying 173.236.186.125... connected
Connected to r-datacollection.com (173.236.186.125) port 80 (#0)
Connection #0 to host r-datacollection.com left intact
Closing connection #0
headerIn stores the HTTP response header:
R> cat(str_split(debugInfo$value()["headerIn"],"
")[[1]])
HTTP/1.1 200 OK
Date: Wed, 26 Mar 2014 00:20:25 GMT
Server: Apache
Vary: Accept-Encoding
Content-Length: 89
Content-Type: text/html
The HTTP request header is stored in headerOut:
R> cat(str_split(debugInfo$value()["headerOut"],"
")[[1]])
GET /materials/http/helloworld.html HTTP/1.1
Host: r-datacollection.com
Accept: */*
The body of the response is contained in dataIn:
R> cat(str_split(debugInfo$value()["dataIn"],"
")[[1]])
<html>
<head><title>Hello World</title></head>
<body><h3>Hello World</h3>
</body>
</html>
The body of the sent data—for example, if we use the POST method—is found in dataOut:
R> cat(str_split(debugInfo$value()["dataOut"],"
")[[1]])
In this example it is empty as we used the GET method, which, by definition, does not send any data along with the request body.
The remaining two items sslDataIn and sslDataOut are analogous to dataIn and dataOut but for encrypted connections. They are also empty in our request:
R> cat(str_split(debugInfo$value()["sslDataIn"],"
")[[1]])
R> cat(str_split(debugInfo$value()["sslDataOut"],"
")[[1]])
Another source of valuable information might be the getCurlInfo() function, which provides additional information on the present state of a curl handle. To get the information we first specify a handle, use it in a function call, and then apply getCurlInfo() to the handle:
R> handle <- getCurlHandle()
R> url <-"r-datacollection.com/materials/http/helloworld.html"
R> res <- getURL(url = url, curl = handle)
R> handleInfo <- getCurlInfo(handle)
The information provided is manifold:
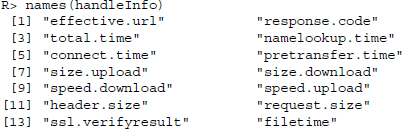
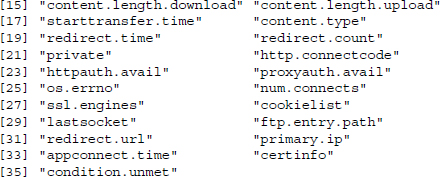
A useful operation might be to consider the total time it took to complete the request and the time it took to do all the things necessary to start the transfer—that is, resolve the host name, establish the connection to the host, and send the request—to get an idea where possible bottlenecks occur:
R> handleInfo[c("total.time","pretransfer.time")]
$total.time
[1] 0.219

$pretransfer.time
[1] 0.11
If the time before the actual download takes up a substantial part of the overall time it takes to complete a request, we should—for multiple requests to the same server—ensure that connections are reused. Let us gather the ratio of pre-transfer time to total time ten times in succession with and without reusing the same handle:
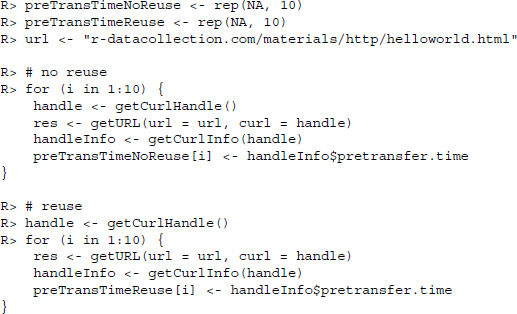
The gathered times show quite nicely how connection times can accumulate when establishing connections for each request and how this can be prevented by reusing curl handles that establish a connection once and reuse this connection to send multiple requests:
R> preTransTimeNoReuse
  [1] 0.110 0.094 0.109 0.109 0.094 0.109 0.110 0.109 0.125 0.110
R> preTransTimeReuse
  [1] 0.125 0.000 0.000 0.000 0.000 0.000 0.000 0.000 0.000 0.000
5.4.7 Error handling
After discussing tools for discovering why things might not work, this section presents an RCurl specific way to handle errors. We can experience various types of errors—those that we generated ourselves (e.g., by specifying a wrong host name or asking for a nonexisting resource), those that are due to a broken connection, and those generated on the server side. The set of functions provided by RCurl to retrieve content know a lot of different error types. We get a list by calling the getCurlErrorClassNames() function. We selected a couple of the most common ones:

Using tryCatch()22 we can specify individual actions to react to different types of errors. As an example we choose a user-generated error. We have a set of two URLs. We begin by trying to collect the first one. This operation fails because the host does not exist. The second URL serves as a replacement in case the first URL produces an error of class COULDNT_RESOLVE_HOST:
R> url1 <-"wwww.r-datacollection.com/materials/http/helloworld.html"
R> res <- getURL(url1)
Error: Could not resolve host: wwww.r-datacollection.com; Host not found
The call produces an error and res is not created. This can cause further errors in the program if we try to process the res object.
Now let us try to react to the error. In the following snippet, the object res stores the results from a call to tryCatch(). Within the function we first state the default—retrieving the URL. The next two statements are of the form errorType = errorFunction. For each error tryCatch checks whether the class of the error matches one of the error names provided—in our case COULDNT_RESOLVE_HOST and error—and executes the matching function. In the example the default statement produces a resolve host error and the second URL will be retrieved. Any other error would have produced an NA that would have been assigned to res and the default error message would have been printed.

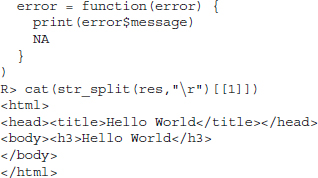
5.4.8 RCurl or httr—what to use?
RCurl is a quite powerful package that helps to make the most sophisticated requests and to receive and process the incoming response. At times, it is a bit bulky, however. Fortunately, there is a package that offers a more slender interface: the httr package (Wickham 2012). It builds upon RCurl by wrapping the functions we have discussed so far.
In Table 5.4 we contrast functions of both packages to perform selected HTTP and authentication tasks. Some of the functions have quite a different syntax and do not always provide the same functionality. Although we do not want to go into more details of the httr package at this point, there is no reason to be dogmatic and work with only one of the two packages. In fact, httr offers several features that considerably ease some data collection tasks, for example, authentication via OAuth (see Section 9.1.11).
Table 5.4 Selected HTTP and authentication tasks and how to realize them with RCurl or httr
| Task | RCurl function/option | httr function |
| HTTP methods (verbs) | ||
| Specify GET request | getURL(), getURLContent(), getForm() | GET() |
| Specify POST request | postForm() | POST() |
| Specify HEAD request | httpHEAD() | HEAD() |
| Specify PUT request | httpPUT() | PUT() |
| Content extraction | ||
| Extract raw or character content from response | content <- getURLContent() | content() |
| Curl handle specification | ||
| Specify curl handle | getCurlHandle(), curl | handle() |
| Request configuration | ||
| Specify curl options | .opts | config() |
| Specify glocal curl options | options(RCUrlOptions = list()), .opts | set_config() |
| Execute code with curl options | with_config() | |
| Add headers to request | httpheaders | add_headers() |
| Authenticate via one type of HTTP authentication | userpwd | authenticate() |
| Specify proxy connection | proxy | use_proxy() |
| Specify User-Agent header field | useragent | user_agent() |
| Specify cookies | cookiefile | set_cookies() |
| Error and exception handling | ||
| Display HTTP status code | getCurlInfo(handle) $response.code | http_status() |
| Display R error if request fails | stop_for_status() | |
| Display R warning if request fails | warn_for_status() | |
| Return TRUE if returned status code is exactly 200 | url_ok() | |
| Return TRUE if returned status code is in the 200s | url.exists() | url_success() |
| Set maximum request time | timeout | timeout() |
| Provide more information about client–server communication | verbose | verbose() |
| URL modification | ||
| Parse URL into constituent components | parse_url() | |
| Replace components in parsed URL | modify_url() | |
| Build URL string from parsed URL | build_url() | |
| OAuth registration | ||
| Retrieve OAuth 1.0 access token | oauth1.0_token() | |
| Retrieve OAuth 2.0 access token | oauth2.0_token() | |
| Register OAuth application | oauth_app() | |
| Describe Oauth endpoint | oauth_endpoint() | |
| Sign Oauth 1.0 request | sign_oauth1.0() | |
| Sign Oauth 2.0 request | sign_oauth2.0() | |
Functions are indicated as function(), arguments within RCurl high-level functions, as argument.
Summary
A basic knowledge of HTTP is fundamental to specify advanced requests to web servers with R. In this chapter, we gave a brief overview of the basic concepts of HTTP and some more intricate features that prove useful in web scraping. We also introduced RCurl, which provides excellent facilities to use R as an HTTP client and for other protocols.
There may be R users who have performed some rudimentary web scarping tasks with download.file() and have thus largely disregarded most of the features of RCurl and libcurl to specify advanced HTTP requests. We have argued that the RCurl toolbox offers a number of handy features that should pay off even for basic scraping tasks. And after all, even though the package is not too easily accessible for users who are not yet experienced with HTTP, the fundamentals can be learned and implemented quickly. For those who are deterred by the vast range of functions in the manual, the httr package offers convenient wrappers for the most useful RCurl features and a couple more handy functions. In Section 9.1 we will come back to some scenarios of HTTP communication with R. We will show, among other things, how to efficiently deal with forms, use HTTP authentication, and collect data via HTTP Secure.
Further reading
Gourley and Totty (2002) offer an encyclopedic introduction to HTTP. The shorter—and a little less useful—version is the “HTTP Pocket Reference” by Wong (2000). A very thorough treatment of the subject can be found in “DNS and BIND” (Liu and Albitz 2006), although we doubt that this will add much to your practical web scraping skills. While libcurl is generally well documented on the Web at http://curl.haxx.se/libcurl/, RCurl and httr are less so. Fortunately, the recently published “XML and Web Technologies for Data Sciences with R” (Nolan and Temple Lang 2014) provides an extensive overview of RCurl’s functionality.
Problems
-
What are the common methods defined in HTTP/1.1? Describe what they are used for. Which are most important for web scraping?
-
Describe the basic makeup of an HTTP message!
-
What are the five basic status types a server can respond with?
-
What headers can be used for identification purposes?
-
Why can cookies be necessary or even useful when we scrape information from websites?
-
Browse to http://curl.haxx.se/libcurl/c/curl_easy_setopt.html and read about the autoreferer, followlocation, and customrequest options. Are these options part of the RCurl package?
-
Create a handle called problemsH that defines options to identify yourself and provide information about your software.
-
Using the problemsH handle, download http://www.r-datacollection.com/materials/ http/simple.html with …
- …getURL() and save it as simple1.html.
- …getBinaryURL() and save it as simple2.html.
- …getURLContent() and save it as simple3.html.
- Add cookie management to the handler and download all verses from http://www .r-datacollection.com/materials/http/SessionCookie.php
-
Create a debug gatherer object called info and a new handle called problemsD with the following features:
- Cookie management is enabled.
- info is used as debugfunction.
- You should identify yourself and your software.
-
Using problemsD as handle, replicate the previous problem and save all request headers (outgoing headers) in hout.txt and response headers (incoming headers) in hin.txt. Inspect both files with a text editor and answer the following questions.
- How many times did the server ask for a specific cookie in subsequent requests?
- Which parameters did the server send in the request(s) for sending a specific cookie in subsequent requests?
- How many times was the cookie sent to the server?
- Which parameters/values where sent to the server as cookies?
- Learn about the details of the last request executed by problemsD, specifically: response code, time it took to complete the request, download size, download speed, list of cookies, number of times the request was redirected, and content type of the response.
-
Declare the following options as default values for all RCurl functions:
- Server redirections should be followed.
- The maximum number of redirects should be 10.
- Identify yourself and your software.
- Enable cookie management.
Create a new handle called problemsG. Check whether your specifications work by downloading http://httpbin.org/cookies/set?myname=Eddie, http://httpbin.org/redirect/20, and http://httpbin.org/headers using getURL() and problemsG.
-
Write a function called presentHTTP() that prints header and content information to the screen in a readable format. Use str_split() and cat() to solve the problem.
-
Create a debug gatherer object info or reset the one you created in a previous problem. Create a new handle called problemsM that uses info’s update function as debug function parameter.
- Use readLines() to read http://www.r-datacollection.com/materials/http/ bunchoffiles.html into a vector called urls.
- Use the following functions to download the files and save them to disk: getURL(), getURLContent(), download.file()—names should be of form: geturl1.html, geturl2.html, …; geturlcontent1.html, geturlcontent2.html, …; downloadfile1.html, downloadfile2.html.
- Which of the functions accept a vector of urls as argument?
-
Use getForm() and postForm() to send five query parameters to http://www.r-datacollection.com/materials/http/return.php and capture the returned document in objects getParameters and postParameters.
-
Replicate the following RCurl commands with httr functions:
- getURL("www.r-datacollection.com/index.html", useragent ="R", httpheader = c(From = [email protected]))
- getForm("www.r-datacollection.com/materials/http/GETexample .php", name ="Eddie", age = 32)
- postForm("www.r-datacollection.com/materials/http/POSTexample .php", name ="Eddie", age = 32, style ="post")
- getCurlHandle(useragent ="R", httpheader = c(from ="[email protected]"), followlocation = TRUE, cookiefile ="")