13
Networking and Radio
In the previous chapter, we learned how to program the Micro:bit for producing music and speech. We learned to connect an external speaker to the Micro:bit. We also explored the built-in speaker and microphone in Micro:bit V2.
Networking means connecting two or more computers (or microcontrollers). It enables them to exchange data. This short yet intense chapter focuses on networking multiple (a minimum of two) Micro:bit devices together to exchange data between them. We will also create a few simple games that demonstrate the radio communication capabilities of the Micro:bit. The following is a list of topics that we will explore in this chapter:
- A wired network with GPIO pins
- Working with radio
- Basketball using Micro:bit
- Rock, paper, scissors
- Voting using the Micro:bit
Let’s get started with networking and radio communications.
Technical requirements
For this chapter, we will need a minimum of two Micro:bit devices with a computer connected to the internet and a micro USB cable. We will need the GPIO extender and jumper cables for the wired networking part.
A wired network with GPIO pins
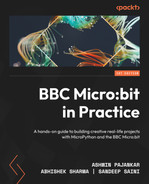
We can use the GPIO pins of the Micro:bit to create very primitive networks that exchange data in binary format. We know that the HIGH signal (which corresponds to 1) and LOW signal (which corresponds to 0) represent binary data. We will use the built-in write_digital() method to exchange 1s and 0s between devices. Let’s use two Micro:bit devices to create a simple circuit to exchange binary data:
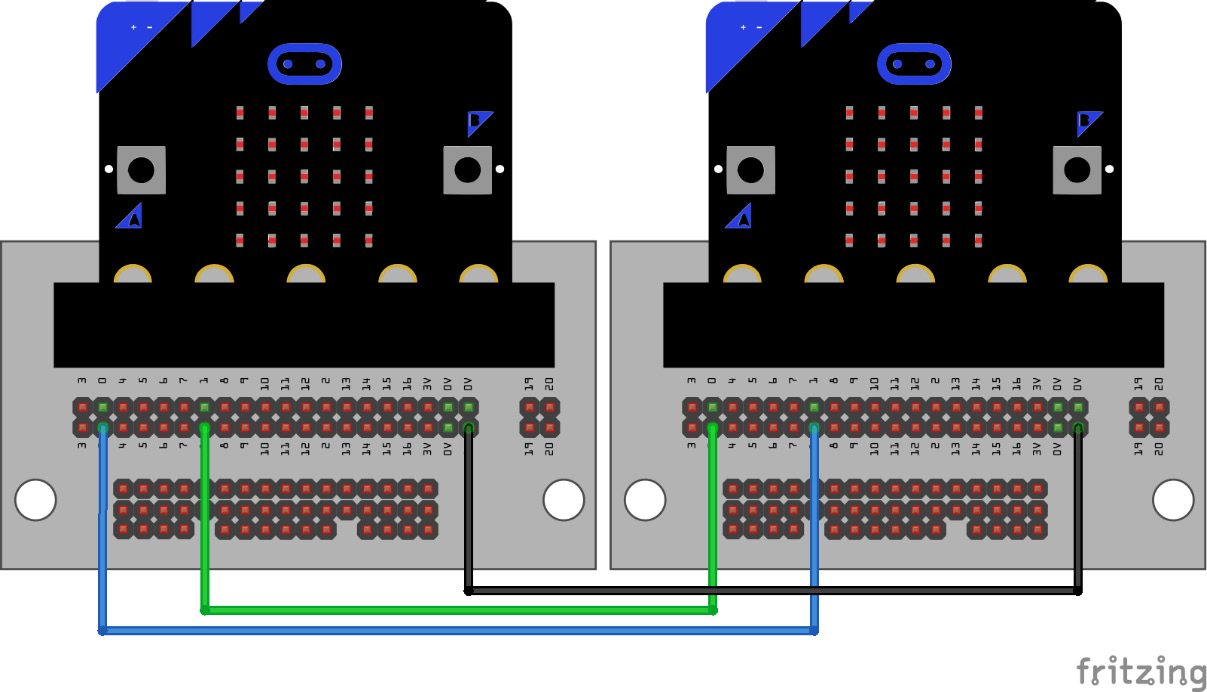
Figure 13.1 – Micro:bits connected together
Let’s write a simple program that sends 1 over pin 0 if the A button is pressed and sends 0 otherwise. Similarly, we will read pin 1; if a device reads 1, then it will show a heart symbol and a smiley face otherwise. Here, pin 0 acts as a transmitter, and pin 1 acts as a receiver for both devices.
Upload this program to both devices and test it by pressing the A buttons on both devices:
from microbit import *
try:
    while True:
        if button_a.is_pressed():
            pin0.write_digital(1)
        else:
            pin0.write_digital(0)
        input = pin1.read_digital()
        if (input == 1):
            display.show(Image.HEART)
        else:
            display.show(Image.HAPPY)
except KeyboardInterrupt as e:
    print("Interrupted by the user...")
In the next section, we will explore radio communication with the Micro:bit in detail.
Working with radio
The Micro:bit comes with a built-in 2.4 GHz radio module. Using the built-in library radio, we can send and receive messages wirelessly. For demonstrations of the radio functionality, we do not need to create a circuit. We are ready to go by just powering up a few Micro:bit devices.
Turning the radio on and off
We can get started by turning the radio of a Micro:bit on and off with the following simple code executed in a REPL:
>>> from microbit import *
>>> import radio
>>> radio.on()
>>> radio.off()
Let’s learn to send and receive messages.
Sending and receiving messages
We can send messages with the built-in radio.send() method. The maximum length of the string that can be sent with this method is 250 characters. Let’s write the code for a transmitter routine:
from microbit import *
import radio
try:
    radio.on()
    while True:
        radio.send("Hello, World!")
        sleep(1000)
except KeyboardInterrupt as e:
    print("Interrupted by the user...")
Run this code on the first Micro:bit.
The built-in radio.receive() method receives messages at a Micro:bit receiver as shown in the following program:
from microbit import *
import radio
radio.on()
try:
    while True:
        msg = radio.receive()
        if msg is not None:
            display.show(msg)
        sleep(1000)
except KeyboardInterrupt as e:
    print("Interrupted by the user...")
Run this program on the second Micro:bit and see the radio communication in action.
We can change the program on the transmitter Micro:bit side to send different messages when a button is pressed as follows:
from microbit import *
import radio
try:
    radio.on()
    while True:
        if button_a.is_pressed():
            radio.send("A")
        elif button_b.is_pressed():
            radio.send("B")
        else:
            radio.send("C")
        sleep(1000)
except KeyboardInterrupt as e:
    print("Interrupted by the user...")
The receiver-side program requires no change. However, you may wish to add an if–elif ladder to decode the message on the receiver side. Then, you can write custom code for each type of message.
Using the knowledge we have gained so far, we can program a group of Micro:bit devices to behave like a group of fireflies. I have adapted the program written by Nicholas H. Tollervey (https://microbit-micropython.readthedocs.io/en/v2-docs/tutorials/radio.html) to work for a group of two Micro:bit devices. Run the following program on a minimum of two Micro:bit devices:
import radio, random
from microbit import *
flash = [Image().invert()*(i/9) for i in range(9, -1, -1)]
print(flash)
try:
    radio.on()
    while True:
        if button_a.was_pressed():
            radio.send('flash')
            print("Sent the flash message!")
        if radio.receive() == 'flash':
            sleep(random.randint(50, 1000))
            display.show(flash, delay=100, wait=False)
            sleep(random.randint(50, 1000))
            radio.send('flash')
except KeyboardInterrupt as e:
    print("Interrupted by the user..")
Once the program runs on the devices, if you press the A button on any Micro:bit running this program, all the devices will start flashing in a continuous loop.
In this section, we talked about the basic GPIO pin-based network connections. We learned how to set up radio communication on a Micro:bit and use it for simple applications. We are able to communicate between two Micro:bits now using radio communication. This section gave us the confidence to build radio communication-based games and applications and we will use this knowledge in future sections.
Basketball using Micro:bit
In this activity, we will make a fun game using radio communication between two Micro:bits. Both players will hold a Micro:bit in their hands. One of the users will have a ball shape displayed on their Micro:bit. If the user shakes their Micro:bit, the message will be sent to the other Micro:bit, and the display will show a ball on the other user’s Micro:bit. The display of the first user will go blank. It shows that the first user has transferred the ball to the second user. The second user can also shake their Micro:bit to pass the ball back to the first user. Figure 13.2 shows the arrangement for the basketball passing game:
Figure 13.2 – Passing the basketball from one Micro:bit to another
For coding, we will code both the Micro:bits with the same code. We define a custom display using the Image() function. The function will define a 5 x 5 image. The intensity of the LED can be set between 0 to 8. Here, a 0 value will keep the LED off, and the LED will glow at maximum brightness if set to 8. Therefore, we have defined a ball shape with the help of the following array named ball:
("08880:"
 "88888:"
 "88888:"
 "88888:"
 "08880")
Now, we display the ball shape at the beginning. When the Micro:bit is shaken, then we send the ball code on the radio and clear the display. Whenever we receive the ball code, we display the shape again:
from microbit import *
import radio
ball = Image("08880:"
              "88888:"
              "88888:"
              "88888:"
              "08880")
radio.on()
display.show(ball)
while True:
    if accelerometer.was_gesture('shake'):
        radio.send('ball')
        display.show(" ")
    incoming = radio.receive()
    if incoming == 'ball':
        display.show(ball)
In this section, we made a simple game that involves radio communication between two or multiple Micro:bits. In this example, we displayed a ball shape on the LED matrix and after shaking it, the shape disappeared from the Micro:bit and sent a signal to another Micro:bit. This signal was received at the next Micro:bit and the ball shape was displayed on the LED matrix. It appears as though we have passed the ball from one Micro:bit to another.
Rock, paper, scissors
Rock, paper, scissors is a very popular game; almost all of us play it with friends. We can make three gestures with our hands – that is, rock, paper, and scissors. Every gesture can overpower one of the other two gestures and can be defeated by another. Two users will display a random gesture, and the following rules decide the winner:
- Rock can kill scissors but is wrapped in paper
- Paper is cut by scissors but can cover rock
- Scissors can cut paper but are broken by rock
- If both gestures are the same, then it is a tie
For coding, we will assign integers to these three gestures and use conditional statements to decide the winners.
We have used the following codes and image icons for the gestures:
- Rock = 0 and displays a square
- Paper = 1 and displays a heart
- Scissors = 2 and displays scissors
We will also display three different outputs on the screen based on the game’s outcome. We select the pre-defined gestures from the Image library. The following display images are chosen for the respective outcomes:
- Asleep = match is tied
- Tick symbol = user won
- Cross symbol = user lost
Figure 13.3 shows one such game between user 1 and user 2:
|
|
|
|
|
|
|
|
|
When both Micro:bits are on, A is displayed to both users. It’s a much better way of indicating to them that they should press the A button. |
User 1 and user 2 press the A button simultaneously and in this case, they both get scissors. |
Simultaneously, the result for each respective user is displayed. In this case, as they both got the same output (scissors), they see an asleep image, indicating a tie. |


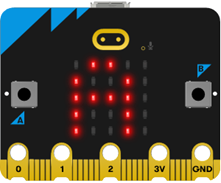

Figure 13.3 – A match tied between user 1 and user 2
Initially, user 1 selected a random gesture (the scissors icon). Now, user 1 will confirm the selection. After this, user 2 will select a random gesture (again, the scissors icon) and confirm it. The figure shows that the match was a tie in this case.
Figure 13.4 shows one more game between user 1 and user 2:
|
|
|
|
|
|
|
|
|
When both Micro:bits are on, A is displayed to both users. It’s a much better way of indicating to them that they should press the A button. |
User 1 and user 2 press the A button simultaneously and in this case, user 1 gets scissors and user 2 gets a rock. |
Simultaneously, the result for each respective user is displayed. In this case, user 2 wins, as rock crushes scissors. |


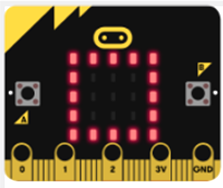

Figure 13.4 – State of the Micro:bit at various junctures in the game (user 1 and user 2 – user 2 WINS)
Initially, user 1 selected a random gesture (rock with a square icon). Now, user 1 will confirm the selection. After this, user 2 will select a random gesture (paper with a heart icon) and confirm it. The preceding figure shows that user 1 has lost the match.
Now, let us consider the coding aspects. As decided earlier, we define the icons for rock, paper, and scissors, respectively. We define a my_move variable. When the A button is pressed, the variable will store a random number (0, 1, or 2). The user will see the respective icon on their screen. Then, after a second, the number is sent to the other board using the radio.send function.
Once the message is received, the message is stored in the opp_move variable. Once we have both values (my_move and opp_move), then we compare them and display the outcome on the Micro:bit: The code here should be uploaded to both the Micro:bits. Initially, we called the required libraries and defined the scissor, rock, and paper display patterns:
from microbit import *
import random
import radio
my_move = 0
opp_move = 0
SCISSORS = Image("88008:"
                 "88080:"
                 "88800:"
                 "88080:"
                 "88008")
radio.on()
display.show("A")  #on start display letter A
Now, we define the function by pressing the A button. We generate a random number between 0 to 2 and depending on the number, one of the moves is selected as my_move:
while True:
  if button_a.was_pressed():
    my_move = random.randint(0, 2)
    if my_move == 0:
      display.show(Image.SQUARE)
    elif my_move == 1:
      display.show(Image.HEART)
    else:
      display.show(SCISSORS)
    sleep(1000)
    display.show(
      " "
    )
   radio.send(str(my_move))
Now, we have sent the value of my_move via radio communication.
The following code explains the logic followed on receiving the opponent’s move. We will compare the value of my_move with opp_move and set all nine possibilities:
  opp_move = radio.receive()
  if my_move == 0:
    if opp_move == "0":
      display.show(Image.ASLEEP)
    elif opp_move == "1":
      display.show(Image.NO)
    elif opp_move == "2":
display.show(Image.YES)
#Now, we check if the input is 1
  elif my_move == 1:
    if opp_move == "0":
      display.show(Image.YES)
    elif opp_move == "1":
      display.show(Image.ASLEEP)
    elif opp_move == "2
      display.show(Image.NO)
#And here is the last case, when input is 2
  else:
    if opp_move == "2":
      display.show(Image.ASLEEP)
    elif opp_move == "1":
      display.show(Image.YES)
    elif opp_move == "0":
      display.show(Image.NO)
In this section, we designed a very popular game using Micro:bits. We replicated the rock, paper, scissors game using a combination of two Micro:bits. We used radio communication to transfer a random value for rock, paper, or scissors from one Micro:bit to another. By comparing the user’s move and the opponent’s move, the result is displayed on the LED matrix.
Voting using the Micro:bit
Now, let us make an application involving more than two Micro:bits. We can create an electronic voting machine using multiple Micro:bits. One Micro:bit is used to collect the votes and others are used to cast their votes. Only one Micro:bit will be used to receive the radio messages, while all others will be used to send the radio message. The codes for the two categories of Micro:bits will be different. The code for sending the vote from a Micro:bit is as follows:
from microbit import *
import radio
radio.on()
my_vote = "Vote"
while True:
    if button_a.was_pressed():
        my_vote = "Yes"
        display.show(Image.YES)
        radio.send(my_vote)
    elif button_b.was_pressed():
        my_vote = "No"
        display.show(Image.NO)
        radio.send(my_vote)
In this code, we have chosen two buttons, A and B, to decide the value of the my_vote variable. We send Yes by pressing the A button and No with the B button. Now, let us explore the code for receiving and counting the casted votes:
from microbit import *
import radio
radio.on()
my_vote = "Vote"
vote_count = 0
while True:
    my_vote = radio.receive()
    if my_vote == "Yes":
        vote_count = vote_count+1
        display.show(vote_count)
    elif my_vote == "No":
        vote_count = vote_count
        display.show(vote_count)
In this section, we designed another simple yet useful game. This game is perfect for digital voting in a small group. Every user is given a Micro:bit. There is one Micro:bit that counts the votes while others are used to send their votes.
Summary
This chapter explored the basics of wired networking and radio communication with Micro:bits radio library. Once we understand how to work with basic communication, we can use this concept with the combination of earlier hardware projects we learned. We can use this concept in plenty of projects involving a group of Micro:bit devices. For example, we can use it with a few external inputs (push buttons and analog inputs) and external outputs (LEDs, RGB LEDs, NeoPixels, and Piezzo buzzers) to create interesting projects.
The next chapter explores different sensors built into the Micro:bit. We will discuss the access and use of capacitive touch and a temperature sensor or a light sensor on the Micro:bit. We will learn how to locate, access, and use these sensors and develop interesting applications using them.
Further reading
We can find more information about the radio API in a Micro:bit implementation of MicroPython at https://microbit-micropython.readthedocs.io/en/v2-docs/tutorials/radio.html and https://microbit-micropython.readthedocs.io/en/v2-docs/radio.html.