
The sound team will be led by the Sound Supervisor who may have a number of sound assistants. The Sound Supervisor will be responsible for the overall sound output but may be helped by a Boom Supervisor who will work with the sound team on the studio floor operating microphones fitted to the sound booms.
It seems to be stating the obvious to say that the sound team’s job is to get the performers’ voices from the floor and mix them with any music or sound effects from sources such as CD or tape so that they can be added to the pictures and recorded onto video tape.
This is indeed the sound supervisor’s job, and to do this he or she will normally work in the gallery area with a range of tape recorders, CD machines, microphones and a sound mixing desk. The problem is caused by taking it for granted that a microphone will pick up the sound we want and that mixing it with music, or sound effects, will create the effect we want.
The sound team need to work together to produce an overall sound that is not only acceptable but is also realistic, and at the same time does not interfere with, or conflict with, the picture that has been selected. To achieve acceptable results the sound team need to know how sounds behave, how microphones work, how to correct any differences in quality resulting from inadequacies in the microphones or associated equipment and how to balance the levels to produce a natural sound. Often, like the problems the lighting team have, it is not so much a question of ‘what’s the answer to the problem’ as ‘what definitely will not work and what might’. This leads the team to consider a number of possibilities, all of which may work, from which one possibility is selected more on personal experience and preference than because ‘that’s what the book says’.
The television studio is an enclosed environment. It has walls, floor and ceiling which form a shape and contain the sound. The problems start because of the way sounds behave in this enclosed space.
All sounds start from their source and move outwards, getting weaker all the time, until they come to a surface. Here they follow similar laws as light. Some of the sound will be reflected back into the studio as audible, but quieter, sounds. Some will be absorbed by the surfaces and will not be reflected back into the studio. Simply this means that the sounds will bounce around the studio, adding to the original sound, until they are either all absorbed or have become so weak, due to the total distance they have travelled, that they are no longer significant.
Unlike light, which travels at 300,000,000 metres per second, sound travels very slowly, at around 330 metres per second. This means that the reflections are easily heard as slightly quieter and slightly later sounds identical to the original. These indirect sound waves, as they are known, add to the direct, or original, sound to produce an echo. In a studio these echoes are so close together that they form part of the original sound and are known as reverberation.
Apart from the loudness of a sound, we also need to consider its frequency. This is a measure of the pitch of a particular sound. Frequency is measured in Hertz (shortened to Hz). Very low frequency (bass) sounds have low numbers (e.g. 20 Hz to 400 Hz) whereas high frequencies (treble) have high numbers (in the thousands, e.g. 6 kHz to 15 kHz).
Not all materials reflect, or absorb, all the frequencies equally but it is true to say that very large studios, or studios with very hard surfaces, have more audible sound reflections than small studios or ones with softer surfaces. This means that more or fewer reflections will be apparent depending on the size and surfaces of the studio.
This is exactly true of any enclosed environment. We can tell by listening unconsciously to this reverberation the sort of environment a person is in, a bathroom or a living room for example. If a studio has a very high level of reverberation it is known as a live studio and the sounds appear to come from a live environment similar to a bathroom. Putting a living room set into this live environment might fool the cameras but it won’t fool the sound, it still sounds like a bathroom.
A live studio often makes sounds unnaturally hollow and boomy. It may be possible to control some of this effect with careful use and placement of microphones, but it will never sound quite right.
The opposite of a live studio is a dead studio. This has lots of absorbent material on the walls and ceiling in an attempt to deaden the sound completely. An advantage of this arrangement is that unwanted noises from the air conditioning plant and cameras moving are minimalized.
The disadvantage is that now everything sounds like a living room environment. A kitchen scene won’t sound like a kitchen. Perhaps a bigger disadvantage is that everything now sounds very dead and dry, this is particularly serious when it comes to music recordings where much higher levels of reverberation than are ever required for speech are needed to make the music sound natural.
In a dead studio with less reflected sound there is a lower overall sound level, which means that microphone positioning, and choice, is even more crucial. A dead environment also affects performers, who find it can be very tiring, not only working under hot lights, but now also finding that their voices sound very dead and dry.
In practice, studio design tries to strike a happy balance between a very dead and a slightly live environment. It is always possible to add reverberation to a recording with a reverberation unit, but it is almost impossible to remove it.
Because different materials control overall reverberation in different ways, it will always be a problem that adding scenery, props or an audience to a set will change the overall reverberation level. This means that the sound team needs to learn to listen to the actual sound and alter it to sound as natural as possible.
Microphones come in a range of sizes and prices and have different directional properties and produce different sounding sounds. It is not a question of biggest, or most expensive, is best, but a question of deliberately choosing the microphone that is most suited to the job it is required to do.
All microphones do the same thing. They convert sound waves into electrical waves that can be used in mixers or recorded onto video tape recorders. Because of this changing of the form of the information (from sound to electricity), problems will occur and this will mean that some microphones are more suitable than others for a given situation. There are microphones especially designed for speech, others for music and others that are ‘general purpose’ and can be used with reasonable results for practically all situations.
Microphones come in a range from very small personal microphones, designed to be worn, through various types of hand-held or stand-mounted microphones to microphones designed for mounting on booms. There are specialist microphones designed to be mounted on walls or floors, microphones designed to cut down background noise and radio microphones.
Microphones employ different working principles, some need batteries, some only pick up sounds from a particular direction, some are designed for use very close to the source, others will distort and ‘pop’ if used too close to the sound source.
How can we make a choice? Clearly now we can’t just get a microphone out of the cupboard and expect it to work perfectly.
Often the choice of microphone comes down to the personal likes of the sound supervisor, but we can narrow the choice quite considerably by asking a couple of simple questions. The first, perhaps the most obvious, is can the microphone be seen in shot? This is crucial because the best recordings are made by gathering the strongest sound signal and amplifying it as little as possible. The strongest sound signal is closest to the source. As the sound moves away from the source it decreases in strength very rapidly and is added to by other sounds around it, most of which we don’t want. The difference between television and radio, or normal sound recordings, is that the microphone has to be placed to fit the picture. This is rarely the best place for picking up high quality sounds.
If the answer to the question is that we cannot have the microphone seen in shot (a drama for instance would be ruined by the performers walking round holding microphones), then the next question to ask is can we have the microphone in the scene? This raises the possibility of using very small microphones concealed around and within the scene, or even concealed on the performers.
If this is not possible, and it often isn’t, then we have to resort to using microphones that can be held above the performers on booms or fishpoles. Being a Boom Operator is a very skilled job. There may be two or three Boom Operators in the sound team and they may come under the control of a Boom Supervisor, who works with the Sound Supervisor.
All microphones can be described in terms of their working principle, directional response, sensitivity and impedance. Whole books have been written on microphones so here we will just look at the basics.
The two most common working principles in use today are the moving coil, or dynamic, microphone and the electrostatic, or capacitor, microphone. The electret microphone works on the principle of the electrostatic and can be grouped with it.
The dynamic microphone is so called because it works on the dynamo principle. This is a principle of physics whereby a small coil of wire moved inside a magnetic field will produce a small electrical current. This current is identical in frequency to the sound waves and is proportionately larger or smaller depending on the loudness of the sound waves. It is often called a moving coil microphone because it works by having a coil of wire that is moved by the sound. In the same way that our ears hear sounds, the sound vibrations in the air move a small diaphragm (ear drum) to which is connected a coil (bones in the ear), this produces a mechanical movement which is detected within the surrounding coil as electricity.
These microphones are very robust and will take a fair amount of abuse. They are ideal when used on booms or hand held, because they produce very little handling noise, or close to very loud sounds. Their main problem is that they do not reproduce high frequencies (treble) very well. This may be turned to advantage if the sound source is over sibilant or shrill.
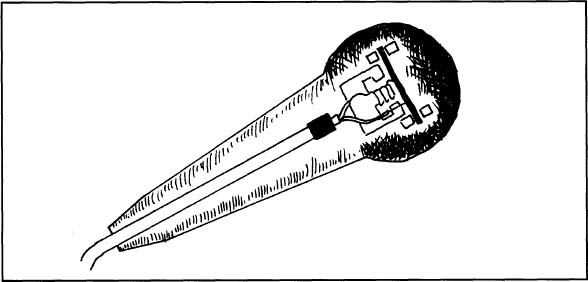
Figure 3.1 Dynamic microphone working principle
Electrostatic microphones work on the electronic principles of a capacitor (hence its other name). This involves a pair of flat metal plates which are quite close to, and facing, each other. If a voltage is applied across these plates nothing will happen, but if the plates are moved closer or further away, by the movement of the sound pressure waves, then the voltage will alter proportionately.
This voltage is in the region of 48 volts and must be DC (unlike the normal electrical mains voltage which is AC). It is often supplied to the microphone down the same wires as the audio using a system known as phantom power. In practice the front plate is a thin diaphragm and free to be moved by the sound vibrations, and the back plate is fixed.
The disadvantages of electrostatic microphones are that they need a special voltage and that they are very sensitive to loud, close sounds. They produce very small voltage variations and this calls for a small pre-amplifier to be fitted either inside the microphone casing or very close to it. Their advantage comes from their sensitivity to sounds which makes them ideal if the microphone has to be placed some distance from the source. They can be used on booms, but are sensitive to movement of air caused by exaggerated swinging around (producing a wind effect). Their main advantage is that their frequency response is as good as ours and, unlike the dynamic microphone, they will pick up all the sounds we can hear.

Figure 3.2 Electrostatic microphone working principle
The electret microphone uses exactly the same principle as an electrostatic microphone, but the voltage needed across the plates is replaced by a permanent electrostatic charge. This electrostatic charge can get weaker with age, causing the microphone to increase in noise level and produce weaker sounds.
Electrets do not respond to the higher frequencies (treble) as well as the true capacitor microphone, can be noisier and less sensitive, but do offer considerable value for money. The main disadvantage lies in the fact that they are prone to ‘sudden death syndrome’, caused by moisture or high humidity discharging the electrostatic charge, which results in the permanent total failure of the microphone.
Like electrostatic or capacitor microphones, the output is extremely small and this, again, calls for a small amplifier to be placed very close to the microphone. These amplifiers are often called ‘head amplifiers’ because they are fitted inside the body of the microphone casing. Because there is no external voltage supplied to electrets, a small (1.5 volt) battery needs to be fitted to supply power to the amplifier.
Radio microphones are best described using the old name of wireless microphones. Splitting the word we find that they are wire less and, if that destroys some of their magic, it makes them easier to understand.
Any microphone that is normally connected by cable to the sound desk can be fitted with a miniature radio transmitter instead. This allows the microphone signal to be transmitted, like any other radio signal, to a receiver. The receiver, normally placed very close to the sound desk, decodes the signal in the same way as any other radio broadcast and sends it to the desk as a normal audio signal.
The transmitter can be fitted inside the casing of the microphone, with a short aerial coming out of the bottom, or can be totally separate, in which case the microphone has a normal wire which is plugged into the transmitter. This is obviously preferred with personal mics, because the transmitter would make the whole microphone casing too big to be worn.
Radio microphones can, logically, have any working principle, or directional response, because they are normal microphones which merely transmit the sounds through a radio system rather than down cables.
There can be interference problems caused by other microphones on the same, or very close, frequencies, much in the same way as we experience interference with radio stations that are too close to each other. Radio microphones have quite short ranges and are not very good at transmitting through walls or steel enclosures, so care is needed with siting the receiving aerial. A good guide is to make sure that the transmitter aerial can ‘see’ the receiving aerial.
Legislation has recently been changed, but a licence may be needed to operate radio microphones (particularly on location). The manufacturers are the best people to explain the requirements. The need for a licence depends on use and radio frequency used.
The choice of microphone is not limited just to the working principle, or the size, or the frequency response. An important thing to remember is that, as human beings, we can select the sounds we wish the brain to ‘hear’.
Microphones respond to sound pressures in the same way as we do, but have no brain to select a particular sound from the crowd. As the sound pressures arrive at the microphone from all directions, they are turned into electricity and fed to the amplifier as if they had all come from the same place. There is no directional information to help us sort out, later, where a particular sound came from.
Manufacturers employ various techniques that can offer some directional information. By only allowing sound pressures coming from a particular direction to reach the capsule and be turned into electricity, we have a form of control over directional response.
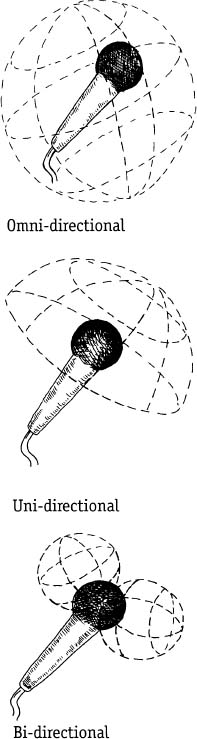
Figure 3.3 Typical polar responses
This directional response is known as the polar response of a microphone. It is called polar response because, using the poles of the compass, it is possible to draw curves showing the direction(s) in which the microphone is most sensitive to picking up sound pressures.
Imagine the microphone being placed in the centre of a very large football. If any sounds coming from anywhere inside that football are picked up equally by the microphone then it is said to have an omnidirectional response. It picks up sounds from in front of it, from behind it and from the sides as if they all came from the same direction. This may be very useful if you have a discussion group around a table, but not particularly useful if you want to pick up just the cymbals from a drum kit.
The first level of control is to make the microphone only pick up sounds coming from in front of it. Back to the football: only the sounds coming from the front half will be picked up. This is known as unidirectional, or cardioid (because the shape is similar to a heart).
The football example is a good one because the studio is an enclosed space (like a football), and sounds coming from behind the microphone will bounce off the front and sides of the studic and arrive at the front of the microphone (much weaker from the distance and effort of bouncing around) and be picked up as if they had come from the front. No uni-directional microphone can be a true one direction-only microphone in these circumstances, but the control is considerably better than omni-directional.
These are the two most common polar response patterns for studio microphones, although others will offer narrower responses than cardioid and are called super-cardioid or hyper-cardioid. These tend to be used more on location, but are useful in studio when it is necessary to isolate a particular sound, like the cymbals of the drum kit for instance.
A third standard pattern is bi-directional, or figure of eight. These microphones will only pick up sounds from the back and the front, but are not very sensitive to sounds arriving from the sides.
Bi-directional microphones are used as the basis of stereo recordings but are useful for ‘across the table’ interviews, where just one microphone can be used to pick up both people, and still offer some control of sounds coming from the sides, for example the noise from cameras or crew moving.
Microphones can be attached to people or props, hand held, fitted to a microphone stand or used fitted to the end of a long rod known as a fish pole or boom.
While the other teams are busy setting up in their areas, the sound team will be making decisions about which microphones to use and how to support them. The Sound Supervisor will make the decisions and the Sound Assistants will carry them out.
The best place for a microphone is to have it fixed as close to the sound source as possible and not moved. This can sometimes be achieved by using strategically placed microphones hung from the ceiling, or fixed to the scenery, or mounted on stands to cover music videos. More normally, the microphone will have to be attached to a performer and will have to move about with the performer.
The sub-miniature ‘personal’ microphones need a lot of thought before just clipping them onto a performer. Most are omni-directional and, because of the absorbing effect of clothing, may actually sound more natural if they are used ‘upside down’ if the performer is sitting at a desk or table. This allows the reflected sounds from the table to play a greater role in the overall output.
These microphones can be concealed under clothing, but care is needed so that clothing does not rub the microphone and cause unwanted noise. Equally care must be taken with the connecting cable - a little loop in the cable, by the clip, will provide a strain relief that will help prevent rustle noises as the performer moves.
A further option involves more of the sound team, the Boom Supervisor and Boom Operators. The Boom Operator will have a long pole (often called a fish pole, because it looks like a fishing rod), on the end of which is fixed a microphone. This will be mounted in a shock-proof suspension and, although any polar response may be used, normally the cardioid response is favoured.
This whole pole is then held so that the microphone is kept just above, and just in front of, the performer’s head. Care has to be taken so that the microphone and boom do not appear in shot. The Boom Supervisor will be able to talk directly to the operator and will be able to see the pictures from the cameras to check the position.
Another consideration is to make sure that moving this pole about to follow the performers does not cause shadows, from the lights, to fall anywhere in the picture area. It helps, and is normal, for the Boom Operator to hear the output from the boom through a separate intercom system. In one ear the operator normally hears the sound from the microphone and in the other ear the instructions from the Boom Supervisor. If the director wishes to speak to the Boom Operator these instructions can be relayed through the Boom Supervisor.
Booms in large studios can be mounted on dollies, which are moving platforms with controls for moving the pole backwards or forwards, as well as altering the height. These sound dollies are normally fitted with a picture monitor to help the operator judge how close the boom can be set without appearing in shot. In smaller studios, and on location, the pole should be as light as possible to let the operator hold it above the head for long periods at a time. Apart from suspending the microphone in a shock-proof clamp, the cable from the microphone should be isolated from the pole if possible. This will reduce handling and cable noise as it is moved.
Apart from the live sounds from the microphones, all programmes will have some recorded music and/or sound effects. These will be taken from a range of source machines.
Although record players are still in limited use, they can be very largely discounted. The humble cassette deck is still in use, but the quality and access time has moved it to the last resort’ category. Most studios will still have an open reel tape recorder which has good quality and the advantage that selections of music and effects can be assembled into the right order by cutting the tape and splicing the individual pieces into the right order.
The preferred option is a digital source, of which the compact disc is a standard workhorse. It is possible to cue these up very accurately and to programme them to play the selections in the right order, assuming all the items are on the same CD!
Increasingly the DAT (Digital Audio Tape) recorder is replacing the open reel tape recorder. DAT can be used in exactly the same way as cassette or open reel recorders in that material can be recorded onto them in the right order and then indexed electronically for fast and accurate playback. As well as stereo versions there are multi-track variants.
There are also two disc-based systems in common use. One uses a standard 3.5 inch HD disc to record and play back digital audio and the other is the Mini Disc system. Both have the advantage of instant start, accurate cueing, digital quality sound and easy compilation of programme material.
Normally the music and effects that are required are on different discs, perhaps different mediums and maybe recorded from live sounds. It will help the sound team to make a special compilation of all the music and effects in the right order and of the right duration This is called a music and effects tape (or M&E for short). The M&E tape can be indexed to make finding and cueing the sounds very easy in a time pressured environment.
Studio-based television programmes are shot time sequentially. They start at the beginning and end at the end. There is very little editing and no chance for adding or balancing sounds afterwards.
The heart of the sound system is the sound mixer, sometimes called the desk or the board. This is operated by the Sound Supervisor and consists of a box containing a number of identical channels, through which each sound is processed, from where it can either be fed to groups or the outputs direct.
Each channel should have a gain, or trim, control which is a coarse control over the incoming sound level and allows the channel to receive exactly the right level of sound.
There should be some way of controlling the tonal quality. This is called equalization or EQ for short. The EQ section of the channel may just be bass and treble controls or may offer much more subtle control.

Figure 3.4 Basic mixer set-up
There should be some auxiliary outputs (Aux for short) which have several uses. The most often used are ones that allow sound from a particular channel to be cued, without being sent to the outputs. Sometimes this is on a separate button called PFL (pre-fader listen), allowing the operator to hear the sound before raising the channel fader.
Another use for the aux outputs is to send a particular channel to the effects units, like reverberation or echo, or the processing units like compressors or gates.
Reverberation or echo units are used to make the sounds from a particular channel sound as if they are in a particular environment. Adding a little reverb, for instance, will make a voice sound as if it is coming from a bathroom or large hall.
Compressors can make quieter sounds louder and louder sounds quieter. This produces a ‘tighter’ sound for music, or helps to compensate for performers moving further away, or closer, to a microphone.
Gates are electronic switches which will only allow sounds through when they reach a predetermined level. Useful for cutting the ambient sound from being picked up by a microphone when there is no voice, but remember that when they open they let all the sound through, including the ambient. Most mixers nowadays are stereo, so there will be a pan control to determine which track of the video recorder the channel is sent to. For mono recordings this pan control is left in the centre position.
The advantage of having groups is that a number of separate channels can be fed to one group and controlled from one fader. A classic example is when a drum kit may have ten or twelve microphones, all looking after the sounds from different bits of the whole kit. Each microphone can be sent to a separate channel and the sound adjusted for level and tonal quality. All these channels can then be fed to one group allowing the whole drum kit to be made louder or quieter with one fader whilst retaining the overall balance.
All the sounds that have been gathered together into different groups are then fed to the output faders, which control the overall level of the whole programme.
There should be provision within the mixer for something called foldback. This is a separate output which allows any sound to be fed to the studio floor. This is essential if action is cued from sound effects. For example, if the performer hears the phone ring, or a knock at the door, and responds. It must be possible to select sounds for foldback. Microphone sounds must not be fed to the floor because that would cause the microphones to ‘hear’ themselves, resulting in a high-pitched whistle called feedback.