A television studio is a complex place, particularly the production control gallery. Lots of busy people, confusing layers of sound, and many pictures. It falls to the Vision Mixer to make sense of all the pictures by choosing the right one to go out to be recorded or transmitted, and to give the director the correct transitions between pictures, and combinations of images. The Vision Mixer has one main piece of equipment, but that is one of the most complex in the studio. Confusingly that equipment is also called a vision mixer. The Vision Mixer operates the vision mixer! From here on we will show the person as the Vision Mixer and the equipment operated the vision mixer. It is common in some countries to call the vision mixer a video switcher. As we shall see neither is quite accurate because the equipment will both switch and mix. The important thing is not what you call it, but understanding what it does.
It could be said that the Vision Mixer has relatively little chance for creative input, since what he is doing is reliably delivering, for the director, the transitions that the director has already chosen.
Whilst it is true that a good Vision Mixer will not have to think about many common transitions - like touch typing they will happen almost automatically - it is in the unusual that the challenge lies. That and the ability to react quickly, accurately, while under pressure, are what makes the job more interesting. When the director unexpectedly asks for a new title to be superimposed, or decides she is going to an unscripted reaction shot in the middle of a fast cut sequence, that is when the Vision Mixer will face a real test of their knowledge and skill.
What then is this wonder machine that the Vision Mixer operates and what does it do? Once we understand that, we can easily understand what the Vision Mixer does. They simply operate a box called the vision mixer under instruction from the director.
In very simple summary the vision mixer takes in a number of different signals (representing images) and sends out one to be recorded or transmitted. Sometimes that one is a simple repeat of one of the input signals; sometimes, not infrequently, it is a combination of two or more of them. It also allows different ways of going between the signals (or pictures). Many vision mixers will also give out ‘preview’ picture signals that enable the Vision Mixer to test special effects and other shots before committing them to the main output.
The pictures going in will include, at the very least, every camera in use on the programme. Additional full images which may be available could include telecine (an image from a film projector unit), telejector or slide scanner (an image from slide), stills store (an image from a library of still images held on computer disc), video source machines (for pre-recorded video sequences), a connection to another studio (or studios) to allow remote feeds, a feed from a satellite dish (to allow international connection), a feed from a video effects unit (to allow manipulated images to be used), and even perhaps a feed from a camera on a speeding Grand Prix car, or from a helicopter! Of course not all of these will be available every time -what is available, and what is to be used, depends on the studio and on the nature of the programme.
Partial images, which will be combined with others before going to output, could include such things as a VT clock, caption generator for titling, a matte generator for building layered pictures and a subtitle generator. With four, or maybe more, cameras, and possibly more than one VT source, the Vision Mixer could easily be dealing with upwards of twenty different pictures!
The layout of vision mixers differs from machine to machine, but all of them will have columns and rows of buttons, arranged in groups. The rows are sometimes called banks or busses. In most there are also a number of faders. The full images, such as the cameras’, come into the columns of buttons. Camera 2’s buttons, for instance, will be arrayed one above each other. The Vision Mixer makes a simple selection (on any of the horizontal rows) by pressing the appropriate button, so moving left to right they might press in turn Camera 1, Camera 2, Camera 3, Camera 4, VT source 1, VT source 2, etc. The rows allow for different ways of moving between the images. So, for instance, with Camera 1 selected on the A bus, and Camera 2 on the B bus moving a fader at the end of the rows might give a mix.

Figure 6.1 A simple vision mixer
The partial images such as caption generator come into separate areas, and are combined either with the pre-selected output picture or with some stage of transition before that (such as the mix mentioned above between A and B).
The different transitions available will depend on the complexity of the vision mixer, but all of them will allow the two commonest, the cut and the mix (or dissolve, or fade).
The cut gets its name from a film technique where the recording medium (the film) is physically cut and rejoined between two frames. The effect of this when played back is an instant switch between the two images.
This is achieved in a vision mixer by switching electronically between the two images, and the Vision Mixer does this very simply by pressing a different button in the group that is active.
Although this may sound a very harsh way of moving from image to image it is actually the closest to how we look at the world. In our normal experience our eyes are restless, often moving to look at different parts of the view available to us. This may be triggered by sound (somebody shouts at us, we turn to look at them) or by something that we can see (the person who we are looking at suddenly looks up, we follow their eyes to look up also). Because of the way our brain and eyes work, though, we are not aware of seeing anything whilst our eyes are moving to the new part of the scene.
It is as if we instantly move our eyes to the new position. This is an exact equivalent of what the cut gives us. The crucial thing is to get the timing of it exactly right, on the very moment when we would have wanted to move our eyes had we been looking at the scene directly. Such a well timed cut becomes almost invisible - a badly timed one will stand out as intrusive to our concentration on the scene. Luckily the timing of the cut is the responsibility of the director rather than the Vision Mixer, but the split second nature of that correct moment does mean the Vision Mixer must have quick, accurate reactions to the director’s instructions.
The mix (or fade or dissolve), and indeed all other transitions available on the vision mixer, is not similar to something in the natural world so has to be used with care, and only when justified by the programme. What happens is that one image will slowly fade away as another fades up to take its place. A mix must be given time to have its effect - normally a minimum time of about 2½-3 seconds is recommended, but it could be a lot longer. For an appreciable amount of time two images are laid over each other on the screen. The director needs to choose carefully images which will work together like this, remembering that for most of the time of the mix neither image will be at its full level of vividness and contrast. Some vision mixers allow for three or more images to mix together, but this rarely succeeds as the confusion of different layers of picture reduces the effectiveness of all. The Vision Mixer executing a mix needs to be careful first to select the final image of the mix, in its appropriate group, before starting to move the fader. A mix with a cut in the middle of it (the result of selecting the final image too late) looks very messy.
Most programmes normally have at least two fades, because a nearly universal convention is that programmes start by fading up from black and finish by fading back down to it. This is just a special case mix.
Almost all vision mixers, as well as displaying indicators on their front panel, have the ability to switch indicator lights (called tally lights) on the cameras they send to output. This is a very valuable aid to the camera operators, and floor performers, showing which is the active camera. It is normal practice for a tally light to come on below the active camera monitor in the control room. This is particularly useful if two cameras are being mixed when both monitor tally lights will come on for the duration of the mix. To make sure they work accurately the Vision Mixer must ensure they are careful about, for instance, completing fader movements and positively pressing buttons.
As well as moving between pictures vision mixers allow for combinations of images to be put together. Two commonly found combinations are wipes and key effects.

Figure 6.2 A vision mixer selecting camera to output and visible tally on camera top Wipes simply generate a geometrical pattern - at its simplest a straight line - and put an image on each side of the line created. The line could have a coloured border added to it, or be soft, or have patterning along it. Wipes are used in two ways. Either the wipe itself is preset to a fixed position, and the complete package of the two images is then sent to output. This might be used, for example, to show both sides of a telephone conversation, or a close up shot magnifying a critical part of the action, inset into the longer shot. The other way of using wipes is to have them actually move across between images on output, but here the same constraints apply as to using a mix - it must not be too fast, and must be justified by the images. Wipes used to be very popular, but are now less favoured. Their artificiality is less acceptable to a sophisticated audience.
Key effects are a very important way of combining pictures, but here we can only give a brief introduction. There are two versions of keying - keying on brightness and keying on colour. What both do is use a triggering image to cut a hole in another picture, and then fill that hole with a third picture.
Brightness keying discriminates between two different brightnesses in, for instance, the output of a caption generator. This then derives a shape which in turn cuts a gap in the output picture. The gap is refilled with something else - in this case usually a plain colour. This particular technique is very commonly used to cut coloured letters (titles for example) into a pictorial image.

Figure 6.3 Brightness keying
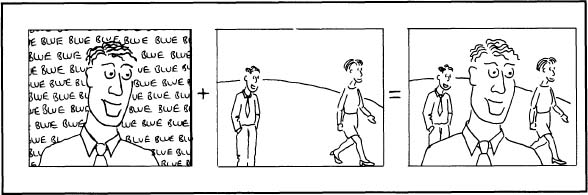
Colour keying (known as chromakey, or colour separation overlay) works with two rather than three images. From one picture a specified colour (often blue) is electronically removed. The part of the image that was that colour is then replaced by another image. This is a very powerful effect allowing the layering together of two images so that they look like one. This allows all sorts of impossible, dangerous, or just expensive composite shots to be built up.
Vision mixers, or video switchers (equipment), can seem intimidating and confusing when you first come to them, but the key to understanding them is to look at what is happening on the output screen, as you operate each control on its own. Also look at the indicators. Different buttons will light up, warning indicators will light up or flash. Start with simple transitions, one by one, and you will soon get the hang of it.