Audio post-production is the final stage involved in putting our programme together. With so many different video formats, and the increasingly affordable option of non-linear editing, it is impossible to do more than look at the concepts involved in this ‘basics’ book. We will assume that the tape has come to audio post-production to have the audio track, which should be complementary to the picture track, cleaned up and finished off with music and/or effects and ambient sound.
We have been given the master tape which has all the sync audio on one track, leaving one other audio track for us to record onto. Hopefully, we also have an audio log to help find the bits of buzz track we will need from the various original video tapes and any audio tapes we made whilst on location. So where do we start?
The very least we are going to need to do is to add some music at the beginning and probably over the credits at the end. We may also need to add a voiceover or some sound effects. We may need to mix in some buzz track. We may need to ‘clean up’ the dialogue by adjusting the levels or using some equalization. We may need to add some reverberation or some other effect. What we need first is a plan showing exactly what we are going to do. To do this the Sound Editor will need to go through the whole tape and very carefully note down exactly what is needed at exactly what time. If timecode has been used life is easier, but if not an accurate time from the start of the tape will suffice.
The plan should end up looking similar to the picture EDL. It will be laid out in columns showing the time, what is needed and the duration. You will notice from CD sleeve notes about the times of tracks that punctuation marks are used to symbolize seconds and minutes. Seconds are shown as”, and minutes as’, so 2′47″ is 2 mins 47 sec. We will use these in the example which might, for instance, have Time = 0″, F/U (fade up) opening music (title, track number, how far in to the track it starts etc.), Duration = 15″, Time = 15″, F/0 (fade out) music. Time = 1′16″, raise level of voice by 4 dbs, Duration = 3″ (it helps to have the actual words written down that need a level change). Time = 6′28″, V/0 (voice over) Duration = 18″.
With two independent audio tracks on the video recorder, it is possible to select which track we wish to record onto. If the sync sound is already on track 2, all we need to do is to select record on track 1 and record the music, voice over, buzz and effects in the right places onto track 1. If we now play back both tracks simultaneously this will give us a mixed sound track. Figure 20.1 shows this idea in pictorial form.

Figure 20.1 Existing sync sound on track two, new sound added to track one

Figure 20.2 As Figure 20.1, but copied through mixer
What we haven’t managed to do is to alter the quality or change the levels of the sync track. We could, however, make a copy of this master tape and make any adjustments we need, or add effects, by taking the audio tracks through a mixer. Figure 20.2 shows this idea.
The master tape remains intact and if we need to change the music or alter the levels at a later stage all we need to do is make the changes and then make another copy. What we have not ended up with is a fully mixed audio track on the master tape.
The simplest way of getting a fully mixed audio track on the master uses a method known as Track Bouncing (also track collapse, or ping pong). This involves not only recording the music, voiceover, buzz and effects onto track 1, but taking the sync sound on track 2 out of the machine, sending it through a mixer channel and re-recording it onto track 1 at the same time. Everything is now mixed on track 1 and only the sync sound is left on track 2. All the facilities of the mixer are available during this re-recording so altering levels, adding equalization or reverberation are all possible. This is shown in Figure 20.3.
To free your hands, and brain, from the problem of cueing up new music and effects, if this can be done in the edit suite there is no reason why you shouldn’t record the new music or effects onto a separate, blacked videotape which can be used in the player machine. Now it is a straightforward matter of setting up an ‘audio only’ edit. The music and effects will be available when you need it, it is only a question of adjusting the levels and equalization.

Figure 20.3 Schematic of sync being collapsed with new audio
The previous example of using the audio tracks of the player introduces the idea of creating a separate Music and Effects track (M&E). Using either the two tracks of a video tape recorder or, preferably, a multi-track audio recorder, it is possible to draw up a track chart. This will show the time position of the voiceover, music or effects in relation to the sync sound (take the beginning of the video as time zero) on each separate track. Each can now be recorded separately onto different tracks of the tape recorder. This makes overlapping, or multiple, sound effects very easy. You should record everything at the normal recording level, without fading in or out. This allows adjustments to be made to the mix when you compile the M&E and sync sound, through the mixer, onto the video recorder.
The real answer is to use timecode, a synchronizer and a digital multi track audio recorder. Over the last few years this option has become genuinely affordable for even the smallest of post-production suites.
Timecode (TC or SMPTE) is a recorded signal placed on both the video and the audio tapes which gives the exact time position on a tape in hours, minutes, seconds and frames. The synchronizer will compare the times it reads from both tape recorders and keep them both running together with absolute accuracy. The smaller, cassette based, digital audio recorders have a timecode and synchronizer board built in and do not need a separate track for the timecode, so all eight are available for audio. This concept is shown in Figure 20.4.
The possibilities with this system are endless. Because it is possible to run audio and video in absolute sync there is no reason why you can’t take the sync sound off the video recorder, then make a complete multi-track audio mix before recording the complete mix back onto the video recorder in absolute sync.
Because you are using a multi-track recorder all the possibilities offered by track bouncing are available. You could end up with all the separate tracks fully mixed, with final levels, equalization, effects and fades all on one track ready to be re-recorded onto the video tape recorder.
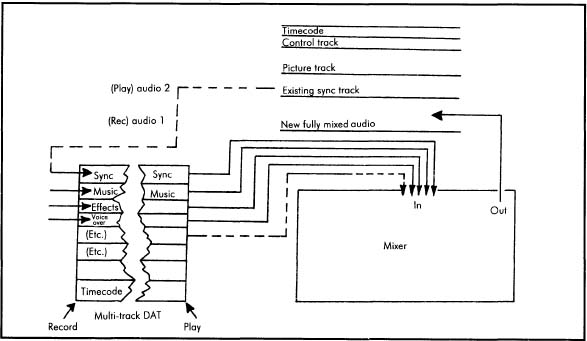
Figure 20.4 Schematic for digital 8 track with timecode
It is usual, and advised, to leave the sync sound on the video so that it can be used as a ‘guide track’. This guide track can be played back whilst you record the new mixed audio onto the video recorder to allow you to compare the position of the original sync with the newly created audio.
Digital is now the firm favourite for even the small audio post-production suites. With computer prices falling and the ever increasing range of sequencer programmes it is possible to put together a very professional programme at truly affordable prices.
The current range of semi-professional non-linear editing programmes include a number of audio tracks that can be built up in much the same way as a multitrack audio recorder. Many have facilities built in similar to the audio sequencer programmes, whereby an ‘audio studio’ module is incorporated to perform the basic functions found in a normal audio mixing desk. The tracks can be assembled using computer files of MIDI or analogue sourced material, mixed, equalized and have effects added before outputting the finished audio to the final video tape.