Television is made up of pictures and sound. Pictures come from cameras. Cameras need light to see. Whilst on location there is often plenty of light around ‘accidentally’, from ambient daylight, room lights etc., in the totally controlled environment of a studio the light has to be provided for the cameras. This is the job of the lighting team.
The lighting team consists of a Lighting Director, Lighting Operator and Sparks led by a Gaffer. Often in small studios this is all done by one person. Sometimes, particularly on location video or film shoots, the role is combined with camera operator to become Lighting Camera Operator.
If we look at the full team in studio the Lighting Director is the person with overall responsibility for designing the lighting and for supervising its installation and operation. The Lighting Operator is the person who controls the lighting system during the programme. This used to be fairly straightforward, but with the increasing use of programmable mobile lights it is becoming more complex. The Sparks are the people who actually rig the lanterns and the Gaffer is their supervisor. In the past Sparks have had an unjustified reputation for being basic and perhaps insensitive souls, with no understanding of the niceties of television aesthetics, but it is worth remembering that their understanding of how to place lanterns, despite dealing with extreme heat, dangerous voltages and perilous heights, has made possible the delicately beautiful shots of many a director.
In reality, most small studios cannot sustain a large lighting team, so let’s look at the processes to be covered, by one or maybe more bodies, rather than concentrate too much on the division of the roles.
As ever, one of the most important processes is that of the planning. Here it is vital that the Lighting Director understands the two different requirements of lighting so that she or he can harmonize their solutions. These two are the need for illumination so that the camera can see useful images and the need for some kind of atmospheric interpretation, so that the image conveys powerfully the required message.
The need for illumination is explained very simply. The studio, being a controlled environment, starts with no light (it is in darkness) so obviously we have to give the camera some light to see by. Not so obvious is that even the best, most advanced camera does not see the world as we see it through our eyes. Our eyes are both extraordinarily sensitive and intelligent. The sensitivity means that we can see useful images even in very dark conditions. Try looking out at your garden at night, or switching the light off in your sitting room. With hardly any light you can still see enough to separate and discern things. Although there are some television cameras that can see by starlight they are very expensive and are not used for programme making, but rather for surveillance, or military purposes.
Perhaps more of a problem is not the absolute sensitivity of the cameras, but their limited range of acceptable light input. The human eye can not only see in almost total darkness, but can accommodate bright sunshine. Television cameras have a very narrow usable range from the darkest to the brightest within a scene. Certainly modern camera technology is much better than the old tube-based systems, but still the effective range of what the camera can see with is restricted.

Figure 4.1 Different lighting scales

Figure 4.2 An over-exposed image will lose texture and detail in both highlights and dark areas
Cameras that can see in dark conditions would be hopelessly overloaded in bright conditions. So the nub of the problem for a Lighting Director is not just to give the camera enough light, but also not to give it too much. To be technical, the contrast ratio of the scene must be controlled. Contrast ratio is the difference between the brightest part of the scene and the darkest part. Too high a contrast ratio will lead to poor quality images. Either the bright areas will be burnt out, with no texture detail, or the dark areas will be compressed into indiscernible shadow. Sometimes you can, if you are unlucky, get both symptoms, as the electronics of the camera, detecting too bright an image, attempt to compensate by altering how the signal is processed.
Too low a contrast ratio is not a problem, except that the images may look flat and dull, but if the camera does not have enough light the electronics will lift a dark picture to an artificially bright level. Unfortunately this does not solve the problem, but merely makes what should be unseparated darkness into a muddy mid range, with little life or contrast in the image and poor pastel colours.
Cameras therefore have to be presented with just the right amount of light to give vivid images. That amount is critical, so the lighting team’s most important task is to control the amount of light.
The camera itself has a very crude light control device as part of its lens -the iris. This very simply allows more or less light to fall on the camera’s pickup system, but it does it across the whole area of the image being unable to discriminate between dark and bright areas.
Automatic irises, while seeming very tempting to look after the tricky problem of getting the correct exposure, can be very troublesome precisely because of this lack of discrimination. As they average the brightness of the whole picture, any change to any area of the picture will trigger a change in the iris setting. This is well and good when the image is changing rapidly and our attention is elsewhere, but with the small, gentle changes which are common in production we will immediately notice the background of the shot fluctuating as the auto iris attempts to compensate for changes in overall brightness.
Really we have to avoid this, especially in the studio where everything is controllable, so the key problem for the lighting team (from a technical as opposed to an aesthetic viewpoint) is to give the cameras an even field of light at the level that they work. To the naked eye this may seem fairly flat and uninteresting, but the trick is to use the best light meter available, which is of course the camera, feeding into a monitor. As this is how the final picture will be judged the lighting team may as well ensure they are getting it right by using it as their test.
The atmospheric, or aesthetic requirement of the lighting is a great deal less tangible and measurable, but luckily there are some guiding principles which will give a good starting point for the lighting team.
The most important is also the one that is easiest to overlook because it is so obvious! In a programme we are telling a story, creating a scene. We want the audience to be given an impression of a particular place, particular circumstances, that are part of that scene. So we should go back to that imagined scene to find the defining aspect of its lighting. A room lit by moonlight coming through a high window will look different from the same room lit by bright sunshine, from the same room lit by artificial lighting, from the same room on a cloudy day. All of those differences are to do with where we would expect the light to be coming from and thus how affecting the room. You could jot down a list of how you expect to see the light in each of those circumstances. This list would be the first clue as to how you could begin to build a lighting plot for the television cameras to be able to see the room as the director envisaged it. It would tell you where to place your lanterns, how to distribute the lighting, how to juxtapose light and shade.
This brings up the next crucial principle. When we design lighting we are not only dealing with light, but also shadow. The two together give subtle clues to the viewers about shape and texture, such that they can have a sense of the three-dimensionality of an image, even though they only see it through a two-dimensional screen. This works because the brain interprets light as being closer than dark (unless there is other visual information to contradict this). If we put darkness next to light the first thing we assume is that the dark area is slightly further away. So how we place light and dark for the camera to see will begin to give depth (and therefore texture) clues.
In the days of monochrome television this juxtaposition of light and shade was vital to give a sense of shape. Tones of similar grey become inseparable. Now, with colour, we have another piece of information. Maybe what would have looked like grey next to grey now looks like pink next to green, but it will still be given a great deal more apparent shape if there is shading to emphasize depth.
The shadow is a precise tool. From it, quite unconsciously, we pick up information about the nature and position of the light casting the shadow. For instance, look at a photo of somebody at midday, then at one of somebody in the evening. The high shadows cast by an overhead sun fall differently on the face from the longer, more horizontal shadows from a sun low in the sky. Normally we don’t think about this, but accept its clues, but when we are creating a scene with light for a camera to see we must think very carefully about where our light is and what kind of shadow it is casting.
What are the tools of the lighting team? Obviously, at the planning stage, the Lighting Director will be working with the designer on floor plans and possibly models of the set. Later in the process he or she will develop detailed lighting plans and brightness plots. These will show where the lanterns are to be placed and how bright they should be at any moment.
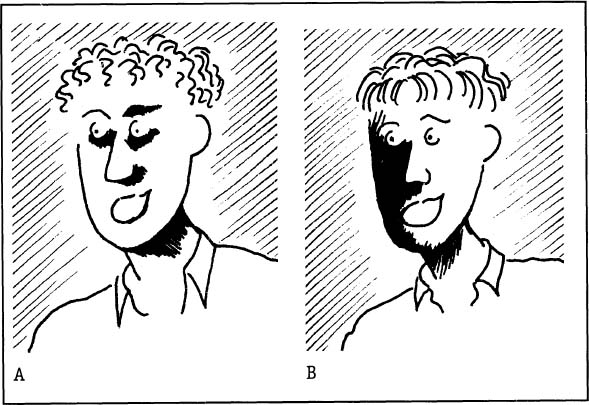
Figure 4.3 Where is the light coming from? In A it comes from high above like midday sun. In B it comes from lower — perhaps evening sunshine
Other tools fall into two main groups, the lanterns and their accessories and the control system.
The lanterns, or luminaires, are the basic building blocks of the lighting system. They come in a variety of different forms, designed to do different jobs. All of them will have some kind of light emitting unit (commonly known as a bulb, technically called a lamp, often referred to as a ‘bubble’), some kind of housing to protect the lamp, some kind of optical system to ensure the light coming out is of the right kind and in the right direction and some kind of mounting or fixing arrangement. More often than not they will also have some kind of power connection.
The bulb (or lamp) size is often used as a way of defining the lantern, since it governs both how much electricity it uses and also how much light we can expect out of it. Almost all sizes are possible from the smallest (15 W) up to giants of 25 kW or more. (The W here refers to ‘Watts’ which is a measure of the power of the lamp. The k refers to 1000, so a 25 kW lamp will have a power rating of 25,000 watts.) Most of them work by having a wire filament which glows when electricity passes through it - much the same as an ordinary household bulb - but a significant number of television lights work to different systems (such as a controlled spark in an exotic gas inside the lamp). These latter ones will often give a much higher light output, at a specific colour (useful on location), and cannot be used on studio dimming systems, so we will pass over them for now.
The housing types are highly varied, but all serve the function of providing a safe and robust box for the lamp and the optical system. Quite often the lamps operate at high temperatures, so the housing must be able to withstand such heat safely. Sometimes they will have cooling fans incorporated within them.
The optical systems again vary widely. At the most simple they are little more than a simple reflector. The difference is governed by what type of light the lantern is intended to give out and how much, if at all, the shape and nature of its output beam is meant to be controlled.
The type of light given out is an important choice. The choice is between what is called ‘hard light’ or ‘soft light’. ‘Hard light’ will give sharp focused, hard-edged shadows similar to sunshine; ‘soft light’ gives shadows that diffuse at their edges and have no sharp delineation, like cloudy daylight. The Lighting Director uses the two different types of light for quite distinct purposes.
Hard lights, with their clear shadows, form a mimic of an imagined source of natural light in the scene and their shadows give clues about where that light is coming from. A scene of bright midday sunshine would require a high overhead position for such a lantern. A similar scene later in the day might have a much lower angle for the lantern to shine from, suggesting a sun low in the sky.
The angle at which the lantern shines is a key parameter - more important than its actual position. This is because we don’t look, with our cameras, at the source of light, but rather at where its shadows are cast, for instance on the face of a performer. The Lighting Director will therefore choose hard light lantern positions which give the correct angle and are convenient.
Soft lights are used when the Lighting Director does not want to add another set of distinct shadows. The reason for this is very simple. In real life we are used to one sun in the sky, not two or more. So a face with two or more conflicting shadow angles on it looks wrong. The Lighting Director chooses his one angle of ‘sunshine’, but then needs to add other non-shadow-casting light to give the camera a controlled contrast ratio in the scene. In other words the one ‘sun’ spotlight gives correct shape and modelling to the face, but casts shadows the camera cannot see into. They appear as dark undiscriminated areas – not acceptable. Into those shadow areas the Lighting Director points ‘soft light’ to lift their illumination to a level visible to the camera.
Other more specialized lanterns may have optical systems allowing, for example, projection of a shaped pattern (such as from an arched window), or the even illumination of background walls.
The mounting, or fixing arrangement must allow the lantern to be easily pointed, so it must allow for the unit to be panned or tilted. It is useful as well for it to allow the height of the unit to be varied. Once again there is a huge variety of different types, from the simplest of tripod stands to powered hoists and systems which allow the pan, tilt, height and beam angle of lanterns to be computer controlled from a remote control desk. Needless to say a fundamental requirement of all of them is that they are safe and secure.
Many large studios have what is called a ‘saturation rig’. This means that the whole of the studio’s ceiling is covered with many lights, all on hoists. The Lighting Director then merely has to choose which lantern of the many available is nearest to his chosen angle. These lanterns are often double ended, so that the Lighting Director can choose whether to use the hard end, or the soft end depending on his need.
Finally the power connection to the lanterns needs some brief mention. Lanterns are the biggest users of electrical power in a studio, so it is important that this power is delivered safely to them.
Heavy gauge cable and connectors are used and the routing of the cables as they come to the lanterns must allow for expected movements and not create a hazard for people in the studio (by crossing walkways for instance). The power will usually (in studio) come from some form of dimming or control system.
The dimming system allows the lanterns in use to be set to different levels of brightness and for those levels to be smoothly changed as the programme progresses. This is done by varying the amount of electrical power applied to the lanterns. Each lantern has a numbered sign on it (or its hoist) the number being visible from the studio floor and also from the lighting control area. The numbers correspond to channel numbers on the dimming system, so that when the Lighting Operator moves the fader for channel 17, for instance, the brightness of lantern 17 will change.
There are two main parts to the dimming system. The less visible of these are the actual dimmer circuit packs. There will be one of these for every channel of the control system, usually gathered in groups of six, in cabinets containing maybe twenty-four or thirty dimmers. What each of them does is control the amount of power fed to its appropriate lantern socket, according to the level of a small low voltage control signal. Each dimmer pack, then, will have a heavy power supply coming in to it, a small control connection and an output which will go ultimately to the lantern concerned.
Often, to help flexibility, studios will have some sort of patching arrangement, whereby the output from particular dimmers can be re-routed to different lanterns when required. Once these three connections are made and the required patching set up, the dimmers operate as ‘black boxes’, needing no direct contact from the operators, so (because they cause some noise and require very heavy power inputs) they are often installed in separate areas away from the studio floor.
The other part of the system is the control desk. This allows the Lighting Operator to change the lanterns’ brightness by operating faders and other controls. It generates the small control signals which feed back to dimmer packs, but because these are at low level the desk itself can be remote from the dimmers and it is usually placed in a vision control area, often near to the camera exposure controls. At its simplest the desk will have a single fader for each control channel, but many types of desk are available, some giving elaborate memory, auto-fade, special effects and other facilities. It is in the flexibility of what the desk can do that the creativity of the Lighting Operator can have its greatest expression. Some studios also have small portable desk units, or hand-held radio-linked controllers which allow the Lighting Director to alter levels from the studio floor whilst rigging.
At the desk the Lighting Operator is primarily concerned with balance between the lanterns being used. Bearing in mind that the cameras need even light across the whole of their image, having one lantern disproportionately bright can ruin the shot. It is surprising how little a variation of a dimmer fader can alter and improve the lighting balance of the shot. Obviously there is a close relationship between camera exposure and lantern brightness - this is why the two controls are often adjacent. The Lighting Operator needs to remember that the overall brightness of the shot is best controlled by the camera vision engineer (probably using the iris), but brightness of areas within the image is only controllable by skilful use of the lighting desk.
A common fault of lighting novices is to judge the scene by their own naked eyes rather than by how the camera sees it. This is a particular trap if the director has asked for dramatic lighting. The naked eye leads the poor novice to put very bright areas adjacent to dramatically dark ones. It looks great to the eyes and would be wonderful in a theatre, but the cameras don’t stand a chance. They see excessively bright areas, probably with grossly over-exposed highlights right next to deep darkness. Any attempt to correct this on the cameras’ irises merely pushes the dark areas further down. The real solution is to forget looking directly at the scene but to look through the camera instead, then (strange as it may seem) put more light into the dark areas and less in the bright hot spots. It may look disappointingly flat to the floor crew but the cameras will put the drama back into it - controllably!

Figure 4.4 A simple schematic of a control system

Figure 4.5 (a) Correct with camera iris (b) Correct with lighting balance
Another concern the Lighting Operator (and Lighting Director) will need to be careful about is the fact that the cameras will be adjusted to a particular reference level of lighting. This is not so much from a brightness aspect, which can be accommodated by iris adjustment, but from the point of view of colour response. The cameras (not being intelligent) have to be told what white (and black) are. These settings are directly related to the colour of the lighting on the scene. This colour varies according to variation of the dimmers, so the Lighting Operator should aim to have all of his lanterns at, or close to, a chosen optimum fader level (which will have a predictable colour temperature). Any lantern burning much brighter will look blue; any burning much darker will look red. Of course this colour variation (under careful control of the lighting desk) can be used deliberately to cool down, or warm up the coloration of the shots, but needs great finesse!
So how do all these tools get used and how does the lighting team actually operate?
The first stage is for the Lighting Director, with the director and designer, to agree what kind of lighting style is required and what if any special lighting requirements the director may have. This is the basis of his lighting plan, where he organizes the practicality of how to achieve the lighting necessary. The lighting plan will show a detailed floor plan of the studio and the set, with perhaps indication of likely camera positions. Onto this will be added symbols showing the position of the lanterns and where they are intended to shine.

Figure 4.6 A lighting plan
Using this lighting plan as a starting point, once the production has occupation of the studio and the set is built, the Sparks will carefully adjust each of the specified lanterns to be pointing in the required direction and have any necessary colour filters, or accessories fitted to them. As this rigging may well require use of ladders and will at least occupy floor space, it must be done early before the director needs to start work on camera rehearsals.
Careful note must be taken of things like performer movement, camera movement and microphone positions to ensure that no problems occur later which would be difficult to remedy. A wise Lighting Director might also at this stage allow for possible alternative lanterns in the trickiest situations. Once they are rigged they can easily be faded up or not as needed, but if the need is only discovered later in the process and the lanterns then have to be rigged, rehearsals would have to be interrupted.
Once all the lanterns are pointing in the right direction the emphasis is on the Lighting Operator methodically programming the desk. Each individual lantern is carefully adjusted to its correct level (bearing in mind the target setting for which the cameras’ colour has been set). The scenes are built up and the lanterns balanced together. If the desk allows, scenes can be stored in memories in the desk so that they can be quickly and smoothly reset. If this is not possible the Lighting Operator needs to prepare his own log to remind him how to move efficiently from scene to scene.
As soon as possible a basic level of lighting is set up so that the director can progress with camera rehearsals. This may not be the final refined balance - the Lighting Operator will continue to improve it as rehearsals progress - but the director must be enabled to look at shots. Lighting and its adjustment always seems to take all the available time, so a sense of priorities is essential in the lighting team. The top priority has to be to give the director workable lighting for shots as early as possible, then quietly and unobtrusively to improve the lighting balance!
During the programme the Lighting Operator will keep an attentive eye on the monitors showing each camera’s shot and ensure that the lighting is fine tuned accordingly, before the director needs that shot! Something as simple as a performer turning their head slightly may need their key light to be brightened or dimmed slightly to keep the balance right. Throughout the process the Lighting Director is ensuring that all is as good as it can be.
The satisfaction for the lighting team is that they will have made a real contribution to possibly beautiful shots. The frustration is that their efforts, when successful, are often not noticed, but when unsuccessful will be immediately criticized by everyone!