To give you an idea of how branching and merging works, we will walk through a simple example that uses multiple branches. Our example is a simple project containing "hello world" programs that simply print Hello World! on the console, implemented in different languages.
Given a stable branch called trunk, we will create a branch to work on a new feature, and before the feature is finished, we will create another branch to fix an urgent bug. Finally, we will merge the bugfix branch back to the trunk.
In the example steps, we will focus on using the branch operations with basic parameters, the content of the files, and the changes made are not important. In the later sections, we will explain all branch operations in more detail.
To use branches efficiently, let us first create a shared repository using the command line or Bazaar Explorer, as explained in the previous section. The examples will assume the path /sandbox/hello (on Linux or Mac OS X) or C:sandboxhello (on Windows), but you may choose any other path of your choice.
The example project is available publicly on Launchpad (https://code.launchpad.net/~bzrbook/bzrbook-examples/hello-start). This URL points to a Bazaar branch. Using the branch operation, we will create a local branch that is a perfect replica of the remote branch, with all its revisions and complete history copied locally.
The new local branch will be completely independent of the original remote branch. We will use it as the basis of many other branch operation examples throughout the chapter.
You can create a branch based on another branch by using the bzr branch command and by specifying the URL of the source branch. Optionally, you can specify the target directory, where you want to create the new branch. Let's try that to download the example branch into /sandbox/hello/trunk:
$ mkdir /sandbox/hello
$ cd /sandbox/hello
$ bzr branch https://code.launchpad.net/~bzrbook/bzrbook-examples/hello-start trunk
Branched 6 revisions.
You can create a branch based on another branch using the Branch view. You can open this view in several ways:
- Click on the large Start button in the toolbar and select Branch...
- From the menu, select Bazaar | Start | Initialize
In the From: textbox, enter the URL of the source branch. In the To: textbox, you can either type the path of the directory where you want to create the branch, or click on the Browse button and navigate to it. In the Revision textbox, you can specify a revision to download the history only up to that revision. In this example, we want to download all the revisions, so simply leave it empty:
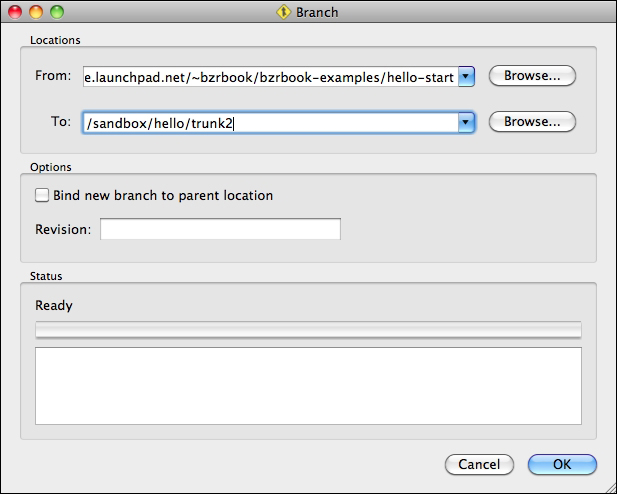
After you click on OK, the Status box will show the bzr command that was executed along with its output. For example:
Run command: bzr branch https://code.launchpad.net/~bzrbook/bzrbook-examples/hello-start /sandbox/hello/trunk2 --use-existing-dir
Branched 6 revisions.
At this point, the "Hello World!" implementations are very primitive. Executing any of them simply prints the message Hello World! on the screen, and that's it. For example:
$ ./hello.py
Hello World!
Let's say we want to improve the programs to accept an input parameter, and use it to make them more personal. For example, if you run ./hello.py Jack, it should print Hello Jack! instead of Hello World!
In order to separate the new development from the main branch, let's create a new branch for it. Actually, you already know how to create a feature branch; the method is the same as the one we used to download the sample branch. The only difference is that the source branch will be a local branch, which is the trunk, instead of the original remote branch.
Let's use the same method we used earlier to get the remote branch, but this time branching from the local trunk, and let's call the new branch say-hello-to-x:
$ cd /sandbox/hello
$ bzr branch trunk say-hello-to-x
Branched 6 revisions.
To create a new branch from the trunk, open the Branch view in the same way as you did earlier, using the menu or the large Start button in the toolbar. When coming from the Status view, the From: textbox is prefilled with the path of the current branch. In the To: textbox, enter the path or browse to the location to place the new branch. For example, /sandbox/hello/say-hello-to-x2.
The goal of our branch is to implement a new feature—change the programs to use a parameter. Let's start with hello.sh; rewrite it as follows:
#!/bin/sh
#
if test "$1"; then
    echo "Hello $1!"
else
    echo 'Hello World!'
fi
This change seems noteworthy enough to include a memo in the README file. For example, let's append the following to the end of the file:
Variation: "say hello to X"
---------------------------
- Bash
So far so good; let's commit the change using Bazaar Explorer or the command line:
$ bzr commit -m 'bash impl can say hello to X'
Committing to: /sandbox/hello/say-hello-to-x/
modified README.md
modified hello.sh
Committed revision 7.
We are not yet done with the say-hello-to-x branch; we still have to change the implementations of the other languages too. However, let's suppose that somebody using our project has discovered a bug in the C implementation—the program does not print a line ending character, making the output strange. Let's suppose we have to finish this quickly, or else our good reputation is at stake here.
Instead of fixing the problem in the current branch or trunk, let's use a new dedicated branch. For one thing, the change clearly does not belong to the say-hello-to-x branch. And to avoid our intermediate commits in the fixing process from affecting the trunk, using a new branch is really the cleanest solution.
Let's create the new bugfix branch based on the trunk, using Bazaar Explorer or the command line. For example:
$ cd /sandbox/hello
$ bzr branch trunk fix-c
Branched 6 revisions.
$ cd fix-c
The fix is easy enough. We can rewrite hello.c as follows:
#include "stdio.h"

int main() {
    printf("Hello World!
");
}
So far so good, let's commit the change using Bazaar Explorer or the command line:
$ bzr commit -m 'c impl should add newline'
Committing to: /sandbox/hello/fix-c/
modified hello.c
Committed revision 7.
On a second thought, our current implementation is not great. The first line is in a somewhat old-fashioned writing style; it would be better to change it as follows:
#include <stdio.h>
Let's commit this too, using Bazaar Explorer or the command line:
$ bzr commit -m 'use more modern include-style'
Committing to: /sandbox/hello/fix-c/
modified hello.c
Committed revision 8.
Now that the work on the bugfix branch is completed, let's merge it in the trunk.
You can merge from another branch using the bzr merge command and specifying the URL of the source branch to merge from. Let's change to the directory of the trunk and merge from the bugfix branch:
$ cd /sandbox/hello/trunk
$ bzr merge ../fix-c/
 M  hello.c
All changes applied successfully.
At this point, the changes in the bugfix branch have been applied to the working tree, leaving it in a changed state without recording a new revision, as we can confirm using the status command:
$ bzr status
modified:
  hello.c
pending merge tips: (use -v to see all merge revisions)
  Janos Gyerik 2013-03-03 use more modern include-style
Notice that in addition to showing that hello.c has been modified, the status command also indicates that we are in the middle of merging. By default, Bazaar shows the log message of the last revision in the branch that is being merged. Use the -v flag to see all merged revisions.
After running the merge command, you should always verify the changes that resulted by the merge and that everything in the project is still working well. If everything looks in order, you can commit the merge. If there are problems, you can use the revert command to undo the merge. We will revert now to try merging using Bazaar Explorer.
To merge the bugfix branch into the trunk, you need to open the trunk in Bazaar Explorer. You can do this by using any of the Open..., or Open location..., or Open Recent options in the File menu, or by using the Ctrl + O keyboard shortcut in Windows and Linux systems or Cmd + O in Mac OS X.
Having the trunk opened in the Status view, click on the large Merge button in the toolbar to open the Merge view.
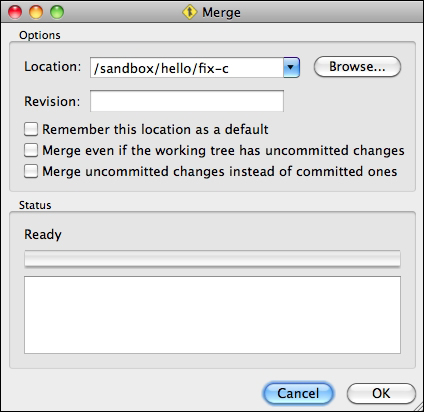
By default, the Location: input box is prefilled with the location of the parent branch; in our example, it is the remote branch we started from. Change that to the path of the fix-c branch by directly entering the path or by using the Browse button.
As the Revision: input box suggests, we can specify a revision to merge all the changes up to a certain revision only. But in our current example, we want to merge everything.
After you click on Ok, the Status box will show the bzr command that was executed along with its output. For example:
Run command: bzr merge /sandbox/hello/fix-c/
 M  hello.c
All changes applied successfully.
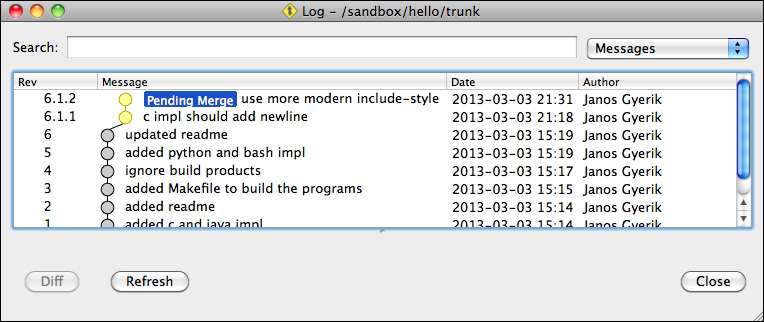
Click on Close to dismiss the Merge view and return to the Status view of the trunk. The left panel now shows the Pending Merge tip—the log message of the last revision in the branch that is being merged.
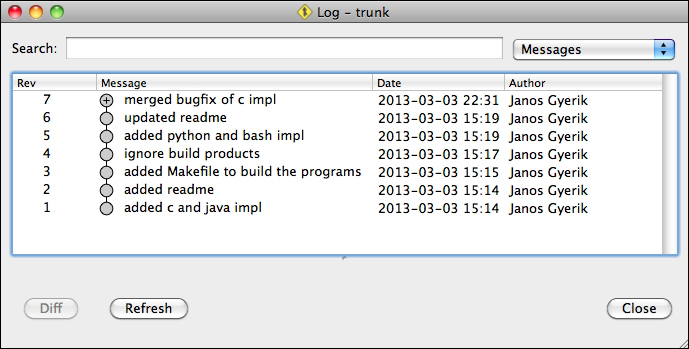
Until you commit, the merge is in a pending state. Open the Log view to see all the revisions that will be merged:
To finish the merge, commit the changes, ideally with a message that summarizes the meaning of the changes in the merged branch. For example, bugfix of the C implementation.
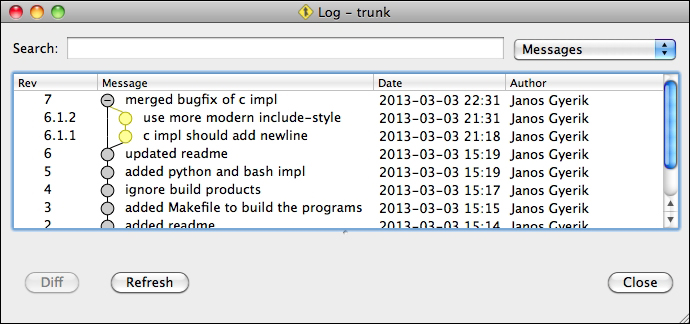
When viewing the revision history in the logs, the revisions of the merged branches are hidden by default. In this way, you get an overview of the larger steps in the project, with the option to drill down into more details and see all the merged revisions.
Let's look at the recent four revisions in the trunk:
$ bzr log --line -l4 /sandbox/hello/trunk
7: Janos Gyerik 2013-03-03 [merge] bugfix of c impl
6: Janos Gyerik 2013-03-03 updated readme
5: Janos Gyerik 2013-03-03 added python and bash impl
4: Janos Gyerik 2013-03-03 ignore build products
Notice [merge] in front of the log message of the last commit, where we merged the bugfix branch. This was added by Bazaar to indicate that the revision merged other branches. Use the -n0 or --include-merged flag to see the merged revisions too:
$ bzr log --line -l4 /sandbox/hello/trunk -n0
7: Janos Gyerik 2013-03-03 [merge] bugfix of c impl
  6.1.2: Janos Gyerik 2013-03-03 use more modern include-style
  6.1.1: Janos Gyerik 2013-03-03 c impl should add newline
6: Janos Gyerik 2013-03-03 updated readme