
Now that BitlBee is running on the BeagleBone, you can enjoy OTR-protected instant messaging, but we can improve the setup. Currently, we are connecting to BitlBee directly from your IRC client. This is fine if you have one client. But, if you are chatting with your laptop and then get up and go, you may want to continue a conversation on your phone. For this, we will need a more persistent proxy connection. The problem can be stated in a more general way: how can we maintain a persistent connection to all of our IRC networks, including BitlBee. For this, we'll need an IRC bouncer.
IRC bouncers act as a proxy server and maintain your connection to an IRC server. This may be useful on servers that don't support nick registration and you want to maintain your nick. As mentioned in the previous use case, bouncers generally support multiple clients which will allow you to have a near seamless IRC conversation as you switch devices. Since we are using BitlBee as an IRC gateway to our XMPP and instant message networks, we can combine IRC connections as well and have all of this managed by the bouncer.
IRC was invented in 1988 and it was one of the first global, real-time, chat networks. While social networks may have replaced much of the casual conversation on the Internet, IRC still has its place. While those conversations still continue on IRC, there is a group that routinely hangs out on IRC that should be of interest to the readers of this book: open source developers. Most well-maintained open source projects have a corresponding IRC channel where at all hours, you can generally find help.
For open source projects, the two biggest IRC networks are freenode and oftc. In fact, every major software and hardware package in this book has a corresponding IRC channel where you can ask for help. There are a few benefits to using IRC over other mediums. For active channels, it is beneficial and encouraged to lurk prior to adding to the conversation. Lurking is just passively watching the conversation. You may, and probably will, learn something just by reading the existing conversation. Also, if you do have a problem or a question, IRC is a real-time chat, so you potentially can quickly resolve your issue. It's also a more informal medium than a public mailing list. If you have some trepidation about asking your question on a mailing list, IRC is the place to ask.
Note
On freenode, the relevant channels are: #sparkfun, for general electronics questions and to chat with some SparkFun employees and customers, #beagle, home to BeagleBone enthusiasts, #gnupg, for GPG-related questions, and #cryptotronix, which is the author's channel about open source crypto hardware. On oftc (irc.oftc.net), you can check out the #bitlbee channel for help on BitlBee or #tor to talk about Tor.
IRC, like any shared communication medium, has certain netiquette that users expect everyone to follow. Surprisingly, there is an RFC that defines netiquette guidelines (RFC 1855). It's certainly worth a read, but you should be ok if you follow these tips. First of all, don't ask to ask. This means, don't ask in an IRC channel if you can ask a question. You can just ask your question directly. While there are operators in channels, IRC typically doesn't follow the raise-your-hand-and-wait-to-be-called-on approach. Secondly, don't flood the channel. This means not to paste a large amount of text into the channel as it will cause all connected clients to rapidly scroll the text off of the screen. Instead, use a paste service like that provided by Debian (http://paste.debian.net/) and then paste the link in the IRC channel, while explaining what is contained in the linked information. Lastly, be patient. As previously stated, many people lurk on IRC in the background and may not immediately see your question. Depending on the time at which you asked your question, it's reasonable to wait 30 minutes or so. On an active channel, you'll probably get a response quicker than that, just don't keep asking the question repeatedly.
We'll be using the IRC bouncer package called ZNC. ZNC is a well-maintained and up-to-date package and like all good open source software, has an IRC channel: #znc on freenode. The packages in the Debian repository are a bit old, so we'll install ZNC from source. Download the source tarball by issuing the following command:
wget http://znc.in/releases/znc-1.4.tar.gz
We want to develop the good habit of checking signatures on downloaded software. The 1.4 release is signed by Alexey Sokolov, whose GPG fingerprint is: D582 3CAC B477 191C AC00 7555 5AE4 20CC 0209 989E. You can download his public key with the following command:
gpg –recv-key D5823CACB477191CAC0075555AE420CC0209989E
Next, download the signature file for the release:
wget http://znc.in/releases/znc-1.4.tar.gz.sig
Lastly, verify the signature over the downloaded software:
gpg --verify znc-1.4.tar.gz.sig znc-1.4.tar.gz
You should see something like the following:
gpg: Signature made Thu 08 May 2014 08:21:40 PM UTC using RSA key ID 0209989E
gpg: Good signature from "Alexey Sokolov <[email protected]>"
gpg:                 aka "Alexey Sokolov <[email protected]>"
gpg:                 aka "Alexey Sokolov <[email protected]>"
gpg: WARNING: This key is not certified with a trusted signature!
gpg:          There is no indication that the signature belongs to the owner.
Primary key fingerprint: D582 3CAC B477 191C AC00  7555 5AE4 20CC 0209 989E
While this procedure adds a few steps, it should soon become second nature. If you don't perform these steps, when there is a signature file available, you are assuming that the software you downloaded is the software that was posted. Even though there are checksums built into the TCP, which you are using when you use wget, it does not guarantee that the file is the correct file since there is an opportunity for a MITM attack. Regardless of your paranoia level, it's good practice to verify the software each time. In fact, a quick bash script will help here since it's standard practice to append .sig to the end of the file:
wgetsig(){
    wget $1
    wget $1.sig
    fn=$(basename $1)
    gpg --verify $fn.sig $fn
}
If you add that function to your .bashrc or equivalent, you can just type wgetsig <url> to grab the file, the signature, and run them through GPG. Now that you can trust that the software you downloaded is the software that was posted, you can finally extract the package:
tar -zxvf znc-1.4.tar.gz
To build ZNC from source, you'll want to install the following dependencies:
sudo apt-get install libssl-dev libperl-dev
Most software tarballs support the confgure-make-make install dance and this one is no different. You can build and install with the following:
cd znc-*
./configure
make
sudo make install
Building ZNC on the BBB will take a while because it will build each of the ZNC modules as well, so go enjoy some coffee.
Before we configure ZNC, let's step back and examine our system architecture. We have at least three distinct pieces of hardware involved: the machine on which your IRC client is running, the BBB, and the machines running IRC servers. One of those machines is the BBB since it's running the BitlBee IRC server. Examine the following deployment diagram:
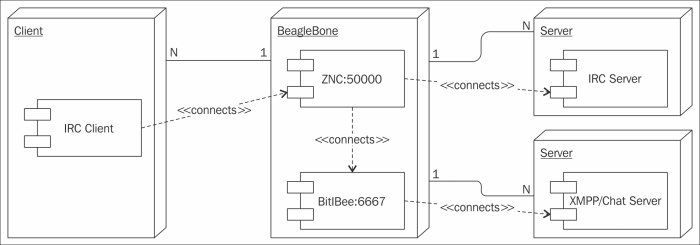
Let's start with the BBB, depicted by the center cube. The BBB is running two modules: ZNC and BitlBee. ZNC is the module to which multiple IRC clients can connect. ZNC is connected to the BitlBee module, which is a process also running on the same hardware. ZNC is also connected to one or more different IRC servers. BitlBee maintains connections to various XMPP or chat servers but since BitlBee itself is an IRC server, you connect to it through ZNC. Once everything is set up, you will only have to worry about connecting to ZNC.
ZNC needs a configuration file and the easiest way to generate the configuration file is to run the following command:
znc --makeconf
This will launch an interactive command-line interface. You'll need to create a new ZNC username that is not associated with any BitlBee or IRC systems. You will also have to decide what port to run the service. If you pick a port number in the private range, 49152 to 65535, you'll have less of a chance of colliding with another service. For this example, port 50000 was chosen. There are quite a few ZNC modules, but you'll want to enable the webadmin module to easily configure ZNC. Lastly, be sure to enable SSL. It will generate a self-signed certificate, at which most browsers will grumble when connecting. Alternatively, you can create a full Public Key Infrastructure (PKI), complete with your own certificate authority, and supply the server certificate to ZNC.
Note
PKIs are a bookworthy subtopic. An introduction to the complexities to PKI is well documented by Peter Gutmann in Everything you Never Wanted to Know about PKI but were Forced to Find Out at http://www.cs.auckland.ac.nz/~pgut001/pubs/pkitutorial.pdf.
The example configuration session is listed as follows:
[ .. ] Checking for list of available modules...
[ >> ] ok
[ ** ] Building new config
[ ** ]
[ ** ] First let's start with some global settings...
[ ** ]
[ ?? ] What port would you like ZNC to listen on? (1025 to 65535): 50000
[ ?? ] Would you like ZNC to listen using SSL? (yes/no) [no]: yes
[ ?? ] Would you like ZNC to listen using both IPv4 and IPv6? (yes/no) [yes]: yes
[ .. ] Verifying the listener...
[ >> ] ok
[ ** ] Unable to locate pem file: [/home/debian/.znc/znc.pem], creating it
[ .. ] Writing Pem file [/home/debian/.znc/znc.pem]...
[ >> ] ok
[ ** ]
[ ** ] -- Global Modules --
[ ** ]
[ ** ] +-----------+----------------------------------------------------------+
[ ** ] | Name      | Description
[ ** ] +-----------+---------------------------------------+
[ ** ] | partyline | Internal channels and queries for users
                                          connected to znc |
[ ** ] | webadmin  | Web based administration module       |
[ ** ] +-----------+---------------------------------------+
[ ** ] And 10 other (uncommon) modules. You can enable those
       later.
[ ** ]
[ ?? ] Load global module <partyline>? (yes/no) [no]: yes
[ ?? ] Load global module <webadmin>? (yes/no) [no]: yes
[ ** ]
[ ** ] Now we need to set up a user...
[ ** ]
[ ?? ] Username (AlphaNumeric): zncbeagle
[ ?? ] Enter Password:
[ ?? ] Confirm Password:
[ ?? ] Would you like this user to be an admin? (yes/no) [yes]:
       yes
[ ?? ] Nick [zncbeagle]:
[ ?? ] Alt Nick [zncbeagle_]:
[ ?? ] Ident [zncbeagle]:
[ ?? ] Real Name [Got ZNC?]: ZNC Admin
[ ?? ] Bind Host (optional):
[ ?? ] Number of lines to buffer per channel [50]:
[ ?? ] Would you like to clear channel buffers after replay?
       (yes/no) [yes]:
[ ?? ] Default channel modes [+stn]:
[ ** ]
[ ** ] -- User Modules --
[ ** ]
[ ** ] +--------------+------------------------------------------+
[ ** ] | Name         | Description                              |
[ ** ] +--------------+------------------------------------------+
[ ** ] | chansaver    | Keep config up-to-date when user         |
       |              | joins/parts                              |
[ ** ] | controlpanel | Dynamic configuration through IRC. Allows editing only yourself if you're not ZNC admin. |
[ ** ] | perform      | Keeps a list of commands to be executed when ZNC connects to IRC.                        |
[ ** ] | webadmin     | Web based administration module                                                          |
[ ** ] +--------------+------------------------------------------------------------------------------------------+
[ ** ] And 21 other (uncommon) modules. You can enable those later.
[ ** ]
[ ?? ] Load module <chansaver>? (yes/no) [no]:
[ ?? ] Load module <controlpanel>? (yes/no) [no]:
[ ?? ] Load module <perform>? (yes/no) [no]:
[ ?? ] Load module <webadmin>? (yes/no) [no]: yes
[ ** ]
[ ?? ] Would you like to set up a network? (yes/no) [no]:
[ ** ]
[ ?? ] Would you like to set up another user? (yes/no) [no]:
[ .. ] Writing config [/home/debian/.znc/configs/znc.conf]...
[ >> ] ok
[ ** ]
[ ** ]To connect to this ZNC you need to connect to it as your IRC server
[ ** ]using the port that you supplied.  You have to supply your login info
[ ** ]as the IRC server password like this: user/network:pass.
[ ** ]
[ ** ]Try something like this in your IRC client...
[ ** ]/server <znc_server_ip> +50000 zncbeagle:<pass>
[ ** ]And this in your browser...
[ ** ]https://<znc_server_ip>:50000/
[ ** ]
[ ?? ] Launch ZNC now? (yes/no) [yes]: yes
[ .. ] Opening config [/home/debian/.znc/configs/znc.conf]...
[ >> ] ok
[ .. ] Loading global module [partyline]...
[ >> ] [/usr/local/lib/znc/partyline.so]
[ .. ] Loading global module [webadmin]...
[ >> ] [/usr/local/lib/znc/webadmin.so]
[ .. ] Binding to port [+50000]...
[ >> ] ok
[ ** ] Loading user [zncbeagle]
[ .. ] Loading user module [webadmin]...
[ >> ] [/usr/local/lib/znc/webadmin.so]
[ .. ] Forking into the background...
[ >> ] [pid: 7019]
[ ** ] ZNC 1.4 - http://znc.in
While BitlBee has our XMPP and chat networks covered with OTR, our IRC networks are OTR-less at the moment. If you don't plan on using OTR, then you can still use the BBB as your IRC gateway and enjoy a consolidated IRC platform. Since OTR has to be initiated by one of the communicating parties, this chat configuration will interoperate with any IRC system. But, if you want OTR over your other IRC channels, then there are two methods to resolve this. First of all, you can use OTR from your IRC client. This will provide an end-to-end OTR session from your client to your communicating party, assuming they are using OTR from their client. However, most, but not all clients have an OTR-plugin. The other approach, the one that will be presented here, is to use OTR inside ZNC.
There are pros and cons to this approach. The benefit is that for all of your chat networks, regardless of your client, you will have the same OTR key. Therefore, once your buddies authenticate you and trust your key, they can keep that trust even when you switch to a different IRC network. Also, you will no longer need to run an OTR plugin on your client. However, the OTR session is terminated at ZNC. Therefore, it is extremely important to have a secure connection from your client to ZNC. At minimum, you should turn on the SSL option as previously mentioned. With that self-signed certificate, you are susceptible to a MITM attack, though, so it may be worth your time to generate a certificate authority and issue a certificate to your ZNC server. The reason you are at risk is that it's fairly easy to generate a self-signed certificate as ZNC does. At minimum, you should take note of the public key generated in the self-signed certificate and only trust the SSL connection if your ZNC server presents that known key. This technique is known as certificate pinning. As previously mentioned, generating PKIs is a nuanced task, so I'll leave this as a (moderately difficult) exercise for the reader.
Another option, if you don't want to deal with SSL, is that you can ssh into your BBB and run an IRC client on localhost. This will still provide confidentiality for your messages between your computer and the server (the BBB) but it will restrict the IRC clients available to you since the IRC client would be running on the BBB. For the rest of this chapter, we will continue with the SSL approach.
The ZNC OTR module is fairly new, so it must be built from source. It also depends on a version of OTR that is not available in Debian wheezy, but it is available as a backport. Edit your apt-sources file to add the backport repository:
sudo nano /etc/apt/sources.list
Add the following line to the end:
deb http://http.debian.net/debian wheezy-backports main
Then perform:
sudo apt-get update
To install the newer version of OTR, enter the following command:
sudo apt-get -t wheezy-backports install "libotr5" "libotr5-dev"
Clone the znc-otr module repository:
git clone https://github.com/mmilata/znc-otr.git
Enter the directory and type make. You should see:
LIBS="-lotr" znc-buildmod otr.cpp
Building "otr.so" for ZNC 1.4... [ ok ]
Copy otr.so to ~/.znc/modules and note, you may have to create the modules directory. The znc-otr module is now installed, but not loaded.
With all of the components installed, we can now configure ZNC. Since we've enabled the ZNC webadmin module, we can use our browser to configure our bouncer and add accounts. You can access the webadmin module by typing the URL of your BBB followed by the port number of ZNC as follows:
https://192.168.1.42:50000
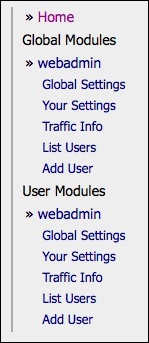
Log in with your username and password. On the right-hand side of the page, there will be a navigation menu as shown in the following screenshot:
Click on Your Settings. Then scroll down to the Networks section and click on Add. Here you can add your BitlBee settings we previously created. The Network Name is BitlBee and the Nickname is the BitlBee user you created. Under Servers of this IRC Network, enter the following and replace the password with your BitlBee password:
localhost 6667 password
Scroll to the bottom of the page and click on Add Network to save. Now you can go back to the Your Settings page and add other IRC networks in a similar manner. For this chapter, let's add a freenode account as we'll be using it to demonstrate how to use OTR over IRC. If you don't have one, you can make up a nick and enter the following in the Servers of this IRC network section:
chat.freenode.net +6697
The +6697 indicates to ZNC that you want to connect to freenode using SSL on port 6697, which is the semi-official IRC TLS port. You can add channels by clicking on Add under Channels and ZNC will not only keep you in the channel when your client detaches, but will playback the channel's conversation. You can specify how many lines to playback by changing the Buffer Count setting in the Channel Info screen.
You can now connect to ZNC from your IRC client. Depending on the client, you should be able to set your username and password in the server password field. If you receive an incorrect password warning and you are sure that you typed in the password correctly, set your password to username:password. You need to do this if using ERC. More specifically, you should connect with M-x erc-tls and supply the IP of your BBB, the port number of ZNC, username, and the password in the previous format.
If you've added multiple networks, the first messages you should see are the following when you make your connection to your BBB:
-*status- You have several networks configured, but no network was specified for the connection.
-*status- Selecting network [bitlbee]. To see list of all configured networks, use /znc ListNetworks
-*status- If you want to choose another network, use /znc JumpNetwork <network>, or connect to ZNC with username zncbeagle/<network> (instead of just zncbeagle)
These messages are from a
virtual user. The prefix for virtual users is an * and this user is status. While ZNC is connected to multiple networks, you are only seeing the BitlBee network at the moment. Here you can interact with BitlBee like we did in a previous section. As long as ZNC and BitlBee are running, ZNC will remain connected to BitlBee and you can attach and detach at will. To use OTR on an actual IRC network, like freenode, we need to attach ZNC to the other network. There are two ways to do this. We can, as status reminded us, jump to that network with the following command, assuming you named your freenode network freenode:
/msg *status JumpNetwork freenode
This will take your existing session and jump it over to freenode. While you may be in the same client window, you are now talking on a different IRC network since we switched from BitlBee to freenode. If you use GNU screen or tmux, we just performed a similar action as we would have had we switched to a new screen. The session is still running; we are just looking at a different instance. This method has the benefit of only using one connection from your client to ZNC, but it can be a bit confusing.
Alternatively, you can open another ZNC connection. To indicate to ZNC that you want the new session to attach to a different network, you must use a different syntax. Your username must be in the form username/network and if you were sending the username in the password field, as you must with ERC, the format is username/network:password. So, in this example the username is:
zncbeagle/freenode
Using either method, connect to freenode via IRC.
Now that we are using ZNC to manage our IRC traffic, let's establish an OTR session. The process is similar to what we did with BitlBee and by the end of this, you should be well-versed in establishing identity with OTR. For this experiment, you will either need a crypto-savy friend, a begrudging significant other, or a separate IRC account. Basically, you need somebody with whom you can chat via OTR.
Now that you are logged onto freenode or your favorite IRC network, initiate a chat with another user. On most clients, this will open the conversation in a new window when you type the following command:
/query username
At this point, you can enjoy an old-fashioned, unencrypted chat with your buddy. To chat with OTR, we first need to generate a key, like we did with BitlBee. In ZNC, there is a virtual user, *otr, similar to the *status user, to whom you direct OTR commands. First, you should generate a keypair by typing in the following command:
/msg *otr genkey
Remember, all virtual users in ZNC have the * prefix. This will probably open a new window with the *otr user and you should see something like this:
<*otr> Starting key generation in a background thread.
<*otr> Key generation finished.
Now you can initiate an OTR conversation. If you want to initiate the OTR conversation, type the following:
?OTR?
Otherwise, your buddy can initiate the OTR conversation and ZNC-OTR will automatically proceed with the protocol. Unlike BitlBee, the question is not part of the authenticate command, so you must type that first on your own. If Alice and Bob are talking, the conversation prior to the authenticate step would look like:
<alice> When prompted, answer the question: What was printed on my t-shirt which I wore yesterday? One word, lowercase.
<bob> got it.
The command to initiate authentication is of the format: /msg *otr auth username answer. Continuing our example, the command would look like the following, where the answer to the question is tworkeffx:
/msg *otr auth bob tworkeffx
This will prompt your buddy to participate in the OTR authentication phase and what he sees on his screen depends on the IRC client he is using. The *otr user should respond with something like the following messages:
<*otr> [bob] Gone SECURE. Please make sure logging is turned off on your IRC
<*otr> [bob] Peer is not authenticated. There are two ways of verifying their identity:
<*otr> [bob] 1. Agree on a common secret (do not type it into the chat), then type auth bob <secret>.
<*otr> [bob] 2. Compare their fingerprint over a secure channel, then type trust bob.
<*otr> [bob] Your fingerprint:  E8949490 D0326A85 1049EE79 DF111C0A BCC68D42
<*otr> [bob] Their fingerprint: 00694775 3945FA05 B2E0DA61 5416DFFC 4F9C5936
<*otr> [bob] Initiated authentication.
<*otr> [bob] Peer replied to authentication request.
<*otr> [bob] Successfully authenticated.
As *otr reminds us, there are two methods to authenticate the user. We are using method number 1, which is the Socialist Millionaire Protocol. Your buddy, Bob, responded with your answer and you have authenticated him. Bob should conduct a similar exchange and the format for the answer is:
/msg *otr auth bob <answer>
And now, you can enjoy an encrypted chat session.