
Chapter 11
A Deeper Dive Into Data Access
What you will learn in this chapter:
- Secure data access
- How to develop forms for CRUD
- How to display data using the WebGrid helper
The previous chapter provided you with an introduction to databases, Structured Query Language, and the Database Helper. The last exercise provided a glimpse at how these three things come together with a web page to provide the true basis of dynamic web development: that which relies on the contents of a database to make it current and specific to the user.
You saw that you can filter data with a WHERE clause. The next step is to provide your visitors with the ability to create their own filters, or choose the order in which they can view data, or indeed how much they want to see. Since SQL commands are strings, and as you learned in Chapter 4, strings can be constructed dynamically, this opens the door to a means by which you can provide your users with a way to personalize their data access. However, as with all things powerful, there are potential dangers that you need to manage. But first, you need to understand the potential dangers.
Simply stated, SQL injection is a technique whereby a malicious user injects a SQL command with additional legitimate SQL syntax that alters the intended behaviour of the command, and potentially compromises the security of the application that makes use of the SQL command. You may well be scratching your head at the moment, and trying to read that sentence a few times to see if it makes any more sense. An illustration should provide you with some relief at this point.
Think about some of the SQL commands you met in the previous chapter. A typical example might retrieve items according to the category they are in:
var sql = "SELECT * FROM Items WHERE CategoryId = 2";
The problem with this is that it is constant. It doesn’t change, which means that it will always draw items that belong to the category specified in the WHERE clause. That might indeed not be a bad thing, depending on circumstances and the requirement of your site. However, it is a common enough requirement to provide your users with a means to choose which category they would like to filter products by. The most usual means is a form, perhaps featuring a list of categories in a drop-down menu or a text box. Your server-side code would take the posted selection and combine it with the stem of the SQL to dynamically construct a working statement. It might look something like this:
var sql = "SELECT * FROM Items WHERE CategoryId = " + Request["categoryId"];
At the moment, any value that is passed to the Request["categoryId"] value will be concatenated to the SQL string and executed against the database. There is nothing to prevent a user entering anything they like into a text box. If the user enters some rubbish into a text box, and the resulting concatenation does not produce a valid piece of SQL syntax, the site will error. Otherwise, the SQL will execute successfully. If in the previous example, the user submitted the value 2, the SQL will result in all items in the Computing category being retrieved, if the SQL was run against the sample database from the last chapter. However, the user could also enter the following into a text box:
2 or 1 = 1
When concatenated with the stem of the statement, the result would be this:
SELECT * FROM Items WHERE CategoryId = 2 or 1 = 1
That is perfectly valid SQL and it will result in all rows being returned as the condition WHERE 1 = 1 is always true.
The original intended purpose of the SQL was to provide a means to restrict results to one category, assuming that the user knew what valid categories are available, but the resulting SQL behaves in an unplanned way because the user has been allowed to modify its behaviour by injecting an additional filter. That is SQL injection, and it is one of the top two vulnerabilities that poorly written websites are exposed to.
The previous example might not seem that dangerous, so what problems can SQL injection lead to? Well, for one thing, the filter was provided for a good reason. Perhaps the filter was meant to prevent every record being retrieved from the database because there are millions and millions of them, and continually requesting all of them will hurt the site’s performance. It makes a possible denial of service (DoS) attack easier to conduct. But there are greater dangers.
Look at the following piece of code:
var sql = @"SELECT Count(*) FROM Users
                          WHERE UserName = '" + Request["UserName"]  + "'
                          AND Password = '" + Request["UserPass"] + "'";
This is commonly seen as a way to authenticate users by matching the user name and password they provide in a log-in form. It tests to see how many rows in the database contain user names and passwords matching those supplied by the user, and if the result is greater than zero, the user is allowed to proceed further. In the previous example, you were shown a condition that is always true and results in all rows being returned. Here is another condition that’s always true:
WHERE '' = ''
It is really easy for a hacker to inject code into this SQL to cause all rows in the Users table to be returned, and thus gain access to restricted areas of a website by simply inserting ' or ''=' into either the user name or password text box. The concatenation will complete the job of creating a valid piece of SQL syntax to be executed.
Fortunately, SQL Server Compact suffers some restrictions in functionality compared to its grown-up cousin, the full version of SQL Server. For example, the Compact edition doesn’t support batched statements. More powerful databases do, and this exposes them to potentially serious consequences. A batched statement is one where multiple operations are passed in one SQL statement, with each separate command being executed in turn. The following provides an illustration of a batched statement:
SELECT * FROM Items; DROP TABLE Users
Running that against a SQL Server database will result in all rows in the Items table being retrieved, and then the table called Users being deleted permanently. There are even more powerful commands that can result in the entire database being deleted, or that can even result in the hacker taking full control of the server on which the database resides.
Parameters Provide Protection
Now that you understand the nature of the problem, and the potentially very serious consequences that can result, you need to learn how to protect your code properly from the threat of SQL injection. Some people suggest that using a blacklist approach is effective. This involves screening user input for SQL keywords, and if they are found, rejecting the submission. The problem with this idea is two-fold: A lot of SQL keywords are used in common everyday language (or, and, and so on) and SQL keywords are subject to change. That means that you will have to update every site you ever built if a new SQL keyword is introduced to accommodate it within your blacklist. A second suggestion involves escaping single quotes. Again, this can be effective, but is of no use if strings are not part of the SQL, such as in the first example provided earlier.
The truth is that there is only one proven and effective means to protect your site from SQL injection attacks, and that is to use parameters. Parameters are placeholders for dynamic values that are combined with the SQL query at execution time in a safe manner. To help explain how the concept works, here is an example that shows how the Database Helper supports the use of parameters:
var sql =  "SELECT * FROM Items WHERE CategoryId = @0;
var data = db.Query(sql, Request["categoryId"]);
Notice that the dynamic value is represented within the SQL statement by a marker: @0. That is the @ sign followed by a zero. The SQL is passed in to the database Query method as usual, but this time it is followed by the source of the dynamic value. Internally, the Database Helper creates ADO.NET parameter objects and passes those to the database. That in turn checks the incoming parameter value to ensure that it is the correct data type for its target column, which prevents strings being passed in where numbers are expected, and ensures that all strings that are passed in successfully are treated literally and not as part of the SQL to be executed. Of course, the fact that this happens should not prevent you from validating the values for type as shown in Chapter 5, but you should understand now how parameters provide protection. If you relied solely on using parameters to validate data type, your application would generate a lot of exceptions.
Multiple parameters are passed in order as in this snippet:
var sql = "INSERT INTO items (Title, Description, Price) VALUES (@0, @1, @2)";
var title = Request["title"];
var desc = Request["desc"];
var price = Request["price"];
db.Execute(sql, title, desc, price);
The parameter makers start with @0 and increment by one each time. You don’t have any choice about this. If you start the sequence at @1, you will generate an exception. If you omit any numbers, you will generate an exception.
Now you know how to communicate safely with your database using the Database Helper and parameters. In the next section, you will take that knowledge and apply it to the form that you built in Chapter 5 to save the submission in a database.
CRUD forms are the foundation of any dynamic website. They feature heavily in any Content Management System (CMS) for example, or Line of Business (LOB) application. More advanced web development frameworks, such as ASP.NET MVC and Dynamic Data, provide clever ways to scaffold forms from database schema information. It could well be the case that a future version of Web Pages offers something similar, but in the meantime, you have to create your own forms from scratch.
CRUD forms can vary widely in their complexity, depending on what they are intended to manage. The principle behind each type of form is the same, however. If you want to add a new item to a database, you create a form containing the required inputs — text boxes, checkboxes, select lists, and so on — for each piece of data. On submission, the form should be validated and the values passed to a parameterized query for insertion into the database. A form for updating data provides the user with a means to select the item that they want to update, make their changes, and submit those changes. The final part of the CRUD acronym — Delete — is accommodated typically by providing the users with a way to select the item or items they would like to remove from the database, and then code to delete them when the selection is posted back to the server.
It is time to have your first go at creating some forms for managing CRUD operations. You will start off with the most simple of examples that will be used to manage the Categories table in the sample Classifieds database that you met in the last chapter.
TRY IT OUT: Creating Basic CRUD Forms
This exercise will make use of the Classifieds site that you last worked on in Chapter 6, when you added client-side validation to the form you created in Chapter 5. You will extend the site to begin to work with the sample Classifieds database that you explored in the last chapter. Therefore, the first steps in this exercise walk you through adding an existing database to the site. If you prefer, you can use the download that accompanies this chapter instead.
1. Open the Classifieds site that you last worked with in Chapter 6 and add a new folder to the root folder called App_Data.
2. Right-click on the newly created App_Data folder and select the Add Existing File option. Navigate to the Classifieds.sdf file, which is in the sample site you worked on in the previous chapter. The name of the containing folder and location will depend on how you saved the previous website, but typically, it should be My Documents My Web Sites Chapter10. Select the file to add it to the Classifieds site.
3. Add another folder to the root of the site, but name this one Admin. Within that, add a _PageStart.cshtml file and replace the default code with the following:
@{
    Layout = "~/Shared/_Layout.cshtml";
}
4. Now add a file to the Shared folder and name it _AdminLayout.cshtml. Add the following to the <head> element to reference the existing style sheet:
<link href="@Href("~/Content/StyleSheet.css")" rel="stylesheet" type="text/css" />
Then add this code to the <body> element:
<div id="content">
    <h1>Admin</h1>
    <a href="@Href("~/Admin/CreateCategory")">Create Category</a>
    <hr />
    @RenderBody()
</div>
5. Add a new CSHTML file to the Admin folder and name it CreateCategory.cshtml. Replace the default code with the following:
@{
    var message = "";
    if(IsPost){
        if(!Request["category"].IsEmpty()){
            var db = Database.Open("Classifieds");
            var sql = "INSERT INTO Categories (Category) VALUES (@0)";
            db.Execute(sql, Request["category"]);
            var id = db.GetLastInsertId();
            message = Request["category"] + " added with ID: " + id;
        }
    }
}
<form method="post">
    <div>@message</div>
    <fieldset>
        <legend>Create Category</legend>
        <div>
            <label for"category">Category:</label>
        </div>
        <div>
            <input type="text" name="category" />
        </div>
        <div>
            <input type="submit" value="Add"/>
        </div>
    </fieldset>
</form>
6. Make sure that the CreateCategory.cshtml file is selected and click the Run button to launch the page in a browser. Enter a new category and submit the form. You should receive confirmation that the new category has been created along with its ID. Figure 11-1 illustrates how this should look if you added a category for Clothes.

How It Works
You have now produced a Create form — the first part of CRUD. The form itself is simple, and only makes use of server-side validation. It takes just one entry; tests it for presence; and if there is a value, passes that to a parameterized SQL statement. The statement is passed to the database via the Execute method, and a new entry is added to the table. You used the GetLastInsertId method to obtain the newly created ID value to confirm that the INSERT statement has worked. You could have captured the return value of the Execute method instead. On success, the value should be 1.
In the next exercise, you will create a form that enables you to update existing categories.
TRY IT OUT: Creating an Update Form
1. Add a new file to the Admin folder in the site you are currently working on. Name the file UpdateCategory.cshtml.
2. Replace the default code with the following:
@{
    var category = "";
    var message = "";
    var sql = "";
    var db = Database.Open("Classifieds");

    if(Request["categoryId"].AsInt() > 0){
        if(!IsPost){
            sql = "SELECT Category FROM Categories WHERE CategoryId = @0";
            category = db.QueryValue(sql, Request["categoryId"]);
        }
        else{
            if(!Request["category"].IsEmpty()){
                sql = "UPDATE Categories SET Category = @0 WHERE CategoryId = @1";
                db.Execute(sql, Request["category"], Request["categoryId"]);
                message = "Category changed to " + Request["category"];
            }
        }
    }
    sql = "SELECT * FROM Categories";
    var categories = db.Query(sql);
}
<form>
    <div>
        Select Category:
        <select name="categoryId">
            <option value="0">--Select Category--</option>
            @foreach(var cat in categories){
                <option value="@cat.CategoryId">@cat.Category</option>
            }
        </select>
        <input type="submit" value="Select" />
    </div>
</form>
<form method="post">
    <div>@message</div>
    <fieldset>
        <legend>Update Category</legend>
        <div>
            <label for="category">Category:</label>
        </div>
        <div>
            <input type="text" name="category" value="@category" />
        </div>
        <div>
            <input type="submit" value="Update"/>
        </div>
    </fieldset>
</form>
3. Amend _AdminLayout.cshtml to include a link to the new file:
<div id="content">
    <h1>Admin</h1>
    <a href="@Href("~/Admin/CreateCategory")">Create Category</a>
    |
    <a href="@Href("~/Admin/UpdateCategory")">Update Category</a>
    <hr />
     @RenderBody()
</div>
4. Make sure that UpdateCategory.cshtml is selected. Run the page in a browser and choose a category to edit and click the Select button. Notice that the URL in the browser address bar has acquired a query string at this point representing the ID of the category you want to amend. When the category name appears in the text box, make your alterations and click the Update button to submit your changes. Notice that the message confirms your change was successful, then double check that the category has in fact been changed by expanding the drop-down list and examining its new value there.
How It Works
There are two forms on this page. The top form enables the users to select the category that they would like to update from a drop-down list. The top form does not specify a method attribute value, which means that it will use the HTTP GET method (being the default method, if you recall from Chapter 5). Consequently, the selected value will be passed as a query string value when a selection is made and the form submitted. The drop-down list itself is populated from a query that returns all rows from the Categories table. The query is executed at the end of the code block. You will return to that fact a little later.
Turning now to the code block at the top of the page, you can see that a test is made of the value of Request["categoryId"]. If it is equal to zero (0) when converted to an int data type, the page has been requested for the first time (meaning that there is no query string), or the Submit button on the second form has been clicked while the default option is selected in the drop-down list. Either way, there is nothing else to do except populate (or re-populate) the drop-down list. If a query string value exists for categoryId, and it is greater than zero, a selection has been made. If that is the case, but the page has not been requested via the POST method, the user has simply chosen which category to amend. The category’s name is extracted from the database using a parameterized query, and the QueryValue method (since only one scalar value is needed). The resulting value is displayed in the second form’s text box, ready for amending.
If the page has been posted, you assume that the user has amended the category and is submitting that amendment. You check to see if they have in fact supplied a value, and not just emptied the text box, and then pass the new value to a parameterized query, which locates the category according to its ID (which is still available in the query string) and updates it with the new value. Just before the page is redisplayed with a confirmation message, the categories drop-down list is repopulated. It has to be done at this stage of the process, because if it is done before the update statement is executed, the category will not have been updated at that point. Figure 11-2 shows how this should have worked if you amended the previously added Clothes category to Clothing.

For completeness, this section will explore developing forms for the “D” of CRUD — deleting. An important part of this exercise is seeing how relationships work when you attempt to delete something that has related records in another table, so ensure that you are working with a version of the sample database where the FK_Items_Categories relationship exists. Refer to the “Creating a Relationship Between Two Tables” exercise in the previous chapter for instructions on how to create this relationship if you have not already created it.
TRY IT OUT: Creating a Delete Form
In this exercise, you will begin by providing the users with a form that allows them to delete items one at a time. Following that, you will look at one way to enable users to make multiple selections and delete them in bulk.
1. Continuing with the Admin folder, add a new file called DeleteCategory.cshtml. Replace the default code with the following:
@{
    var message = "";
    var sql = "";
    var db = Database.Open("Classifieds");

    if(Request["categoryId"].AsInt() > 0){
            sql = "DELETE FROM Categories WHERE CategoryId = @0";
        try{
            db.Execute(sql, Request["categoryId"]);
            message = "Category deleted. Delete another?";
        }
        catch(Exception ex){
            message = "Category could not be deleted. Other references exist";
        }
    }
    sql = "SELECT * FROM Categories";
    var categories = db.Query(sql);
}
<form>
    <fieldset>
        <legend>Delete Category</legend>
        <div>@message</div>
        <div>
            <label for="categoryId">Select Category to delete:</label>
            <select name="categoryId">
                <option value="0">--Select Category--</option>
                @foreach(var cat in categories){
                    <option value="@cat.CategoryId">@cat.Category</option>
                }
            </select>
            <br />
            <input type="submit" value="Select" />
        </div>
    </fieldset>
</form>
2. Amend _AdminLayout.cshtml to include a link to your newly created page by adding the highlighted code:
<div id="content">
    <h1>Admin</h1>
    <a href="@Href("~/Admin/CreateCategory")">Create Category</a>
    |
    <a href="@Href("~/Admin/UpdateCategory")">Update Category</a>
    |
    <a href="@Href("~/Admin/DeleteCategory")">Delete Category</a>
    <hr />
    @RenderBody()
</div>
3. Run DeleteCategory.cshtml in your browser and attempt to delete one of the original categories. You should find that the category cannot be deleted because references to it exist in the Items table. If you find that it can be deleted, you have not implemented the relationship correctly. If you attempt to delete one of the categories you created while testing CreateCategory.cshtml, you should find that it can safely be removed from the database as you have no entries in the Items table referencing it at this point.
How It Works
This page works in almost exactly the same way as the UpdateCategory.cshtml page. The form that enables the users to select a category to delete has no method attribute defined, which means that the form will use the GET verb, resulting in values appearing in a query string. The server-side code ensures that a valid category ID value has been selected before attempting to delete the corresponding entry from the database using a parameterized command. The database operation is wrapped in a try-catch block to ensure that any exception is caught, and a friendly error message is provided to the users.
The approach outlined previously is fine as far as it goes. If the user needs to delete a lot of items, picking them one by one from a drop-down will get tedious very quickly and can badly affect the usability of your application. It won’t be long before your users clamour for a more elegant and efficient way to delete items in bulk. In the next exercise you will provide a way for users to select multiple categories and delete them in one go. You will also provide a little client-side addition to the form that prompts the users to confirm that they want their selection to be removed from the database permanently.
TRY IT OUT: Creating a Bulk Delete Form
1. Add a new file to the Admin folder and name it DeleteCategories.cshtml. Notice the use of the plural in the filename. Replace the default code with the following:
@{
    var message = "";
    var sql = "";
    var db = Database.Open("Classifieds");

    if(!Request["categoryId"].IsEmpty()){
        sql = "DELETE FROM Categories WHERE CategoryId IN({0})";
        try{
            db.ExecuteIn(sql, Request["categoryId"]);
            message = "Categories deleted. Delete more?";
        }
        catch(Exception ex){
            message = "One or more Categories could not be deleted. Other references exist";
        }
    }
    sql = "SELECT * FROM Categories";
    var categories = db.Query(sql);
}
<script type="text/javascript">
    $(function(){
        $('#delete').click(function(){
            return confirm('Are you sure you want to delete?');
        });
    });
</script>
<form method="post">
    <fieldset>
        <legend>Delete Categories</legend>
        <div>@message</div>
        <div>
            Select Categories to delete:
            <div>
                @foreach(var cat in categories){
                    <input type="checkbox" name="categoryId"
                           value="@cat.CategoryId" /> @cat.Category<br />
                }
            </div>
            <input type="submit" id="delete" value="Delete" />
        </div>
    </fieldset>
</form>
2. Amend _AdminLayout.cshtml to include a link to this new file, and a reference to jQuery:
<!DOCTYPE html>

<html lang="en">
    <head>
        <meta charset="utf-8" />
        <title></title>
        <link href="@Href("~/Content/StyleSheet.css")"
              rel="stylesheet" type="text/css" />
        <script src="@Href("~/Scripts/jquery-1.5.min.js")"
                type="text/javascript"></script>
    </head>
    <body>
        <div id="content">
            <h1>Admin</h1>
            <a href="@Href("~/Admin/CreateCategory")">Create Category</a>
            |
            <a href="@Href("~/Admin/UpdateCategory")">Update Category</a>
            |
            <a href="@Href("~/Admin/DeleteCategory")">Delete Category</a>
            |
            <a href="@Href("~/Admin/DeleteCategories")">Delete Categories</a>
            <hr />
            @RenderBody()
        </div>
    </body>
</html>
3. Add a new file to the App_Code folder. The file type should be a C# Class File. You should name this file DatabaseExtensions.cs.
4. Adjust the existing code so that the complete file contents contain the following code:
using System;
using System.Collections.Generic;
using WebMatrix.Data;
using System.Linq;

/// <summary>
/// Summary description for ClassName
/// </summary>
public static class DatabaseExtensions
{
    public static int ExecuteIn(this Database db, string commandText, string values)
    {
        var temp = values.Split(new[]{','}, StringSplitOptions.RemoveEmptyEntries);
        var parms = temp.Select((s, i) => "@" + i.ToString()).ToArray();
        var inclause = string.Join(",", parms);
        return db.Execute(string.Format(commandText, inclause), temp);
    }
}
5. Launch CreateCategory.cshtml in your browser and add a number of new categories. It does not matter what you name these; they are all going to go soon. Once you have added several, click the link to navigate to DeleteCategories.cshtml and select some of the new categories that you have just added together with at least one of the original categories. Click the Delete button, and notice that you are asked to confirm that you want to delete. Click OK, and see that the resulting list of categories has not changed, and that the message indicates that one or more categories are related to existing items. Now select some or all of your new categories and submit the form to delete them. Again, confirm that you would like to proceed with the delete operation. This time, you should be told that the categories you selected have been deleted. They should no longer appear in the list of items to be deleted.
How It Works
You should by now be used to how database operations are managed from form submissions, but there are two things that are worthy of note in this exercise. The first is the JavaScript that you used to prompt the users to confirm that they wish to delete something. Deleting an item from a database is a permanent thing. It is good practice to prompt your users to think about what they are doing. The script required to invoke the confirmation dialog box (which belongs to the browser, incidentally and can be seen in Figure 11-3) is simple, and probably one of the most often used on the Internet:
return confirm('message text')
In this example, that command is wired up to the click event of the Submit button using jQuery’s clean, terse syntax. If you choose to click the Cancel button on the confirmation box, the form is not posted and no server-side code that relies on the form being posted is executed.

The second point of note is the C# class file that you added to the App_Code folder. This class contains an extension method. An extension method is a static method that extends a type to provide additional functionality. In this case, the type that’s extended is the Database type, which you have been working with happily up to now. You have met the methods offered by the Database type: Query, Open, Execute, GetLastInsertId, and so on. But you have not seen a method called ExecuteIn until now. That is because it did not exist until you created it, and then extended the Database type to expose this method.
The key characteristic of an extension method is the this keyword in the parameter list: (this Database db…). It points to the type being extended. Additional parameters are added after the type that the method operates on. In the example you have just created, the two additional parameters are a string representing some SQL to be executed, and a string representing a series of one or more values.
So why is this additional method needed? The SQL IN operator works by allowing you to specify multiple values in a WHERE clause as a comma-separated list. It is shorthand for multiple OR statements. Look at the following:
SELECT * FROM Items WHERE Id = 1 OR Id = 3 OR Id = 4 OR Id = 7
If you use the IN operator, the revised statement is as follows:
SELECT * FROM Items WHERE Id IN (1,3,4,7)
When you group checkboxes by giving a number of them the same name value, the checked values are passed in the Request collection as a comma-separated string. You might think, therefore, that you can pass the whole lot in one parameter value:
var data = db.Query("SELECT * FROM Items WHERE Id IN (@0)", Request["Ids"]);
But that won’t work. This query expects a number of separate ints to be passed separated by commas, with a matching parameter value for each int. It will receive a single string instead. Therefore, a way is needed to separate each value from the Request collection, and to dynamically generate a parameter for each one, and that is what the extension method you added does.
The first line of the extension method body takes a string and uses the string.Split method to create an array from it. If Request["Ids"] from the previous example was passed into the extension method, at this point there would be an array, with each element containing one ID. String.Split uses the character passed into it (in this case a comma) as the delimiter on which to separate items to elements within an array. The delimiter is then ignored. The second line of the method body creates another array. This time the elements are the index of the elements in the existing array preceded with the @ sign. There are four elements in this example, so the indexes of those will be 0, 1, 2, and 3. The new array will therefore contain the following values: @0, @1, @2, and @3. Finally, those values are brought together and joined, with a comma as the separator, so the resulting string looks like this:
@0,@1,@2,@3
The extension method now constructs a valid parameterized SQL statement, and passes in the comma-separated Request.Form value to be executed against the database.
The actual database call is wrapped in a try-catch block. If you include any categories with existing related records, they cannot be deleted. You get a warning to that effect. Your newly created categories with no matching records in the Items table are deleted in one go very efficiently.
You have practiced creating, updating, and deleting data in the series of exercises you have just undertaken. You have also had a brief look at displaying data on a web page. In the next section, you will explore this aspect of working with data in more detail.
Data can be displayed in a number of ways. Often, you will want to display single items of data, such as a news story, or details of a particular product. You might want to display lists of data. You did this in a very simple way in the previous exercise when you rendered the names of each category next to a related checkbox. The snippets of code that you create to maintain consistency over the display of each item in a list are known as templates. You can move these templates across to helpers for code re-use and to keep your files smaller and more manageable. An example helper that renders a list of checkboxes might look like this:
@helper CheckList(IEnumerable<dynamic> items, string name,
                  string value, string text){
    foreach(var item in items){
        <input type="checkbox" name="@name" value="@item[value]" />
                                     @item[text]<br />
    }
}
The calling code, assuming that you want to render categories as in the last exercise, looks like this:
@Helpers.CheckList(categories, "categoryId", "categoryId", "category")
The rendered result is identical to the example in the last exercise. This example might not save a lot of space on a page, but if your application is form-heavy, you may be rendering lists often. The helper will be a time saver and will help to minimize errors as there is only really one place for the code to go wrong.
Another common way to display data is in a tabular manner. You often see lists of data presented in rows and columns with sorting and paging features. In the really old days of classic ASP, displaying tabular data was a considerable pain. You have to take care of rendering tables, together with their rows and cells by hand. If you wanted to implement paging, that too had to be hand-crafted, as did sorting. It was a tedious and error-prone process. ASP.NET Web Forms changed that by introducing server controls that render data in tables and had paging and sorting built-in. The most popular of these controls is the GridView. There are in fact websites devoted to the topic of the GridView.
The Web Pages Framework exposes helpers instead of server controls. The helper that’s designed to make working with tabular data easier is called the WebGrid. This helper is quite feature-rich, so it is worth exploring in detail.
The WebGrid Helper
The WebGrid Helper can accept data from a number of sources, although it has been principally designed to work with the results of a Database.Query call. WebGrid will attempt to identify suitable names for column headers from the data source. If the data has been obtained via the Database Helper, WebGrid will obtain information from the schema of the data and use that. If the data comes from other sources, the WebGrid Helper will use public properties as column names. For example, if you were to supply the WebGrid with a List<Car> from Chapter 4, it would use the public properties Make, NumberOfDoors, and YearRegistered as column names. But you are most likely to use the WebGrid in conjunction with data from your database so that is what you will spend more time exploring in this book.
At its most basic, all the WebGrid needs is some data. The following code is the minimum needed to display all items from the Classifieds database using the WebGrid.
@{
    var db = Database.Open("Classifieds");
    var data = db.Query("SELECT * FROM Items");
    var grid = new WebGrid(data);
}
<!DOCTYPE html>

<html lang="en">
    <head>
        <meta charset="utf-8" />
        <title></title>
    </head>
    <body>
        @grid.GetHtml()
    </body>
</html>
The first two lines in the code block are familiar to you and establish which database is to be used to obtain the contents of the Items table. The last line in the code block initializes a WebGrid. It uses the new keyword to establish an instance of the WebGrid class that’s represented by the variable grid. The constructor takes a minimum of one parameter, and that is the data source for the WebGrid. In this case, it is the result of the Database.Query call. Finally, the WebGrid’s GetHtml method is called and renders a table of data with the default settings. You can see this in Figure 11-4.

Notice in the illustration that the column headings are underlined. This is because by default, they act as links that manage sorting in the grid. If you click on one of the headings, the page is posted back to the server, and the data is re-ordered based on the contents of the column you clicked. The number of items displayed is 10 by default, and since there are more than 10 items in your Items table, a paging mechanism at the bottom of the grid enables the users to view more data. You can affect all of this behaviour, and more, by passing in values for optional parameters when you initialize the WebGrid. Table 11-1 details the full range of parameters that are available to you.
Table 11-1: The WebGrid’s Parameters
| Parameter (Default Value) | Type | Description |
| source | IEnumerable<object> | The data source for the grid. |
| columnNames (null) | IEnumerable<string> | The columns to display. |
| defaultSort (null) | string | The column that you want to have the grid sorted on by default. |
| rowsPerPage (10) | int | The number of rows you want per page. |
| canPage (true) | bool | If this is true, paging is enabled. |
| canSort (true) | bool | If this is true, sorting is enabled. |
| ajaxUpdateContainerId (null) | string | The ID of the element for Ajax paging and sorting support. |
| fieldNamePrefix (null) | string | A value that prefixes the default query string fields, such as “sort” and “sortdir.” |
| pageFieldName (null) | string | A custom value to replace the default query string “page” field. |
| selectionFieldName (null) | string | A custom value to replace the default query string “row” field. |
| sortFieldName (null) | string | A custom value to replace the default query string “sort” field. |
| sortDirectionFieldName (null) | string | A custom value to replace the default query string “sortdir” field. |
The first parameter is the only one that is required. All others are optional. As such, they can be placed in any order that you like so long as you use named parameters. The columnNames argument can be used to specify the order of columns and also to limit the data to be displayed. The following code alters the previous example by providing a List<string> to the columnNames parameter:
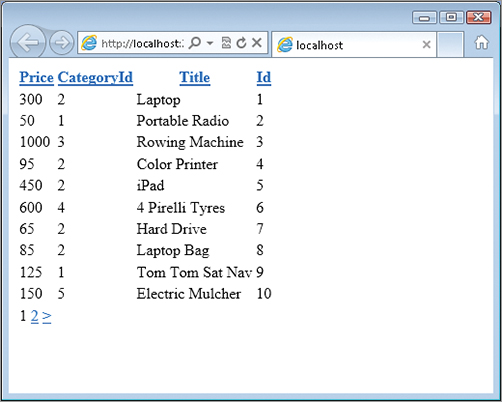
var data = db.Query("SELECT * FROM Items");
var columns = new List<string>{"Price","CategoryId","Title","Id"};
var grid = new WebGrid(data, columnNames: columns);
Figure 11-5 clearly illustrates how, despite the fact that the query returns all columns in the Items table, only those specified in the columnNames argument are displayed, and the order in which they appear follows the order in which they are added to the List<string>.
At the moment, the data is sorted according to how it sits in the table, although you might not be able to always rely on that fact. If you wanted to sort the data by price, you would add that as the value for defaultSort:
var grid = new WebGrid(data, defaultSort: "Price", columnNames: columns);
This ensures that items will be placed according to price in ascending order. If you wanted items to be ordered by price in descending order (most expensive first) you have two options. One is to add an ORDER BY clause to the SQL statement. The other is to chain the Database.Query method call with an OrderByDescending extension method call:
var orderBy = "Price";
var data = db.Query("SELECT * FROM Items").OrderByDescending(c => c[orderBy]);
The benefit of taking this second approach is that it leaves you room for dynamically altering the default sort column and the order in which the data is sorted based on user selection safely. However, if you want to select data from the database based on its ordered position, you must include the ORDER BY as part of the SQL.
When you click on one of the headers in this example, the grid redisplays with data sorted in ascending order of whichever column you chose to sort by. Those pieces of information are represented in the URL as query string values. If you sort by price, the query string that gets generated is as follows:
?sort=Price&sortdir=ASC
You can see the default sortFieldName and sortDirectionFieldName values here: sort and sortdir. You can change those completely by setting your own values for these parameters in the WebGrid’s constructor. For example, take a look at the following code:
var grid = new WebGrid(data,
                       defaultSort: "Price",
                       columnNames: columns
                       sortFieldName: "fieldToSortBy",
                       sortDirectionFieldName: "UpOrDown"
                       );
This produces the following query string:
?fieldToSortBy=Price&UpOrDown=ASC
You could instead use the fieldNamePrefix to alter the values in the query string:
var grid = new WebGrid(data,
                       defaultSort: "Price",
                       columnNames: columns
                       fieldNamePrefix: "grid1"
                       );
This will result in the default field names being prefixed with grid1, as in the following example:
?grid1sort=Price&grid1sortdir=ASC
Why would you want to do this? Well, for one thing, you might have multiple grids on a page with similar column names. You will need to customize the field names to prevent all grids being sorted on the same field. More importantly, if you have multiple grids on the same page without customizing their respective fieldnames, they will all be affected by each other’s paging links. Paging links are rendered by default if the total number of items in the data source exceeds the rowsPerPage value.
Some AJAX Spice
So far, sorting and paging has required a full-page refresh. The links that are generated by default are straightforward HTML links. If you click one of them, the entire page is replaced with the target of the link. The WebGrid offers support for AJAX sorting and paging, which results in a partial page refresh. This functionality relies on jQuery, so that needs to be available to and referenced within the page that houses a grid. The grid itself needs to be placed within an HTML element that has an ID attribute. The value of the ID attribute is the ajaxUpdateContainerId. In the next exercise, you will build a page that makes use of this functionality.
TRY IT OUT: An AJAX Powered WebGrid
1. Continuing with the Classifieds site that you worked with earlier in this chapter, open the Default.cshtml file.
2. Add the following to the existing code block at the top of the file:
   var db = Database.Open("Classifieds");
    var sql = @"SELECT Id, Title, Description, Price, Items.CategoryId,
            Category, DatePosted FROM Items JOIN Categories ON
            Items. CategoryId = Categories.CategoryId";
    var data = db.Query(sql).OrderByDescending(c => c.DatePosted);
    var grid = new WebGrid(data, ajaxUpdateContainerId: "grid");
3. Add the following code to the content part of the page, replacing the paragraph that exists there:
<h2>Latest Items at @DateTime.Now</h2>
<div id="grid">
    @grid.GetHtml()
</div>
4. Run the page in your browser, and click some sorting and paging links. You should notice that the grid contents change according to the paging or sorting options that you choose but that the time in the Latest Items heading remains the same.
How It Works
The standard WebGrid paging and sorting functionality is driven by simple HTML hyperlinks. This behaviour changes when you specify a value for the ajaxUpdateContainerId parameter. HTML hyperlinks are still produced, but now their destination anchors (the href value) are set to a hash sign (#). The hyperlinks also acquire a JavaScript onclick event handler which fires a jQuery load function call. You should remember from Chapter 6 that this function makes an asynchronous request and loads either the whole response, or a fragment from the response into the specified part of the DOM. In this case, jQuery requests the current page, passing sorting and paging instructions in the query string. The response consists of the HTML for the entire page. However, only a fragment of the response is required — the ajaxUpdateContainerId element and its contents — and this fragment is loaded into the existing element, denoted by the ajaxUpdateContainerId.
Here is a decoded example of the click event handler that’s added to the link at the top of the Id column, and which controls sorting for that column:
$('#grid').load('/Default.cshtml?sort=Id&sortdir=ASC&__=634436543370524609 #grid'),
This example clearly shows the element that will receive the content to be loaded, the URL for the request, which includes a timestamp value to prevent caching of results. You can also see the fragment identifier after the timestamp.
Working with Styles and Columns
The grid that you have just worked with is cool in an AJAX way, but it looks kind of default and bland. It needs some styles applied to it. The GetHtml method accepts a large number of optional parameters that control a range of grid features, including style. Table 11-2 details the parameters available to you.
Table 11-2: WebGrid GetHtml Style Parameters
| Parameter | Description |
| tableStyle | CSS class that contains style rules for the whole table |
| headerStyle | CSS class for styling the header |
| footerStyle | CSS class that styles the footer |
| rowStyle | CSS class for styling rows |
| alternatingRowStyle | CSS class providing the style for alternating rows |
| selectedRowStyle | CSS class for setting the style of selected row |
The following style sheet provides a typical set of CSS classes relating to styling various aspects of a grid. It has already been added to the style sheet that comes with this chapter’s download:
/*
-------------------------------------------------
GRID
-------------------------------------------------
*/
.grid
{
    background: #fff;
    width: 650px;
    border-collapse: collapse;
}
.grid th
{
    font-size: 1.1em;
    font-weight: normal;
    color: #039;
    padding: 10px 8px;
    border-bottom: 2px solid #728059;
    text-align: left;
}

.grid td
{
    border-bottom: 1px solid #ccc;
    padding: 4px 6px;
}

.alternate{
    background: #d3ff80;
}

.gridheader, .gridfooter{
    background: #9ebf60;
}
.gridheader a, .gridfooter a{
    color: #fff;
    text-decoration:none;
}
.dateWidth{
    width: 100px;
}
The various styles are applied via the GetHtml method in the following way:
@grid.GetHtml(
    tableStyle : "grid",
    alternatingRowStyle : "alternate",
    headerStyle : "gridheader",
    footerStyle : "gridfooter"
)
Figure 11-6 illustrates how these styles affect the grid you have just created in the previous exercise. As an additional exercise, add the style declarations to your existing style sheet and alter the GetHtml method in the code you have just created so that it resembles the previous snippet.

Table 11-3 details more parameters that provide access to other display-related properties.
Table 11-3: Additional WebGrid Display-Related Parameters
| Parameter | Description |
| caption | The text you want to display as a table caption. The result will appear within a <caption> element. |
| displayHeader | True by default. If false, the table header is not displayed. |
| fillEmptyRows | False by default. If true, this ensures that empty rows are added to ensure that the rowsPerPage value is met when there are insufficient rows of data to do so. |
| emptyRowCellValue | If fillEmptyRows is set to true, the emptyRowCellValue determines what is displayed in the cells of any empty rows that are added. By default, it is an HTML non-breaking space ( ). |
The grid is coming along nicely now and looks a lot better, but there are still some aspects of it that can be improved. If you look at the column headers, they replicate the database column names. That might not always be desirable. For example, the final column has a header containing two words concatenated into one: DatePosted. That’s not particularly user-friendly. The contents of the column itself are displayed using the default DateTime as a string setting. The column also needs a CSS style applied to it to ensure that the date doesn’t break over two lines, and the price is not displayed as a currency. Finally, there is a column in the grid for every field returned by the SQL query, although you might not want all of them displayed in the grid.
Column-specific properties are accessible via the columns parameter. This represents a collection of individual WebGridColumn objects that represent each column in the grid. Each column exposes a number of properties, as detailed in Table 11-4.
Table 11-4: WebGridColumn Properties
| Property | Description |
| ColumnName | The name of the data item associated with a particular column. Most often this is the database field name. |
| CanSort | True by default, if sorting is enabled on the grid as a whole, but you can disable sorting on specific columns by setting this to false. |
| Header | The value you want to appear in the column header, if not the database field name. |
| Style | The CSS class you want to apply to the column. |
| Format | A function that formats the item displayed in the column. |
The first four properties are easy to follow. The final one (Format) is not quite so straightforward. You will explore that in more detail shortly, but first, you need to understand how these properties are set as part of the GetHtml method.
Here’s the relevant code that you should have so far:
@grid.GetHtml(
    tableStyle : "table",
    alternatingRowStyle : "alternate",
    headerStyle : "header",
    footerStyle : "footer"
)
The WebGrid.Columns() method gives you access to the collection of columns, which can be manipulated individually via another method, WebGrid.Column():
@grid.GetHtml(
    tableStyle : "table",
    alternatingRowStyle : "alternate",
    headerStyle : "header",
    footerStyle : "footer",
    columns: grid.Columns(grid.Column(),grid.Column(),grid.Column()etc…)
)
You must reference all the columns that you want to appear, even if you do not want to set any of the properties that are available to you in Table 11-4. You must also provide the columnName parameter value unless you specify an argument to the format parameter. If, for example, you simply didn’t want the Id column to show a header, but you wanted all fields from the database displayed except for the CategoryId field, this is the minimum that you need:
@grid.GetHtml(
    tableStyle : "table",
    alternatingRowStyle : "alternate",
    headerStyle : "header",
    footerStyle : "footer",
    columns: grid.Columns(
        grid.Column(
            columnName: "Id",
            header: string.Empty
            ),
        grid.Column(
            columnName: "Title"
            ),
        grid.Column(
            columnName: "Description"
            ),
        grid.Column(
            columnName: "Price"
            ),
        grid.Column(
            columnName: "Category"
            ),
        grid.Column(
            columnName: "DatePosted"
            )
        grid.Column(
            columnName: "Condition"
            )
        grid.Column(
            columnName: "Duration"
            )
        )
)
You can see that the properties of the column object are accessible via parameters that have the same name, but with a lowercase first letter. If you wanted to remove sorting from the Id column and set a CSS style, the following code will arrange that:
grid.Column(
    columnName: "Id",
    canSort: false,
    style: "specialClass"
    ),
That just leaves formatting cell values. Earlier, you learned that the Format property’s data type is a function. It is actually an inline Razor Template. It is a snippet of Razor syntax, just like you have seen before, which determines the way that the data item is presented for display. Inline Razor templates can take one of a number of forms. Technically, it is a delegate that takes a single parameter called item, which represents the data for the current row. Since it is a delegate, it will take a lambda expression. For example, if you wanted to display a Long Date version of the DatePosted value, you could pass this to the format parameter:
(item) => string.Format("{0:D}", item.DatePosted)
More often than not, you will see the terser Razor syntax used in examples, and that is what this book recommends. The following two lines are functionally equivalent and equally as valid:
@:@item.DatePosted.ToString("D")
@<text>@item.DatePosted.ToString("D")</text>
If you want to include HTML, you can do so easily. The following line will result in the content of the column being rendered bold:
@<strong>@item.DatePosted.ToString("D")</strong>
Putting all of this together, the following revised version of the GetHtml method call will resolve the outstanding issues that were identified earlier:
@grid.GetHtml(
    tableStyle : "grid",
    alternatingRowStyle : "alternate",
    headerStyle : "gridheader",
    footerStyle : "gridfooter",
    columns: grid.Columns(
        grid.Column(
            columnName: "Id",
            header: string.Empty
            ),
        grid.Column(
            columnName: "Title"
            ),
        grid.Column(
            columnName: "Description"
            ),
        grid.Column(
            columnName: "Price",
            format: @<text>@item.Price.ToString("c")</text>
            ),
        grid.Column(
            columnName: "Category"
            ),
        grid.Column(
            columnName: "DatePosted",
            header: "Date Posted",
            style: "dateWidth",
            format: @<text>@item.DatePosted.ToString("D")</text>
            )
        )
)
Figure 11-7 illustrates the finished grid.

Selecting Items
Most often, grids are used to display summary data as in the previous example. Visitors usually need a way to drill down to more detail. In the Classifieds site, the visitor will want to examine the description of any item that interests them, and perhaps make a bid on it. You can present this detailed information in a number of ways, but first you must provide the visitors with a way to select particular items.
There are a number of ways to enable selection. Which one you choose largely depends on whether you have AJAX paging and sorting enabled. If you do, your options are restricted somewhat. The simplest way to enable selection is to use the WebGridRow’s GetSelectLink method, which acts on the item parameter you met before. This method works by generating a hyperlink with a query string indicating the current row. You can detect whether a row has been selected using the WebGrid’s HasSelection property, which is true if a selection link was clicked. Since this approach relies on hyperlinks, it cannot be used with AJAX paging and sorting. In the following exercise, you will alter the existing grid to try out the built-in selection feature.
TRY IT OUT: Enabling Selection
1. Open the Classifieds site if you have closed it, and remove the ajaxUpdateContainerId value from the grid’s constructor. The relevant line of code should now simply read as follows:
var grid = new WebGrid(data);
2. At the same time, alter the <h2> element to remove the reference to the time. That should now read as follows
<h2>Latest Items</h2>
3. Amend the column initializer for the Id column to remove the columnName and header parameter values and replace them with a value for the format parameter as follows:
columns: grid.Columns(
    grid.Column(
        format: @<text>@item.GetSelectLink()</text>
),
Ensure that the format parameter is separated from the header value by a comma.
4. Add the following code just after the closing </div> tag:
@if(grid.HasSelection){
    dynamic Item = grid.SelectedRow;
    <p>The selected item is @Item.Title with an ID of @Item.Id</p>
}
5. Launch the page in a browser by clicking the Run button or pressing F12, and click any one of the Select links. Notice just below the grid that the title of the item in the selected row is displayed along with its ID.
How It Works
You removed the columnName parameter value from the Id column along with the header value. This didn’t really have much effect, except that it demonstrates that you can add arbitrary columns to the WebGrid, which are not linked to fields in the database or other data-related items. Then you applied the GetSelectLink method. This generates a hyperlink in the cell, which features “Select” as the text. You can pass any string value you like to the GetSelectLink method to alter the default text value of the generated link. The anchor for the hyperlink is the current page with a query string value. Each row of the grid generates a different query string value based on its ordinal position, starting from 1 and incrementing by 1 each time. The query string field is called row by default. This can be altered through the selectionFieldName parameter within the WebGrid’s constructor, as detailed in Table 11-1. It is also subject to the fieldNamePrefix parameter value.
If a link has been clicked, the HasSelection property will be true. The SelectedRow property of the WebGrid represents the currently selected WebGridRow object. You can access the values of the grid cells by passing the SelectedRow to a dynamic object.
From there, you could render a content page using the RenderPage method, passing the dynamic object as PageData. Within the content page, you would access the ID of the object, and query the database for more details. For example, you can replace the code that displays the title and ID of the selected row with something like the following:
@if(grid.HasSelection){
    dynamic row = grid.SelectedRow;
    @RenderPage("~/Shared/_Details.cshtml", new { Item = row } )
}
The page _Details.cshtml will contain a call to the database to obtain details of the item, which has been passed via the page dictionary:
@{
    var db = Database.Open("Classifieds");
    var sql = "SELECT * FROM Items WHERE Id = @0");
    var data = db.QuerySingle(sql, Page.Item.Id;);
    // and so on
}
An alternative way to drill down to an item’s details is to generate links that navigate the user to a separate page altogether. Since this works with AJAX paging and sorting, it is the method that you will implement in the Classifieds site. It means modifying the page you have just worked with again, but the changes are limited.
TRY IT OUT: Creating a Details Page
1. The first thing to do is to restore the AJAX paging and sorting functionality. This is easily accomplished by adding the ajaxUpdatecontainerId parameter value to the WebGrid constructor:
var grid = new WebGrid(data, ajaxUpdateContainerId: "grid");
2. Alter the first column’s format value to the following:
grid.Column(
    format: @<a href="@Href("~/Details.cshtml?id=" + item.Id)">Details</a>
),
3. Add a new file to the root folder and name it Details.cshtml. Replace the default code with the following:
@{
    dynamic item = null;
    if(!Request["id"].IsEmpty() && Request["id"].IsInt()){
        var db = Database.Open("Classifieds");
        var sql = "SELECT * FROM Items, Categories WHERE Id = @0";
        item = db.QuerySingle(sql, Request["id"]);
    }
}
@if(item != null){
    <h2>Details</h2>
    <h3>@item.Title</h3>
    <p>@item.Description</p>
    <p>Price: @item.Price.ToString("c")</p>
    <p>Condition: @item.Condition</p>
    <p>Posted on @item.DatePosted.ToString("D") in the @item.Category category</p>
}
4. Make sure that Default.cshtml is selected in the File Explorer and press the F12 key to launch the site as a browser. The first column of the grid should contain a link with the text “Select.” Choose any product to view, and click the link. You should be taken to a page that displays more detail for that item.
How It Works
The principle behind the links that you generated in the first column is that they use the query string to pass values from one page to another. You were able to easily generate query strings dynamically based on the individual item’s identity value. Once the user is taken to the target page, the identity can be retrieved from the query string and, once validated, passed to a parameterized SQL query. The QuerySingle method is used to obtain one row of data that’s displayed on the page.
You have spent a lot of time learning how to manipulate the items in the Classifieds database, but the one thing that you have not completed yet is to create a means by which the data gets there in the first place. So in this final exercise, you will extend the form you created in Chapter 5 and enhanced in Chapter 6 to save the submitted item in your database. There isn’t a lot of work to do. You need to add a select list for categories, and to fill that for the database. Validation will be needed on that select list too. Then, once all items have passed validation, you need to insert them into the database.
TRY IT OUT: Finishing the Classifieds Form
1. Open the Sell.cshtml file in the Classifieds site you have been working on. At the top of the code block, add the following three lines of code:
var db = Database.Open("Classifieds");
var sql = "SELECT * FROM Categories";
var categories = db.Query(sql);
2. Amend the server-side validation logic so that it includes validation for categories. You can place the following lines of code anywhere in the validation block, but I have placed it at the end, just before the check to determine if the ModelState IsValid:
if(Request["categoryId"].IsEmpty()){
    ModelState.AddError("categoryId", "Please choose a category your item");
}
3. At the end of the code block, just after the WebMail helper has sent a confirmation e-mail, replace the line of code that sets a value for the message variable with the following code:
sql = @"INSERT INTO Items (Title, Description, Price,
    CategoryId, DatePosted, Condition, Duration) VALUES
    (@0, @1, @2, @3,GetDate(), @4, @5)";
var parameters = new[]{Request["title"], Request["description"],
                       Request["price"], Request["categoryId"],
                       Request["condition"], Request["duration"]};
db.Execute(sql, parameters);
Response.Redirect("~/Default.cshtml");
4. Alter the client-side validation code by adding the following line to the rules:
categoryId: 'required',
Add the following line to the messages section:
categoryId: ' *You must choose a category for your item',
5. Add the following code to the form between the “condition” radio buttons and the “e-mail” text box:
<div>
    <label for="categoryId">Category*</label>
</div>
<div>
    <select name="categoryId">
        <option value="">--Choose Category--</option>
            @foreach(var category in categories){
            <option value="@category.CategoryId"
                @(category.CategoryId == Request["categoryId"].AsInt() ?
                    " selected="selected"" : "")>
                @category.Category</option>
            }
    </select>
    @Html.ValidationMessage("categoryId")
</div>
6. Run the page in a browser and ensure that you enter valid values into all the required fields. Submit the page to check that it works. If the submission has been successful, you should be presented with the home page, featuring your newly added item at the top of the grid.
How It Works
By now, you should understand what is going on as you applied these changes to the existing code. You added the select list for categories, which is driven by the database. This is exactly the same principle as the one you used to select a category for editing when you built your admin screens. There is nothing new here. You applied validation to the new field very easily by simple modifications to the existing validation code, and then you inserted the valid details in the database using a straightforward piece of SQL. The one thing to note is the final line you added to the code block at the top of the page:
Response.Redirect("~/Default.cshtml");
Response.Redirect tells your browser to request another page — the one denoted by the string in the method call. Why would you want to make the user’s browser request a different page? For one thing, the users can immediately see the result of their successful form post — the item they just added is at the top of the grid! But more importantly, it reduces the possibility of a double-post. If you redisplay the form, the values will persist and the user can easily click the Submit button again, thus causing a duplicate entry. Or they might refresh the page, which will have the same effect. Redirecting them to another page reduces the chances of this happening dramatically (although they could still use the browser’s Back button to go back to the form and press Refresh). This technique is known as Post/Redirect/Get or PRG. The user makes a POST request, which results in a Redirect command forcing a GET request.
This material has built on the database and SQL basics that you learned in the previous chapter, and covered the Database Helper’s usage in a lot more detail. You now understand the serious dangers posed by SQL injection, one of the top two threats to websites. You were shown how it works and how the Database Helper protects your application from this danger if you use parameters.
The chapter then covered developing simple forms for CRUD operations. You generated a series of forms that allows users to create, update, and delete categories in the Classified site. You learned how to apply secure data access using parameters in these exercises.
The next section of the chapter introduced the WebGrid Helper, which is designed for displaying tabular data on a web page. You saw how the default configuration includes sorting and paging capabilities out-of-the-box. It is also AJAX-capable so that sorting and paging operations do not necessarily result in a full-page postback. You learned how to set the properties of the WebGrid as a whole, and also how to set properties on a column-by-column basis.
In the final part of the chapter, you learned about the Post/Redirect/Get pattern, which is used to help prevent accidental form submission, and the subsequent duplication of data.
Together with Chapter 10, this chapter has provided you with a good grounding in data access within ASP.NET Web Pages development. The skills and principals you have learned here are core to being able to develop great dynamic websites. The best news is that these skills and techniques are not limited to WebMatrix development. They are just as applicable at a basic level to website development using any other framework, such as Web Forms or MVC, or indeed PHP, or any other kind of development that involves interaction with databases.
EXERCISES
1. What is the main cause of successful SQL injection attempts?
2. Why might you need to set a value for fieldNamePrefix?
3. Imagine that you are using the WebGrid, and that one of the columns in the database is used to store an image filename. The column is called FileName, conveniently. The actual image files are stored in a folder called “images” in the root folder of the site. Which parameter would you need to use to get the associated image to display in each row of the grid, and what code or markup would you need?
Answers to the Exercises can be found in the Appendix.
What You Learned in This Chapter
| Topic | Key Concepts |
| SQL injection | The alteration of the behaviour of a SQL command by injecting additional SQL syntax into it. |
| Parameter | A placeholder for a value to be sent with a SQL command to the database. |
| Extension method | A method that extends the behaviour of an existing type. |
| WebGrid | A helper for displaying tabular data. |
| Post/Redirect/Get | A technique used to prevent duplicate submissions of forms. |