
Chapter 13
Optimizing Your Site
What you will learn in this chapter:
- Optimizing for search
- How the WebMatrix Reports area works
- How to create SEO-friendly URLs
- Optimizing for performance
- Gathering visitor data
If the site you have built is a public site, you want people to come and visit it often. You want the site to perform well on search engines, which is the primary way that people find out about new sites, and when you have attracted traffic to the site, you want your site to perform well on the server. It’s also important to know about your traffic, such as who your visitors are, where they came from, how long they spent on your site, and how they found out about it.
Search engine optimization (SEO) is the process by which you configure your site so that it is as search engine friendly as possible. This chapter looks at some of the tools that WebMatrix offers to help you optimize your site for search engines, as well as providing some basic SEO advice. You will also explore some ways in which you can improve the performance of your site on the server, thus ensuring maximum availability when people do come visiting. Finally, this chapter looks at the Analytics helper, which is designed to make working with free traffic analysis services as easy as possible.
A lot of people believe that SEO is a black art, which only people “in the know” can successfully practice. Everyone who manages a commercial site wants to get to the top of the search engine results pages (SERPS) for relevant search terms. Of course, only one site can ever be at the top of any search result at any one time, so competition to be that site is fierce.
A large part of SEO is easy. There is no mystery behind it at all. In fact, the leading search engines (Google, Bing, and Yahoo) publish guidelines on how to improve your site’s performance in search results. The first rule is to publish original, interesting, and relevant content. That way, you provide a reason for people to visit your site. If visitors find your content of value, they will link to it. They might link to it from forums, or their own site, but you soon find that links coming into your site grow in number. Generating and maintaining quality content is hard work, but you should have the tools to update your site easily and regularly now that you know how to develop CRUD forms and store content in a database.
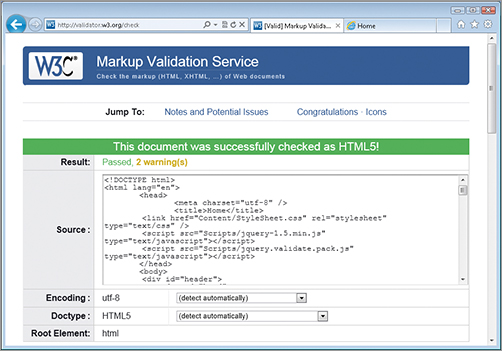
The second part of SEO is technical. All search engines follow similar rules with regards to spidering web pages and assessing their content. Spidering is the process where automated programs (known as spiders, bots or crawlers) make HTTP requests to web pages, and parse the response (HTML code) to establish the content of the page. The content may be indexed for later retrieval in search results. As part of the process, the spider or bot will extract the URLs contained in any links within the page, and add them to a list of URLs to visit. Search engine bots are only interested in HTML. They ignore JavaScript, CSS, images, and video content to a large extent — although the people at Google in particular are working hard to develop algorithms that can make some sense of images. That said, the same advice is offered by all search engines — ensure that your HTML is valid and used appropriately. You can get free help ensuring that your HTML is valid and follows the rules laid down for its doctype from the W3C, which provides a markup validation service at http://validator.w3.org/. Figure 13-1 shows that you can provide a URL for validation, although that won’t work for http://localhost, of course. You can upload a file instead, or paste your HTML source code straight into the third tab.

Figure 13-2 shows the result of validating the Classifieds site home page. The site was launched in a browser and then the View Source option was chosen from the context menu that appears when you right-click anywhere on the rendered page. The resulting markup was copied and pasted into the validation tool. You can see that the tool automatically detected the doctype correctly as HTML5. There are two warnings — one general warning covering the fact that HTML5 is not a Recommendation yet, so the tool may be subject to change, and the other is a minor matter related to Unicode encoding being assumed when you paste text directly into the tool. But the key thing is that the HTML is valid — according to the current specification for HTML5.
If there are errors in the HTML, the tool will provide details of them, including where they appear within the source code and what you should do to correct the errors.
Why do you need to ensure that your HTML is valid? Often, browsers will be quite forgiving with invalid or incorrect HTML. They ignore errors and attempt to do their best to display a page. Browser developers build extensive parsing engines which are designed to guess how the page was intended to display. Search engine crawlers do not have these features. They attempt to identify content as the stuff between opening and closing tags according to the rules of HTML. If you forget to close a tag, for instance, the search engine may assume that everything after the opening tag is part of a tag, and not content. Basically, invalid HTML can hide your content from search engines. If search engines can’t see your content, they won’t index it or rank your site for it.
SEO Reports
Once you have validated your HTML for errors and fixed any that are found, you need a way of identifying inappropriate use of HTML. WebMatrix provides a fantastic reporting tool that crawls your pages or site in exactly the same way as a search engine, and reports back to you on SEO errors as well as any issues that might affect the performance of your site. It doesn’t stop there either. The tool provides detailed explanations of warnings and errors and offers comprehensive advice on how to fix the problems.
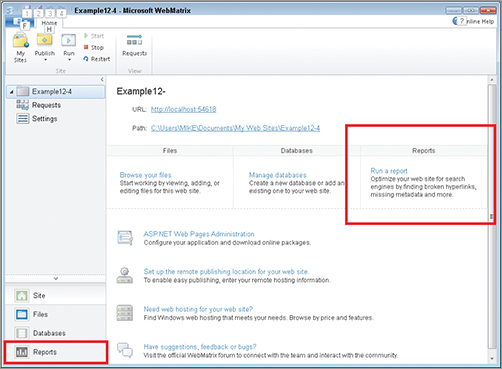
Based on the IIS SEO Toolkit, the Reports feature is accessible within WebMatrix from the Reports workspace selector (see Figure 13-3) or from the Run a Report link in the Site workspace.
You will explore how to use WebMatrix Reports to improve your Classifieds site in the next exercise.
TRY IT OUT: Running an SEO Report on the Classifieds Site
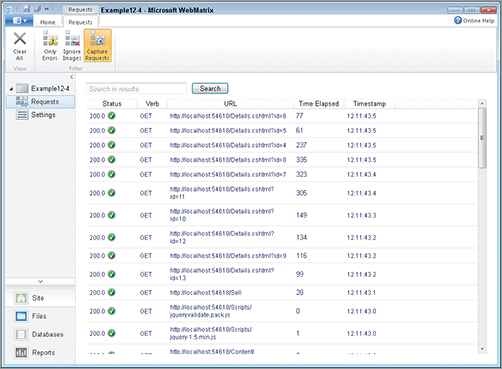
1. Open the Classifieds site that you last worked on in the previous chapter. Click the Requests button just under the site name (see Figure 13-4) and verify that Capture Requests is highlighted, and that a request to the default page has already been made if you tested the online validation tool yourself.

2. Click the Reports workspace selector, and then the New button on the Home tab illustrated in Figure 13-5.

3. Leave the Start URL as it is and name the report Classifieds Report #1 in the New Report dialog box. Click the OK button or press your Enter key. The result should look similar to Figure 13-6. There should be four items in the list, three of which have a severity of “Warning” and one has a severity of “Error”.

4. Expand the first issue about missing <h1> tags so that the error’s details are listed, as illustrated in Figure 13-7. In addition to the other items mentioned, notice that two pages in the Account folder are included in the list.

5. Switch to the Files Workspace using the selector in the bottom-left corner and open the robots.txt file. Amend the contents so that the code reads as follows:
# WebMatrix 1.0
User-agent: *
Disallow: /Account
6. Save your changes and then switch to the Reports workspace using the selector again. The report you just created should still be visible. This time, click the Re-run button in the Home tab. Expand the first warning about <h1> tags missing and notice that the pages in the Account folder are no longer listed. See also that the total number of issues has reduced by two, and that a new entry with a severity of “Information” has appeared. Expand that new entry and confirm that the two pages in the Account folder that were previously included in the <h1> tag warning entry are now included in this Information entry (see Figure 13-8).

7. Expand the error related to the title being empty, and click once on the first entry. Notice how more details appear on the right side, as illustrated in Figure 13-9.

8. Click the View More Details link at the bottom of the right pane. A new tabbed form should appear similar to Figure 13-10. You will explore the contents of this soon.

9. Click the Edit This Page link to view the dialog box that offers a selection of files to choose from (see Figure 13-11).

10. Choose the Details.cshtml file and insert the following highlighted line to the page just after the line that reads @if(item != null){:
@if(item != null){
    Page.Title = "For Sale: " + item.Title;
    <h2>Details</h2>
11. Switch back to the Reports workspace, select the report and re-run the report to ensure that the error has been resolved.
12. Switch back to the Site workspace and verify that the Requests log is substantially longer than it was at the beginning (see Figure 13-12)
How It Works
The Reports engine crawler began with the URL that appeared in the New Report dialog box, which was http://localhost:xxxx, where xxxx is the port number assigned to your Classifieds site. It requested that page and examined the rendered HTML, logging any errors, warnings, or information items it found. It also logged all links within the page, and followed them, causing the page to be requested. As it followed each link, it examined the rendered HTML again, and again logged errors, warnings, and information item. The Requests report demonstrated that each page on the site — as well as any JavaScript files — were requested via HTTP. This is how search engine crawlers work. They follow links and index what they find at the end of those links.
Between the first and second running of the report, you altered the contents of the robots.txt file, which is the only file added to the Empty Site template. The robots.txt file is special, in that compliant search engines will obey instructions in it. It is designed to guide user agents (bots, crawlers, and other automated HTTP request agents) as to which parts of the site they should visit and which parts they should avoid. The instruction you gave when you amended the file was to tell all user agents to stay away from the Account area. The Reports crawler honored that instruction, but robots.txt is not a mandatory protocol and is not followed by all bots or crawlers. It should not be used to protect sensitive pages or areas. That’s the job of the WebSecurity helper. You can learn more about robots.txt at www.robotstxt.org/.
Entries in the report are entered under one of three headings: Error, Warning, or Information. You had just one error if you have followed along correctly — there was nothing in the <title> tag on the Details.cshtml page. You were able to view more details on why that was considered an error, and what impact it might have on the SEO of your site. You were also provided with instructions on how to fix the error, which was easily accomplished by clicking the Edit This Page link next to the entry in the report.
noindex and nofollow
There are other ways to instruct search engine crawlers how to behave when indexing and following links besides using a robots.txt file. You can, for instance, add a noindex meta tag to the head section of a page:
<meta name="robots" content="noindex" />
This will not prevent crawlers from visiting the page, but it should stop them from indexing the page and listing it among the search results. In addition, you can apply the "nofollow" value to the rel attribute of a hyperlink:
<a href="/Account/Register" rel="nofollow">Register</a>
This does not prevent the crawler or bot from actually following the link. Different crawlers behave in different ways, but most of the leading search engine crawlers will not include the link in their calculations for assessing the value of the target. nofollow is more often used for external links than internal links.
During Step 8 in the previous exercise you clicked on a View More Details link, which opened a tabbed dialog box similar to the one shown in Figure 13-10. It’s time to look at that series of tabs in greater depth, as there is a wealth of useful information hidden in this dialog box.
The first tab — Details — provides basic information about the HTTP response that resulted from the request to the URL. It shows the content-length value, or the number of bytes that were returned, along with the time taken for the response to reach the tool. These times should be pretty quick because all the requests are local. However, since you can also run the tool against your live site, this information can be useful for checking performance on the production server. To run a report against a live site, just enter the address of the home page in the Start URL box when you create a new report.
The Details tab also shows the title, description, heading, and keywords for the page. In this example, you are missing all but the title. These pages are not very SEO friendly at the moment. The description is taken from the meta tag for description. Search engines use the description as part of their SERPS (search engine results pages) to describe your site. If they cannot find a description, they try to infer one from the text on the page. You can create descriptions in much the same way as you created titles: You can use the PageData dictionary to set the value on a page-by-page basis, including dynamic content if you like. Where your layout page includes the head element, you add the following meta tag:
<meta name="description" content="@Page.Description" />
Headings are <h1> elements. You have not used any of these in the site so far. They should represent the top-level heading for each page, and there should only be one per page. Keywords are taken from another meta tag called keywords:
<meta name="keywords" content="comma separated list of keywords" />
The next tab — Violation — provides the same details as the right pane when you select an entry in the report. It explains the reason that the item was flagged in the first place, and provides information about how the problem can be resolved. The Headers tab shows the Response headers, and the Content tab displays the source HTML that came back as the response body. The last two tabs — Links and Violations — are self-explanatory. The remaining tab — Word Analysis — is very useful. It performs analysis on the textual content of the page, providing you with a report covering word density. The title, description, keywords, and heading are redisplayed on this tab so that you can assess whether your chosen keywords appear often enough on the page, and in the most important parts of the page, such as the title, description, and main heading.
Search
As well as appealing to search engines, you might also want to provide your users with a means to search your site contents. You can build your own search engine, and it really isn’t that difficult to build a simple one that can search database contents using the LIKE keyword in SQL and wildcard characters, as you saw in Chapter 8. There is another approach, which involves the use of Microsoft’s search engine, Bing. A Bing helper is available in the ASP.NET Web Helpers Library, which makes it easy to add search capability to your site.
The following code sample shows the Bing helper being added to _Search.cshtml, which is in the Shared folder. The example assumes that you have downloaded and installed the ASP.NET Web Helpers Library:
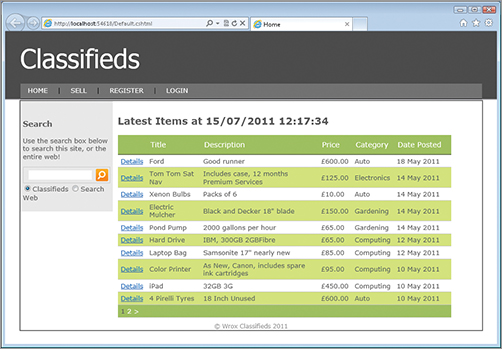
<div id="search">
    <h3>Search</h3>
    <p>Use the search box below to search this site, or the entire web!</p>
    @Bing.SearchBox("170", "www.mysite.com", "Classifieds")
</div>
The result is illustrated in Figure 13-13.
The first value that the SearchBox method expects is the width in pixels of the box. The second is the URL of your site, and the third is a friendly name for that site. Note that Bing must have first indexed the site before you can get any results from a site search.
You have used two different URL formats throughout this book. Sometimes, you have added the file extension to the filename and other times you haven’t. For example, the link to the Sell page in the main navigation omits the file extension:
<a href="@Href("~/Sell")">Sell</a>
The following would work just as well:
<a href="@Href("~/Sell.cshtml")">Sell</a>
The links from the grid on the home page to Details.cshtml all include the file extension. So how does this work? And how can you take advantage of this system to improve SEO?
Apart from the software engineers who develop the algorithms that the search engines work to, no one really knows how much weight is placed on each individual aspect of a web page in terms of how it influences that page’s performance on search engines. The title and description, for example, are known to be important, but which one is more important? Similarly, there are questions about the value of keywords in the URL of a page. Do the search engines take any notice of them? Well, according to Google (www.youtube.com/watch?v=gRzMhlFZz9I), having key words in the URL can help your SEO a little bit. They don’t say what a “little bit” actually means, but the fact that keywords in the URL help at all is enough reason to try to work them in. Beyond that, if you can create more descriptive URLS, such as www.mysite.com/Details/2432/LapTop-For-Sale instead of www.mysite.com/Details.cshtml?Id=2432, you immediately improve the usability of your URLs. They become self-describing.
Web Pages Routing
In a typical ASP.NET application, all incoming requests map to physical files on disk. That is why the filename and extension appear in the URL, apart from when the request is for the “default” document, which might be index.aspx or default.aspx, or both. One of the results of this is that you need to use query strings if you want to pass arbitrary pieces of data as part of the URL. Taking the previous example. If you want to pass details about the product being offered, you might construct a link such as www.mysite.com/Details.cshtml?Id=2432&Product=LapTop-for-Sale. Now that is fine, and it kind of does the job. However, there are warnings from search engines that you should keep query strings short, and name/value pairs few in number. When you combine this kind of approach to URL construction with a grid that has paging and sorting enabled (which generates its own query string values, as you saw), you begin to tread into dangerous waters. No one knows how many query string name/value pairs are “too many” for a search engine.
The Web Pages Framework has a built-in routing system that, although it still requires URLs to be mapped to physical files on disk, allows for additional information to be passed as segments in the URL instead of query string values. What this means is that you can use www.mysite.com/Details/2432/LapTop-For-Sale as the URL in a link, and it will find the Details.cshtml file and work as before. So how does this work and how can you use it?
Web Pages routing assumes that the URL represents path information to a file or a folder containing a default document. At some stage within the URL, one of the segments must match either a filename or a folder name in which there is an index.cshtml or default.cshtml file. This matching process is initially a little confusing, but becomes quite clear. In the following exercise, you explore how it works.
TRY IT OUT: Matching Web Page Routes
1. Create a new site from the Empty Site template and name the site Testing Routes.
2. Add a file named _Layout.cshtml with the following content:
<!DOCTYPE html>

<html lang="en">
    <head>
        <meta charset="utf-8" />
        <title>Testing Routes</title>
    </head>
    <body>
        @RenderBody()
        <div>
        @if(UrlData.Count() > 0){
            <text>UrlData:</text>
                for(var i = 0; i < UrlData.Count(); i++){
                    <div>UrlData[@i]: @UrlData[i]</div>
                }
            }
        </div>
    </body>
</html>
3. Add a _Pagestart.cshtml file to the site with the following code:
@{
    Layout = "_Layout.cshtml"
}
4. Create a folder called Red, and in that create a folder called Green, and in that create a folder called Blue. The structure should follow the one shown in Figure 13-14

5. In the Red folder, add these four files: Green.cshtml, Blue.cshtml, Index.cshtml and Default.cshtml. Replace the default code with the following in each of them:
<div>
    @VirtualPath.Replace("/", " > ").Replace("~", "Root ")
</div>
6. In the Green folder, add these two files: Blue.cshtml and Default.cshtml. Again, replace the default markup with the same code as the previous three files:
<div>
    @VirtualPath.Replace("/", " > ").Replace("~", "Root ")
</div>
7. Add a file named Default.cshtml to the Blue folder. You can probably guess what code this file should contain:
<div>
    @VirtualPath.Replace("/", " > ").Replace("~", "Root ")
</div>
8. Add a folder to the root of the site called Blue. In that folder, add a folder called Green, and in that folder, add a folder called Red. Add a new Index.cshtml file to the Red folder, and replace the default code with the same as all the other files.
9. Finally create a new file called Default.cshtml to the root folder, and replace the existing code with the following:
<div>
    @VirtualPath.Replace("/", " > ").Replace("~", "Root ")
</div>
<div>
    <a href="@Href("~/Red")">~/Red</a><br />
    <a href="@Href("~/Red/Green")">~/Red/Green</a><br />
    <a href="@Href("~/Red/Green/Blue")">~/Red/Green/Blue</a><br />
    <a href="@Href("~/Red/Green/Blue/123/456")">~/Red/Green/Blue/123/456</a><br />
    <a href="@Href("~/Red/Blue/Green")">~/Red/Blue/Green</a><br />
    <a href="@Href("~/Blue/Green/Red")">~/Blue/Green/Red</a><br />
    <a href="@Href("~/Blue/Green/Red/123")">~/Blue/Green/Red/123</a><br />
</div>
The final site structure should resemble Figure 13-15.

10. Launch the site, making sure that the Default.cshtml file you just added to the root folder is selected. Click each link in turn, noting the path and filename depicted on each page. Pay attention to any UrlData that is displayed and the values shown. The final link should result in a 404 error. That is not a mistake.
How It Works
Routing within Web Pages works by trying to match file paths. It will assume that the final segment represents a filename without the extension. If you take the third link as an example, the routing system will attempt to locate a file named Blue.cshtml in a folder called Green in a folder called Red. When you click that link, the resulting path is Root ➪ Red ➪ Green ➪ Blue.cshtml. You can see this principle working in the second link too, where a file called Green.cshtml within the Red folder is located. Now look at the fourth link, called ~/Red/Green/Blue/123/456. Working on the same principle, the routing system will attempt to match the following path: Root ➪ Red ➪ Green ➪ Blue ➪ 123 ➪ 456.cshtml. There is no file named 456.cshtml, so routing considers 456 to be UrlData — an arbitrary value passed as part of the URL — and will attempt to match the remainder of the URL to a file path: Root ➪ Red ➪
Green ➪ Blue ➪ 123.cshtml. Again, there is no match so the final segment is added to UrlData, and an attempt to match Root ➪ Red ➪ Green ➪ Blue.cshtml is made. This time, there is a match. Two items have been added to the UrlData collection, and they can be referenced by their indexes (which as usual in C#, is zero-based). 123 is the first item in UrlData and 456 is the second. You can pass as many values you like as UrlData. There is no limit — except for that imposed on the size of URLs (which is generally around 2,000 characters).
Take another look at the first and sixth links. These links illustrate what happens when no match is made to a file path. In that event, one final attempt is made to find a default document (first Default
.cshtml and then Index.cshtml) in the folder structure suggested by the URL segments. The first link, according to the rules, might represent a file called Red.cshtml in the root folder. No such file exists, so an attempt is made to match a default document in a folder called Red. There are two candidates — Default.cshtml and Index.cshtml. When you click the link, the file path is shown as Root ➪ Red ➪ default.cshtml, thus demonstrating that a match with Default.cshtml is attempted before a match with Index.cshtml. You can confirm that Index.cshtml is also matched by clicking the sixth link. If you use the default document approach to URL construction, you cannot add UrlData to the URL. Of course, you can use UrlData if the default document is included as part of the URL.
The final link results in a Page Not Found error. The URL doesn’t meet either of the previous patterns. It is not a file path (with or without UrlData) and it doesn’t point to a folder containing either a Default.cshtml file or an Index.cshtml file. To get this URL to resolve to an existing file, you can change it to ~/Blue/Green/Red/Index/123, which results in the Index.cshtml file in the inner-most Red folder being found, and UrlData of 123.
The ability to add any number of arbitrary values as UrlData is what makes Web Pages routing such a flexible and easy-to-use system. Just before the exercise, you were shown an example of a friendly URL that is possible to achieve with Web Pages: Details/2432/LapTop-For-Sale. How would you generate such a URL? This URL is similar to the one that you already created in your WebGrid, which takes people to the details pages for products. It is generated as part of the format argument to the first column like this:
<a href="@Href("~/Details.cshtml?id=" + item.Id)">Details</a>
You can instead create the following function and use it to generate the friendly URL:
@functions {
    public static string SeoFriendly(string page, int id, string title){
        return "~/" + page + "/" + id + "/" + title.Replace(" ", "-")
               + "-For-Sale";
    }
}
It can be used in a WebGrid as follows:
format: @<a href="@Href(Functions.SeoFriendly("Details",
                        item.Id, item.Title))">Details</a>
On the receiving page (Details.cshtml), you can replace Request["id"] with UrlData[0]. The rest of the code will work as-is. You may, however, want to check that the value of UrlData[1] (which is the human readable part of the URL comprising the item title minus the "-For-Sale", also is known as a slug) matches the actual item title. If you only rely on matching the ID value to an item in the database, you run the risk of becoming a victim of link bombing. This is the practice whereby people with malicious intent plant links to your site with the last segment altered to convey a poor impression of the site. I could, for example, go to a forum somewhere and plant links like http://domain.com/Details/3422/This-site-will-rip-you-off. The link will be indexed by search engines, and will appear nice and bold. It will also appear to describe the content found at the page, and will not cause any errors to happen when the link is clicked, because the current code relies purely on the ID portion being correct.
To prevent this from happening, you should ensure that the slug is a valid one, and if it is not, redirect the visitors to a valid URL using the Response.RedirectPermanent method. This is how code in the Details page might handle that if you applied the SeoFriendly function to generate your URL:
@{
    dynamic item = null;
    if(!UrlData[0].IsEmpty() && UrlData[0].IsInt()){
        var db = Database.Open("Classifieds");
        var sql = "SELECT * FROM Items, Categories WHERE Id = @0";
        item = db.QuerySingle(sql, UrlData[0]);
        if(!UrlData[1].Contains(item.Title.Replace(" ","-"))){
            var validUrl = Functions.SeoFriendly("Details", item.Id, item.Title);
            Response.RedirectPermanent(validUrl);
        }
    }
}
This is not production-ready code, but it illustrates the logic: Ensure a match between what the URL contains and what you expect it to contain. If that match doesn’t exist, reconstruct the URL and permanently redirect users to the valid version.
Response.RedirectPermanent is a new method to ASP.NET, introduced in Version 4.0. It was introduced to cure an inherent problem with the traditional way of sending a visitor to another page through the Response.Redirect method, and illustrates Microsoft’s fairly recent focus on providing a much better range of SEO tools to developers. When you use either of these methods, they send response headers that tell the “user agent” (browser or search engine, for example) the status of the requested resource. Most often, the status codes are 200, meaning OK, or 304, meaning Not Modified, (typically for images, style sheets, and other resources cached by the browser). Response.Redirect issues a 302 status code, which has this definition: "The requested resource resides temporarily under a different URI". Note the use of the word temporarily. Response.RedirectPermanent issues a different status code: 301, which has this definition: "The requested resource has been assigned a new permanent URI and any future references to this resource SHOULD use one of the returned URIs". This clearly instructs user agents, particularly search engines crawlers, to disregard the URL they have just followed in the future and to replace it with the one your code has just presented them with. In other words, by using Response.RedirectPermanent, you defeat any attempts to get the malicious link indexed and published by search engines.
You have a site that is full of rich original content. It has been validated for error-free HTML and CSS, and optimized to ensure that it is search engine and user friendly. All pages have titles, headings, descriptions, and descriptive URLs. People start visiting. You still have two tasks remaining: You need to do your best to ensure that the site is available when they visit, and you need to measure and track the site visitors. In the next section, you will look at one of the tools provided by the Web Pages Framework specifically to help you optimize for performance.
Each time a page is requested on your site, the web server has to do some work in order to generate a response. Often, this work includes calls to databases, the generation of variables, possibly computations on those values, and so on. Servers can be extremely powerful beasts, but if your data-driven content rarely changes, there is little point in retrieving it fresh from a database on every page request. The less work you ask your server to do, the quicker it can complete what it has to, and the more responsive your site appears to visitors.
The ASP.NET Framework includes a mechanism known as caching. This allows you to effectively save all or part of a page so that it can be reused, without being processed again. Items are stored in the cache, which is a collection and can contain all kinds of data, including strings, integers, and even complex objects. In this way, the cache is similar to the PageData or AppData collections that you have already learned about.
Web Pages provides a simple helper — the WebCache helper — which enables you to use caching easily within your application. It has just three methods — Get, Set, and Remove. The Get method takes a string, which is the key to the item to be retrieved from the cache. The Remove method similarly takes a string, which is the key to the item that is to be removed from the collection. The final method, Set, adds an item to the cache and takes a number of parameters. The first is a string representing the key for the item. The second is the item itself, which can be any kind of object. The third is the number of minutes that the item should be stored for, and the final argument is a Boolean, representing whether sliding expiration should be applied. If you decide to store an item for 60 minutes, that period will elapse one hour after the item was committed to the cache if you pass false to this parameter. If you pass true (or pass no value as true is the default), the expiration time is reset every time an item is accessed, so the 60 minutes period begins again when the item is retrieved. This expiration feature is the primary difference between using the WebCache helper and AppData (global) variables.
The home page of your Classifieds site makes a good candidate for the WebCache helper. At the moment, every time someone lands on your home page, the server-side code connects to the database and retrieves all items for display in the WebGrid. However, that data may not change for a while. Sellers might only post one item every 10 minutes on average, but buyers might be visiting the home page 10 times a minute. So for every 10-minute period, there are 100 database calls, and just one change in the data. In the following exercise, you will amend the Classifieds site to incorporate the use of caching through the WebCache helper. The goal in doing so is to reduce the load on your server.
TRY IT OUT: Adding Caching with the WebCache Helper
1. Open the Classifieds site if you closed it and turn to the Default.cshtml file. Amend the existing code block at the top of the file so that it looks like this:
@{
    Page.Title = "Home";
    var data = WebCache.Get("cachedData");
    var fromCache = " From Cache!";
    if(data == null){
        fromCache = " Not From Cache!";

      var db = Database.Open("Classifieds");
        var sql = @"SELECT Id, Title, Description, Price, Items.CategoryId,
                Category, DatePosted FROM Items JOIN Categories ON
                Items. CategoryId = Categories.CategoryId";
        data = db.Query(sql).OrderByDescending(c => c.DatePosted);
    }
    WebCache.Set("cachedData", data, 1, true);
    var grid = new WebGrid(data, ajaxUpdateContainerId: "grid");
}
Notice that the data variable has been declared at the top of the code block now, so the var keyword has been removed where data is assigned the return value of the Database.Query method call.
2. Modify the <h2> heading so that it looks like this:
<h2>Latest Items @fromCache</h2>
3. Run the Default page in the browser. Confirm that the heading says “Latest Items Not From Cache!.” Then click the Home link and confirm that the heading now reads “Latest Items From Cache!.”
4. Wait for at least one minute, and then click the Home link again. The heading should say that the items in the grid did not come from the cache.
5. Amend the line that begins WebCache.Set so that the expiry interval is set to 10 minutes and sliding expiration is enabled:
WebCache.Set("cachedData", data, 10, true);
6. Turn to the Sell.cshtml file and add the following line of code just before the Response
.Redirect call at the end of the code block:
WebCache.Remove("cachedData");
This line should be preceded by the db.Execute() method call.
7. Click the Restart button on the Site menu. Then re-launch the site in your browser. Check that the cache was populated by refreshing or reloading the home page, and then log in to the site using one of your existing user accounts in the Seller role. Navigate to the Sell page and add a new item. When you have successfully submitted the new item, notice that you are redirected to the home page. At this point you should check the heading to see whether the data came from the cache or not.
How It Works
Your initial code changed how the data variable is declared and first assigned. You used the WebCache
.Get method to obtain an item from the cache that has a key of cachedData. The value of the retrieved item is assigned to the data variable. A string is assigned a value suggesting that the data came from the cache. However, there is no guarantee that an entry with that key exists, so the value is tested for null. If the value is null, the string is amended to say that the value did not come from the cache, and data is obtained from the database. Once it has been retrieved, it is added to the cache using the WebCache.Set method. In the first instance, it was given a key of cachedData and set to expire after one minute. Once this period has elapsed, the item will be removed from the cache regardless of whether it has been accessed within the previous 60 seconds, as sliding expiration was not enabled.
You then amended the code so that the item stays in the cache for 10 minutes after it was last accessed, by changing the interval and the Boolean to enable sliding expiration. Because your theoretical site is being accessed 10 times a minute, this 10-minute expiration time is continually being reset, which means that the data stays in the cache. That is not helpful if someone wants to post a new item. Their item will not be displayed, because the database is not being called all the time that the data is in the cache. That’s why you added a line that forces removal of the data from the cache just after the new item was added to the database.
During this exercise, you saw two ways to remove items from the cache. The first is to allow the expiration period to pass, and the second is to call the WebCache.Remove method. There is also a third method, and that is to restart the site. When your site is running on a live server, your cache is cleared when the server is stopped and restarted. The server might decide to clear the cache for reasons of its own, such as a dangerous lack of resources. In that case, it will reclaim as much memory as it needs at the expense of your cache. What this means is that you can never rely on an item being retained in the cache. Whenever you attempt to retrieve an item from the cache, you should always check to ensure that it is not null before trying to do anything with it. Otherwise, your website will throw NullReferenceExceptions: "Object reference not set to an instance of an object".
When I first started in web development, getting good analysis on visitors to a website was expensive. Web hosting companies used to resell traffic analysis software at a healthy profit. It was the only way that you could get a meaningful picture of the volume of traffic you got, as well as its behavior when it got to your site, and where it came from. Nowadays, highly advanced analytics software is given away free. Google is the primary source of free analytics software, but Yahoo also offers a free service for some eligible groups. It should therefore come as no surprise that there is a helper for that.
The Analytics helper can be found in the ASP.NET Web Helpers Library along with the Bing helper discussed earlier. Before you can use the Analytics helper, you need a relevant account with whichever provider you choose. Google provides you with a site identity, as does Yahoo. You need that information when you use the Analytics helper. In both cases, all you need to do is to pass the account name to the relevant method call:
@Analytics.GetGoogleHtml("account_id")
@Analytics.GetYahooHtml("account_id")
Both of these render JavaScript, so the code must be placed before the closing </body> tag on the page.
This chapter discussed a number of ways in which the Web Pages Framework offers help for optimizing your site. You began this chapter by examining ways in which you can optimize your site for search engines. You learned about the importance of valid HTML and quality content. Then you looked at how the Reports area of WebMatrix provides invaluable help with its SEO, or Search Engine Optimization, analysis reports. You learned how to interpret the reports and categorize the importance of any details provided in a report. You also saw how you can make changes and instantly get feedback by re-running the report.
Keywords in URLs have some effect on the way a site is indexed, by Google, at least. Therefore, you need to understand how the Web Pages routing system works, and how you can take advantage of it to produce both user friendly and search engine friendly URLs. You saw how the routing system tries to match file paths. You also learned how trailing segments of URLs are stored in UrlData, and can be used to provide very descriptive URLs and parameter information.
In the next section of the chapter, you explored how to optimize your site for performance using the WebCache helper. You learned how to add items to a cache and retrieve them, as well as the benefits of doing so in terms of minimizing the load on the server.
Finally, you learn about the Analytics helper, which is available from the ASP.NET Web Helper Library, and which takes care of rendering the right code for Google and Yahoo analytics services on your site.
Your site is finished. It is optimized and ready. The only thing you need to do now is make it publicly available. In the final chapter, you will explore the options available for deploying your site, as well as look at some of the key things you should prepare to ensure your site works in its new environment.
EXERCISES
1. What is the purpose of a robots.txt file?
2. A site has a Pages folder within an Admin folder, which is in the root folder. Within the Pages folder, there is a page called Edit.cshtml, which needs to know which page (identified by a numeric ID) it should display for editing. Which of the following URLs can be used to reach this page, and pass the appropriate information for editing page 29?
~/Admin/Pages/Edit/29
~/Pages/Admin/Edit/29
~/Admin/Pages/Default/29
~/Admin/Pages/Edit/?id=29
3. What can cause items to be removed from the cache?
Answers to the Exercises can be found in the Appendix.
What You Learned in This Chapter
| Topic | Key Concepts |
| SEO | Search Engine Optimization — the process of optimizing websites to improve their visibility to search engines. |
| Spider | An automated program designed to parse HTML and index the content. |
| Crawler | An alternative term for spider. |
| Routing | A mechanism within the ASP.NET framework that maps URLs to physical files on disk. |
| UrlData | Segments of a URL consisting of arbitrary data that do not form part of a file path. |
| Caching | Storage of data in memory on the web server which is intended to reduce the need for processing to create it. |
| WebCache Helper | A component that is designed to make working with caching easy. |