
Chapter 12
Security
What you will learn in this chapter:
- An overview of website security
- Services offered by the WebSecurity Helper
- How to retrofit security features to an existing site
- How to manage access to parts or all of a website
- How to let users create accounts
- How to manage the display of content based on the user’s role
At this point, you have a site that is capable of storing items for sale, and notifying the person who posted the item by e-mail that their item is listed. You also have a way of managing categories with a series of CRUD forms in an administration area. However, the site is completely open, which means that anyone can access your CRUD forms and add or alter existing categories. This is likely to be unacceptable, because people will add duplicate items, or worse. You need some way to restrict access to the administration area to only people whom you trust. You need to be able to identify those people when they visit the site, and more importantly, you need to be able to prevent untrusted visitors from being able to access trusted areas.
Membership and Roles Management
The ASP.NET security model is built on two pillars — Membership and Roles Management. The next sections examine these concepts in more detail and explain what they incorporate.
Membership
A lot of sites these days invite visitors to register with them — to submit personal details in a form in order to take advantage of some of the features the site offers. For example, I have an account at the official ASP.NET forums. I created an identity with the site by completing a registration form and providing some information about who I am along with an e-mail address. The site used that e-mail address to verify my identity. It sent an e-mail to that address which contained a link I had to click in order to confirm I own that e-mail address. When I visit the forums, I have to provide my details in a login form to identify myself. Once I have done that, I have access to my existing threads, and can post new questions or answers. I am a member of the forums. The features responsible for managing the creation of my account, storing my personal details, and authenticating me (confirming who I am) when I return to the site are delivered via a membership provider.
Roles
Most of the members at the ASP.NET forums have the same set of privileges. They can start threads by posting a question, edit their posts, mark other posts as the answer if they appear in a thread started by them, or reply to another member’s thread. If you are a Microsoft Most Valuable Professional (MVP) you enjoy some additional privileges. You can mark any post as an answer, and you have access to an MVP-only forum. Moderators have a considerably wider set of permissions. We can move posts from one forum to another, delete them, merge duplicate threads, and ban users. An ordinary member, an MVP, and a moderator all have different roles within the forums. Once the member has authenticated his or herself, the system determines what they are authorized to do based on the permissions allocated to their role within the site. This functionality is managed by a role provider.
The Provider Pattern defines a base set of behaviors, which are then implemented by specific components. There is SqlMembershipProvider, which is the default implementation for managing membership services via SQL Server databases. Other membership providers include one for Access and another for Active Directory.
The Web Pages Framework introduces a new membership provider called SimpleMembershipProvider. It features a range of methods for managing common tasks such as creating accounts, validating users, resetting passwords, and so on. The Web Pages Framework also introduces a new role provider called SimpleRoleProvider. Again, this features a range of methods for creating roles, adding users to roles, checking whether a given user is in a particular role, and so on. You will explore how to manage roles later in the chapter.
The WebSecurity Helper wraps the most commonly used membership properties and methods to make them easier to work with. The Starter Site template site has been designed to illustrate how the WebSecurity Helper can be used, and offers a view of the typical workflow required to create and implement a membership. It is worth creating a site from the Starter Site template to explore these features in more detail.
The WebSecurity Helper needs initializing, which is best done in an _AppStart file. You can see this in the _AppStart.cshtml file within the Starter Site template:
@{
    WebSecurity.InitializeDatabaseConnection("StarterSite", "UserProfile", "UserId",
                                             "E-mail", true);
    // WebMail.SmtpServer = "mailserver.example.com";
    // WebMail.EnableSsl = true;
    // WebMail.UserName = "[email protected]";
    // WebMail.Password = "your-password";
    // WebMail.From = "[email protected]";
}
The InitializeDatabaseConnection method takes five arguments. The first is the name of the database that holds user information. This must be an existing database. Just as with the Database.Open method, the string can point to a connection string within the web.config file, or to a SQL Server Express or SQL Server Compact 4.0 database filename within the App_Data folder. The second argument is the name of the table that houses the user profile information. The absolute minimum information that this table must store is a unique integer identity and a user name value. The columns within the table that holds this data are specified in the third and fourth arguments. The final argument indicates whether the table and its columns should be created automatically if they do not already exist.
When the InitializeDatabaseConnection method is called, it checks to see if the specified table and columns exist. If they do not, it will create them in the specified database. It will also add three other tables: webpages_Membership, webpages_Roles, and webpages_UsersInRoles. These tables are used by the SimpleMembershipProvider to store information that enables the management of users and their roles. The tables are useless without some way to capture user data in the first place. For that, you need a registration form.
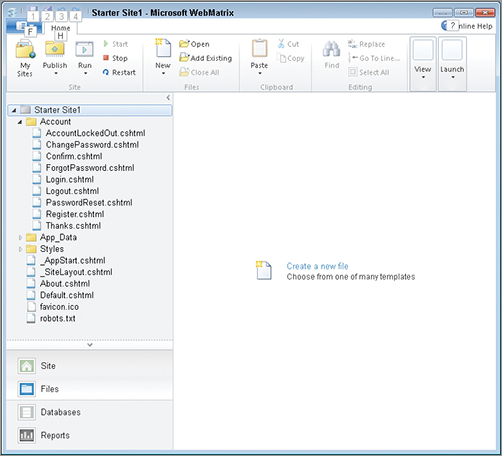
All of the Starter Site membership logic including a registration form is housed in files with the Account folder. Within that, you can see the following files depicted in Figure 12-1:
- Register.cshtml: Contains the registration form so that users can create an account
- Confirm.cshtml: Used to confirm creation of an account based on a confirmation e-mail
- Login.cshtml: Allows existing account holders to log in to the site
- Logout.cshtml: Enables the users to log out of the site
- ChangePassword.cshtml: Enables the users to change their passwords
- ForgotPassword.cshtml: Enables users to apply to reset their password if they have forgotten it
- PasswordReset.cshtml: Enables the users to reset their passwords
- Thanks.cshtml: A POST/Redirect/GET destination to prevent duplicate form submission when the user applies for an account
Individual pages can be protected to allow only currently authenticated users access by adding a call to the WebSecurity.RequireAuthenticatedUser() method at the top of the page. You can see this in ChangePassword.cshtml. If you attempt to browse this page directly, having just created the site without registering, you will be redirected to Login.cshtml. You can also protect an entire folder and its subfolders by adding WebSecurity.RequireAuthenticatedUser() to a _PageStart file.
The Web Pages security framework assumes that a login form will be found by default at "~/Account/Login". If you moved the Login.cshtml file from the Account folder in the Starter Site to somewhere else, you will get 404 Not Found errors. You need to tell the framework that you want to use a different location for your login form, and you do that by adding an entry to your site’s web.config file, within the appSetting section. The following shows how to add an entry that specifies that the login form is in a file called Enter.cshtml in a folder called Private:
<appSettings>
    <add key="loginUrl" value="~/Private/Enter" />
</appSettings>
The code in the Starter Site’s registration form may at first glance look a little daunting. It includes some commented-out lines that take care of validating a ReCaptcha control. Part of the Starter Site’s purpose is to demonstrate the use of the ReCaptcha Helper. You won’t be exploring that in any detail in this book, but it is a device that prevents automated bot submission of forms. If you want to explore the ReCaptcha Helper in more detail, it is available in the ASP.NET Web Pages Helpers library that you worked with in Chapter 7.
The registration form contains an input for an e-mail address, which will serve as a user name. It also asks the registrant to provide their chosen password twice. When the form is posted back, the code block initially ensures that there is a user name and a password, and that the second password matches the first. This is basic validation, which you should be used to seeing by now. The form uses the first method of creating and displaying error messages that you worked with in Chapter 5 — the one based on building up a string as opposed to using the Html.Validation Helpers. The code then connects to the database and determines if anyone has already registered an account with the same user name, assuming that all validation passes. If no results are found, the code uses SQL to add the user to the users table, which is called UserProfile in this site.
This is the point at which the user has been created. However, an account is created only after a corresponding entry for that user is added to the webpages_Membership table. The definition of the webpages_Membership table is illustrated in Figure 12-2.

It is the place where passwords are stored as a hashed value along with account confirmation tokens and fields for managing password resetting. The account is created in the Starter Site via the WebSecurity.CreateAccount method. There is an alternative method that negates the need for creating the user via SQL. This is the WebSecurity.CreateUserAndAccount method. You will use this method soon.
Both the CreateAccount and the CreateUserAndAccount methods return a string. This string is a token that’s generated by the SimpleMembershipProvider and is used for confirming an account — if you decide to implement that feature. The Starter Site implements it, and sends out an e-mail containing a link that new users must follow to validate their accounts. Part of the link URL consists of a query string that features the token. This confirmation feature is based on the theory that only people who have access to the e-mail account that the user registered with can verify the account — thus increasing the likelihood that the account is genuine.
Creating a Registration Form
In the following exercise, you will create a registration form for the Classifieds site. The workflow that you introduce will be based on the Starter Site example that you have just looked at. As well as a registration form, the workflow requires a page to redirect to after successful submission, and a page for confirming registration.
TRY IT OUT: Creating a Registration Form
1. Open the Classifieds site that you last worked with in the previous chapter, or use the version that accompanies this chapter in the book’s downloads. Move to the Database workspace and add a new table to the Classifieds database. Table 12-1 details the columns you need to add. Save the table as Users.
Table 12-1: User Table Columns
| Name | Details |
| UserId | Identity, int |
| UserName | nvarchar 100 |
| FirstName | nvarchar 100 |
| LastName | nvarchar 100 |
| nvarchar 100 |
2. Open the _AppStart.cshtml file that you created when you worked with the WebMail Helper and add the following line to the code block:
WebSecurity.InitializeDatabaseConnection("Classifieds",
                                         "Users",
                                         "UserId",
                                         "UserName",
                                         true);
This doesn’t need to be broken over multiple lines. It is presented like that in this book because the pages aren’t wide enough sometimes.
3. Add a new folder named Account to the root folder. Create a new page in this folder called Register.cshtml. Replace the existing code with the following:
@{
    Page.Title = "Create an account";
    var sql = string.Empty;
    var firstname = Request["firstname"];
    var lastname = Request["lastname"];
    var username = Request["username"];
    var password = Request["password"];
    var email = Request["email"];
    var email2 = Request["email2"];
    if(IsPost){
        if(firstname.IsEmpty()){
            ModelState.AddError("firstname", "Please provide a first name");
     }
        if(lastname.IsEmpty()){
            ModelState.AddError("lastname", "Please provide a last name");
 }
        if(username.IsEmpty()){
            ModelState.AddError("username", "You must provide a user name");
 }
        if(password.IsEmpty()){
            ModelState.AddError("password", "You must provide a password");
 }
        if(email.IsEmpty()){
            ModelState.AddError("email", "Please provide your email address");
 }
        if(!email.IsEmpty() && !Functions.IsValidEmail(email)){
            ModelState.AddError("email", "Please provide a valid email address");
 }
        if(email2 != email){
            ModelState.AddError("email2", "Your email addresses must match");
 }
        if(!ModelState.IsValid){
            ModelState.AddFormError(@"Please fix the errors
                                    below before resubmitting the form");
 }
        else{
            var db = Database.Open("Classifieds");
            var user = new {FirstName = firstname, LastName = lastname, Email = email};
            try{
                var token = WebSecurity.CreateUserAndAccount(username, password, user, true);
                var hostUrl = Request.Url.GetComponents(UriComponents.SchemeAndServer,
                                                        UriFormat.Unescaped);
                var queryString = HttpUtility.UrlEncode(token);
                var confirm = "~/Account/Confirm?confirmationCode=";
                var confirmationUrl = hostUrl +
                               VirtualPathUtility.ToAbsolute(confirm + queryString);
                var message = "<p>Your confirmation code is: " + token + "</p>" +
                    "<p>Visit <a href="" + confirmationUrl + "">" +
confirmationUrl + "</a>" +
                    " to activate your account.</p>";
                WebMail.Send(
                            to: email,
                            subject: "Please confirm your account",
                            body: message,
                            isBodyHtml: true
                        );
                Response.Redirect("~/Account/Thanks");
            }
            catch(MembershipCreateUserException ex){
                if(ex.StatusCode == MembershipCreateStatus.DuplicateUserName){
                    ModelState.AddError("username",
                        "That user name is already in use. Please choose another.");
                    ModelState.AddFormError(@"Please fix the errors below
                         before resubmitting the form");
                }else{
                    ModelState.AddFormError("Something went wrong. Please try again");
                }
            }
        }
    }
}
<h2>Create an account</h2>
<p>Use the form below to create an account with the site.
    Then you can post items for sale and bid on other items.
    Please ensure that you complete all fields
    marked with an asterisk *</p>
<form method="post">
    <fieldset>
        <legend>Register</legend>

        @Html.ValidationSummary(true)
        <div>
            <label for="firstname">First Name*</label>
        </div>
        <div>
            <input type="text" id="firstname" name="firstname"
value="@firstname" />
            @Html.ValidationMessage("firstname")
        </div>
        <div>
            <label for="lastname">Last Name*</label>
        </div>
        <div>
            <input type="text" id="lastname" name="lastname" value="@lastname" />
            @Html.ValidationMessage("lastname")
        </div>
        <div>
            <label for="username">User Name*</label>
        </div>
        <div>
            <input type="text" id="username" name="username" value="@username" />
            @Html.ValidationMessage("username")
        </div>
        <div>
            <label for="password">Password*</label>
        </div>
        <div>
            <input type="password" id="password" name="password" />
            @Html.ValidationMessage("password")
        </div>
        <div>
            <label for="email">Email*</label>
        </div>
        <div>
            <input type="text" id="email" name="email" value="@email" />
            @Html.ValidationMessage("email")
        </div>
        <div>
            <label for="email2">Re-enter your email*</label>
        </div>
        <div>
            <input type="text" id="email2" name="email2" value="@email2" />
            @Html.ValidationMessage("email2")
        </div>
        <div>
            <input type="submit" name="Submit" value="Register" />
        </div>
    </fieldset>
</form>
4. Add another file to the newly created Account folder and name it Thanks.cshtml. Replace the existing code with the following:
@{
    Page.Title = "Thanks for registering";
}
<h2>Thanks</h2>
@if (!WebSecurity.IsAuthenticated) {
    <p>
       An email with instructions on how to activate
       your account has been sent to you.
    </p>
} else {
    <p>
        Please use the navigation to find your way around.
    </p>
}
5. Add another file to the Account folder. Name this one Confirm.cshtml and replace the default code with the following:
@{
    Page.Title = "Registration Confirmation Page";

    var message = string.Empty;
    var confirmationToken = Request["confirmationCode"];

    WebSecurity.Logout();
    if (!confirmationToken.IsEmpty()) {
        if (WebSecurity.ConfirmAccount(confirmationToken.Trim())) {
            message = @"Registration Confirmed!";
            message += "Click <a href="/Account/Login">here</a>"
            message += "to log in to the site.";
        } else {
            message = "Could not confirm your registration info";
        }
    }
}

@if (!message.IsEmpty()) {
    <p>@Html.Raw(message)</p>
} else {
    <form method="post" action="">
        <fieldset>
            <legend>Confirmation Code</legend>
            <label for="confirmationCode">
                Please enter the confirmation code sent to you via email and
                then click the <em>Confirm</em> button.
            </label>
            <input type="text" id="confirmationCode" name="confirmationCode" />
            <input type="submit" value="Confirm" />
        </fieldset>
    </form>
}
6. Open the _Navigation.cshtml file in the Shared folder and alter the link to My Account so that it points to the newly created Register.cshtml file:
<div id="nav">
    <a href="@Href("~/")">Home</a> |
    <a href="@Href("~/Sell")">Sell</a> |
    <a href="@Href("~/Account/Register")">Register</a>
</div>
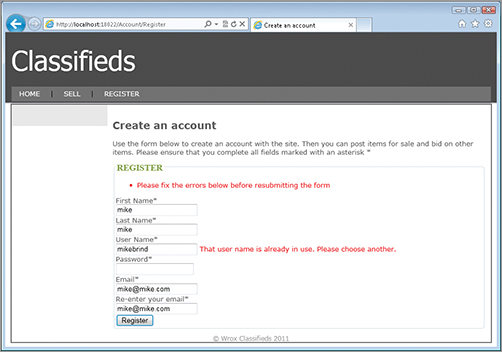
7. Make sure that your WebMail Helper is set up correctly. If you are using the SpecifiedPickupDirectory method for managing e-mail while testing, ensure that the specified directory still exists. Once you have verified all is working, launch the Register.cshtml page in your browser. Enter valid values into the form and submit the form. You should be transferred to the Thanks.cshtml page you created. Check your e-mail (or pickup folder) for the confirmation e-mail, and click the link within it to confirm the account. Now click the Register link in the navigation menu and attempt to create another account, entering the same user name that you just used. Submit the form and notice the error message that appears in Figure 12-3.
How It Works
The first step you took was to create your own user table within the existing Classifieds database. The schema for the table exceeds the minimum requirements, which is an integer column for the User’s ID and a unique user name value. It also provides for a first name, last name, and an e-mail address. There is no limit to the amount of information you can collect from users, but these additional fields serve to illustrate the point sufficiently.
The next step was to initialize the WebSecurity Helper. You did this in the _AppStart file, which as you might remember is executed once when the application starts. The parameter values that the InitializeDatabaseConnection method takes are the database to use, the user table, the unique integer identity column in that table, the unique user name, and whether to create all tables if they do not exist. In this case, the user table exists, but the other membership and roles tables do not. When you first requested a page in the application, this method took care of creating the extra tables in the nominated database for you.
The bulk of the work went into creating the registration page. It contains a form, with server-side validation using the Validation Helpers and ModelState, just like you worked with in Chapter 5 when creating the form that allows people to post items for sale. If you recall, at the point that the form submission is deemed to be valid, the Starter Site example queries the database to see if the submitted user name is already in use. It uses QuerySingle to obtain the result of a SQL SELECT statement. (QueryValue would be more correct…). Your code didn’t do this. First, you created an anonymous object:
var user = new {FirstName = firstname, LastName = lastname, Email = email};
An anonymous object is like a temporary container for values. In this case, you gave your object three properties: FirstName, LastName, and Email. They are all deemed to be strings, based on the value that was assigned to them. The important thing with these properties is that they mimic the names of the database columns in your user table. You will see why in a second.
The next section of code takes place in a try-catch block. Remember from Chapter 9 that try-catch blocks are used to safely manage possible exceptions. You use the WebSecurity.CreateUserAndAccount method to add the new user to the database. This does more than the CreateAccount method that you see used in the Starter Site template. The CreateAccount method populates the webpage_Membership (the accounts) table only. You have to populate the user table yourself. The CreateUserAndAccount method populates the user and the account tables. The parameters this method accepts are the user name, password, an object containing further user details (your anonymous object), and true or false indicating whether you want to generate an account confirmation token or not. Internally, the method will examine your anonymous object and attempt to match values to be inserted against database column names taken from the names of the object’s properties. It will construct a SQL statement based on the property names, so it is vital that you double check your spelling and ensure that your property names are identical to the database column names in your user table.
The CreateUserAndAccount method (and the CreateAccount method for that matter) checks to see if the user name value it has been asked to insert is in use. If it is, the method returns an exception of type MembershipCreateUserException. This particular exception has a status code of MembershipCreateStatus
.DuplicateUserName. There are other possible status codes, such as InvalidUserName (if you don’t pass a value to the user name parameter, for example). Consequently, your code checks to see if the exception has the DuplicateUserName flag, and if it does, you present the users with a friendly error message asking them to choose another user name. Since the WebSecurity Helper performs these checks for you, there seems little point in executing your own SQL to determine if a user name is already in use. There is also a WebSecurity method called UserExists, which takes a string representing the user name you want to check:
if(WebSecurity.UserExists(username){
    //it's already in the database
}
Since you indicated that you want to use confirmation tokens, the successful execution of the CreateUserAndAccount method generates and returns an appropriately hashed and encoded value for that purpose. The value is also stored in the account table against the user. Your code used the confirmation token value as part of an e-mail message that it constructs and sends to the owner of the e-mail address that the user registered with. An example of the resulting e-mail can be seen in Figure 12-4.

The code in this section is largely identical to the Starter Site template, except that your version creates an HTML-based e-mail by specifying the WebMail’s isBodyHtml parameter value as true. Once the e-mail has been generated and sent, the code takes the visitor to the Thanks.cshtml page.
The account confirmation page examines Request["confirmationcode"] and uses the WebSecurity.ConfirmAccount method, which simply updates the account table (webpages_Membership) to set IsConfirmed to 1 where it finds a matching confirmation token. If it cannot match the query string value to a value in the database, the form displays instead. This might happen if the link in the e-mail breaks across more than one line and some of the last characters are not included in the link. In that event, the user can copy and paste the token from the e-mail. The only difference between your implementation of the confirmation page and the Starter Site is your use of the Trim() method on the confirmation code. This removes leading and trailing whitespace from the strings, which might get picked up when copying.
Creating a Login Form
At this point, you have created a registration page and a database for storing user account information. Your site is still wide open, in that none of the pages are protected from unauthenticated users, and if they were, your users have no way to authenticate themselves. There is no form for them to use to log in. The key part of the site that needs protecting at this point is the Admin folder and its contents. As you learned earlier, a folder can be protected from prying eyes by adding a _PageStart file to the folder and including a single line of code:
@{ WebSecurity.RequireAuthenticatedUser(); }
There is little point in doing this just yet, because the WebSecurity Helper will attempt to redirect unauthenticated users to a login form, and that still needs to be created. Therefore, in the next exercise, you will continue with protecting your site by adding a login form.
TRY IT OUT: Adding a Login Form
1. It is time to protect that Admin folder. Open the existing _PageStart.cshtml file that currently resides in the Admin folder and add the following line to the code block:
WebSecurity.RequireAuthenticatedUser();
Test that it works by trying to browse to any of the other files in the folder. You should be met with an HTTP Error 404 Not Found page.
2. Add a new file to the Account folder and name it Login.cshtml. Replace the existing code with the following:
@{
    Page.Title = "Log In";

    var username = Request.Form["username"];
    var password = Request.Form["password"];
    var rememberMe = false;
    if (IsPost) {
        rememberMe = Request.Form["rememberMe"].AsBool();

        if (username.IsEmpty()) {
            ModelState.AddError("username", "You must specify a username.");
        }
        if (password.IsEmpty()) {
            ModelState.AddError("password", "You must provide your password");
        }

        if(!ModelState.IsValid){
            ModelState.AddFormError(@"Please fix the errors below
                                    before resubmitting the form");
        }
        else {
            if (WebSecurity.Login(username, password, rememberMe)) {
                var returnUrl = Request.QueryString["ReturnUrl"];
                if (returnUrl.IsEmpty()){
                    Response.Redirect("~/");
                } else {
                    Context.RedirectLocal(returnUrl);
                }
            }
            else{
                ModelState.AddFormError(@"Your credentials did not match
                                        a valid account. Please try again");
            }
        }
    }
}
<p>
   Please enter your username and password below. If you don't have an account,
   visit the <a href="@Href("~/Account/Register")">registration page</a> and
   create one.
</p>
<form method="post">
    <fieldset>
        <legend>Log In to Your Account</legend>
        @Html.ValidationSummary(true)
        <div>
            <label for="username">User Name*</label>
        </div>
        <div>
            <input type="text" id="username" name="username" value="@username" />
            @Html.ValidationMessage("username")
        </div>
        <div>
            <label for="password">Password*</label>
        </div>
        <div>
            <input type="password" id="password" name="password" />
            @Html.ValidationMessage("password")
        </div>
        <div>
            <input type="checkbox" name="rememberMe" value="true"
                            @(rememberMe ? "checked="checked"" : string.Empty) />
            <label for="rememberMe">Remember Me</label>
        </div>
        <div>
            <input type="submit" value="login" title="Login"/>
        </div>
    </fieldset>
</form>
3. Add another new file to the Account folder and name it Logout.cshtml. Replace the default code with the following:
@{
    WebSecurity.Logout();
    var returnUrl = Request.QueryString["ReturnUrl"];
    if (returnUrl.IsEmpty()) {
        Response.Redirect("~/");
    } else {
        Context.RedirectLocal(returnUrl);
    }
}
4. Alter the _Navigation.cshtml file in the Shared folder to read as follows:
<div id="nav">
    <a href="@Href("~/")">Home</a> |
    <a href="@Href("~/Sell")">Sell</a> |
    <a href="@Href("~/Account/Register")">Register</a> |
        @if(WebSecurity.IsAuthenticated){
        <a href="@Href("~/Account/Logout?returnUrl=" +
        Server.UrlEncode(Request.ServerVariables["SCRIPT_NAME"]))">Log Out</a> @:|
        <span style="color: white">You are currently logged in as
        @WebSecurity.CurrentUserName</span>
    } else {
        <a href="@Href("~/Account/Login")">Login</a>
    }
</div>
5. Alter the _AdminLayout.cshtml file to include a link to the home page of the site:
<h1>Admin</h1>
<a href="@Href("~/Admin/CreateCategory")">Create Category</a>
|
<a href="@Href("~/Admin/UpdateCategory")">Update Category</a>
|
<a href="@Href("~/Admin/DeleteCategory")">Delete Category</a>
|
<a href="@Href("~/Admin/DeleteCategories")">Delete Categories</a>
|
<a href="@Href("~/")">Main site</a>
<hr />
@RenderBody()
6. Make sure that you have a valid account registered and confirmed. Select a file other than _PageStart in the Admin folder, and launch it in your default browser. Notice now that you land on the Login form (see Figure 12-5).

Use the valid account details to log in to the site, and you should be redirected to the page you first attempted to browse to. Now click the link to the Main site, and notice that your user name appears in the navigation bar, next to the Log Out link. Click the Log Out link so that the text changes to Login. Now click that link and log in all over again. Once you have done so, close the browser entirely. Re-launch the site in the same browser that you just used and notice that you are not logged in according to the navigation bar. Log in once more, this time ensuring that you check the Remember Me box. Notice that you are logged in according to the navigation bar (shown in Figure 12-6).

Now close the browser. This time, when you launch the site, you should see that you are logged in to it.
How It Works
A lot of functionality is provided here in relatively few lines of code. The login form requires that the user enter just their user name and password. Just these two items are subject to validation. The WebSecurity.Login method does all the hard work. It takes the user name, password, and a Boolean value to indicate whether Remember Me was checked, and checks that there is a matching name/password combination in the database. If there is, it sets the user to authenticated. If the Remember Me box was checked, the WebSecurity Helper sets a persistent cookie on the client’s browser. By default, this cookie expires after 30 minutes, but it will keep the user authenticated in the meantime. You may decide that 30 minutes is not enough, and that your visitor might come back to the site only once every few days. If you want to extend the lifetime of the cookie that the membership provider sets, you can do so in your web.config file as follows:
<system.web>
  <compilation debug="false" targetFramework="4.0"/>
  <authentication mode="Forms">
    <forms timeout="10080"/> <!--one week-->
  </authentication>
</system.web>
You should add an authentication element within the system.web section, and set the mode to Forms. The type of authentication you are using by default is known as forms authentication (as opposed to Windows authentication, for example), and you set the timeout value in minutes within the forms element.
Once the WebSecurity Helper has authenticated the user, the code checks to see if there is a value for the returnUrl parameter in the query string, which might indicate you attempted to access a protected resource without being logged in. If there is, the code will try to get you there using the HttpContextBase.RedirectLocal method. This extension method is a security feature. It protects your visitors against open redirection attacks. This type of attack takes advantage of the fact that people rarely look at query string values when they attempt to log in to a site. Query string values are open to being tampered with. For example, imagine that you operate a site www.wroxbank.com. I’m an evildoer and I know that you use a returnUrl or similar in your query string to redirect users once they have logged in. I send a lot of e-mails out to potential customers of Wrox bank, asking them to log in to confirm they approve of the revised terms and conditions, or something similar. The link in the e-mail is www.wroxbank.com/Account/Login?returnUrl=http://www.worxbank/Account/Login.
Notice that the returnUrl points to Worx Bank — the letters “o” and “r” are the wrong way round. If the e-mail gets to an existing customer who is taken in by my ruse, they will click the link and land on the legitimate login page for Wrox Bank. On successful login, they will be redirected to the returnUrl, or phony Worx Bank site. I control that site, and I will present them with a page that looks identical to the legitimate Wrox Bank login form, with a message saying they got the user name or password wrong, and that they should attempt to login again. This time, I hit pay dirt as I obtain their user name and password. The RedirectLocal method prevents this attack. It checks to see if the URL that is being redirected to is local to the site. If it is not, the user is redirected to the home page of the site instead. Under no circumstances will the user be redirected to an external domain.
The Logout page that you created doesn’t present any interface to the user. When the page is requested, the WebSecurity.LogOut method is called, which simply signs the user out of the site, setting them to an unauthenticated state. The code uses the safe RedirectLocal method to safely transfer the user back to the returnUrl or the default page. When you created the link to Logout.cshtml in the navigation page, you constructed the returnUrl value by using Request.ServerVariables["SCRIPT_NAME"]. This value returns the virtual path to the page that is currently executing, or anything after the domain part of the current URL. It means that wherever you are in the site, when you click the logout link, you will stay on the same page — unless you are in an area that requires you to be logged in, of course.
These two exercises have given you a hands-on introduction to the WebSecurity properties and methods you will use most often. There are two features within the Starter Site template that have not been covered so far, and those are the ability to allow users to reset their passwords if they have forgotten them, and the ability to lock accounts for a period of time if too many unsuccessful attempts are made to log in.
Resetting Passwords
If you want to incorporate a mechanism that allows users to reset their passwords in the event they have forgotten them, the WebSecurity Helper makes this quite easy. The first thing you need to do is provide a form for the user to submit the user name and/or e-mail address associated with the relevant account. You need both of these values. You need the e-mail address in order to send an e-mail, and you need the user name to identify the account. If the user name and e-mail address are one and the same, that makes life a lot easier.
The WebSecurity.GetUserId() method will return the identity of the account that the user name belongs to. If it cannot find a matching user name, it returns -1. You can use WebSecurity.IsConfirmed() to ensure that the account was activated before you permit resetting of passwords. This method requires the user name as well. Once you have the account identity, you can use that to query the user table for the e-mail address if you have not obtained it already. If you have obtained it from the user, you might still want to check that it belongs to the account whose identity you have. You can do this by executing your own SQL against the user table.
The WebSecurity.GeneratePasswordResetToken() returns a secure hashed value, much like the confirmation token. This method also requires the user name to be passed as a parameter. You can also optionally provide another integer value to set the number of minutes that the reset password token will be valid for. The default value is 1,440 minutes, or 24 hours. From that point, you follow the workflow that you used previously when sending a link by e-mail to the owner of the account. Your receiving page will be slightly different than the one that confirmed the account. You need to provide the user with a means to provide a new password. Then a simple method does all the hard work: WebSecurity.ResetPassword. This method needs the token, which is obtained from the query string or the user can paste it into a text box. It also needs a proposed new password. The method will return false if it cannot find a match for the reset token, or if the reset token has expired. It will return true if the operation was a success.
Locking Accounts
When your users get their passwords wrong, the PasswordFailuresSinceLastSuccess field in the membership table automatically increments in value by one. The time of the failure is also updated in the LastPasswordFailureDate field. When the users get their passwords right, the PasswordFailuresSinceLastSuccess field reverts back to its default value of 0. These two fields form the core of a locking account strategy. You decide how many failures you will accept. You may decide that you will allow users to get their passwords wrong an unlimited number of times and never lock their accounts, but this opens a potential security hole — it allows hackers to use brute force to guess the password of an account. You might think that it would take ages for someone to guess a password, and you are probably right. That’s why hackers use computers to do the work for them.
When the user attempts to log in, you can check to see the value of WebSecurity
.GetPasswordFailuresSinceLastSuccess(), passing in the current user’s name. It will return the value of the PasswordFailuresSinceLastSuccess field. You can also obtain the value of the LastPasswordFailureDate by using the WebSecurity.GetLastPasswordFailureDate() method. If the number of failures exceeds the limit that you set, you can choose to lock the account for a predetermined period. Locking the account means that you will not allow the user to log in, so any attempt to do so will be met with a redirect to a page that explains that the user has been locked out. The lockout period expires when the LastPasswordFailureDate together with the lockout period is no longer greater than the current time. If, for example, you decide to apply a lockout period of five minutes, you would use the following code to establish whether the time had expired:
if(WebSecurity.GetLastPasswordFailureDate(username).AddMinutes(5) >
                     DateTime.Now){
         //the lockout period has not expired yet} else {
         //the last time a wrong password was entered was more than 5 minutes ago
}
Managing Roles
At the moment, when a user posts an item for sale, you are reliant on them providing a valid e-mail address so that you can identify them. If you forced users to register prior to being able to post an item, you enforce proper authentication mechanisms on them. You know who they are when they post an item, because they will have had to log in to the site to do so. But there will be no way to differentiate between people who can post items and people who can administer categories. One of the reasons that you implemented security over the category administration area was to prevent untrusted users from messing around with them. You need a way to differentiate between these two differing sets of authorized users. The mechanism you will use is called roles.
Roles are common throughout software. Windows employs roles-based permissions. You can belong to a number of groups, such as Administrator, Guest, Power User, and so on. You can define permissions at the role level, which means that all members of the role have the same permissions. You can apply the same concepts to your site. People who have access to the Admin folder and the category management pages can be placed in a role called Administrator. People who can post items will be placed in a different role — Seller perhaps. You have a table in your database for logging bids against items. If and when you develop the site to allow people to place bids, you might only allow people in the Bidder role to do so.
When WebSecurity is initialized in a site, it generates at least three tables. Two of these have the word “role” in their name, and they are where role information is stored. The first table — webpages_Roles — consists of two columns. The first, RoleId, is an Identity column; and the other, RoleName, is a column for storing the names of your roles. This is where you create your roles. The second table — webpages_UsersInRoles — is what is known variously as a bridge table or a junction table. Its job is to resolve many-to-many relationships, such as the case where many users can be in many roles. The typical pattern for these tables is that they contain two foreign keys, each pointing to a primary key on one side of the relationship. These two foreign keys are then combined to form a composite primary key on the table itself. As you create roles in the webpages_Roles table, you enter the RoleId value that is generated together with the selected UserId into the webpages_UsersInRoles table.
The SimpleRoleProvider
The SimpleRoleProvider has been introduced specifically for the Web Pages Framework to work with the two database tables you have just been introduced to. The provider offers 10 useful methods for adding users to roles, determining if a given role exists, creating roles, and so on. These are listed in Table 12-2.
Table 12-2: SimpleRoleProvider Methods
| Method | Description |
| AddUsersToRoles | Enables you to add one or more users to a role |
| CreateRole | Creates a new entry for a role in the Roles table |
| DeleteRole | Removes an entry from the Roles table |
| FindUsersInRole | Returns the specified users in the specified role |
| GetAllRoles | Returns a list of all roles |
| GetRolesForUser | Returns a list of all roles that the specified user is in |
| GetUsersInRole | Returns all users in a role |
| IsUserInRole | Indicates whether the specified user is in the specified role |
| RemoveUsersFromRoles | Disassociates users from the specified roles |
| RoleExists | Indicates whether the specified role exists |
In the next exercise, you will use a number of these methods to create new roles and add users to them as part of your administration area.
TRY IT OUT: Creating Roles and Adding Users to Them
1. Open the _AdminLayout.cshtml file in the Shared folder of your Classifieds site. Add the following two hyperlinks to it before the link to the main site that you just added in the last exercise:
<br />
<a href="@Href("~/Admin/CreateRole")">Create Role</a>
|
<a href="@Href("~/Admin/AddUsersToRoles")">Add User To Role</a>
2. Add a new file to the Admin folder and name it CreateRole.cshtml. Replace the existing code with the following:
@{
    var message = "";
    var role = Request["role"];
    if(IsPost){
        if(!role.IsEmpty()){
            if(!Roles.RoleExists(role)){
                Roles.CreateRole(role);
                message = role + " added as Role";
            }else{
                message = "That role already exists";
            }
        }
    }
}
<form method="post">
    <div>@message</div>
    <fieldset>
        <legend>Create Role</legend>
        <div>
            <label for="role">Role:</label>
        </div>
        <div>
            <input type="text" name="role" value="@Request["role"]" />
        </div>
        <div>
            <input type="submit" value="Add"/>
        </div>
    </fieldset>
</form>
3. Run the page in a browser. You will be redirected to the Login form but once you have logged in, you can enter a new role. Add a role called Admin to check that the form works. Try submitting the same role again if it works, and note the message. Don’t close your browser at this stage to prevent having to log in again.
4. Add another new page to the Admin folder. This time, name the page AddUsersToRoles.cshtml. Replace the default code with the following:
@{
    var message = "";
    var db = Database.Open("Classifieds");
    var sql = "SELECT UserName FROM Users";
    var users = db.Query(sql);
    var roles = Roles.GetAllRoles();
    if(IsPost){
        var user = Request["user"];
        var role = Request["role"];
        if(!user.IsEmpty() && !role.IsEmpty()){
            if(!Roles.IsUserInRole(user, role)){
                if(Roles.RoleExists(role)){
                    Roles.AddUsersToRoles(new []{user}, new[]{role});
                    message = user + " added to the " + role + " Role";
                } else {
                    message = role + " no longer exists!";
                }
            } else {
                message = user + " is already in the " + role + " Role";
            }
        }
    }
}
<form method="post">
<div>@message</div>
    <fieldset>
        <legend>Add User To Role</legend>
        <div>
            <label for="user">Select User:</label>
            <select name="user">
                <option value="">--Choose user--</option>
                @foreach(var user in users){
                    <option>@user.UserName</option>
                }
            </select>
        </div>
        <div>
            <label for="role">Select Role:</label>
            <select name="role">
                <option value="">--Choose role--</option>
                @foreach(var role in roles){
                    <option>@role</option>
                }
            </select>
        </div>
        <div>
            <input type="submit" value="Add"/>
        </div>
    </fieldset>
</form>
5. Navigate to this page using the link in your still-open browser, or launch it via the Run button and log in again. You should have a “user” select list containing one or more user accounts, depending on how many you have created so far. You should also have at least one role — the Admin role you just created. Select your first user account and the Admin role, and click the Add button. You should receive a confirmation message indicating that the user has been added to the role. If you try adding the same user to the same role, a different message appears. Finally, try adding a new role to the system using the first form you created, and then run the second form to add a user to this new role. However, just before you click the Add button, remove the role from the database by switching to the Database workspace, opening the webpages_Roles table in Data view, selecting the line that the new role is on, and pressing Delete. Once you have done that, go back to the form in the browser and click the Add button. Notice the message you get.
How It Works
These two forms are quite uncomplicated. One features a text box and a Submit button, and the other just two select lists and a button. The code blocks are equally simple, in that the SimpleRoleProvider via the static System.Web.Security.Roles class does all the heavy lifting. The CreateRole form is interesting in that it obviously adds a record to the database, and yet there is no Database.Open call, or any suggestion of SQL at all. The database operations are managed on your behalf by the SimpleRoleProvider. It knows what tables and columns it expects to find in the database that has been initialized in the AppStart file, and internally, it attempts to perform an INSERT operation, taking the value that you provided. First, you checked the database to ensure that the role you are attempting to add doesn’t already exist. This is the job of the RoleExists method, which returns true or false depending on the result. The CreateRole method actually inserts the new role into the database.
In the second form, you create two select lists. The first is populated with all the current users. The second list is populated with all the current roles. The GetAllRoles method retrieves all roles from the database. It returns an array, which is iterated through to generate the select list options. When the form is posted back, the code uses the IsUserInRole method to ascertain whether the selected user is already in the chosen role. The code also uses the RoleExists method to establish that the selected role hasn’t been removed since it was first presented in the form (by another user, perhaps). Once those tests have been passed, the AddUsersToRoles method takes care of assigning the selected user to the selected role. AddUsersToRoles is designed to take care of adding multiple users to multiple roles at the same time, which is why you had to put both the user and the role into arrays before feeding them to the method. You could have added multiple="multiple" attributes to the select lists:
<select name="user" multiple="multiple">
Doing so would enable the user to select multiple users and multiple roles by holding down the Ctrl key. When they post the form back, the selected user and the selected roles will appear in the Request collection as comma-separated values, just like the grouped check boxes in the last chapter. You can use the string.Split method on the incoming form values and pass the result directly to AddUsersToRoles:
Roles.AddUsersToRoles(user.Split(','), role.Split(','));
Programmatically Applying Roles
Having created some roles, you will want to apply them to protect areas of the site, or to optionally show or hide pieces of content based on the role that the user is in. You will use the IsUserInRole method to determine whether the current user is in a specific role. You may decide, for example, to show a link in the navigation to the Administration area that you have built. You only want users who are in the Admin role to be able to see this link. The following code, added to the _Navigation.cshtml file, will accomplish that:
@if(Roles.IsUserInRole("Admin")){
    @:| <a href="@Href("~/Admin/")">Admin</a>
}
In the final exercise of this chapter, you will create a role for sellers so that only logged in members of this new role will be able to access the form to post items for sale. You will also apply a different protection over the Administration folder, so that only users in the Admin role can access the pages there.
TRY IT OUT: Restricting Access Based on Roles
1. In the last exercise, you should have added a user account to the Admin role that you created. Use that account to log in to the Classifieds site, and add another role named Seller, using the CreateRole page that you created earlier.
2. Add the following highlighted line to the code in Account/Register.cshtml just before the line that redirects the user to Thanks.cshtml:
Roles.AddUsersToRoles(new[]{username}, new[]{"Seller"});
3. Switch to the database workspace and open the Items table. Switch to definition view and add a new column to the Items table. The column should be called UserId, and should be an int data type. You will have to allow nulls initially since none of the existing values have a UserId associated with them. Save the changes and then switch to Data view. Enter a valid UserId value for each of the existing items, and then change back to definition view. Amend the UserId column so that it no longer accepts nulls, and save your changes once more.
4. Amend the _PageStart file in the Admin folder so that it reads as follows:
@{
    Layout = "~/Shared/_AdminLayout.cshtml";
    //WebSecurity.RequireAuthenticatedUser();
    if(!Roles.IsUserInRole("Admin")){
        Response.Redirect("~/");
    }
}
5. The Sell.cshtml page needs a number of alterations. They begin with the removal of the text box for inputting an e-mail address from the form itself, and all the validation (client-side and server-side) related to the e-mail address. In the code download that accompanies this chapter, these elements have been commented out rather than deleted so that you can more easily see which parts need removing. Following that, change the code in the else block that sends the e-mail and stores the item in the database so that it reads as detailed here:
var message = "<p>Details of your item for sale:</p>";
message += "Title: " + Request["title"] + "<br />";
message += "Description: " + Request["description"] + "<br />";
message += "Duration: " + Request["duration"] + " days<br />";
message += "Price: " + String.Format("{0:c}", Request["price"].AsFloat());
message += "<br />";
message += "Condition: " + Request["condition"];
var id = WebSecurity.GetUserId(WebSecurity.CurrentUserName);
sql = "SELECT Email From Users Where UserId = @0";
var email = db.QueryValue(sql, id);
WebMail.Send(
                to: email,
                subject: "Advertisement confirmation",
                body: message,
                isBodyHtml: true
                );
sql = @"INSERT INTO Items (Title, Description, Price,
      CategoryId, DatePosted, Condition, Duration, UserId) VALUES
      (@0, @1, @2, @3,GetDate(), @4, @5, @6)";
var parameters = new[]{Request["title"], Request["description"],
                       Request["price"], Request["categoryId"],
                       Request["condition"], Request["duration"], id.ToString()};
db.Execute(sql, parameters);
Response.Redirect("~/Default.cshtml");
6. At the beginning of the HTML, just after the closing </script> tag, add the second line of code below:
</script>
@if(Roles.IsUserInRole("Seller")){
<div> @result</div>
7. Finally, add the following lines after the closing </form> tag at the end of the file:
}else{
    <p>You need to be <a href="@Href("/Account/Login")">logged in</a>
        to post items for sale.
        If you do not have an account, please
        <a href="@Href("/Account/Register")">register</a> first.</p>
}
8. If you still have the site open in the browser, click the Log Out link to log yourself out. Now click the Sell link. You should be told that you need to log in or register, as shown in Figure 12-7.

9. Log in to the site with the account you just created. Now navigate to the Sell page, and you should be presented with the form. Add an entry and submit the form. Once you have submitted the item successfully, check whichever e-mail method you are using to see the confirmation e-mail. Notice that it was sent to the e-mail address associated with the user account you created. Then check the Items table in the database in Data view. See your newly added item, and verify that it was given the correct UserId value. Finally, attempt to navigate to the Admin folder. You should be redirected to the home page.
How It Works
In this exercise, you have used roles to manage different levels of access to different groups of people. It is no longer good enough just to be an authenticated user to be able to access the Admin area. You have to be a member of the Admin role. Additionally, you have to be a member of the Seller role to be able to see and use the form for posting items for sale. Since this is the case, you must be logged in, which means that you no longer have to identify yourself to the site every time you want to post an item. The WebSecurity Helper already knows your user name. It is therefore able to obtain your UserId from the database via the GetUserId method. From that, your registered e-mail address is available via SQL. You wouldn’t actually use the GetUserId method in this way in the real world, as it resulted in two calls to the database when you could have passed the user name as a parameter to the SQL instead. This contrived example serves purely to illustrate another WebSecurity Helper method that you haven’t seen.
On the topic of the WebSecurity Helper, notice that since you are now using roles to manage access to resources, you no longer need to use the RequireAuthenticatedUser method. In fact, you commented it out in the Admin folder’s _PageStart file.
Security in an ASP.NET Web Pages application is implemented by default through a mechanism called forms authentication. The three concepts behind the security model are identity, authentication, and authorization. Identity represents you on a website. It determines who you are. Authentication is a process whereby you confirm your identity by providing some proof, such as a user name and password combination. Authorization manages your access to features within the site based on the permissions you have been granted, or more often, permissions that people in a similar role to you have been granted.
The WebSecurity Helper is a component that includes numerous features for simplifying identity and authentication. It is a wrapper around the SimpleMembershipProvider class, which encompasses standard and extended ASP.NET membership properties and methods. The helper greatly simplifies the tasks of writing code to create accounts, managing logging in, logging out, and other related tasks such as resetting passwords and generating appropriate database tables for managing membership.
Authorization is managed via the SimpleRoleProvider class, which includes methods to create roles, establish whether the current user is in a role, add users to roles, remove users from roles, and so on. Through determining which role the current user is in, you can programmatically control what they see on a page, and which resources they can access within the site.
EXERCISES
1. What is the difference between authentication and authorization?
2. Imagine that you want to enhance the Details page to display a link to a page called Bid.cshtml, but you only want that link to be visible to users in the Bidder role. What is the code you would add to achieve this?
3. What is the difference between the membership table and the user table in your database?
Answers to the Exercises can be found in the Appendix.
What You Learned in This Chapter
| Topic | Key Concepts |
| Authentication | The process whereby you identify yourself to a website. |
| Authorization | The system that determines what permissions you have. |
| Identity | Who you are. |
| Membership | The system that manages creating identities and authenticating them. |
| WebSecurity | A helper that simplifies common membership programming tasks. |
| Roles | The system that manages groups of permissions and controls how they are applied to individuals. |
| Open Redirection Attack | A security flaw that allows hackers to spoof the redirection URL to fool the user into providing sensitive information. |