If you’re one of those who treat audio in Animate CC as an afterthought, think again. In many respects, audio is a major medium for communicating your message. In this chapter, we dig into audio in Animate CC: where it comes from, what formats are used, and how to use it in a project. Regardless of whether you are new to Animate CC or an old hand with Flash Professional, you are about to discover the rules regarding audio in Animate CC have changed—for the better.
We’ll cover the following in this chapter:
Audio file formats used in Animate CC
Adding and previewing audio in Animate CC
Playing audio from the Library
Playing remote audio files
Using JavaScript to control audio
If you haven’t done so already, download the chapter files. You can find them at http://www.apress.com/us/book/9781484223758 .
The following are the files used in this chapter (located in Chapter05/Exercise Files_CH05/):
FrogPan.fla
FrogLoop.fla
Bang.fla
Kaboom.mp3
ButtonSound.fla
CodeButtonSound.fla
LibraryLinkage.fla
Drowning_Past_the_Sky.wav
Alice.mp3
6Threads.jpg
RemoteSound.fla
RemoteSound2.fla
RemoteSound3.fla
Pukaskwa.jpg
RainStorm.mp3
Animate CC and Audio Formats
When it comes to sound, Animate CC is a robust application in that it can handle many of the major audio formats, including the more common formats listed here:
MP3 (Moving Pictures Expert Group Level-2 Layer-3 Audio): This cross-platform format is a standard for web and portable audio files. In many respects, the growth of this format is tied to the popularity of Apple iOS, Google Android, and other mobile operating systems and devices that handle personal audio playback. Although you can output these files in a stereo format, you really should pay more attention to bandwidth settings for your MP3s when publishing for the web. (ActionScript 3.0 and HTML5 Canvas)
WAV: If you use a computer to record a voice-over or other sound, you are familiar with the WAV format. WAV files have sample rates ranging from 8 kilohertz (the quality of your home phone) up to 48 kilohertz (DAT tapes) and beyond. These files are also available with bit depths ranging from 8 bits right up to 32 bits. Just keep in mind that a file with a sample rate of 48 kilohertz and a 32-bit depth will result in a massive file size that simply shouldn’t be used with Animate CC.
(ActionScript 3.0 and HTML5 Canvas)
AIFF(Audio Interchange File Format): AIFF is the standard for the Macintosh and offers the same sample rates and bit depths as a WAV file. Many purists will argue that the AIFF format is better than the WAV format. This may indeed be true, but to the average person, the difference between this format and WAV is almost inaudible. (ActionScript 3.0)
AAC(Advanced Audio Coding): AAC is the new “audio kid on the block” when it comes to working with audio in Animate CC. It is another lossy codec but is regarded as being far superior to its MP3 cousin. In fact, AAC was developed as the successor to the MP3 standard. Although you may not be familiar with the format, if you have ever downloaded a song from iTunes, used the Sony PlayStation, the Nintendo Wii, or even iPhone, you have “heard” an AAC-encoded audio file. (ActionScript 3.0)
ASND(Adobe Sound Document): In very simple terms, an ASND file is a stereo audio file that you can use in Premiere Pro, After Effects, or Animate CC. The format was introduced way back in Adobe Soundbooth CS4 as a way of easily moving audio between Premiere Pro, After Effects, and Animate CC while at the same time saving audio edits in a nondestructive manner. For example, you can launch Audition from the ASND file in the Animate CC project library and not only make changes to the stereo audio but get an entire “multitrack environment” as well as the ability to save multiple versions of your audio edits and move between them. (ActionScript 3.0)
AU, SND (Sun AU): A simple audio file format introduced by Sun Microsystems and used across a variety of applications. (ActionScript 3.0)
SD2(Sound Designer II): This format was originally developed by Digidesign for the Macintosh and is a widely accepted standard for transferring audio files between different applications. (ActionScript 3.0)
OGG, OGA(Ogg Vorbis): An open source patent-free audio compression format, developed as a replacement for proprietary digital audio encoding formats, such as MP3 and AAC.
(ActionScript 3.0)
FLAC(Free Lossless Audio Codec): A format similar to MP3, but without any loss in quality. The compression used is similar to ZIP compression, but is designed specifically for audio.
(ActionScript 3.0)
Take this obscure fact to a trivia contest, and you will clean up: AIFF also has a sample rate of 22,254.54KHz. Why the odd sample rate? This was the original Macintosh sample rate and was based on the horizontal scan rate of the monitor in a 128KB Mac.
Bit Depth and Sample Rates
We traditionally visualize sound as a sine wave—when the wave rises above the vertical, the sound gets “higher”; where it runs below the vertical, the sound gets “lower.” These waves, shown in Figure 5-1, are called the waveform. The horizontal line is silence, and the audio is “measured” from the top of one “blip” to the top of the next one along the waveform. These blips are called peaks, and the sampling is done from peak to peak.
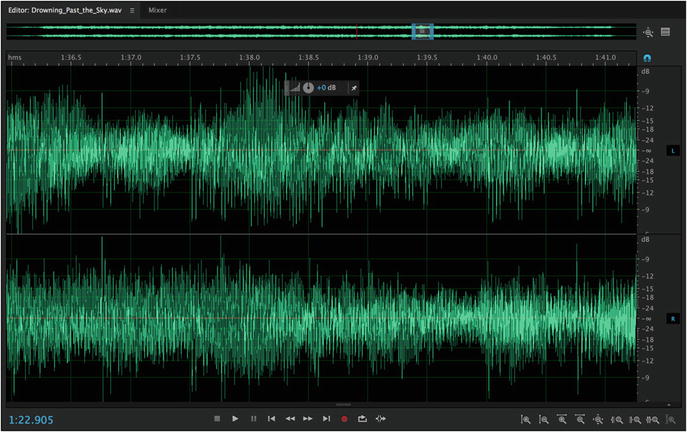
Figure 5-1. A typical stereo waveform from Audition
For any sound to be digitized, like a color image in Illustrator or Photoshop, the wave needs to be sampled. A sample is nothing more than a snapshot of a waveform between peaks at any given time. This snapshot is a digital number representing where, on the waveform, this snapshot was taken. How often the waveform is sampled is called the sample rate.
Bit depth is the resolution of the sample. A bit depth of 8 bits means that the snapshot is represented as a number ranging from –128 to 127. A bit depth of 16 bits means that the number is between –32,768 to 32,767. If you do the math, you see that an 8-bit snapshot has 256 potential samples between each peak, whereas its 16-bit counterpart has just over 65,000 potential samples between the peaks. The greater the number of potential samples of a wave, the more accurate the sound. The downside to this, of course, is the more samples on the wave, the larger the file size. These numbers represent where each sample is located on the waveform. When the numbers are played back in the order in which they were sampled and at the frequency they were sampled, they represent a sound’s waveform. Obviously, a larger bit depth and higher sample rate mean that the waveform is played back with greater accuracy—more snapshots taken of the waveform result in a more accurate representation of the waveform. This explains why the songs from an album have such massive file sizes. They are sampled at the highest possible bit depth.
One wave cycle in one second is known as a hertz, which can’t be heard by the human ear, except possibly as a series of clicks. Audible sound uses thousands of these waves, and they are crammed into a 1-second time span and measured in that span. A thousand waveform cycles in one second is called a kilohertz (KHz), and if you listen to an audio CD, the audio rate is sampled at the frequency of 44.1 thousand waves per second, which is traditionally identified as 44.1KHz. These waves are the sample rate.
The inference you can draw from this is the more samples per wave and the more accurate the samples, the larger the file size. Toss a stereo sound into the mix, and you have essentially doubled the file size. Obviously, the potential for huge sound files is there, which is not a good situation when dealing with Animate CC. Large files take an awfully long time to load into a browser, which means your user is in for a painful experience. One way of dealing with this is to reduce the sample rate or number of waves per second.
The three most common sample rates used are 11.025KHz, 22.05KHz, and 44.1KHz. If you reduce the sample rate from 44.1KHz to 22.05KHz, you achieve a significant reduction, roughly 50 percent, in file size. You obtain an even more significant reduction, another 50 percent, if the rate is reduced to 11.025KHz. The problem is reducing the sample rate reduces audio quality. Listening to your Beethoven’s Ninth Symphony at 11.025KHz results in the music sounding as if it were playing from the inside of a tin can.
As an Animate CC project designer or developer, your prime objective is to obtain the best quality sound at the smallest file size. Though many audio-focused developers tell you that 16-bit, 44.1KHz stereo is the way to go, you’ll quickly realize this is not necessarily true. For example, a 16-bit, 44.1KHz stereo sound of a mouse click or a sound lasting less than a couple of seconds—such as a whoosh as an object zips across the screen—is a waste of bandwidth. The duration is so short that average users won’t realize it if you’ve made your click an 8-bit, 22.05KHz mono sound. They hear the click and move on. The same holds true for music files. The average user is most likely listening through the cheap speakers that were tossed in when they bought their computer. In this case, a 16-bit, 22.05KHz soundtrack will sound as good as its CD-quality rich cousin.
Animate CC and MP3
The two most common sound formats imported into an Animate CC project are WAV and AIFF. Both formats share a common starting point—they are both based on the Interchange File Format proposal written in 1985 by Electronic Arts to help standardize transfer issues on the Commodore Amiga. Like video, sound contains a huge amount of data and must be compressed before it is used. This is the purpose of a codec. Codec is an acronym for enCODer/DECoder, and the format used by Animate CC to output audio is the MP3 format, although you can import both AIFF and WAV files (and others) into Animate CC.
As Animate CC is generally a platform-agnostic application—certain audio file formats cannot be imported across all project types. You will generally be safe with WAV or MP3… but anything else can get strange. If you want to create a project that is as trouble-free as possible, stick with WAV and MP3.
Let’s take WAV files versus MP3 files as an example. From your perspective, the need to compress audio for web delivery makes the use of WAV files redundant. The MP3 format is the standard, which explains why WAV files are converted to MP3 files on playback. If you are working with an audio-production facility, you will often be handed a WAV file. Even if you have the option of receiving an MP3, you are better off with the WAV file, for the same reason that you wouldn’t want to recompress a JPG file: because they are both lossy compression schemes.
Why are MP3 files so small but still sound so good? The answer lies in the fact that the MP3 standard uses perceptual encoding. All Internet audio formats toss a ton of audio information into the trash. When information gets tossed, there is a corresponding decrease in file size. The information tossed when an MP3 file is created includes sound frequencies your dog may be able to hear but you can’t. In short, you hear only the sound a human can perceive (and this sort of explains why animals aren’t huge fans audio playback through iPhones).
All perceptual encoders allow you to choose how much audio is unimportant. Most encoders produce excellent-quality files using no more than 16Kbps to create voice recordings. When you create an MP3, you need to pay attention to the bandwidth. The format is fine, but if the bandwidth is not optimized for its intended use, your results will be unacceptable, which is why applications that create MP3 files ask you to set the bandwidth along with the sample rate.
So much for theory; let’s get practical.
Adding Audio to Animate CC
Knowing that you can bring all of these formats into Animate CC for certain project types and that MP3 is the output format for your project is all well and good. But how do they get into Animate CC, and, more importantly, how does an WAV file get converted to an MP3 file when it plays in Animate CC? Let’s explore that right now starting with an import.
Importing an Audio File
To see what happens when you import an audio file, create a new HTML5 Canvas document and import Drowning_Past_the_Sky.wav (in the exercise folder of this chapter) to the Library. Because of the unique manner in which sound files are added to an Animate CC movie, they simply cannot be imported to the stage.
If you select Import to Stage when importing an audio file, it won’t be placed on the stage. Instead, it will be placed directly into the Library.
When you open the Library and select the file, you will see the file’s waveform in the preview area, as shown in Figure 5-2. You can click the Play button, which is the triangle located above the waveform in the preview area, to test the sound file.
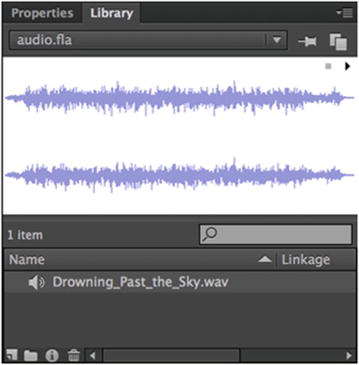
Figure 5-2. Select an audio file in the Library, and its waveform appears in the preview area
Setting Sound Properties
To set the sound properties for an audio file, double-click the speaker icon next to the audio file’s name in the Library. Figure 5-3 shows the Sound Properties dialog box for Drowning_Past_the_Sky.wav.
Figure 5-3. The Sound Properties dialog box is opened when you double-click an audio file in the Library
This dialog box is a really useful tool. You can use it to preview and stop an audio file: click the Test button to preview the sound file, and then click the Stop button to stop the sound playback. The Update button is also handy. If an audio file has been edited after being placed into Animate CC, you can click the Update button to replace the imported copy with the edited version—as long as its original location on your hard drive hasn’t changed since the file was imported. If the file has moved, use the Import button to find it again, or replace this Library asset with a new file.
Notice the audio information under the path and date. This file—at over 2.0 minutes in duration (149.1 seconds) and around 26MB (26305.2KB)—is rather large.
From our perspective, the Compression drop-down list is of major importance. In this drop-down, you are asked to pick a codec. In Animate CC, the default is to export all sound in the MP3 format. Still, the ability to individually compress each sound in the Library is an option that shouldn’t be disregarded. Your choices are as follows:
ADPCM: This type of sound file is best suited for very short clips and looped sound. This format was the original sound output format in older versions of Animate CC. If, for example, you are outputting for use in Flash Player 2 or 3, ADPCM is required.
Doc Type: (ActionScript 3.0)
MP3: Use this for Flash Player versions 4 or newer, or HTML5 Canvas. MP3s are also not suited for looping sounds because the end of a file is often padded.
Doc Type: (ActionScript 3.0 and HTML5 Canvas)
Raw: No compression is applied, and it is somewhat useless if sound is being delivered over the Web. If you are creating Flash Player content for use on a DVD or CD or an Animate CC movie for incorporation into a video, this format is acceptable.
Doc Type: (ActionScript 3.0)
Speech: Introduced in Macromedia Flash MX, this codec (originally licensed by Macromedia from Nellymoser) is ideal for voice-over narrations.
Doc Type: (ActionScript 3.0)
Once you select a codec, additional compression settings will appear. For our example, select MP3 from the Compression drop-down menu, and the settings change, as shown in Figure 5-4. Click the Test button and listen to the sound. What you may notice is how flat the audio is compared to the original version. If you take a look at the bit rate and quality settings in the Preprocessing area, you will see why. That 26MB file is now sitting at about 1 percent of its original size, or 298KB.
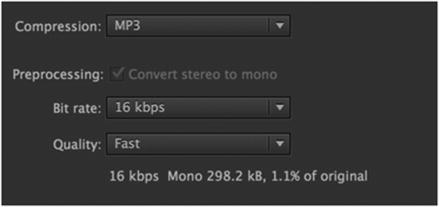
Figure 5-4. Setting MP3 compression
Change the bit rate to 48Kbps, and select Best in the Quality drop-down menu. Also make sure that Convert stereo to mono is selected. If you click the Test button, you will hear a marked improvement in the audio quality.
Unless your audio includes specialized panning or there is some other compelling reason for using stereo, feel free to convert the stereo sound to mono. The user won’t miss it, and the audio file size will plummet. Animate CC even allows mono sounds to be panned.
Asking you to compare the audio quality to the original in the previous two steps is a bit disingenuous on our part. Our intention was to let you “hear” the quality differences, not compare them with the original audio. In the final analysis, comparing compressed audio against the original version is a “fool’s game.” Users never hear the original file, so what do they have as a basis for comparison? When listening to the compressed version, listen to it in its own right and ask yourself whether it meets your quality standard.
No, you can’t “supersize” an audio file. If the original file being used has bit rate of 48Kbps when imported into Animate CC, you can never increase the bit rate above that level in Animate CC. “Up-sampling” audio will more often than not decrease, not increase, the audio quality.
If you’re using an ActionScript 3.0 document, one other place where the sound output format can be set is through the Publish Settings panel. To access these settings, select File ➤ Publish Settings, and select the Flash (.swf) option in the left panel. Near the top of this panel, shown in Figure 5-5, are preferences for Images and Sounds, which include Audio stream and Audio event settings. We’ll get into these two in the next section, but the important thing to note for now is the Override sound settings check box. If you select this check box, the audio settings shown for the Audio stream and Audio event areas will override any settings applied in the Sound Properties dialog box. Think of this as the ability to apply a global setting to every sound in your movie. Unless there is a compelling reason to select this choice, we suggest you avoid it. It’s better to spend time with each file rather than apply a setting that may actually degrade quality for a couple of files.
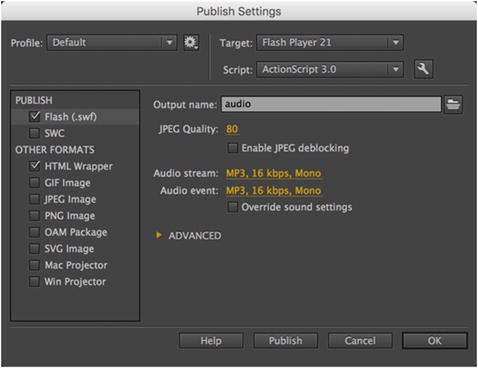
Figure 5-5. The Images and Sounds settings
If you do have a compelling reason to use these settings, click the relevant Set button, and you will be presented with the same options in the Sound Properties dialog box.
Now that you know what the properties do, let’s move on to using a sound file in Animate CC. If you have been following along, close any documents you might have open and don’t save the changes.
Using Audio in Animate CC
In Chapter 1, you added some crickets and wolves howling using audio files to enhance the ambience of the movie and to add a bit of realism to it. We asked you to do a couple of things in that chapter, but we didn’t tell why you were doing them. The purpose was to get you hooked on Animate CC, and it obviously worked because you are now at this point of the book. The time has arrived to give you the answers to the “Why?” questions.
Choosing a Sound Type: Event and Stream
Animate CC has two primary types of sound: Event and Stream . There are also three types of Event sounds—Event, Start, and Stop—but these are all basically variations of the main Event sound type. We will make this distinction here and there, as it is important to know the differences in each. Although, as you saw, when defining sound compression options for an ActionScript 3.0 document, you can define the settings for only Event and Sync, as these are the primary. If Start is chosen, it adopts the same global compression settings as Event sound!
Event and Start sounds tell Animate CC to load a sound completely into memory—as soon as the playhead encounters the frame with this audio—before playing it. Once loaded, the sound continues to play, even if the movie’s playhead stops, which means event sounds are not locked to the timeline. (Audio can be forced to stop, but that takes specific action on your part; that is where Stop comes into play.)
In a 24 fps Animate CC movie, a file like Drowning_Past_the_Sky.wav from the previous section takes about 3,575 frames to play completely. If you’re hoping to synchronize that with animation in the same timeline, think again. If the resultant animation is played back on a slower machine than yours, it’s almost certain the audio will not conclude on the frame you expect. Also, a movie would take a long time to start playing, because the project must load the sound fully before playback can begin.
Event and Start sound are ideal for pops, clicks, and other very short sounds or in situations where the audio will be played more than once or looped. These sounds will begin to play on the first frame they are encountered and will continue to play until the sound playback reaches the end, regardless of the frames provided. Start sound will behave exactly as Event sound does—with one exception—it will not play a new instance of the sound if the same sound is already playing. If you want to synchronize extended audio with timeline animation, use streaming sound. Event sound is available in both HTML5 Canvas and ActionScript 3.0 document types, but Start, Stop, and Stream sound sync are only available in ActionScript 3.0 document types.
Stop sound is more of a command then a sound type. Having this declaration on a certain frame will stop the Event or Start sound from completing playback at the point it is encountered. Stop sound commands such as this are only available in ActionScript 3.0 document types.
Stream sound is a sound that can begin playing before it has fully loaded into memory. The tradeoff is that it must be reloaded every time you want to play it. This sound type is ideal for longer background soundtracks that play only once. Because it is in lock-step with the timeline, streaming sound is the only realistic option for cartoon lip-syncing or any scenario that requires tight integration between audio and visuals. Stream sound is only available in ActionScript 3.0 document types.
Now that you know what to expect, let’s work with both primary types:
Open the ActionScript 3.0 document Bang.fla file. We are using an ActionScript 3.0 document for this example because both main sound types—Event and Stream—can be used in it. When it opens, you will see we have included the kaboom.mp3 audio file in the Library.
Rename the layer in the timeline to Audio and drag the kaboom file from the Library onto the stage. Audio files are added to the Animate CC timeline by dropping them on the stage or the pasteboard where they seemingly vanish—but not by dragging them onto the timeline. When you release the mouse, you may see a line running through the middle of frame 1 in the timeline. This line is the start of the waveform.
Insert a frame in frame 100 of the timeline. You can now see the entire waveform on the timeline.
Right-click (Windows) or Control+click (Mac) the layer name and select Properties from the context menu.
When the Layer Properties dialog box opens, as shown in Figure 5-6, select 300 percent from the Layer height drop-down menu and click OK. When you release the mouse, the layer view is three times larger, and you can see the full waveform.
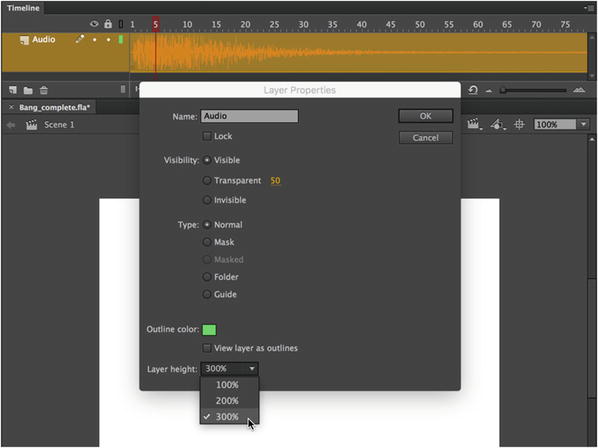
Figure 5-6. Use the layer properties to “zoom in” on the timeline.
Being able to see the waveform on the timeline is a huge advantage to you because you can now use the waveform’s peaks or valleys to time animation of other events to the audio file in Stream mode.
Click once in the waveform on the timeline anywhere but frame 1, and in the Sync area of the Properties panel, select Event from the drop-down menu. Press Enter (Windows) or Return (Mac). The playback head moves, but the sound doesn’t play. Drag the playback head to frame 1, and press Enter (Windows) or Return (Mac).
What you have just heard is a fundamental truth of an event sound: you can only preview event and start sounds by playing them in their entirety, or at least from their initial frame.
Being the nice guys we are, you can thank us for not using the Drowning_Past_the_Sky.wav audio file. If it were a Start sound, you would be sitting here listening to the full two minutes and 29 seconds of the file. Start sounds play for their entire duration, and you can’t stop playback by pressing Enter (Windows) or Return (Mac). All that does is to start playing another copy of the sound over the one that is currently playing. To stop and start sound from playing on the timeline, press the Esc key.
Change the Sync setting to Stream, as shown in Figure 5-7. This time, drag the playhead across the timeline. Notice you can hear the sound as you scrub across it. Drag the playback head to frame 2 and press Enter (Windows) or Return (Mac). The sound plays from that point and, for longer audio files, pressing the Enter (Windows) or Return (Mac) key stops playback.
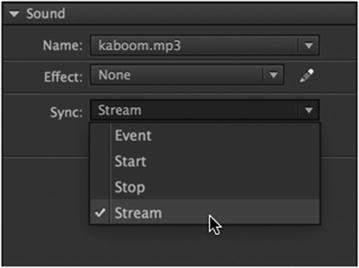
Figure 5-7. Using stream or event sound in the Properties panel
The downside is the playback is only for the frame span on the timeline. For example, the Drowning_Past_the_Sky.wav file would require 3,575 frames on the timeline to play the entire track. If the span were only 50 frames, you would be able to play only about two seconds of the file, assuming your frame rate is set to Animate CC’s default rate of 24 frames per second.
We have also mentioned the Start and Stop choices in the Sync drop-down menu. As mentioned earlier, they’re similar to the Event sync option with the extra ability to keep sounds from overlapping. Let’s try them:
Add a new timeline layer and name it audio2. Add a blank keyframe to frame 20 of the new layer, select that frame, and drag kaboom.mp3 from the Library to the stage. Now you have two layers associated with the explosion sound.
In the audio2 layer, set the Sync property to Event for the audio in frame 20. Drag the playhead to frame 1 and press Enter (Windows) or Return (Mac). You’ll hear two explosions.
Change the Sync property in frame 20 to Stop. The first thing to notice is that the audio file in the audio2 layer disappears. Press Enter (Windows) or Return (Mac) again from frame 1, and you’ll hear only one explosion. Not only that, but the explosion gets cut off right at frame 20. That’s the playhead encountering the Stop keyframe. It’s important to understand that a Stop keyframe doesn’t halt all sounds. The halted sound must be specified.
Select frame 20 and choose None from the Properties panel’s Name drop-down list. Now you merely have a keyframe set to Stop, but without an associated sound. Press Enter (Windows) or Return (Mac) from frame 1, and you’ll hear the full explosion.
Select frame 20 once again. Reselect kaboom.mp3 from the Name drop-down list.
Select frame 20 one last time, and change the Sync property to Start. Press Enter (Windows) or Return (Mac) from frame 1, and you might be surprised to hear only one explosion. Didn’t you just tell two of the sounds to play (one as Event and one as Start)? You did, but the Start option waits until the specified sound has finished before it starts another copy of it.
Drag the keyframe at frame 20 until you move it past the waveform in the audio layer—frame 98 should do it. Now that the Start keyframe has moved beyond the previous sound, you should hear two explosions again when you press Enter (Windows) or Return (Mac) from frame 1. Users on a slower computer might hear only one explosion, because the first sound may not have finished by the time the playhead hits frame 100. Like the Stop option, Start relies on an explicit sound file reference in the Name drop-down list.
Before finishing with the bang.fla, let’s get an interesting quirk out of the way.
Removing an Audio File from the Timeline
Audio files simply can’t be deleted from the timeline. Go ahead, try it:
Hold down the Shift key and select frames 1 and 100 on the timeline to select the audio file. Press the Delete key. Nothing happens.
To remove an audio file from the timeline, select a frame in the audio waveform, and in the Properties panel, select None from the Name drop-down menu. The sound is removed.
To put the kaboom.mp3 audio file back on the timeline, open the Name drop-down menu and select kaboom.mp3. If you have a number of audio files in your Library, they will all be listed in this drop-down menu, and you can use it to add or change audio files without deleting them or dragging them onto the stage.
Close Bang.fla without saving the changes.
Getting Loopy
If you want to loop your audio, the Properties panel puts a couple choices at your disposal. Here’s how to set up looping:
Open FrogLoop.fla in the exercise folder for this chapter. Press the Enter (Windows) or Return (Mac) key, and you will hear a frog croak. The waveform shows that the croaking happens only once, even though the timeline spans 60 frames. Surely, the frog has more to say than that. Let’s give it something to really sing about.
Select anywhere inside the waveform, and change the 1 next to the Repeat drop-down list to 4, as shown in Figure 5-8. Notice that the waveform now repeats four times.
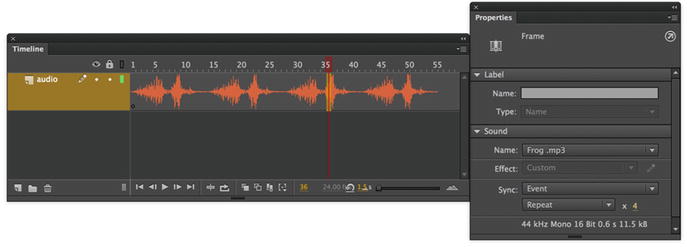
Figure 5-8. Use the Sync area’s Repeat drop-down list to configure looping
Scrub the timeline to verify that, as an event sound, the audio does not preview until you press Enter (Windows) or Return (Mac) from frame 1. HTML5 Canvas cannot employ stream sound.
If you were using an ActionScript 3.0 document type, you would be able to change the Sync property to Stream and scrub again. As expected, you would now hear the audio as you drag the playhead. This tells you that streaming sound can be looped just like event sound when utilizing ActionScript.
Change the Sound Loop property value to Loop. The x 4 value next to the drop-down list disappears, and the waveform changes visually to what looks like a single play-through. In spite of its looks, this sound will repeat forever unless you stop it with a Stop Keyframe later in the timeline—or until your user closes your project or flees the web page out of desperation. The Loop setting repeats a sound indefinitely once published.
Close the file without saving the changes.
Be very careful with the Loop setting! If a sound is set to Event and Loop, you can accidentally cause instant psychosis if the timeline has more than one frame. Timelines naturally loop when they hit the end of their frame span. If the timeline cycles back to frame 1 while the audio is still playing, you can quickly produce an unwanted echo torture chamber.
Adjusting Volume and Pan
Animate CC lets you adjust the volume of audio files even after they’ve been imported to the Library. Because of the way Animate CC outputs its internal audio mix, this also means you can pan your sounds by adjusting each speaker’s volume separately. In effect, you can bounce audio back and forth between the two speakers, even if those audio files were recorded in mono.
Ideally, you’ll want to set a file’s overall volume with audio-editing software, such as Adobe Audition. Animate CC can’t magnify a file’s volume; it can only reduce the volume. So, the volume of your file as recorded is the volume it plays back in Animate CC when the settings are turned all the way up.
You’ll be surprised how easy it is to slowly pan the frog serenade from left to right in the timeline. You can only set custom sound effects if targeting an ActionScript 3.0 target in your Animate CC document. Here’s how:
Open the FrogPan.fla file in the Chapter 5 exercise folder. Click into frame 1 of the audio layer, and verify that the Sync property is set to Event and Repeat x 4.
Select Fade to right in the Effect drop-down list in the Properties panel, as shown in Figure 5-9. Test the project so far.
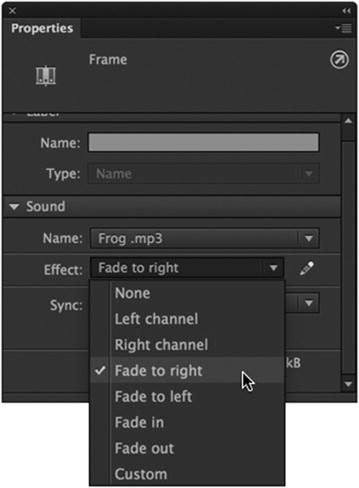
Figure 5-9. The Effect drop-down list lets you change volume and panning
You’ll hear that the effect works, but the panning moves to the right almost immediately, rather than spread over the four “ribbits.” This happens because Animate CC evaluates the actual length of an audio file when assigning one of its effects presets. It’s easy enough to tweak.
Click the Edit button, which looks like a pencil, next to the Effect drop-down list. This opens the Edit Envelope dialog box, as shown in Figure 5-10.
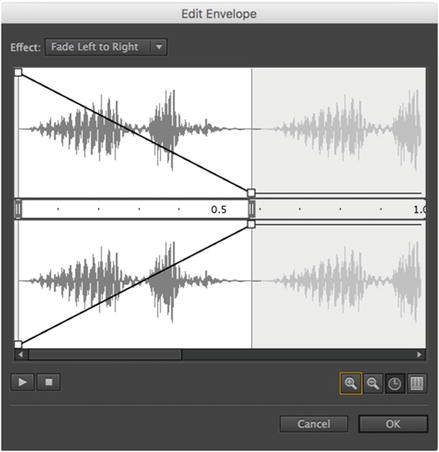
Figure 5-10. The Edit Envelope dialog box lets you apply volume changes to audio files
In the Edit Envelope dialog box, the diagonal lines represent a change in volume in the left (top) and right (bottom) speakers. The volume steadily decreases on the left (moves down) while increasing on the right (moves up), which gives the illusion that the croaking sweeps across the screen. Note that the effect applies to only the first occurrence of the waveform.
Notice the series of buttons along the bottom of the dialog box. You can preview your effect settings by clicking the Play and Stop buttons on the left. On the right, you can zoom in and out to show less or more of the waveform span. The Seconds and Frames buttons affect how the horizontal number line in the middle looks: seconds or timeline frames.
Click the Zoom Out button until all repeats of the waveform are visible. Drag one of the right-side squares on the diagonal lines toward the end of the fourth repeat, as shown in Figure 5-11. It doesn’t matter if you drag in the top or bottom—both will move. The Effect field in this dialog box changes to show Custom, because you’ve altered one of the presets.
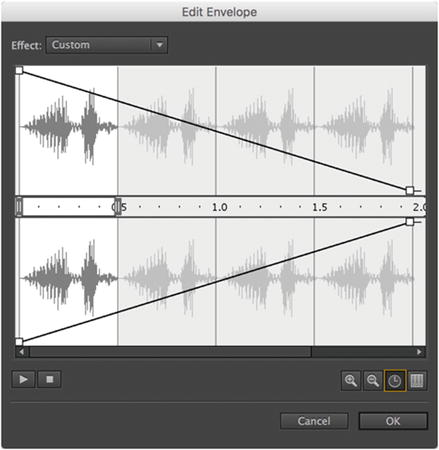
Figure 5-11. The Edit Envelope dialog box lets you apply custom audio effects
Click the Play button to preview the updated effect. Now the panning happens more slowly, arriving fully in the right speaker only after the fourth “ribbit” ends.
Experiment with other Effect drop-down presets. Play around with altering them. Here’s a hint: You can add new draggable white squares by clicking anywhere along one of the diagonal lines. Remove white squares by dragging them off the dialog box.
Click OK and save your movie.
Splitting Stream Audio Along the Timeline
When working with Stream sound in Animate CC, you sometimes need to split the audio at certain frames and resume later on. You can split the stream audio embedded on the timeline using the Split Audio context menu . When using Stream sound within an ActionScript 3.0 document, right-click on the waveform to summon the context menu and choose Split Audio to create a new keyframe. You can perform this action at multiple points along the timeline, and selecting the sound as none across certain segments will, in effect, pause the audio for the duration of those frames, resuming the Stream audio playback once it is enabled through subsequent frames.
This is a really useful feature for lengthy audio segments you must sync to specific frames, or for extending pauses within your Stream sounds. Again, this is only available in ActionScript 3.0 document types.
A Note from a Master
Dave Shroeder is regarded by many in this industry as being a master when it comes to the use of audio in Animate CC. He has spoken at a number of very important industry conferences, and his company, Pilotvibe ( www.pilotvibe.com ), has developed a solid international reputation for supplying the industry with high-quality sound loops and effects for use in Animate CC. In fact, his home page, shown in Figure 5-12, can be regarded as a master class in the effective use in audio to set the “mood” in an Animate CC movie.
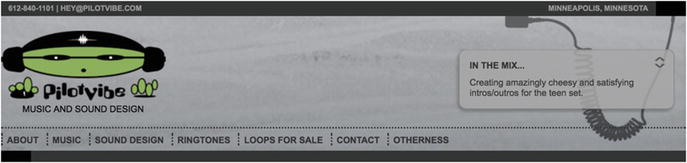
Figure 5-12. The Pilotvibe home page is a master class in the effective use of sound in Animate CC
Who better to talk to you about the use of audio in Animate CC than the guy who lead in setting the standard?
“Once you start to play around with adding sound to Flash (Animate CC) files, you’ll probably realize that it can add an incredible dimension to your project. Sound can really tie an experience together. It can bring an animation to life. It can create a mood or suggest characteristics that reinforce your message. It can be entertaining or informative or both.
If sound is an option for your project, start with some simple planning. First determine why adding sound makes sense. What purpose does it serve? Does voice-over communicate a story? Do button sounds make the site easier to navigate? Do sound effects make a game more fun or easier to play? Does music give it a cool character? Use answers to these questions to generate a short “sonic mission statement” that outlines why and how you plan to use sound. Do this early in project planning, not after the Animate CC work is done.
Sourcing sounds is easier and cheaper than ever before, thanks to the Internet. There are many web sites that will allow you to search and download files for reasonable fees. Once you’ve found sounds, use audio-editing software to adjust them to have similar sonic qualities. You want them to sound like they’re in the same room or in the same canyon or the same secret underground lair, and so on. Adjust their volumes and equalization (EQ) to achieve this. Use your ears, listen, and you’ll do fine. Do they sound close or far, light or heavy, fast or slow? Also, trim the heads and tails of the sound files to be as short as possible without cutting the sound off. The shorter the file, the better it syncs, and the smaller the file size.
When you’re picking music, try to find a piece that fits the mood or reinforces the story. Don’t just use death metal because you like death metal or techno for techno’s sake. Music has emotional power that transcends genre, and you want to leverage it to make your project as engaging as possible. If you’re working with loops, trying to use as long a loop as possible given your file size considerations. Anything under 10 seconds gets old pretty fast unless it’s something minimal like a drumbeat. Look into layering loops to create the illusion of a longer track with more variation.
A sound on/off button is a courtesy I always recommend. Compress your sounds so they sound good. A little bit bigger file is worth it if it means people will listen to it. A tiny file that sounds lousy is worse than no sound. Also, compress each sound so it sounds good by itself and in relation to the other sounds. A combination of hi-fi and lo-fi sounds wrecks the illusion of the sounds existing together.”
Thanks, Dave, and also thank you for supplying our readers with the Pilotvibe clips in the exercise folder.
Your Turn: Adding Sound to a Button
Let’s what you have learned to practical use and blow some stuff up. Follow these steps to accomplish this task:
Open the ButtonSound.fla file in your exercise folder and import the kaboom.mp3 file into your Library.
Double-click the Blam button symbol in the Library to open it in the Symbol Editor.
Add a new layer named Audio and add a keyframe to the Down area of the Audio layer.
With the keyframe selected, drag a copy of the kaboom audio file to the stage. Your timeline should now resemble that shown in Figure 5-13.
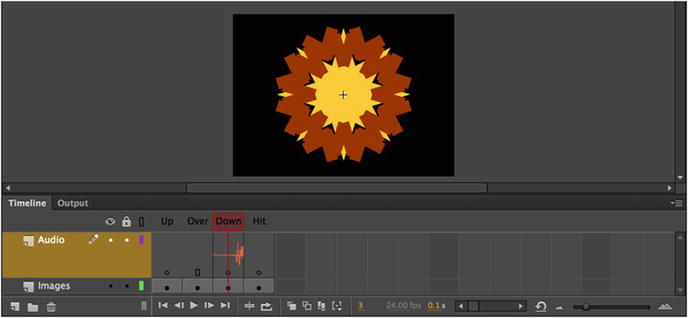
Figure 5-13. You can add sound to buttons
Click in the waveform, and in the Properties panel, select Event in the Sync drop-down menu.
This may seem like an odd instruction because all sounds added to the stage are event sounds by default. We have been around this silly business long enough to embrace the wisdom of the following rule: trust no one and nothing, especially yourself. Get into the habit of double-checking everything and never assuming everything is correct.
Click the Scene 1 link to return to the main timeline.
Test the file. When the browser opens, click the button. You will hear an explosion every time you click the button.
Now that you understand how audio files can be used in Animate CC, let’s take that knowledge to the next level and actually control sound using JavaScript. This is where the full power of audio in Animate CC is handed to you.
Controlling Audio with JavaScript
Before we start, let’s really get clear on the following: you aren’t going to be fully exploring the nuances and features of audio controlled by code. We are going to give you the basics in this section. These include:
Playing a sound in the Library without adding it to the timeline
Using movieclips and buttons to turn audio on and off
Using movieclips and buttons to load sound dynamically—from your HTTP server—into your Animate CC movie
Things work a little differently when using ActionScript, but are similar enough that you should be able to get a good grasp of the differences in syntax. We’ll highlight these differences where it is useful or necessary.
Playing a Sound from the Library
This technique is ideal for sounds that need to play in the background. Be aware that any sound played through JavaScript is always treated similar to an Event sound, but with a bit more control.
Open a new HTML5 Canvas document and import the Drowning_Past_the_Sky.wav file into the Library. The plan is to have this sound play as background audio, when the movie starts.
Select the Drowning_Past_the_Sky.wav file in the Library. Note the Linkage column just to the right of the Name column. This is where we will enter the Linkage identifier.
Double-click in the Linkage column and enter the Linkage identifier BG_Music, as shown in in Figure 5-14. If you are going to play audio files contained in the Library and control them through JavaScript, they must be given this special identifier property to let CreateJS find them in the Library.
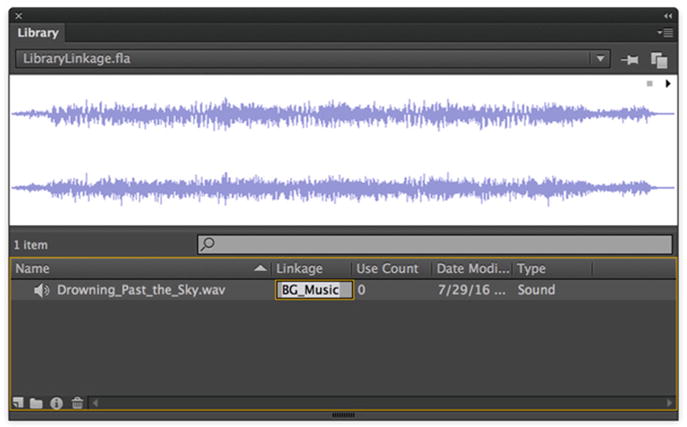
Figure 5-14. Establishing a linkage identifier
In ActionScript 3.0, “linkage” is accomplished in a different way from JavaScript. You need to create a custom class that extends the native Sound class. Fortunately, Animate CC handles the entire process for you, al though advanced developers may, if they want, go to the expense of writing the actual external class file normally needed. You can find this Class field in the ActionScript tab of the Sound Properties dialog box when utilizing ActionScript 3.0.
Click anywhere outside of this field to set the Linkage identifier for your sound file.
Rename Layer 1 to Actions, select the first frame in the layer, and open the Actions panel. Enter the following code:
createjs.Sound.play("BG_Music");This line of the code tells CreateJS to play a sound from the Library and uses the BG_Music Linkage identifier to determine which sound to play.
Save the file as LibraryLinkage.fla, and then test the movie by pressing Ctrl+Enter (Windows) or Cmd+Return (Mac). When the browser opens, the sound will play. To stop the audio, close the browser.
So where does the sound file end up? Have a look in the directory that you saved LibraryLinkage.fla and you will see a sounds directory. Enter this directory and you will find that Drowning_Past_the_Sky.wav has been converted by Animate CC to Drowning_Past_the_Sky.mp3 and placed in this directory. Animate CC certainly does a lot of the work for us!
Using a Button to Play a Sound
In an earlier example, you added the kaboom sound directly to the timeline of the button symbol . This time, you are going to use a button—although you can just as easily use a movieclip. Also, instead of embedding a sound in the button, you will have the sound play from the Library. Follow these steps:
Open the CodeButtonSound.fla file in this chapter’s exercise folder. In the Library, you will see a button and the kaboom.mp3 audio file.
Select the kaboom.mp3 audio file in the Library. Use the Linkage column in the Library, as in the previous exercise, to give this audio file a linkage identifier of Blam.
Click the button symbol on the stage and give it the instance name of btnPlay. (Remember that symbols controlled by JavaScript need an instance name.)
Add a new layer named Actions to the timeline. Lock the scripts layer, select the first frame, and open the Actions panel. Enter the following code:
this.btnPlay.on("click", playClicked);function playClicked(e){createjs.Sound.play("Blam");}The first line binds an event handler to listen for click events on the btnPlay button. When this event is detected, the playClicked() function will execute. In turn, the playClicked() function invokes the CreateJS Sound.play() method, which accepts the argument “Blam”—identifying the Blam sound in the Library through the Linkage identifier. The result is that you hear an explosion when you click the button.
Save the file and test the movie.
While simple event-level sound playback works wonderfully within HTML5 Canvas, audio playback in the web browser is woefully crippled beyond that. Many browsers have widely varying support for the standards dealing with audio. As a result, you never really know what might work and what might fail beyond simple event playback. An interesting thing to note is that the CreateJS Sound class can actually fall back to use the robust audio control in Adobe Flash Player if audio support for the browser in question is… questionable.
Playing a Sound from Outside of Animate CC
You know that embedding sound into the project library adds to overall package size for distribution. Is there a way to play a sound that isn’t inside the project library? Perhaps from a curated online repository? The answer is absolutely.
One of your authors is an active member of the An Early Morning Letter, Displaced darkambient studio recording project—and also the Shivervein side project. There also exists a set of three community compilation albums of free music in the Emergent Collective series. You are encouraged to explore the catalog of music available though these projects, as published by Fractured Vision Media, LLC, at http://fracturedvisionmedia.com/music .
The best use for this technique is to play any audio file that is longer than a couple of seconds. In this case, we will be using a lengthy music track entitled “Alice”. This was originally an atmospheric composition for a haunted house type event composed by the darkambient studio recording artist An Early Morning Letter, Displaced. A shorter, more concise (5:45) version titled “Alice (the bones)” was featured on the 2009 Shudderflowers LP release, and in 2010, the full 7 minute 23 second track was released as part of the 6Threads retrospective EP. The longer, original version of this track is included within the exercise files as an .mp3 file.
Open the RemoteSound.fla file in this chapter’s exercise folder. You will notice we already have a number of assets on the stage, including some artwork, text, and what appear to be buttons. Ignore that for now.
Add a new layer named Actions, select the first frame in the Actions layer, open the Actions panel, and enter the following code (we will review it after you test the movie):
createjs.Sound.on("fileload", handleLoad);createjs.Sound.registerSound("alice.mp3", "alice");function handleLoad(e) {createjs.Sound.play("alice");}Test the movie to view your published content in a web browser. The audio starts to play.
The second line of the JavaScript you entered handles the external sound. In CreateJS, you can’t simply tell Animate CC, “There’s an audio file in this folder that you need to play.” Instead, you need to register it with CreateJS to specify the file’s location and assign it an ID. That ID, named alice, gets passed as a parameter to the play() method of the Sound class within the handleLoad() function once the load is completed.
If the MP3 is in the same folder as the HTML document, you can simply name the MP3 without a file path. Of course, you can just as easily use an absolute path to a folder on your server. In that case, the syntax would be something like this:
createjs.Sound.registerSound("http://some.server.com/audio/alice.mp3", "alice");In recent years, web browsers have become very picky regarding cross-domain server permissions. Most browsers will not allow any data—images, video, audio, or even raw text data—to be transferred across domains unless the headers of the originating server allow it. For more information on this, have a look at the CORS specification at http://www.html5rocks.com/en/tutorials/cors/ (it’s messy business).
Turning a Remote Sound On and Off
The previous exercise contained a rather nasty usability flaw. The audio file played, and there was no way, other than closing the browser, to turn it off. Let’s address this oversight. In this exercise, you will code up two buttons: one button will play the sound, and the other will turn it off. The really neat thing about these buttons is that they aren’t buttons. You are about to learn how movieclips can be used as buttons instead. Let’s get started:
Using the modified RemoteSound.fla file. Again, we have provided you with the raw material, as shown in Figure 5-15. The Start button with the instance name playMC will be used to turn the sound on. The Stop button, stopMC, will be used to turn the sound off.
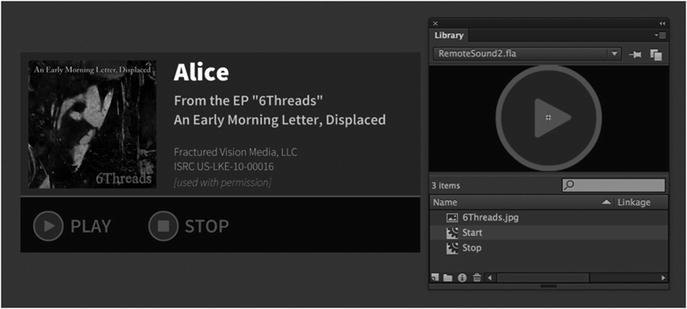
Figure 5-15. Two movieclips are used to turn a sound on and off
The choice of instance names is deliberate. Many Animate CC designers and developers try to use contractions that tell the developer what type of object is being used. This explains why you may see code elsewhere and the instance names somehow contain an indication of exactly what object is being used. For example, playMC could also be written as Play_mc or mcPlay. The key is the mc, which indicates it is a movieclip.
The plan for this project is to have the user click the Start button to have the audio file play and then click the Stop button to turn off the audio.
Remove the previous JavaScript from the Actions layer and save the file as RemoteSound2.fla.
When the save is complete, open the Actions panel. Within the Script pane, enter the following code:
stage.enableMouseOver();this.playMC.cursor = "pointer";this.stopMC.cursor = "pointer";createjs.Sound.registerSound("alice.mp3", "alice");this.playMC.on("click", function(e){createjs.Sound.play("alice");});this.stopMC.on("click", function(e){createjs.Sound.stop();});Save and test the movie by clicking the Start and Stop buttons.
The first thing to notice is that we invoke the enableMouseOver() method of our stage. This will allow us to change the cursor for the playMC and stopMC movieclip instances. Without this function call, the cursor cannot be changed. For both playMC and stopMC, we set the cursor property to pointer. What this does is to turn the cursor to the “Pointing Finger” icon, which tells the user, “Hey, you can click this to make stuff happen.”
Other than that, the only major difference between this code and that used in the previous example is the addition of event listeners on each movieclip.
When the Play button is clicked, it invokes the CreateJS Sound.play() method and passes through the audio file ID that’s already been registered with JavaScript. This will begin sound playback just as the handleLoad() function did in the previous example. The Stop button, when clicked, will use the CreateJS Sound.stop() method to stop playing all sounds in the movie.
Adjusting Volume with Code
What if you don’t want to stop the audio but simply allow the user to temporarily mute it? Providing your users with this option is a courteous thing to do. Fortunately, it’s not very hard to do.
To see how muting is accomplished, open the RemoteSound3.fla file in this chapter’s exercise folder. By this point, you should be feeling a sense of déjà vu. The code will look very similar to what you saw in the previous two exercises, but the instance names have changed. The buttons now have instance names muteMC and unmuteMC. The code has also changed, but not by too much.
Click into frame 1 of the Actions layer and take a look in the Actions panel. You’ll see the following code:
stage.enableMouseOver();var s;this.muteMC.cursor = "pointer";this.unmuteMC.cursor = "pointer";createjs.Sound.on("fileload", handleLoad);createjs.Sound.registerSound("alice.mp3", "alice");function handleLoad(e) {s = createjs.Sound.play("alice");}this.muteMC.on("click", function(e){s.volume = 0;});this.unmuteMC.on("click", function(e){s.volume = 1;});This time, you set a variable s which you assign as a reference to our audio playback instance when we use the CreateJS Sound.play() method within the handleLoad() function. No button click is needed to play this song; it just plays.
With a direct reference to the sound being played, you can modify many of the properties of this sound through CreateJS. The Sound class features a volume property, and this property is referenced in terms of the s instance. When muteMC is clicked, t is given a value of 0 (silence). When unmuteMC is clicked, it is given a value of 1 – that’s all there is to it.
Want to turn down the volume instead of muting it? That’s easy.
Inside the muteMC click handler function, change the 0 to 0.5. Your code should now look like this:
this.muteMC.on("click", function(e){s.volume = 0.5;});Test the movie and click the buttons. Then close the browser. Change the 0.5 back to a 0 and test again. Neat stuff!
For those of you wondering why we stop with this exercise and don’t get into using a slider to adjust the volume, the reason is simple: you need a bit more programming experience before you tackle that and there is no native slider component when using HTML5 Canvas documents. That means you would have a lot to build and program!
Your Turn: Storm Over Lake Superior
One of the really neat aspects of being an Animate CC designer is that you get to bring otherwise static media to life. A great example of this is turning a photograph into a motion graphics piece and then using audio to “seal the deal” and bring it to life. You are going to do just that in this exercise.
One of the authors is an avid hiker and camper. Living in Canada, he has lots of opportunities to indulge in his passion. On the North Shore of Lake Superior is a National Park named Pukaskwa (pronounced “puck-ah-squaw”). In this exercise, you are going to stand with him on the top of a cliff and “experience” a thunderstorm that rolled in off of the lake during his hike. Let’s get started:
Create a new HTML5 Canvas document and import the Pukaskwa.jpg image in the Chapter 5 exercise folder to your Library. Save the file to your Chapter 5 exercise folder.
Add two more layers to the movie and name them Rain and Actions. Rename Layer 1 to Image.
Select the first frame of Layer 1 and drag the image from the Library to the stage. Select Modify ➤ Document to open the Document Properties dialog box and select Match Contents. Click OK, and the stage resizes to fit the image. Lock the Image layer.
The rest of this project will be assembled “over” the image on the stage. The next step will involve adding the rainstorm to the movie. You’ll generate the rainstorm through the use of JavaScript and CreateJS.
The first task is to create a raindrop shape within the Rain layer. Use the line tool with Object Drawing mode enabled and draw a line that’s 24 pixels in height with a stroke size of 3. Use width profile 5 to create a raindrop shape and a stroke color of #FFFFFF at 20% alpha.
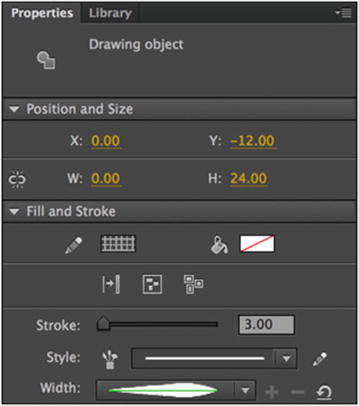
Figure 5-16. The RainDrop movieclip properties
Select the object and create a MovieClip symbol from it with the name of RainDrop. You will also need to provide a Linkage ID of “RainDrop” in the Library panel once the movieclip has been created. You will be reminded of this later on, once you begin writing code.
With the RainDrop movieclip created and the photographic image on stage, it’s time to begin writing the code that will generate the rainstorm.
Select the Actions layer and open the Actions panel. Type the following lines of code into the Script pane.
var stageHeight = stage.canvas.height;var stageWidth = stage.canvas.width;This will allow you to determine the width and height of the stage and preserve these values within variables to access across our movie later on. The stage.canvas object can be used to access both width and height when writing JavaScript.
Next, you need to create a container to hold and manage the raindrops. Enter the following two lines.
var rainField = new createjs.Container();this.addChild(rainField);The rainField is a type of object called a Container in CreateJS. Note that you instantiate a new Container by stating createjs.Container() directly. A Container is useful for grouping a number of additional visual objects within it. You add the rainField object to the stage so that its children will be visible within the project. Using the Container, you can treat all the child objects as a group, and even wipe them all out with a single command. It’s good to be organized!
You will next establish a small utility function that allows you to get a random value between a chosen set of numbers. This is a useful function for all sorts of projects.
function random(min, max) {return Math.floor(Math.random() * (max - min + 1) + min);};Next, go ahead and type in the following function block. This will generate the individual raindrops for your storm.
function generateRain(raindrops) {for (var i = raindrops-1; i >= 0; i--) {var rainDrop = new lib.RainDrop();rainDrop.x = random(0, stageWidth);rainDrop.y = random(-1000, stageHeight);rainField.addChild(rainDrop);}createjs.Ticker.on("tick", downpour);}For the generateRain() function, note that the number value being passed in as an argument is exposed through this function with the identifier of raindrops, since it signifies the amount of raindrops for the function to produce. Based on this number, you use a for loop to basically count down from that number until you hit 0. The loop then no longer runs.
Within the loop itself, create a temporary variable (renewed with each iteration of the loop) named rainDrop. This is set to a new instance of the RainDrop movieclip symbol from our project library by invoking lib.RainDrop(). Note that you must set a Linkage identifier within the Library panel for this to work!
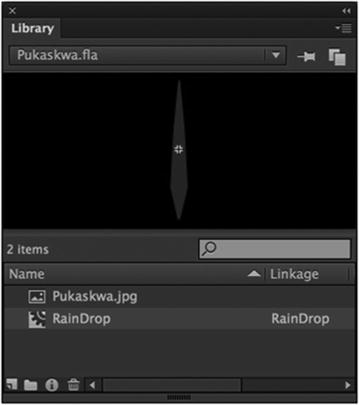
Figure 5-17. The RainDrop movieclip with a Linkage ID of “RainDrop”
The last line of code in this function sets up an event listener for the CreateJS Ticker. To use the Ticker, set it to fire on tick, which is actually the frames-per-second (FPS) of our Animate CC project. Since our project is set to 24FPS, the ticker will “tick” 24 times every second. When a tick fires, we want the function named downpour() to run.
Enter the following code to build the downpour() function. This function will cause the rainstorm to Animate CC continuously.
function downpour(e) {for (var i = rainField.numChildren-1; i >= 0; i--) {var rainDrop = rainField.getChildAt(i);rainDrop.y += 100;if (rainDrop.y > stageHeight + 50) {rainDrop.y = random(-1000, stageHeight);}}};Within the downpour() function, we run through a for loop and move each individual raindrop per loop iteration. What makes this really simple to perform is the use of the rainField Container object. There is a numChildren property inherent to this object type that will report the exact number of child objects within the Container. Using the value of this property, we know exactly how many raindrops we have to move and how many times to iterate our loop.
Within the loop itself, we create a temporary variable named rainDrop for each specific raindrop and increase its position along the y axis by 100 pixels. Seeing as how this function runs 24 times per second, the rain appears to fall very quickly!
The final thing we do is check the position of each raindrop against the height of the stage, adding a 50-pixel buffer to be sure the raindrop is no longer visible. Once a raindrop moves past this point, we reset its position, creating a never-ending rainstorm.
Finally, add a call to the generateRain() function to kick everything off. You are passing in a value of 500 to specify the number of raindrops for the function to generate.
generateRain(500);Run the movie in your browser to see a massive rainstorm overlay the imported photo!
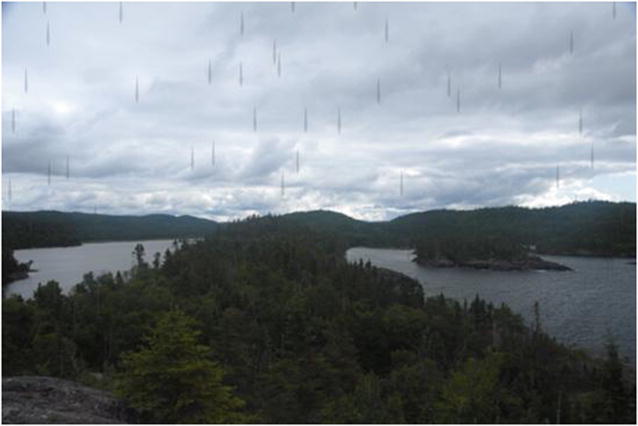
Figure 5-18. The full rainstorm over Lake Superior
Now that you are standing on a cliff overlooking Lake Superior and getting wet, let’s add that last little bit of realism: rain and thunder.
Select the first frame of the Actions layer and open the Actions panel once again. When it opens, enter the following code into the Script pane:
createjs.Sound.on("fileload", handleLoad);createjs.Sound.registerSound("RainStorm.mp3", "storm");function handleLoad(e) {createjs.Sound.play("storm");}Save and play the movie. As you may have noticed, the simple addition of an audio track makes this project much more powerful.
What You Have learned
In this chapter, you learned the following:
How to add audio to an Animate CC project
The difference between an Event, Start, Stop, and Stream sound types
How to set the preferences for sound output in Animate CC
Various approaches to playing a sound in the Animate CC Library and one located outside of the published document
The various mechanics JavaScript uses to control and manage sound in Animate CC
As you discovered, there is a lot more to audio in Animate CC than simply tossing in some sort of electronica beat and becoming a “cool kid.” Audio in Animate CC is a powerful communications tool, and savvy Animate CC designers and developers who realize this are leveraging audio in Animate CC to its full potential. Speaking of communications tools, text is no longer that gray stuff that goes around your animations. To find out more, turn the page, because text is the focus of the next chapter.